Oh, friend, do you ever get that craving for something sweet, something rich, something that just melts in your mouth, but you just don’t have the time (or energy!) for a big baking project? I know I do! There’s a special place in my heart for those classic desserts that bring back childhood memories, and a creamy, dreamy cheesecake always hits the spot. But sometimes, life calls for a shortcut, a little kitchen magic that delivers maximum deliciousness with minimal fuss.
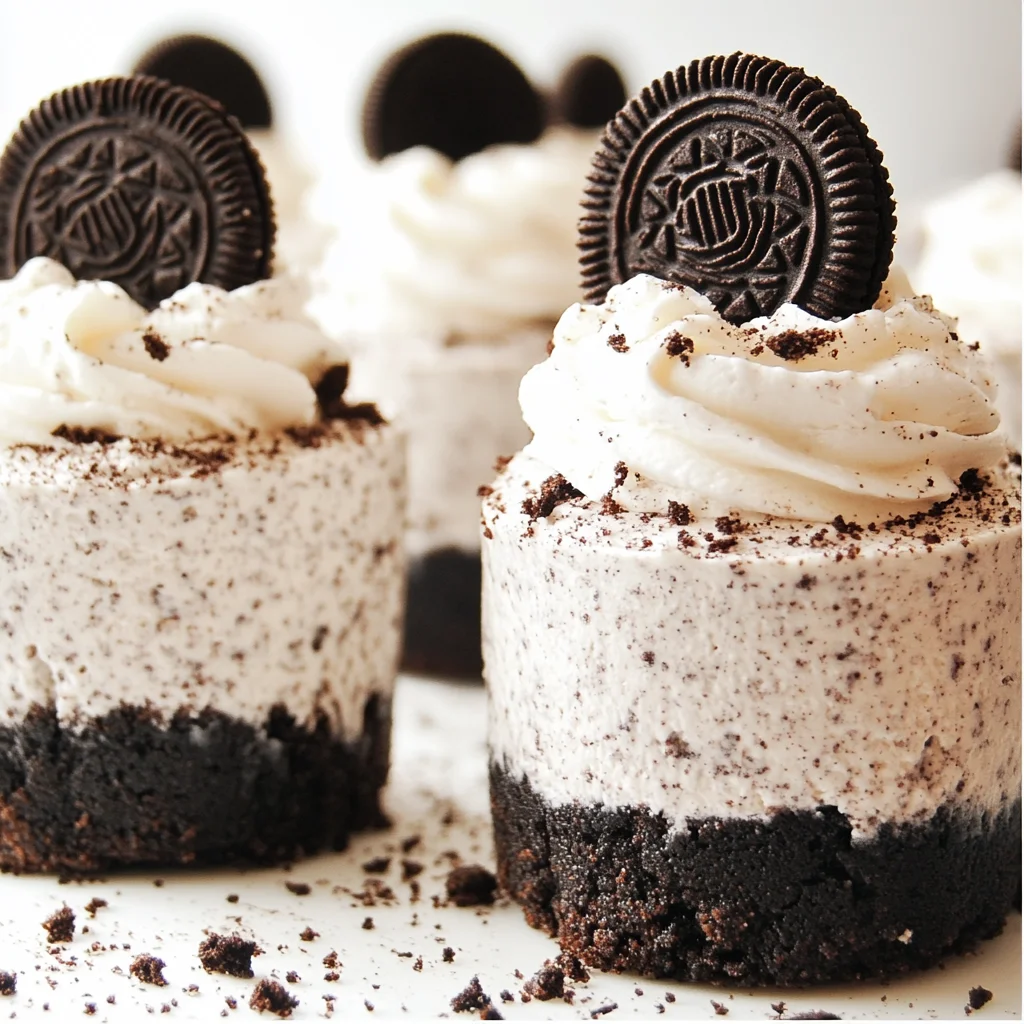
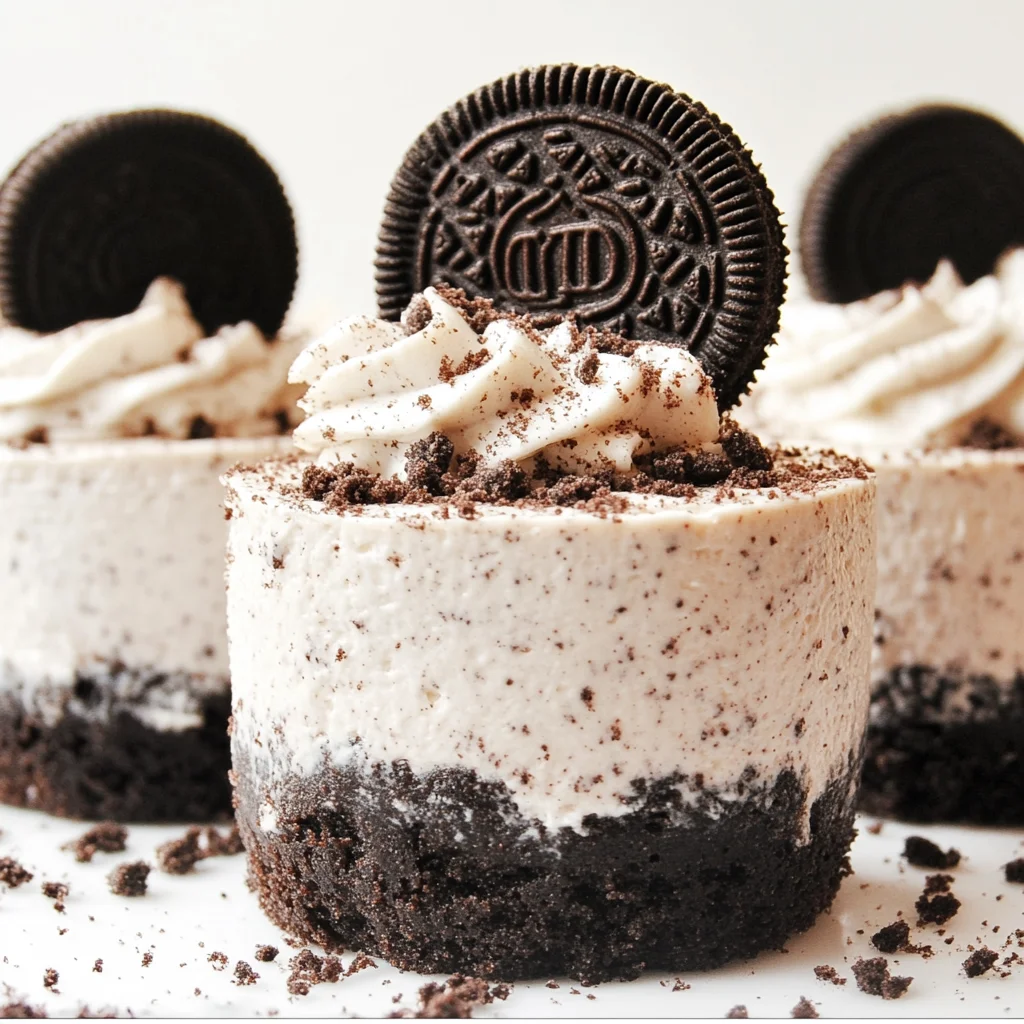
That’s where these Mini No-Bake Oreo Cheesecakes come in! Imagine all the beloved flavors of your favorite chocolate sandwich cookie swirled into a luscious, smooth cheesecake, all nestled in its own perfect little portion. And the best part? No oven required! These are so incredibly easy, quick to put together, and honestly, they’re pure joy in every bite. They’re perfect for a last-minute get-together, a sweet treat for yourself after a long day, or even a thoughtful gift for a neighbor. Trust me, once you try these, they’ll become a staple in your dessert repertoire!
Why You’ll Love Mini No-Bake Oreo Cheesecakes
- Fast: Whipped up in minutes, chilling does the rest!
- Easy: No complicated steps, perfect for beginner bakers (or no-bakers!).
- Giftable: Individual portions make them ideal for sharing.
- Crowd-pleasing: Who doesn’t love Oreos and cheesecake? It’s a match made in dessert heaven!
- Dairy-Free Friendly: This recipe is written to be entirely dairy-free, making it accessible for more friends!
Ingredients
Gathering your ingredients is the first step to sweet success! Here’s what you’ll need for these delightful mini cheesecakes:
- 150g Oreo Cookies: These are for your crust. Go for the classic, or if you’re feeling adventurous, a fun flavor!
- 50g Dairy-Free Butter or Margarine: This will bind your cookie crumbs into a perfect crust. Make sure it’s melted and ready to mingle.
- 260g Dairy-Free Whipping Cream: This is the secret to that light, airy cheesecake texture. Chill it well before whipping for the best results!
- 160g Dairy-Free Cream Cheese: Make sure this is softened to room temperature for a super smooth, lump-free filling. It’s the creamy heart of your cheesecake!
- 8 Oreo Cookies (for filling): We’re not just stopping at the crust, are we? More crushed Oreos mixed right into the filling for an extra burst of cookie goodness.
- 20g Dairy-Free Whipping Cream (for swirl): A little extra cream for that beautiful, irresistible swirl on top.
- 4 Oreo Cookies (for garnish): Because presentation matters! Half an Oreo and some extra crumbs make these mini cheesecakes look absolutely professional.
How to Make Mini No-Bake Oreo Cheesecakes
Alright, let’s get those hands a little messy (the best kind of messy!) and whip up these beauties. You’re just a few simple steps away from dessert bliss!
- Crust Time! First things first, get your dairy-free butter or margarine melting gently in a small saucepan over low heat. Once it’s all liquid gold, take it off the heat and pour it into a medium, heat-proof mixing bowl.
- Crumble Those Cookies: Now for the fun part! Grab your 150g Oreo cookies and blitz them in a blender or food processor until they’re fine, beautiful crumbs. Think sandy texture. Add these crumbs to your melted butter and stir, stir, stir until every crumb is coated. It should look like wet sand.
- Press & Chill: Spoon your cookie mixture into the bottom of each cup in your cookie cup tin. Use the back of a spoon, or even your fingers, to press them down firmly. You want a compact, sturdy base for your cheesecake. Pop that tin into the freezer while you work on the glorious filling.
- Whip Up the Creamy Dream: In another medium bowl, combine the 260g dairy-free whipping cream and the softened dairy-free cream cheese. Start whipping on low speed to get everything incorporated, then crank it up to high. Keep whipping until the mixture is thick and fluffy, like soft clouds.
- Oreo Swirl In: Time for more cookie magic! Blend your 8 additional Oreo cookies into fine crumbs. Gently fold these crumbs into your whipped cream cheese mixture. Give it another quick whip to combine everything evenly. Oh, the anticipation!
- Pipe It Pretty: Transfer your glorious cheesecake filling into a piping bag. If you have a large round tip nozzle, use it for a smooth, even distribution. If not, just snip a corner off the bag – it’ll work just fine!
- Fill ‘Er Up!: Pipe the cheesecake filling evenly into each cookie cup, filling them up generously. Use an offset spatula or the back of a spoon to level out the tops, making them nice and smooth.
- Freeze for Firmness: This is the crucial chilling step! Place your tin back in the freezer for at least 4 hours, or until the cheesecakes are completely firm. This ensures they hold their shape beautifully. If you’re using push-up tins, you’ll be able to gently push up the bases to release them easily once firm.
- Slight Defrost & Swirl Prep: Once your cheesecakes are firm, transfer them to the refrigerator. They’ll need to defrost slightly while you prepare the final flourish. This step helps them become perfectly creamy before serving.
- Whip the Swirl Cream: In a separate bowl, place your 20g of whipping cream. Whip it on high speed until it’s thick and holds soft peaks. This is for that delightful topping!
- The Grand Finale Swirl: Transfer this whipped cream to a piping bag fitted with an open star tip nozzle (or again, just a snipped corner!). Pipe a lovely swirl of cream on top of each cheesecake. This makes them look extra special!
- Garnish & Enjoy!: The final touch! Decorate each cheesecake with half an Oreo and a sprinkle of crumbled cookies. Now, step back, admire your handiwork, and then dive into these irresistible mini no-bake Oreo cheesecakes! If you’re anything like me, you’ll be thinking about your next no-bake creation – maybe our No-Bake Banana Split Cheesecake next?
Substitutions & Additions
One of the best things about these mini cheesecakes is how versatile they are! Don’t be afraid to play around with the flavors and toppings. After all, cooking is all about making it your own!
- Cookie Crust Variations: Not an Oreo purist? You could try graham cracker crumbs, digestive biscuits, or even other cookie flavors like chocolate chip cookies for a different twist. If you’re looking for another amazing Oreo-centric dessert, you absolutely have to check out our No-Bake Oreo Bars!
- Toppings Galore: Beyond the classic Oreo garnish, consider a drizzle of chocolate syrup, a dollop of caramel sauce, fresh berries, mini chocolate chips, or even a sprinkle of sea salt to enhance the chocolate.
- Flavor Infusions: A tiny splash of vanilla extract or a hint of peppermint extract (especially around the holidays!) could elevate the cheesecake filling. You could even fold in some mini chocolate chips or chopped nuts for extra texture.
- Nut Butter Swirl: For a twist, mix a little peanut butter or almond butter into a small portion of the cream cheese filling before piping for a layered effect, or drizzle a thinned-out version on top.
Tips for Success
Even though this is a “no-bake” recipe, a few little tricks can make all the difference in achieving perfect, professional-looking results every time.
- Room Temperature Cream Cheese: This is crucial! If your dairy-free cream cheese isn’t soft, it won’t whip smoothly, and you’ll end up with lumps. Take it out of the fridge at least 30 minutes to an hour before you start.
- Chilled Whipping Cream: For maximum volume and fluffiness, make sure your dairy-free whipping cream is very cold when you whip it.
- Don’t Over-Whip: While you want the cream cheese mixture thick, be careful not to over-whip it. Once it holds its shape, stop. Over-whipping can cause it to become grainy.
- Firm Pressing: Take your time pressing the crust into the tin. A firm, even base prevents crumbling when you try to remove the cheesecakes.
- Piping Bag Perk: While not strictly necessary, using a piping bag makes filling the cups so much cleaner and easier, giving you a neater finish.
- Patience with Freezing: Don’t rush the freezing step. Four hours is a minimum; overnight is even better for perfectly firm cheesecakes that hold their shape.
- Prepping Ahead: These are fabulous make-ahead desserts! You can prepare the cheesecakes entirely, freeze them until firm, and then transfer them to an airtight container. Add the cream swirl and garnish just before serving.
How to Store Mini No-Bake Oreo Cheesecakes
These individual treats are so convenient for storage! You want to keep them fresh and delicious.
- In the Refrigerator: Once set, these mini cheesecakes can be stored in an airtight container in the refrigerator for up to 3-4 days. For best texture, let them sit out for about 10-15 minutes before serving if they’ve been deeply chilled.
- In the Freezer: If you want to make them far in advance or save some for later, you can freeze the un-garnished cheesecakes. Once they are fully firm from the initial freeze, wrap each cheesecake individually in plastic wrap, then place them in an airtight freezer-safe container or bag. They’ll keep well for up to 1 month. When ready to enjoy, transfer them to the refrigerator to thaw for a few hours, then add your cream swirl and garnish.
FAQs
Got questions? I’ve got answers!
Q: Can I use regular dairy ingredients instead of dairy-free?
A: Absolutely! This recipe works perfectly fine with regular butter, whipping cream, and cream cheese. Just follow the same measurements and instructions.
Q: Do I need a special cookie cup tin?
A: While a cookie cup or mini cheesecake tin is ideal, you can also use a regular muffin tin lined with paper cupcake liners. Just make sure to press the crust firmly into the bottom of each liner.
Q: How can I make sure the cheesecakes come out of the tin easily?
A: Ensuring your crust is pressed firmly and allowing them to freeze completely firm are key. If you’re using a mini cheesecake tin with removable bottoms, gently pushing them up should release them. If using a muffin tin with liners, they should peel away easily once firm.
Q: Can I prepare these without a piping bag?
A: Yes! You can spoon the cheesecake filling into the cups, smoothing the tops with the back of a spoon. For the cream swirl, you can use a spoon or a small freezer bag with a corner snipped off.
I hope you love these Mini No-Bake Oreo Cheesecakes as much as I do! They truly are a delightful treat that brings a smile to everyone’s face without the fuss. Happy no-baking, my friend!
For more delicious and easy recipes, be sure to follow us on Pinterest!
Easy & Dreamy Mini No-Bake Oreo Cheesecakes: Your New Favorite Dessert!
Oh, friend, do you ever get that craving for something sweet, something rich, something that just melts in your mouth, but you just don’t have the time (or energy!) for a big baking project? I know I do! There’s a special place in my heart for those classic desserts that bring back childhood memories, and a creamy, dreamy cheesecake always hits the spot. But sometimes, life calls for a shortcut, a little kitchen magic that delivers maximum deliciousness with minimal fuss.
That’s where these Mini No-Bake Oreo Cheesecakes come in! Imagine all the beloved flavors of your favorite chocolate sandwich cookie swirled into a luscious, smooth cheesecake, all nestled in its own perfect little portion. And the best part? No oven required! These are so incredibly easy, quick to put together, and honestly, they’re pure joy in every bite. They’re perfect for a last-minute get-together, a sweet treat for yourself after a long day, or even a thoughtful gift for a neighbor. Trust me, once you try these, they’ll become a staple in your dessert repertoire!
Why You’ll Love Mini No-Bake Oreo Cheesecakes
- Fast: Whipped up in minutes, chilling does the rest!
- Easy: No complicated steps, perfect for beginner bakers (or no-bakers!).
- Giftable: Individual portions make them ideal for sharing.
- Crowd-pleasing: Who doesn’t love Oreos and cheesecake? It’s a match made in dessert heaven!
- Dairy-Free Friendly: This recipe is written to be entirely dairy-free, making it accessible for more friends!
Ingredients
Gathering your ingredients is the first step to sweet success! Here’s what you’ll need for these delightful mini cheesecakes:
- 150g Oreo Cookies: These are for your crust. Go for the classic, or if you’re feeling adventurous, a fun flavor!
- 50g Dairy-Free Butter or Margarine: This will bind your cookie crumbs into a perfect crust. Make sure it’s melted and ready to mingle.
- 260g Dairy-Free Whipping Cream: This is the secret to that light, airy cheesecake texture. Chill it well before whipping for the best results!
- 160g Dairy-Free Cream Cheese: Make sure this is softened to room temperature for a super smooth, lump-free filling. It’s the creamy heart of your cheesecake!
- 8 Oreo Cookies (for filling): We’re not just stopping at the crust, are we? More crushed Oreos mixed right into the filling for an extra burst of cookie goodness.
- 20g Dairy-Free Whipping Cream (for swirl): A little extra cream for that beautiful, irresistible swirl on top.
- 4 Oreo Cookies (for garnish): Because presentation matters! Half an Oreo and some extra crumbs make these mini cheesecakes look absolutely professional.
How to Make Mini No-Bake Oreo Cheesecakes
Alright, let’s get those hands a little messy (the best kind of messy!) and whip up these beauties. You’re just a few simple steps away from dessert bliss!
- Crust Time! First things first, get your dairy-free butter or margarine melting gently in a small saucepan over low heat. Once it’s all liquid gold, take it off the heat and pour it into a medium, heat-proof mixing bowl.
- Crumble Those Cookies: Now for the fun part! Grab your 150g Oreo cookies and blitz them in a blender or food processor until they’re fine, beautiful crumbs. Think sandy texture. Add these crumbs to your melted butter and stir, stir, stir until every crumb is coated. It should look like wet sand.
- Press & Chill: Spoon your cookie mixture into the bottom of each cup in your cookie cup tin. Use the back of a spoon, or even your fingers, to press them down firmly. You want a compact, sturdy base for your cheesecake. Pop that tin into the freezer while you work on the glorious filling.
- Whip Up the Creamy Dream: In another medium bowl, combine the 260g dairy-free whipping cream and the softened dairy-free cream cheese. Start whipping on low speed to get everything incorporated, then crank it up to high. Keep whipping until the mixture is thick and fluffy, like soft clouds.
- Oreo Swirl In: Time for more cookie magic! Blend your 8 additional Oreo cookies into fine crumbs. Gently fold these crumbs into your whipped cream cheese mixture. Give it another quick whip to combine everything evenly. Oh, the anticipation!
- Pipe It Pretty: Transfer your glorious cheesecake filling into a piping bag. If you have a large round tip nozzle, use it for a smooth, even distribution. If not, just snip a corner off the bag – it’ll work just fine!
- Fill ‘Er Up!: Pipe the cheesecake filling evenly into each cookie cup, filling them up generously. Use an offset spatula or the back of a spoon to level out the tops, making them nice and smooth.
- Freeze for Firmness: This is the crucial chilling step! Place your tin back in the freezer for at least 4 hours, or until the cheesecakes are completely firm. This ensures they hold their shape beautifully. If you’re using push-up tins, you’ll be able to gently push up the bases to release them easily once firm.
- Slight Defrost & Swirl Prep: Once your cheesecakes are firm, transfer them to the refrigerator. They’ll need to defrost slightly while you prepare the final flourish. This step helps them become perfectly creamy before serving.
- Whip the Swirl Cream: In a separate bowl, place your 20g of whipping cream. Whip it on high speed until it’s thick and holds soft peaks. This is for that delightful topping!
- The Grand Finale Swirl: Transfer this whipped cream to a piping bag fitted with an open star tip nozzle (or again, just a snipped corner!). Pipe a lovely swirl of cream on top of each cheesecake. This makes them look extra special!
- Garnish & Enjoy!: The final touch! Decorate each cheesecake with half an Oreo and a sprinkle of crumbled cookies. Now, step back, admire your handiwork, and then dive into these irresistible mini no-bake Oreo cheesecakes! If you’re anything like me, you’ll be thinking about your next no-bake creation – maybe our No-Bake Banana Split Cheesecake next? You can find this and so many more easy recipes right here on the blog!
Substitutions & Additions
One of the best things about these mini cheesecakes is how versatile they are! Don’t be afraid to play around with the flavors and toppings. After all, cooking is all about making it your own!
- Cookie Crust Variations: Not an Oreo purist? You could try graham cracker crumbs, digestive biscuits, or even other cookie flavors like chocolate chip cookies for a different twist. If you’re looking for another amazing Oreo-centric dessert, you absolutely have to check out our No-Bake Oreo Bars!
- Toppings Galore: Beyond the classic Oreo garnish, consider a drizzle of chocolate syrup, a dollop of caramel sauce, fresh berries, mini chocolate chips, or even a sprinkle of sea salt to enhance the chocolate.
- Flavor Infusions: A tiny splash of vanilla extract or a hint of peppermint extract (especially around the holidays!) could elevate the cheesecake filling. You could even fold in some mini chocolate chips or chopped nuts for extra texture.
- Nut Butter Swirl: For a twist, mix a little peanut butter or almond butter into a small portion of the cream cheese filling before piping for a layered effect, or drizzle a thinned-out version on top.
Tips for Success
Even though this is a “no-bake” recipe, a few little tricks can make all the difference in achieving perfect, professional-looking results every time.
- Room Temperature Cream Cheese: This is crucial! If your dairy-free cream cheese isn’t soft, it won’t whip smoothly, and you’ll end up with lumps. Take it out of the fridge at least 30 minutes to an hour before you start.
- Chilled Whipping Cream: For maximum volume and fluffiness, make sure your dairy-free whipping cream is very cold when you whip it.
- Don’t Over-Whip: While you want the cream cheese mixture thick, be careful not to over-whip it. Once it holds its shape, stop. Over-whipping can cause it to become grainy.
- Firm Pressing: Take your time pressing the crust into the tin. A firm, even base prevents crumbling when you try to remove the cheesecakes.
- Piping Bag Perk: While not strictly necessary, using a piping bag makes filling the cups so much cleaner and easier, giving you a neater finish.
- Patience with Freezing: Don’t rush the freezing step. Four hours is a minimum; overnight is even better for perfectly firm cheesecakes that hold their shape.
- Prepping Ahead: These are fabulous make-ahead desserts! You can prepare the cheesecakes entirely, freeze them until firm, and then transfer them to an airtight container. Add the cream swirl and garnish just before serving.
How to Store Mini No-Bake Oreo Cheesecakes
These individual treats are so convenient for storage! You want to keep them fresh and delicious.
- In the Refrigerator: Once set, these mini cheesecakes can be stored in an airtight container in the refrigerator for up to 3-4 days. For best texture, let them sit out for about 10-15 minutes before serving if they’ve been deeply chilled.
- In the Freezer: If you want to make them far in advance or save some for later, you can freeze the un-garnished cheesecakes. Once they are fully firm from the initial freeze, wrap each cheesecake individually in plastic wrap, then place them in an airtight freezer-safe container or bag. They’ll keep well for up to 1 month. When ready to enjoy, transfer them to the refrigerator to thaw for a few hours, then add your cream swirl and garnish.
FAQs
Got questions? I’ve got answers!
Q: Can I use regular dairy ingredients instead of dairy-free?
A: Absolutely! This recipe works perfectly fine with regular butter, whipping cream, and cream cheese. Just follow the same measurements and instructions.
Q: Do I need a special cookie cup tin?
A: While a cookie cup or mini cheesecake tin is ideal, you can also use a regular muffin tin lined with paper cupcake liners. Just make sure to press the crust firmly into the bottom of each liner.
Q: How can I make sure the cheesecakes come out of the tin easily?
A: Ensuring your crust is pressed firmly and allowing them to freeze completely firm are key. If you’re using a mini cheesecake tin with removable bottoms, gently pushing them up should release them. If using a muffin tin with liners, they should peel away easily once firm.
Q: Can I prepare these without a piping bag?
A: Yes! You can spoon the cheesecake filling into the cups, smoothing the tops with the back of a spoon. For the cream swirl, you can use a spoon or a small freezer bag with a corner snipped off.
I hope you love these Mini No-Bake Oreo Cheesecakes as much as I do! They truly are a delightful treat that brings a smile to everyone’s face without the fuss. Happy no-baking, my friend!
For more delicious and easy recipes, be sure to follow us on Pinterest!

Mini No-Bake Oreo Cheesecakes
Ingredients
Equipment
Method
- Step 1: Crust Time! Gently melt 50g dairy-free butter or margarine in a small saucepan over low heat. Once liquid, pour into a medium, heat-proof mixing bowl.
- Step 2: Crumble Those Cookies: Blitz 150g Oreo cookies in a blender or food processor until fine crumbs. Add these crumbs to the melted butter and stir until every crumb is coated and it resembles wet sand.
- Step 3: Press & Chill: Spoon the cookie mixture into the bottom of each cup in your cookie cup tin. Press them down firmly with the back of a spoon or your fingers. Pop the tin into the freezer while you prepare the filling.
- Step 4: Whip Up the Creamy Dream: In another medium bowl, combine 260g dairy-free whipping cream and 160g softened dairy-free cream cheese. Whip on low speed to incorporate, then increase to high until thick and fluffy.
- Step 5: Oreo Swirl In: Blend the 8 additional Oreo cookies into fine crumbs. Gently fold these crumbs into your whipped cream cheese mixture. Give it another quick whip to combine evenly.
- Step 6: Pipe It Pretty: Transfer the cheesecake filling into a piping bag (with a large round tip nozzle if desired, or just snip a corner off the bag).
- Step 7: Fill 'Er Up!: Pipe the cheesecake filling evenly into each cookie cup, filling them generously. Use an offset spatula or the back of a spoon to level out the tops.
- Step 8: Freeze for Firmness: Place the tin back in the freezer for at least 4 hours, or until the cheesecakes are completely firm. This ensures they hold their shape beautifully.
- Step 9: Slight Defrost & Swirl Prep: Once firm, transfer cheesecakes to the refrigerator to defrost slightly while you prepare the final flourish. This helps them become perfectly creamy before serving.
- Step 10: Whip the Swirl Cream: In a separate bowl, whip 20g of whipping cream on high speed until thick and holding soft peaks.
- Step 11: The Grand Finale Swirl: Transfer this whipped cream to a piping bag fitted with an open star tip nozzle (or a snipped corner) and pipe a lovely swirl of cream on top of each cheesecake.
- Step 12: Garnish & Enjoy!: Decorate each cheesecake with half an Oreo and a sprinkle of crumbled cookies. Serve immediately.