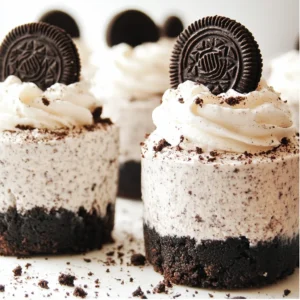
Mini No-Bake Oreo Cheesecakes
Indulge in these incredibly easy and quick-to-make mini no-bake cheesecakes, featuring the beloved flavors of Oreo cookies swirled into a luscious, smooth, dairy-free cheesecake filling. Perfect for quick desserts, gatherings, or a sweet treat anytime, they require no oven and are pure joy in every bite.
Equipment
- small saucepan
- Medium, heat-proof mixing bowl
- Blender or Food Processor
- Cookie cup tin
- Piping bag
- Offset spatula
- Spoon
Ingredients
For the Crust
- 150 g Oreo Cookies for the crust
- 50 g Dairy-Free Butter or Margarine melted
For the Creamy Filling
- 260 g Dairy-Free Whipping Cream chilled well
- 160 g Dairy-Free Cream Cheese softened to room temperature
- 8 Oreo Cookies for filling, crushed into fine crumbs
For the Swirl & Garnish
- 20 g Dairy-Free Whipping Cream for swirl
- 4 Oreo Cookies for garnish, half and crumbled
Instructions
- Step 1: Crust Time! Gently melt 50g dairy-free butter or margarine in a small saucepan over low heat. Once liquid, pour into a medium, heat-proof mixing bowl.
- Step 2: Crumble Those Cookies: Blitz 150g Oreo cookies in a blender or food processor until fine crumbs. Add these crumbs to the melted butter and stir until every crumb is coated and it resembles wet sand.
- Step 3: Press & Chill: Spoon the cookie mixture into the bottom of each cup in your cookie cup tin. Press them down firmly with the back of a spoon or your fingers. Pop the tin into the freezer while you prepare the filling.
- Step 4: Whip Up the Creamy Dream: In another medium bowl, combine 260g dairy-free whipping cream and 160g softened dairy-free cream cheese. Whip on low speed to incorporate, then increase to high until thick and fluffy.
- Step 5: Oreo Swirl In: Blend the 8 additional Oreo cookies into fine crumbs. Gently fold these crumbs into your whipped cream cheese mixture. Give it another quick whip to combine evenly.
- Step 6: Pipe It Pretty: Transfer the cheesecake filling into a piping bag (with a large round tip nozzle if desired, or just snip a corner off the bag).
- Step 7: Fill 'Er Up!: Pipe the cheesecake filling evenly into each cookie cup, filling them generously. Use an offset spatula or the back of a spoon to level out the tops.
- Step 8: Freeze for Firmness: Place the tin back in the freezer for at least 4 hours, or until the cheesecakes are completely firm. This ensures they hold their shape beautifully.
- Step 9: Slight Defrost & Swirl Prep: Once firm, transfer cheesecakes to the refrigerator to defrost slightly while you prepare the final flourish. This helps them become perfectly creamy before serving.
- Step 10: Whip the Swirl Cream: In a separate bowl, whip 20g of whipping cream on high speed until thick and holding soft peaks.
- Step 11: The Grand Finale Swirl: Transfer this whipped cream to a piping bag fitted with an open star tip nozzle (or a snipped corner) and pipe a lovely swirl of cream on top of each cheesecake.
- Step 12: Garnish & Enjoy!: Decorate each cheesecake with half an Oreo and a sprinkle of crumbled cookies. Serve immediately.
Notes
These mini cheesecakes are highly versatile. For the crust, consider graham cracker crumbs, digestive biscuits, or other cookie flavors like chocolate chip cookies. Top with a drizzle of chocolate syrup, caramel sauce, fresh berries, mini chocolate chips, or a sprinkle of sea salt. For flavor infusions, add a tiny splash of vanilla or peppermint extract, or fold in some mini chocolate chips or chopped nuts. For a twist, mix a little peanut butter or almond butter into a small portion of the cream cheese filling or drizzle on top.
Crucial tips for success include using room temperature cream cheese for smooth whipping and ensuring whipping cream is very cold for maximum volume. Avoid over-whipping the cream cheese mixture once it holds its shape to prevent graininess. Take time to firmly press the crust for a sturdy base. Using a piping bag makes filling cleaner and easier. Don't rush the freezing step; at least 4 hours is the minimum, but overnight is even better for perfectly firm cheesecakes. These are excellent make-ahead desserts; prepare and freeze them un-garnished, then transfer to an airtight container. Add the cream swirl and garnish just before serving.
Once set, store these mini cheesecakes in an airtight container in the refrigerator for up to 3-4 days. For best texture, let them sit out for about 10-15 minutes before serving if deeply chilled. For longer storage, freeze the un-garnished cheesecakes. Once fully firm from the initial freeze, wrap each individually in plastic wrap, then place in an airtight freezer-safe container or bag. They'll keep well for up to 1 month. When ready to enjoy, transfer them to the refrigerator to thaw for a few hours, then add your cream swirl and garnish.