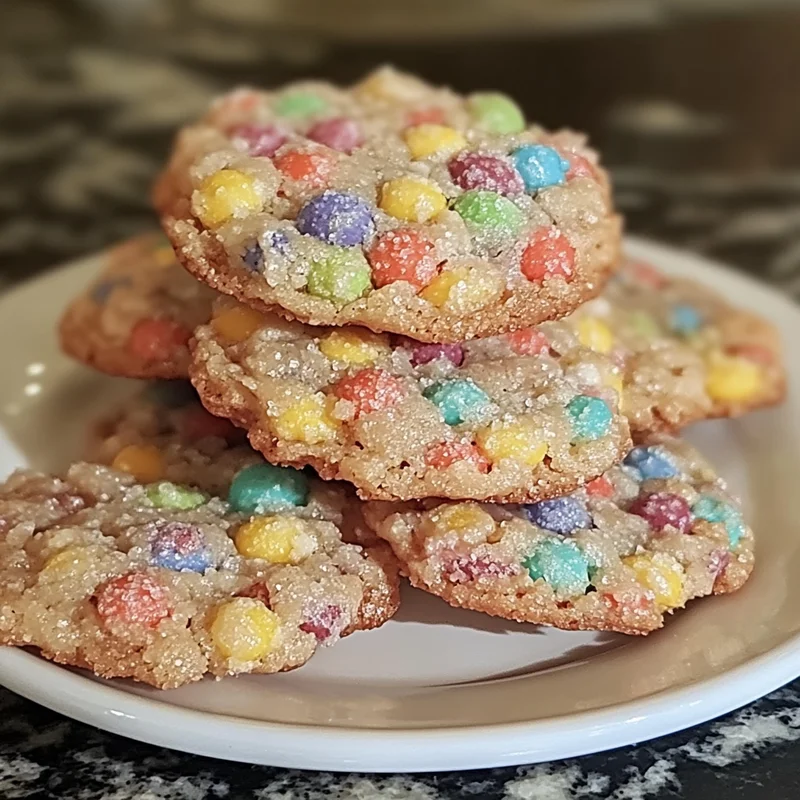
There’s something truly magical about bringing a little nostalgia into the kitchen. Maybe it’s the way certain flavors can whisk you back to Saturday mornings, bowl of cereal in hand, watching cartoons and feeling completely carefree. If you grew up loving the sweet, colorful crunch of Fruity Pebbles, then you’re going to adore this recipe. Fruity Pebbles Cookies are not just cookies—they’re a joyful, vibrant burst of childhood memories baked into every bite.
What I love most about these cookies is how simple and quick they come together, yet they feel special and a bit whimsical. The lemon zest adds a fresh brightness, the cream cheese keeps the cookies tender and soft, and rolling them in extra Fruity Pebbles and sugar gives a delightful texture and sparkle that makes every bite pop with color and flavor. Whether you’re baking for a fun afternoon treat, a party, or gifting them to friends, these cookies are guaranteed to bring smiles.
Why You’ll Love Fruity Pebbles Cookies
- Fast: Ready to bake in under 20 minutes, perfect for last-minute cravings or quick dessert ideas.
- Easy: No complicated steps or fancy techniques—just straightforward mixing and baking.
- Giftable: Their vibrant colors and charming look make them an adorable homemade gift.
- Crowd-pleasing: Kids and adults alike will be drawn to the fun colors and sweet, soft texture.
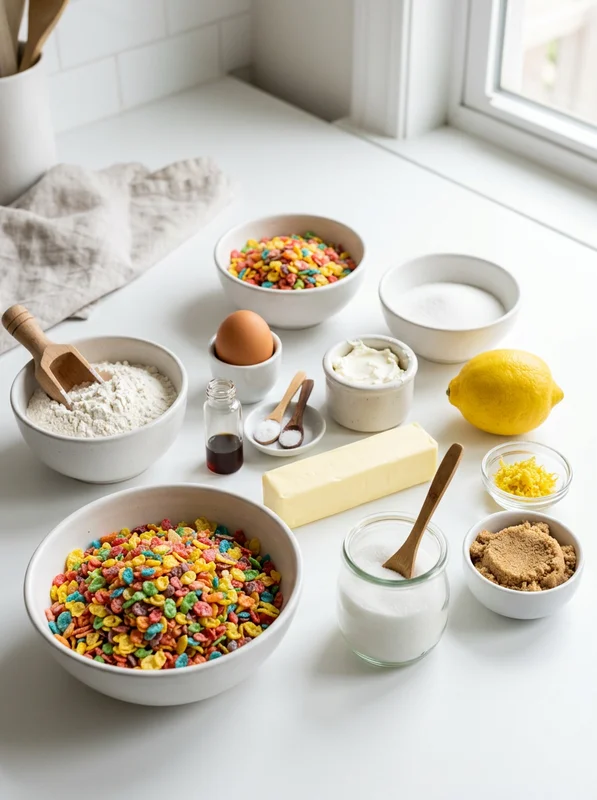
Ingredients
Before you start, here’s a quick rundown of the ingredients and why they’re important for these Fruity Pebbles Cookies:
- Granulated sugar (3/4 cup + 1/4 cup for rolling): Sweetness and a little crunch on the cookie exterior.
- Lemon zest (1 tsp): Adds a fresh, citrusy aroma that brightens the flavor and balances the sweetness.
- Unsalted butter (1/2 cup, softened): Provides richness and helps keep the cookies tender.
- Cream cheese (3 tbsp, softened): This is a little secret ingredient that gives the cookies a soft, chewy texture and a subtle tang.
- Brown sugar (1/4 cup): Adds moisture and a hint of caramel flavor.
- Egg (1): Binds everything together and adds structure.
- Vanilla extract (1 tsp): Enhances the flavor, giving warmth and depth.
- Salt (1/2 tsp): Balances the sweetness and enhances all the flavors.
- Baking soda (1/2 tsp): Helps the cookies rise and spread just right.
- All-purpose flour (1 3/4 cups): The base of the cookie dough, providing structure.
- Fruity Pebbles cereal (1 cup mixed into dough + 3/4 cup for rolling): The star of the show, adding crunch, color, and that nostalgic fruity flavor.
How to Make Fruity Pebbles Cookies
Alright, let’s roll up our sleeves and dive into making these colorful treats. I always find baking is such a comforting experience—plus, the kitchen smells amazing!
- Preheat your oven to 375°F (190°C). Line a baking sheet with parchment paper. This step ensures your cookies don’t stick and helps them bake evenly.
- Zest your lemon and rub the zest into the 3/4 cup granulated sugar in a small bowl. This little trick releases the lemon’s fragrant oils, infusing the sugar with a fresh citrus aroma that really lifts the cookie flavor.
- Beat the butter, cream cheese, and lemon sugar together in a mixing bowl until smooth and creamy. I like to use an electric mixer for this—it makes the process fast and helps incorporate air for a lighter texture.
- Add the brown sugar, egg, and vanilla extract. Beat for about 2 minutes until the mixture is light and fluffy. This step is key for a soft cookie base.
- Mix in the dry ingredients—gradually add the flour, baking soda, and salt, stirring just until combined. Be careful not to overmix here; you want tender cookies, not tough ones.
- Fold in 1 cup of Fruity Pebbles cereal. This adds that unmistakable fruity crunch inside each cookie.
- Scoop the dough into 1/4 cup-sized balls. I find using a cookie scoop or measuring cup helps keep them uniform, so they bake evenly.
- Roll each dough ball first in the remaining 3/4 cup Fruity Pebbles, then in 1/4 cup granulated sugar. This double coating creates a colorful, sparkly crust that’s both crunchy and sweet.
- Place the cookies on your prepared baking sheet, spacing them a few inches apart since they will spread slightly as they bake.
- Bake for 9–11 minutes or until the edges are just turning a light golden color. Don’t overbake—these cookies are best when they’re soft in the center.
- Let the cookies cool on the baking sheet for 5 minutes before transferring them to a wire rack to cool completely. This helps them set up without losing their softness.
Substitutions & Additions
Feel free to make these cookies your own! Here are some fun ideas for customizing or swapping ingredients based on what you have or your preferences.
- Butter & Cream Cheese Swap: You can replace cream cheese with an equal amount of more butter if you want a richer, but less tangy cookie.
- Gluten-Free Flour: Use a 1:1 gluten-free baking flour to make these cookies gluten-free. They’ll still be soft and delicious.
- Flavor Twists: Try adding a teaspoon of almond extract instead of vanilla for a nutty aroma.
- Extra Mix-Ins: Toss in some mini chocolate chips or chopped nuts to add texture and more flavor layers.
- Different Cereals: If you want to switch things up, try using a similar fruity cereal like Trix or Fruit Loops for a slightly different taste.
Tips for Success
Making sure your cookies come out perfect every time is easier when you keep a few things in mind. Here are some tips I’ve learned from baking these cookies multiple times:
- Don’t skip the lemon zest: It really brightens the flavor and balances the sweetness.
- Keep your butter and cream cheese softened: This helps them blend smoothly and creates a better dough texture.
- Be gentle when mixing dry ingredients: Overmixing can develop gluten and make your cookies tough instead of soft.
- Use parchment paper or silicone mats: This prevents sticking and makes clean-up a breeze.
- Roll dough balls evenly: Uniform size means even baking so some cookies aren’t overdone while others stay underbaked.
- Prep ahead: You can make the dough a day in advance and keep it covered in the fridge. Just let it soften a bit at room temperature before rolling and baking.
How to Store Fruity Pebbles Cookies
Once baked, these cookies are best enjoyed fresh, but you can absolutely store them to keep that soft, chewy magic alive.
Room Temperature: Store your cookies in an airtight container at room temperature for up to 3 days. Make sure they’re completely cooled to avoid condensation and sogginess.
Refrigeration: If you want to keep them longer, place them in an airtight container and refrigerate for up to a week. Just bring them to room temperature or warm slightly in the microwave before serving to soften.
Freezing: These cookies freeze well! Freeze them in a single layer on a baking sheet, then transfer to a freezer-safe bag or container. They keep for up to 3 months. Thaw at room temperature or heat in a warm oven for a few minutes to refresh them.
FAQs
Q: Can I use margarine instead of butter?
A: For best flavor and texture, I recommend using unsalted butter. Margarine can change the texture and may make the cookies less tender.
Q: Will the Fruity Pebbles get soggy inside the dough?
A: They do soften a bit during baking but still retain some crunch. Rolling the dough balls in extra cereal helps keep that fun texture on the outside.
Q: Can I make these cookies vegan?
A: This recipe uses cream cheese and egg, so it would need substitutions like vegan butter, vegan cream cheese, and an egg replacer. The texture might be different, but it’s worth experimenting!
Q: Why do you roll the dough in sugar after the cereal?
A: The sugar adds a sparkling crunch and sweetness on the outside, balancing the fruity cereal’s tartness and creating a pretty finish.
Baking Fruity Pebbles Cookies is like wrapping up a favorite childhood memory in a delicious, colorful package. They’re easy, fun, and always bring joy to the table. Whether it’s a cozy afternoon snack or a bright addition to your cookie jar, I hope you enjoy making and sharing these as much as I do!
For more colorful, creative recipes and kitchen inspiration, be sure to follow my Pinterest account. Happy baking!
Delightfully Colorful Fruity Pebbles Cookies
Ingredients
Equipment
Method
- Step 1: Preheat oven to 375°F (190°C). Line a baking sheet with parchment paper.
- Step 2: Zest the lemon and rub zest into 3/4 cup granulated sugar to infuse flavor.
- Step 3: Beat softened butter, cream cheese, and lemon sugar together until smooth and creamy.
- Step 4: Add brown sugar, egg, and vanilla extract; beat for about 2 minutes until light and fluffy.
- Step 5: Gradually mix in flour, baking soda, and salt just until combined. Do not overmix.
- Step 6: Fold in 1 cup Fruity Pebbles cereal carefully.
- Step 7: Scoop dough into 1/4 cup-sized balls for uniform baking.
- Step 8: Roll each dough ball first in remaining 3/4 cup Fruity Pebbles cereal, then in 1/4 cup granulated sugar.
- Step 9: Place cookies on prepared baking sheet, spaced a few inches apart.
- Step 10: Bake for 9–11 minutes until edges turn light golden and centers remain soft.
- Step 11: Let cookies cool on the sheet for 5 minutes before transferring to a wire rack to cool completely.