Oh my goodness, are you ready for a treat that feels like a warm hug? Today, we’re diving into the wonderful world of Ensaymada! If you’ve ever had this sweet, soft, and slightly rich Filipino brioche-like bread, you know exactly the kind of cozy comfort I’m talking about. If you haven’t, get ready to meet your new favorite pastry. Making bread at home can sound a little intimidating, but trust me, this Ensaymada recipe is surprisingly straightforward and incredibly rewarding. There’s nothing quite like the smell of these baking in your kitchen. It just brings back memories of special occasions and simple, delicious moments.
Why You’ll Love This Recipe
- Fast-ish for Bread! While there’s rising time involved (like any good bread), the active work is minimal.
- Surprisingly Easy: No fancy techniques here, just simple mixing, kneading, and shaping.
- Perfectly Giftable: Wrap a few of these up, and you’ve got a beautiful, heartfelt gift for a friend or neighbor.
- Major Crowd-Pleaser: These sweet rolls disappear fast! Everyone adores that soft texture and sweet topping.
Ingredients
Gathering your ingredients is the first step to baking bliss! Here’s what you’ll need for these delightful Ensaymadas:
- 3 1/4 cups all-purpose flour, sifted: Sifting helps make the dough extra light and airy. Plus a little extra for dusting your workspace!
- 7g (1 packet) instant yeast: This is your magic ingredient that makes the bread rise and become wonderfully soft.
- 4 tablespoons granulated sugar: Just enough sweetness for the dough itself.
- 1/2 teaspoon salt: Essential for balancing out the sweetness and enhancing the flavor.
- 2 large eggs, beaten: Eggs add richness, color, and help with the dough structure.
- 1/4 cup fresh warm milk: Warm milk helps activate the yeast and adds tenderness.
- 1/3 cup warm water (around 110°F): The perfect temperature to wake up that yeast!
- 3 tablespoons melted butter or margarine: Adds richness and moisture to the dough.
- Softened butter or margarine for brushing: This is key for that beautiful golden crust and helps the topping stick later.
How to Make It
Okay, let’s get our hands a little floury! Follow these steps, and you’ll have warm, homemade Ensaymada in no time.
Step 1: Wake Up the Yeast
Grab a large bowl. Pour in your warm water and the 4 tablespoons of sugar. Give it a little swirl. Now, sprinkle the yeast right on top. Don’t stir it in just yet! Let it sit there for about 5 to 10 minutes. You’re looking for it to get bubbly and foamy. That foam means your yeast is alive and happy, ready to work! If nothing happens, your water might not have been warm enough (or too hot!) or your yeast might be old. Time to try again with fresh yeast.
Step 2: Add the Wet Crew
Once your yeast is looking nice and foamy, whisk in the beaten eggs, melted butter (or margarine), and the warm milk. Mix it all together until everything is combined nicely.
Step 3: Bring in the Dry Goods
Now for the flour and salt. Add the sifted flour and the salt to the wet ingredients. Start mixing it with a wooden spoon or a sturdy spatula. Keep going until everything starts to come together into a shaggy, slightly messy ball of dough. It won’t be smooth yet, and that’s totally fine!
Step 4: Time to Knead
Lightly flour a clean surface – your counter or a large cutting board works great. Turn the shaggy dough out onto the floured surface. Now, the kneading begins! Push the dough away from you, fold it back towards you, and repeat. Knead for about 8 to 10 minutes. Your dough should transform from sticky and rough to smooth, elastic, and much easier to handle. If it feels too sticky, add just a tablespoon of flour at a time, incorporating it before adding more. Don’t add too much flour, or your bread will be tough!
Step 5: The First Nap (Rise)
Lightly oil a clean bowl (you can use the same one you mixed in, just give it a quick wipe). Place your beautifully kneaded dough in the bowl and turn it over so it gets a light coating of oil all around. Cover the bowl tightly with plastic wrap. Find a warm spot in your kitchen – maybe on top of your fridge, near a sunny window, or in a slightly warm (but turned off!) oven. Let the dough rise for 1 to 1.5 hours, or until it has doubled in size. This is where the magic happens!
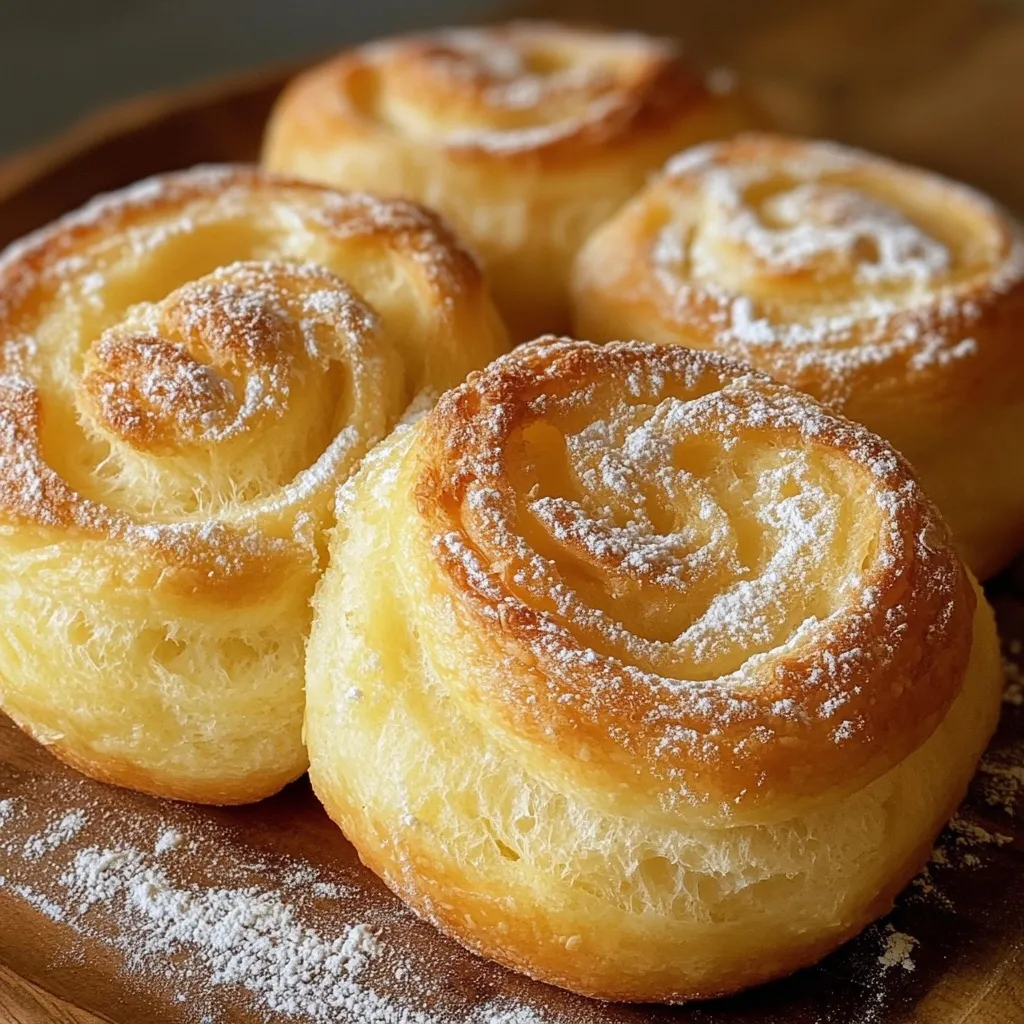
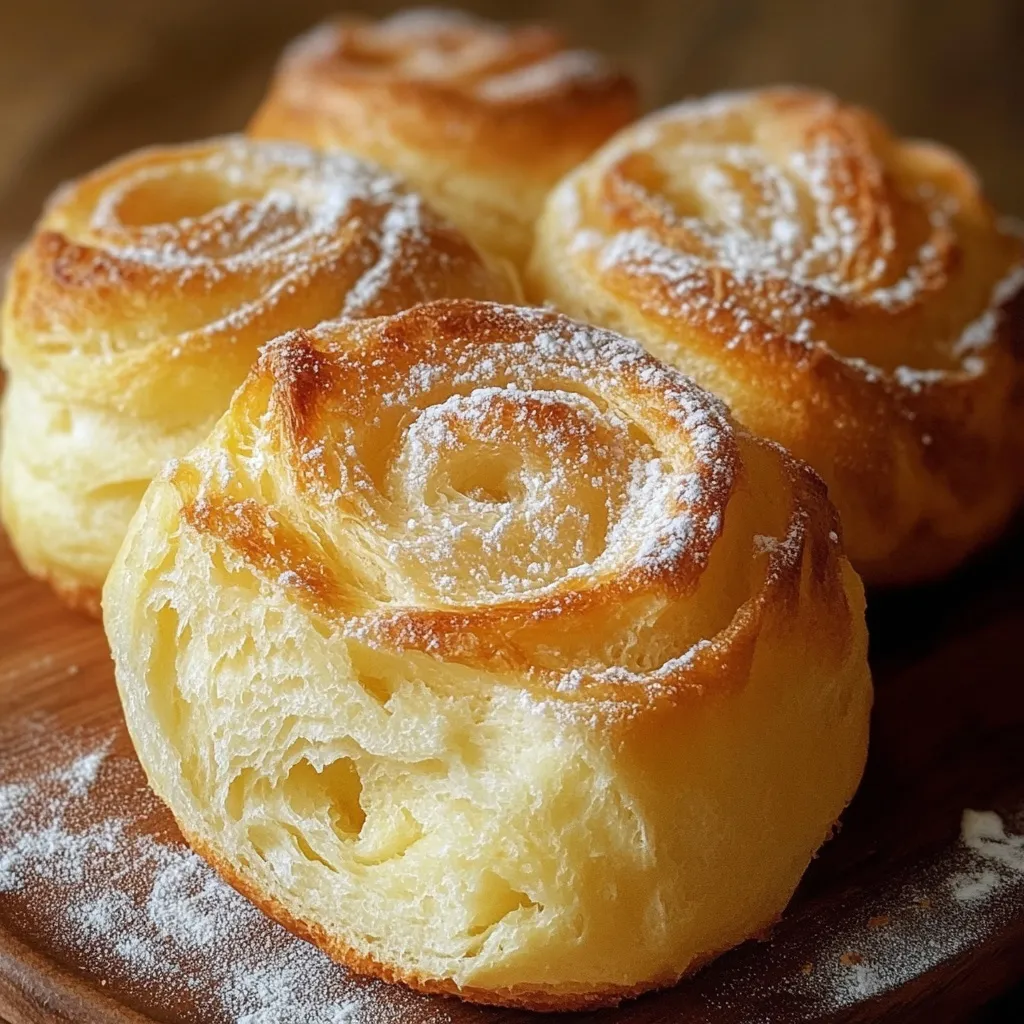
Step 6: Shape Those Swirls
Okay, the dough should be big and puffy now! Gently punch it down to release the air. This helps redistribute the yeast and makes shaping easier. Turn the dough out onto your lightly floured surface again. Divide the dough into 8 equal pieces. You can eyeball it, or use a scale for precision if you like. Take one piece and roll it between your hands or on the counter into a rope about 12 inches long. Now, coil the rope into a spiral shape, just like a snail shell. Tuck the end underneath the coil to keep it neat. Repeat with the remaining 7 pieces of dough.
Step 7: The Second Nap (Rise)
Line a baking sheet with parchment paper. Carefully place your shaped Ensaymadas onto the baking sheet, leaving a little space between them as they will puff up again. Loosely cover the baking sheet with plastic wrap (you can spray the underside of the plastic wrap with a little cooking spray to prevent sticking). Let them rise again for another 30 to 45 minutes. They should look almost doubled in size and feel light and airy.
Step 8: Bake ‘Em Up!
While your Ensaymadas are having their second rise, preheat your oven to 350°F (175°C). Just before they go into the oven, gently brush the tops of each Ensaymada with softened butter or margarine. Pop the baking sheet into the preheated oven. Bake for 20 to 25 minutes, or until they are a beautiful golden brown color on top and sound hollow when you tap the bottom (carefully!).
Step 9: Cool and Enjoy!
Take the glorious golden Ensaymadas out of the oven. Let them cool slightly on the baking sheet for a few minutes, then transfer them to a wire rack to cool completely, or at least until they are warm enough to handle. Ensaymadas are absolutely divine served warm, maybe with a little extra butter or a sprinkle of sugar and grated cheese (a classic Filipino topping!).

Substitutions & Additions
- Butter vs. Margarine: The recipe calls for either, and both work! Butter will give a slightly richer flavor, while margarine often results in a very soft texture. Use what you have or prefer.
- Active Dry Yeast: If you only have active dry yeast, you’ll need to activate it first. Use the same amount (7g). Combine the warm water (make it slightly warmer, around 115°F), sugar, and sprinkle the yeast over. Let it sit for 10-15 minutes until fully foamy. Then add the rest of the wet ingredients as directed.
- Milk: Whole milk adds the most richness, but 2% or even non-dairy milk can work in a pinch.
- Sweet Toppings: Traditionally, Ensaymada is brushed with softened butter and then sprinkled with granulated sugar, and often grated cheese (like Edam or a mild cheddar). Don’t knock the cheese-sugar combo ’til you try it! You could also try a simple powdered sugar glaze once they cool slightly.
Tips for Success
- Yeast is Key: Make sure your yeast is fresh and your water temperature is just right. If the yeast doesn’t foam, don’t proceed!
- Don’t Rush the Rises: Allowing the dough to double is crucial for that soft, fluffy texture. Be patient!
- Proper Kneading: Kneading develops the gluten, which gives the bread structure and chewiness. Don’t under-knead, but also be careful not to add too much flour, which can make the dough tough.
- Warm Spot for Rising: Dough loves warmth! Find a cozy place away from drafts.
- Storage Prep: You can shape the Ensaymadas (Step 6), place them on the baking sheet, cover loosely, and refrigerate them overnight for baking in the morning. Let them sit at room temperature for about 30-45 minutes while your oven preheats before baking.
How to Store It
These are definitely best enjoyed fresh and warm! However, if you have leftovers (a rare occurrence in my house!), store them in an airtight container at room temperature for up to 2-3 days. If you need to keep them longer, you can refrigerate them for up to a week or freeze them for up to 3 months. To reheat, a quick zap in the microwave for 15-30 seconds works wonders to bring back that softness, or warm them in a low oven (around 300°F) for about 5-10 minutes.
FAQs
Here are a couple of common questions you might have:
Q: Can I make this dough in a stand mixer?
A: Absolutely! After activating the yeast, combine all ingredients in the mixer bowl. Use the dough hook on low speed for 8-10 minutes until the dough is smooth and pulls away from the sides of the bowl. Then proceed with the first rise.
Q: My dough didn’t rise, what went wrong?
A: The most common culprit is inactive yeast. Either your yeast was old/dead, or the water temperature was too hot or too cold when you activated it. Ensure your water is warm but not hot (like bathwater, not scalding) and that your yeast is fresh.
Q: What’s the traditional topping for Ensaymada?
A: While a simple butter brush and sugar sprinkle is delicious, the classic Filipino topping often involves brushing with softened butter, generously sprinkling with granulated sugar, and then topping with finely grated cheese, like queso de bola (Edam) or a mild cheddar. Don’t knock it ’til you try it – it’s a wonderful sweet and salty combination!
Classic Ensaymada Bread Recipe
Ingredients
Equipment
Method
- Step 1: Wake Up the Yeast. In a large bowl, pour in warm water and 4 tablespoons of sugar. Sprinkle the yeast on top (do not stir). Let sit for 5 to 10 minutes until bubbly and foamy.
- Step 2: Add the Wet Crew. Once yeast is foamy, whisk in the beaten eggs, melted butter (or margarine), and warm milk. Mix until combined.
- Step 3: Bring in the Dry Goods. Add the sifted flour and salt to the wet ingredients. Mix with a wooden spoon or spatula until a shaggy ball of dough forms.
- Step 4: Time to Knead. Lightly flour a clean surface. Turn the dough out and knead for about 8 to 10 minutes until smooth, elastic, and easier to handle. Add flour a tablespoon at a time if too sticky.
- Step 5: The First Nap (Rise). Lightly oil a clean bowl. Place the dough in the bowl, turn to coat with oil. Cover tightly with plastic wrap. Let rise in a warm spot for 1 to 1.5 hours, or until doubled in size.
- Step 6: Shape Those Swirls. Gently punch down the dough. Turn onto a lightly floured surface. Divide into 8 equal pieces. Roll each piece into a 12-inch rope. Coil the rope into a spiral shape and tuck the end underneath.
- Step 7: The Second Nap (Rise). Line a baking sheet with parchment paper. Place shaped Ensaymadas on the sheet, leaving space. Loosely cover with plastic wrap. Let rise for another 30 to 45 minutes until almost doubled and airy.
- Step 8: Bake ‘Em Up! While rising, preheat oven to 350°F (175°C). Just before baking, gently brush the tops with softened butter or margarine. Bake for 20 to 25 minutes, or until golden brown and sound hollow when tapped.
- Step 9: Cool and Enjoy! Remove from oven. Let cool slightly on the baking sheet, then transfer to a wire rack to cool completely or until warm enough to handle. Serve warm.