Oh, friend, let me tell you about those mornings. You know the ones – where the alarm should have gone off ten minutes earlier, and you’re trying to find matching socks while simultaneously figuring out what you can possibly grab for breakfast that doesn’t involve a drive-thru? We’ve all been there! That’s why I fell head over heels for these little breakfast gems. They’re like tiny bowls of homemade goodness, packed with all the delicious, cozy flavors of granola, but in a perfectly portable cup shape. No more soggy cereal or forgotten toast! Just grab one (or two!), and you’re out the door with a smile. They taste like sunshine and comfort, and honestly, making them is half the fun.
Why You’ll Love This Recipe
Seriously, what’s not to love about a healthy, tasty breakfast that practically makes itself and is ready when you are? These granola cups check all the boxes:
- Fast: Minimal prep time means you can whip up a batch even on a busy weeknight.
- Easy: If you can stir things in a bowl and press them into a muffin tin, you’ve got this! No fancy equipment needed.
- Giftable: Tie a ribbon around a stack, and you’ve got the sweetest homemade gift for friends, neighbors, or a new mom!
- Crowd-pleasing: Kids and adults alike adore these. Serve them with yogurt and fruit for a sit-down brunch, or let everyone grab one on the go.
Ingredients
Gathering your ingredients is the first step to these little cups of joy. You probably have most of these staples in your pantry right now!
- 1/4 cup applesauce or mashed banana: This is your binder and adds natural sweetness and moisture. Use unsweetened applesauce if you have it. A ripe, mashed banana works beautifully too and adds its own lovely flavor!
- 1/4 cup honey or agave: Our main liquid sweetener. Honey gives that classic granola taste, while agave makes them vegan. Maple syrup is another great option here!
- 1/2 tsp pure vanilla extract: Because vanilla makes everything better, right? It adds warmth and depth.
- 1/2 tsp cinnamon: Cozy spice alert! Cinnamon pairs perfectly with the oats and fruit.
- 1/4 tsp salt: Just a pinch helps balance the sweetness and brings out all the flavors. Don’t skip it!
- 1 1/4 cup rolled oats: Make sure you’re using old-fashioned rolled oats, not instant or quick oats. Rolled oats give you the best texture and chewiness.
- yogurt or fresh fruit (for serving): The perfect partners! Think Greek yogurt, regular yogurt, berries, sliced banana, apple… whatever you love!
How to Make It
Alright, let’s get our hands a little sticky and make some magic happen! It’s super straightforward, I promise.
1. First things first, get your muffin tin ready. Give each cup a good grease. You can use cooking spray, butter, or coconut oil. This is key to making sure your granola cups pop out easily later. If you’re using a mini muffin tin, you might get more cups, but the baking time might need a tiny adjustment (usually a minute or two less).
2. Grab a medium-sized bowl. Whisk together your wet ingredients: the applesauce (or mashed banana), honey (or agave), and the lovely vanilla extract. Get them all friendly and combined.
3. Now, add the dry ingredients right into that wet mix. Pour in the rolled oats, cinnamon, and salt. Stir everything together really well. You want every single oat flake coated in that sweet, spiced mixture. Keep stirring until it looks like a thick, cohesive granola batter.
4. It’s time to fill the cups! Portion the mixture evenly into the six greased muffin cups. This is where the pressing comes in. Using the back of a spoon or even your fingers (spray them lightly with oil if they get sticky!), firmly press the mixture down into the bottom of each cup and up the sides. You’re essentially forming a little granola bowl shape. The firmer you press, the better they will hold together.
5. While you’re doing that, go ahead and preheat your oven to 330°F (165°C). We’re using a slightly lower temperature than usual to help them bake evenly and become crisp without burning.
6. Once your muffin tin is filled and pressed, place it on a baking sheet. This makes it easier to get in and out of the oven and also catches any potential drips, keeping your oven clean.
7. Pop the baking sheet with the muffin tin into the preheated oven. Bake for about 12 minutes. You’ll know they’re getting close when the edges look slightly golden and they smell absolutely amazing!
8. Carefully remove the muffin tin from the oven. Remember how we pressed the sides? They might have puffed up a little. While they’re still warm (but not scorching!), use the back of that spoon again to gently press the sides back into shape, reinforcing that cup structure.
9. This step is crucial for preventing crumbs! Let the granola cups sit in the muffin tin for at least 10 minutes after you take them out of the oven. They continue to set and firm up as they cool. Trying to take them out too soon is the most common reason they might crumble.
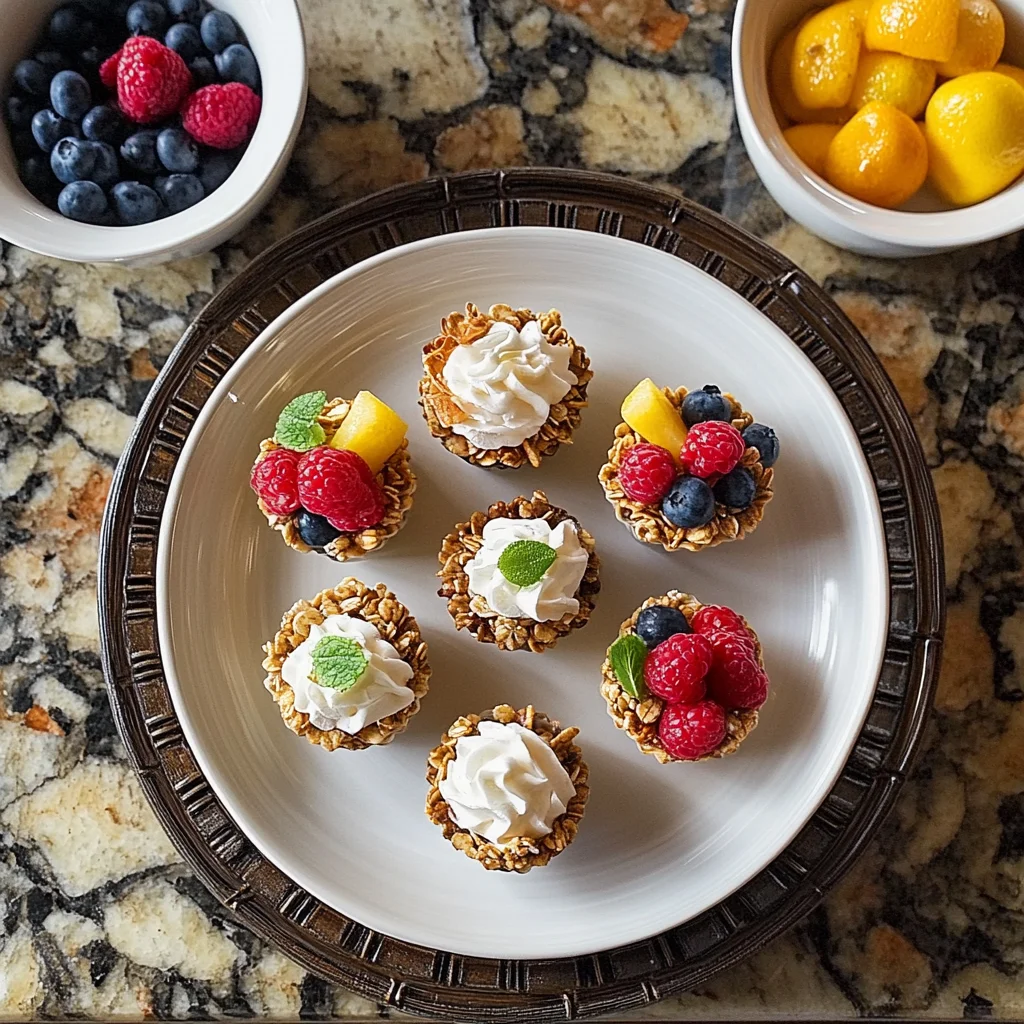
10. Once they’ve cooled slightly in the tin, you can carefully loosen the edges with a knife if needed and lift them out. Serve them warm or at room temperature with a dollop of yogurt and your favorite fresh fruit. Bliss!

Substitutions & Additions
One of the best things about this recipe is how flexible it is! Feel free to get creative and make it your own.
- Sweeteners: As mentioned, maple syrup is a fantastic substitute for honey or agave. You could also reduce the liquid sweetener slightly and add a few drops of stevia or another liquid sweetener if you prefer less added sugar, but the liquid is important for binding.
- Spices: Swap cinnamon for pumpkin pie spice, apple pie spice, or add a pinch of nutmeg or cardamom.
- Extracts: Almond extract or even a little maple extract could be fun twists instead of vanilla.
- Add-ins (before baking): Want more texture? Stir in a couple of tablespoons of chopped nuts (like almonds or walnuts), seeds (chia seeds, flax seeds, pumpkin seeds), or shredded coconut along with the oats.
- Add-ins (after baking/serving): Once they’re baked and cooled, fill the cups with peanut butter or almond butter before adding yogurt and fruit. A sprinkle of mini chocolate chips after they come out of the oven and are still warm is also a delightful treat!
- Gluten-Free: To make these gluten-free, simply ensure you use certified gluten-free rolled oats.
Tips for Success
Want your granola cups to come out perfect every time? Keep these little pointers in mind!
- Pressing is Key: Don’t be shy when pressing the mixture into the muffin cups. The firmer and more compact you make the base and sides, the sturdier your cups will be.
- Cooling Time: Resist the urge to remove them from the tin too soon! The 10 minutes of cooling in the tin is essential for them to set properly.
- Grease Well: A well-greased tin is your best friend here. If you’re worried, you can even lightly flour the greased cups (using GF flour if needed) for extra insurance, but usually good greasing is enough.
- Oven Temperature: The 330°F is important for that even bake. If your oven runs hot, you might even go slightly lower or check them a minute or two early.
- Making Ahead: These are perfect for meal prep! Make a batch on Sunday, and you’ll have grab-and-go breakfasts or snacks for the whole week.
How to Store It
Once your beautiful granola cups have cooled completely, you’ll want to store them properly to keep them fresh.
You can store them in an airtight container at room temperature for 2-3 days. If you want them to last longer, pop them in the refrigerator, where they’ll stay good for up to a week.
For longer storage, these freeze wonderfully! Place cooled cups in a single layer on a baking sheet and freeze until solid. Then transfer them to a freezer-safe bag or container. They’ll keep in the freezer for up to 3 months. To enjoy, just let one thaw at room temperature for about 15-20 minutes, or grab one from the freezer the night before and let it thaw in the fridge.
FAQs
Can I use quick oats instead of rolled oats?
I really recommend sticking with rolled oats for this recipe. Quick oats are cut finer and cook faster, which can result in a different texture, and they might not bind together as well to form the cup shape.
Why did my granola cups crumble?
The most common reasons are not pressing the mixture firmly enough into the muffin tin cups, or not letting them cool in the tin for the full 10 minutes (or longer if needed!) before trying to remove them.
Can I make them sweeter?
You can slightly increase the amount of honey or agave, but don’t add too much liquid sweetener as it can affect the texture. You can also add a few chocolate chips after baking or serve them with sweeter toppings like extra fruit or a drizzle of maple syrup.
Are these very crunchy?
They have a pleasant chewiness with slightly crisp edges, but they aren’t as hard-crunchy as traditional baked granola chunks. They’re designed to be eaten by hand or filled like a bowl.

Easy Homemade Grab-and-Go Granola Cups
Ingredients
Equipment
Method
- Step 1: Grease each cup of a standard muffin tin well using cooking spray, butter, or coconut oil. (Note: A mini muffin tin can be used, baking time may vary slightly).
- Step 2: In a medium bowl, whisk together the applesauce (or mashed banana), honey (or agave), and vanilla extract until combined.
- Step 3: Add the rolled oats, cinnamon, and salt to the wet ingredients. Stir everything together thoroughly until all oats are coated and the mixture is cohesive.
- Step 4: Portion the mixture evenly into the six greased muffin cups. Use the back of a spoon or your fingers to firmly press the mixture down into the bottom and up the sides of each cup to form a bowl shape. The firmer you press, the better they will hold together.
- Step 5: Preheat your oven to 330°F (165°C).
- Step 6: Place the muffin tin on a baking sheet for easier handling.
- Step 7: Bake in the preheated oven for about 12 minutes, or until the edges are slightly golden and fragrant.
- Step 8: Carefully remove the muffin tin from the oven. While the cups are still warm, gently use the back of a spoon to repress the sides back into shape if they have puffed up.
- Step 9: Let the granola cups cool completely in the muffin tin for at least 10 minutes. This is crucial for them to set and prevent crumbling.
- Step 10: Once cooled slightly in the tin, carefully loosen the edges with a knife if needed and lift them out. Serve warm or at room temperature, filled with yogurt and fresh fruit if desired.