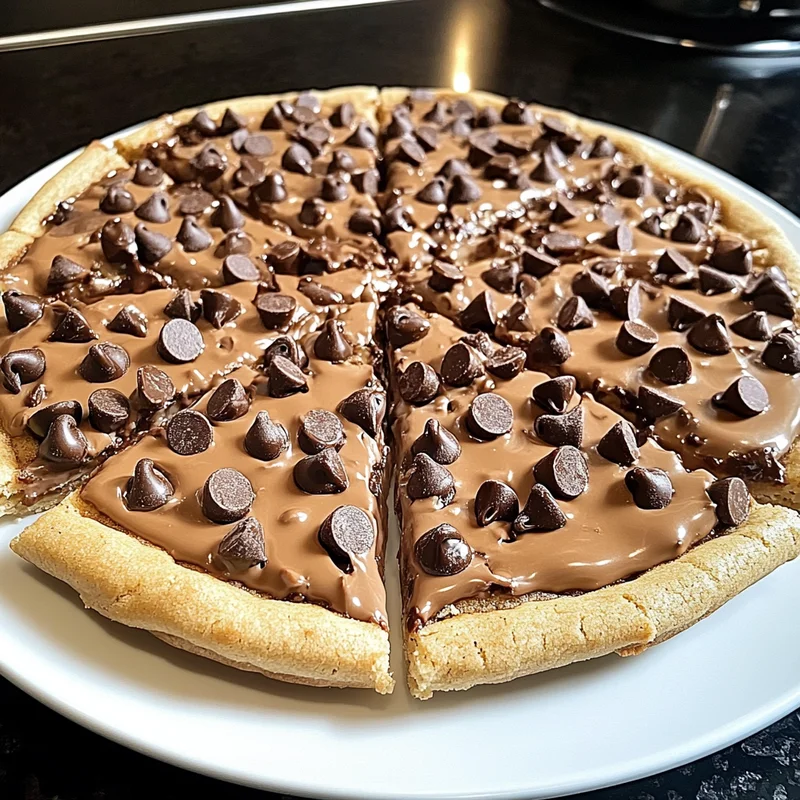
There’s something truly magical about the smell of fresh-baked cookies wafting through the kitchen, isn’t there? It instantly takes me back to cozy afternoons with family, warm smiles, and the simple joy of sharing something homemade. Now, imagine that comforting vibe combined with the fun, shareable format of a pizza. That’s exactly what you get with this Chocolate Chip Cookie Pizza — a deliciously unique dessert that’s quick, easy, and absolutely irresistible. Whether you’re whipping it up for a casual weekend treat or a special celebration, this recipe is sure to bring smiles all around the table.
What I love about this recipe is how it turns two classic favorites—cookie and pizza—into one memorable, crowd-pleasing dish. It’s a perfect balance of crispy crust, sweet cakey topping, and melty chocolate chips that bring all the magic to life. Plus, it’s simple enough that even beginner bakers can feel confident giving it a try. So grab your apron, and let’s dive into everything you need to know to create this delightful dessert!
Why You’ll Love Chocolate Chip Cookie Pizza
- Fast: From start to finish, this recipe takes less than 30 minutes, making it ideal for last-minute cravings or unexpected guests.
- Easy: No complicated dough or fancy ingredients—just a few pantry staples and a ready-made pizza crust.
- Giftable: Wrapped up nicely, this cookie pizza makes a thoughtful and delicious homemade gift for friends, neighbors, or coworkers.
- Crowd-pleasing: Whether it’s a party, family night, or potluck, everyone loves a dessert they can slice and share.
Ingredients
Let’s talk about the simple, everyday ingredients that come together to make this cookie pizza so special:
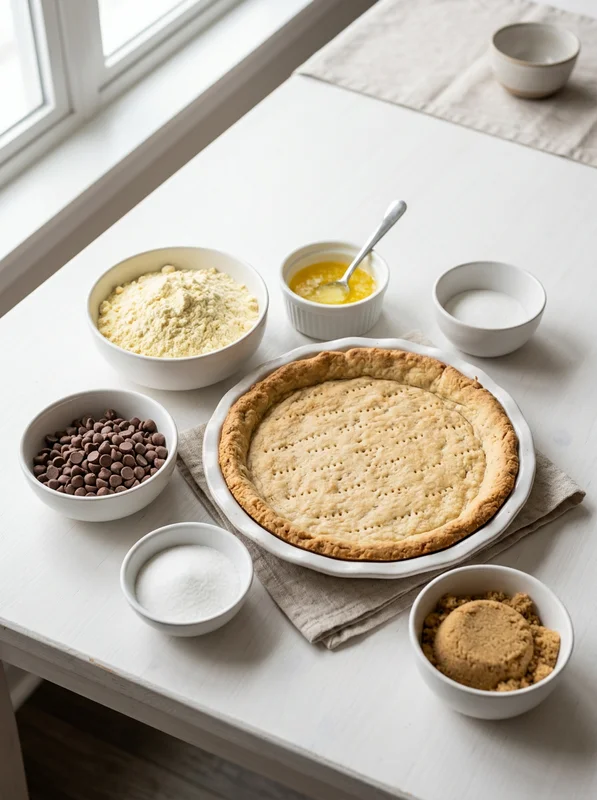
- 1 pizza crust (12–14 inch): Using a store-bought crust saves time and adds a crispy base that holds all the sweet goodness.
- 1 1/2 cups yellow cake mix: This adds a soft, cakey texture and a hint of vanilla flavor that perfectly complements the chocolate chips.
- 1/2 cup unsalted butter, melted: Butter makes everything better! It adds richness and helps bind the cake mix into a crumbly topping.
- 1/2 cup milk chocolate chips: Melty, sweet, and irresistible—these little pockets of chocolate bring the cookie pizza to life.
- 1/4 cup granulated sugar: Adds a bit of crunch and sweetness to the topping.
- 1/4 cup brown sugar: The brown sugar gives a lovely caramel note and moistness to the topping.
Each ingredient plays a crucial role in creating the perfect balance of textures and flavors. I always recommend using good-quality chocolate chips because they make a noticeable difference in taste and melt beautifully on top.
How to Make Chocolate Chip Cookie Pizza
Ready to get baking? This recipe is delightfully straightforward, but I’ll walk you through every step so you can feel confident and have fun with it!
- Preheat your oven to 400°F (200°C). This high temperature helps the crust get crispy while the topping bakes evenly.
- Place the pizza crust on a baking sheet and prick the surface with a fork. This little trick prevents the crust from puffing up too much in the oven. You want it nice and flat to hold your cookie topping.
- Bake the crust for 5 minutes, then remove it from the oven. This gives you a lightly baked base that will finish baking with the topping later.
- In a bowl, mix melted butter with the yellow cake mix until a thick, crumbly paste forms. I like to use a spatula here to get everything combined well. The mixture should hold together but still feel a bit crumbly.
- In a separate small bowl, combine the granulated sugar and brown sugar. This mixture will be sprinkled on top for sweetness and texture, so make sure it’s well mixed.
- Spread the cake mixture evenly over the crust, leaving a small border around the edges. This border keeps the topping contained and creates a nice “crust” edge when baked.
- Sprinkle the chocolate chips evenly across the cake mixture and press them lightly in. Pressing the chips ensures they stay put and melt into the topping beautifully.
- Sprinkle the sugar mixture evenly over the top. This adds a crisp, sweet finish to the cookie pizza’s surface.
- Bake for 10–12 minutes, rotating the pan halfway through for even baking. You’ll know it’s done when the edges turn golden and the topping looks slightly bubbly and set.
- Remove from the oven and let cool for 5 minutes. This cooling time helps the cookie pizza firm up just enough to slice easily without falling apart.
- Slice and serve warm. There’s nothing quite like a warm slice of cookie pizza—gooey chocolate, cakey topping, and crispy crust all in one bite.
I love serving this with a scoop of vanilla ice cream or a drizzle of caramel sauce for an extra indulgent touch. But honestly, it’s amazing all on its own!
Substitutions & Additions
One of the best things about this recipe is how flexible it is. Feel free to get creative and make it your own!
- Crust swaps: If you prefer a softer base, try using a sugar cookie dough or even a brownie mix as your crust instead of a traditional pizza crust.
- Chocolate variations: Swap milk chocolate chips for semi-sweet, dark chocolate, or white chocolate chips. You can even mix different types for a fun twist.
- Add nuts: Chopped walnuts, pecans, or almonds add a wonderful crunch and complement the chocolate nicely.
- Fruit additions: Fresh raspberries or sliced strawberries scattered on top before baking bring a fresh, tangy contrast.
- Spices: Add a pinch of cinnamon or pumpkin spice to the cake mix for a cozy flavor boost, especially great in fall or winter.
- Frosting or glaze: After baking, drizzle with a simple glaze made from powdered sugar and milk, or spread a thin layer of cream cheese frosting for a decadent finish.
When I’m feeling adventurous, I sometimes sprinkle a little flaky sea salt on top right before baking—it really enhances the chocolate flavor and balances the sweetness perfectly.
Tips for Success
Here are some handy tips I’ve picked up from making this recipe multiple times. These little tricks will help ensure your cookie pizza turns out perfect every single time!
- Don’t skip pricking the crust: This step prevents air bubbles and keeps the base flat and sturdy.
- Mix the cake topping well: Make sure the butter and cake mix are thoroughly combined so the topping bakes evenly.
- Watch the baking time closely: Every oven is different, so start checking at 10 minutes. The edges should be golden, and the topping bubbly but not burnt.
- Let it cool before slicing: This helps the topping set and prevents it from sliding off when you cut it.
- Prep ahead: You can assemble the cookie pizza up to the baking step, cover it tightly with plastic wrap, and refrigerate for a few hours before baking. Just add a couple extra minutes to the baking time if it’s cold from the fridge.
- Use a sharp knife or pizza cutter: For clean slices, use a sharp blade and wipe it between cuts if the topping sticks.
One final tip from me: if you want to serve this at a party, consider cutting the pizza into smaller “bite-sized” squares for easy sharing and less mess!
How to Store Chocolate Chip Cookie Pizza
Because this cookie pizza is best enjoyed warm, you’ll want to serve it soon after baking for the best experience. But if you have leftovers (which is rare in my house!), here’s how to keep it fresh:
- Room temperature: Store leftover slices in an airtight container at room temperature for up to 2 days. Avoid refrigerating if possible because it can make the crust tough.
- Reheating: Warm leftover slices in a toaster oven or regular oven at 300°F for 5–7 minutes to bring back that fresh-baked warmth and melty chocolate.
- Freezing: You can freeze unbaked cookie pizza after assembling it (before baking). Wrap tightly in plastic wrap and foil, then freeze for up to 1 month. When ready, bake from frozen, adding a few extra minutes to the baking time.
Just keep in mind, the texture is always best fresh, so enjoy it while it’s warm and gooey whenever possible!
FAQs
Q: Can I use a homemade pizza crust instead of store-bought?
A: Absolutely! A homemade crust can add extra flavor and texture. Just make sure it’s rolled out to the right size and pre-baked briefly before adding the topping.
Q: Can I make this cookie pizza gluten-free?
A: Yes! Use a gluten-free yellow cake mix and a gluten-free pizza crust. Many grocery stores carry these options now, making it easy to adapt.
Q: What if I don’t have yellow cake mix?
A: You can substitute with any cake mix you like, such as white or spice cake, but keep in mind the flavor and color will change slightly.
Q: Can I double this recipe for a larger group?
A: You can! Just bake two pizzas separately to ensure even baking and avoid overcrowding your oven.
Now that you have everything you need, I hope you feel inspired to give this Chocolate Chip Cookie Pizza a try. It’s one of those recipes that brings joy and smiles in every slice. Happy baking!
Don’t forget to follow us on Pinterest for more delicious recipes and kitchen inspiration!
Chocolate Chip Cookie Pizza
Ingredients
Equipment
Method
- Step 1: Preheat your oven to 400°F (200°C).
- Step 2: Place the pizza crust on a baking sheet and prick the surface with a fork to prevent puffing.
- Step 3: Bake the crust for 5 minutes, then remove from the oven.
- Step 4: In a bowl, mix melted butter with the yellow cake mix until a thick, crumbly paste forms.
- Step 5: In a separate small bowl, combine granulated sugar and brown sugar.
- Step 6: Spread the cake mixture evenly over the crust, leaving a small border around the edges.
- Step 7: Sprinkle the chocolate chips evenly across the cake mixture and press lightly in.
- Step 8: Sprinkle the sugar mixture evenly over the top.
- Step 9: Bake for 10–12 minutes, rotating halfway through, until edges are golden and topping looks bubbly and set.
- Step 10: Remove from oven and let cool for 5 minutes.
- Step 11: Slice and serve warm.