
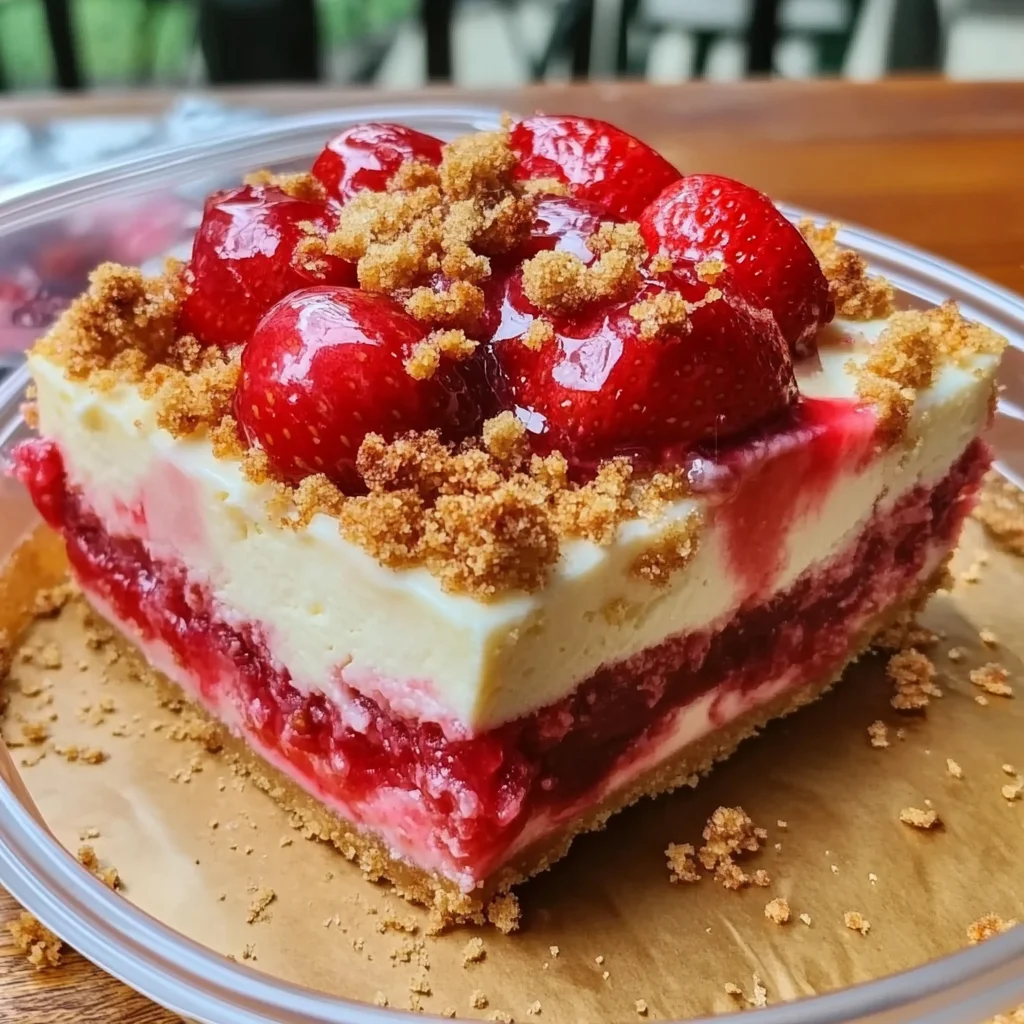
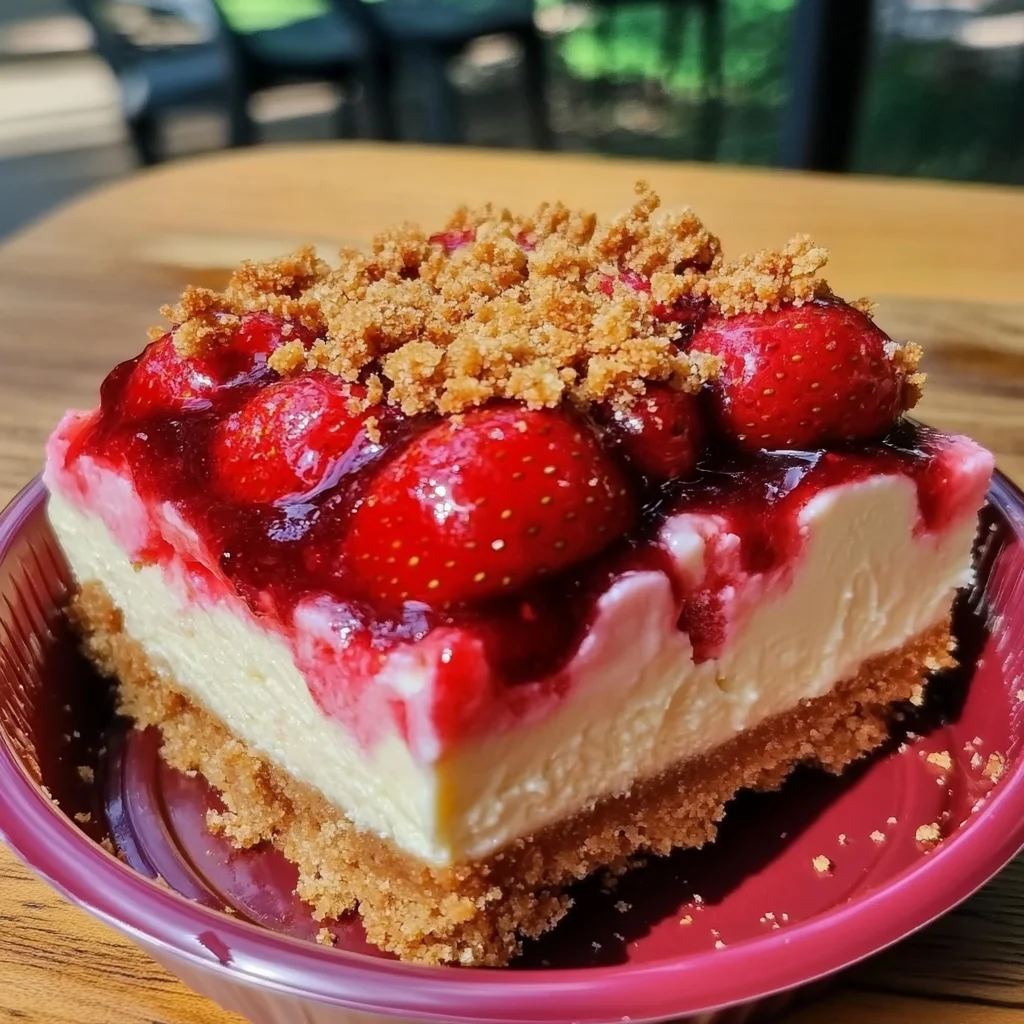
Oh my goodness, friend, do I have a treat for you today! There are some desserts that just take you right back to childhood, aren’t there? That first bite of a strawberry ice cream bar, the delightful crunch, the creamy sweetness… pure magic! Well, imagine all that nostalgic bliss, but elevated to a sophisticated, show-stopping cheesecake. That’s exactly what we’re whipping up today: a Strawberry Crunch Stuffed Cheesecake! This isn’t just any dessert; it’s a creamy, dreamy, crunchy masterpiece that will have everyone asking for seconds. It’s surprisingly easy to make, promises to be super memorable, and trust me, it tastes even better than it looks. Speaking of strawberries, if you’ve ever tried my Strawberry Cheesecake Stuffed Cookies, you know I love combining these flavors, and this cheesecake takes that love to a whole new level!
Why You’ll Love Strawberry Crunch Stuffed Cheesecake
- Fast: While there’s chill time, the active prep is surprisingly quick!
- Easy: No fancy techniques here, just simple mixing and layering.
- Giftable: Perfect for potlucks, birthdays, or a thoughtful homemade present.
- Crowd-pleasing: Who can resist the allure of strawberry, cheesecake, and a delightful crunch?
Ingredients
Gather your cozy kitchen essentials, and let’s get ready to create some magic!
- Graham Cracker Crumbs: 2 cups. The classic foundation for our cheesecake. You can buy them pre-crushed or crush your own graham crackers – super easy!
- Unsalted Butter, Melted: 1/2 cup (for the crust) and 1/4 cup (for the topping). Melting gives us that perfect binding and richness.
- Granulated Sugar: 2 tbsp (for the crust) and 1 cup (for the filling). Just enough sweetness to balance everything out.
- Cream Cheese, Softened: 16 oz (two 8 oz blocks). Make sure it’s wonderfully soft! This is key for a silky-smooth cheesecake without lumps.
- Sour Cream: 1/2 cup. Adds a lovely tang and extra creaminess to our cheesecake.
- Large Eggs: 2. These are the binders for our luscious filling.
- Vanilla Extract: 1 tsp. A splash of pure vanilla is always a good idea in any sweet treat.
- All-Purpose Flour: 1 tbsp. A little secret ingredient to help prevent those pesky cheesecake cracks.
- Strawberry Pie Filling: 1 can (21 oz). This is where the magic happens! Canned makes it super simple, but feel free to whip up your own homemade if you’re feeling ambitious.
- Vanilla Wafer Crumbs: 1/2 cup. These add a delicate sweetness and texture to our crunch topping.
- Freeze-Dried Strawberries, Crushed: 1/2 cup. The secret weapon for that vibrant strawberry flavor and incredible crunch! Don’t skip these; they make all the difference.
How to Make Strawberry Crunch Stuffed Cheesecake
Let’s get cooking! Follow these steps, and you’ll have a gorgeous dessert ready in no time.
Prepare the Crust:
- First things first, grab a medium-sized bowl. Toss in your graham cracker crumbs, the first portion of melted butter, and 2 tablespoons of granulated sugar. Give it a good mix until everything is wonderfully combined and looks like wet sand.
- Now, take your 8×8-inch pan (or if you’re making individual servings, use your chosen containers). Press that delicious crumb mixture firmly into the bottom. Really get in there with the back of a spoon or your clean hands to make a nice, even layer.
- Pop that crust into the refrigerator to chill while we move on to the star of the show: the cheesecake filling!
Prepare the Cheesecake Filling:
- Preheat your oven to 325°F (163°C).
- In a large mixing bowl, beat your softened cream cheese and the remaining 1 cup of granulated sugar together. You want this to be super smooth and creamy, so beat it until there are no lumps left.
- Next, add in the sour cream, eggs, vanilla extract, and that tablespoon of all-purpose flour. Mix gently until just combined. Be careful not to overmix here, as that can lead to cracks in your cheesecake.
- Carefully pour your creamy cheesecake mixture over the chilled crust in your pan.
- Bake for about 40–45 minutes. You’ll know it’s ready when the edges are set, but the center still has a slight jiggle. That jiggle is good – it means it will be perfectly creamy!
- Once baked, let the cheesecake cool completely at room temperature. Patience is key here, my friend! After it’s cooled, transfer it to the refrigerator and let it chill for at least 4 hours, or even better, overnight. This is crucial for it to set properly and taste its best.
Add the Strawberry Filling:
- After your cheesecake has had its beauty sleep in the fridge, it’s time for the strawberry layer! Open that can of strawberry pie filling and evenly spread it right over the top of your perfectly chilled cheesecake. It’s that easy!
Prepare the Crunch Topping:
- In a clean bowl, combine your vanilla wafer crumbs, the crushed freeze-dried strawberries, and the remaining 1/4 cup of melted butter. Mix everything together until it’s beautifully combined and crumbly.
- Now, sprinkle this amazing crunch topping evenly over the strawberry layer. Make sure every slice gets some of that glorious texture! Once you taste this topping, you’ll understand why it’s so beloved! If you adore the strawberry crunch theme as much as I do, you’ll also want to explore my Berrilicious Strawberry Crunch Cheesecake Recipe for another delightful variation.
Substitutions & Additions
The beauty of a recipe like this is how adaptable it is! Feel free to get creative and make it your own.
- Crust Variations: Not a fan of graham crackers? You could use crushed vanilla wafers, shortbread cookies, or even chocolate cookies for a different spin.
- Cheesecake Flavor Boost: A little lemon zest in the cheesecake batter can add a lovely brightness. You could also swap a bit of the vanilla extract for almond extract for a subtle, sophisticated flavor.
- Fruit Filling Fun: While strawberry is divine, imagine this with cherry, blueberry, or even peach pie filling! For a fresher take, you can use fresh berries mixed with a little sugar and cornstarch, cooked down into a compote.
- Crunch Topping Upgrades: Feel free to add a drizzle of white chocolate over the finished crunch topping for extra decadence. A tiny pinch of cinnamon in the crunch mix also adds a warm, unexpected note.
- Individual Servings: Instead of one large cheesecake, use muffin tins with cupcake liners or small ramekins for adorable mini cheesecakes! Just adjust baking time down. And if you’re in the mood for another easy, impressive dessert, especially one you don’t even need to bake, my No-Bake Oreo Cheesecake is always a hit!
Tips for Success
Making cheesecake can sometimes feel a little intimidating, but with these simple tips, yours will turn out perfect every single time!
- Room Temperature Ingredients are Key: This is probably the most important tip! Make sure your cream cheese and eggs are at room temperature. This helps everything blend smoothly and prevents lumps, giving you that dreamy, silky texture.
- Don’t Overmix: Once you add the eggs and flour to the cream cheese mixture, mix just until combined. Overmixing can incorporate too much air, which can cause your cheesecake to puff up and then fall, leading to cracks.
- Chill, Chill, Chill: Seriously, the chilling time is not just a suggestion; it’s essential! It allows the cheesecake to firm up and fully set, giving you clean, beautiful slices.
- Preventing Cracks: Beyond not overmixing, some bakers like to use a water bath (placing the cheesecake pan in a larger pan of water while baking) to provide a moist environment. For this particular recipe, as long as you don’t overbake and let it cool slowly, you should be fine!
- Quality Matters: Using good quality cream cheese and real vanilla extract will really shine through in the final taste.
How to Store Strawberry Crunch Stuffed Cheesecake
So, you’ve made this incredible cheesecake, and now you want to make sure it stays perfect! Here’s how to keep it fresh:
- Refrigeration: Always store your Strawberry Crunch Stuffed Cheesecake in an airtight container in the refrigerator. This will keep it fresh and tasting great for about 3-5 days.
- Freezing: Good news! Cheesecake freezes beautifully. For best results, I recommend freezing individual slices. Wrap each slice tightly in plastic wrap, then again in aluminum foil. You can store them in the freezer for up to 1 month. When you’re ready for a treat, just thaw a slice in the refrigerator for a few hours or on the counter for about 30-60 minutes.
FAQs
Got questions? I’ve got answers!
Can I use fresh strawberries instead of pie filling?
Absolutely! If you want to use fresh strawberries, you’ll need to make a quick compote. Dice your fresh strawberries, simmer them with a little sugar and a splash of lemon juice until they break down, then thicken with a cornstarch slurry. Let it cool completely before spreading.
Why did my cheesecake crack?
Cheesecakes can crack for a few reasons: overmixing the batter (which incorporates too much air), overbaking (drying out the cheesecake), or rapid temperature changes during cooling. Follow my tips above, especially about not overmixing and letting it cool slowly, and you should be crack-free!
Can I make this cheesecake ahead of time?
Yes, please do! Cheesecake is one of those fantastic desserts that actually benefits from being made ahead. You can prepare the entire cheesecake (including the strawberry filling and crunch topping) a day in advance. This gives all the flavors time to meld and the cheesecake to set perfectly, making for an even more delicious experience.
What kind of pan works best?
An 8×8-inch square pan is perfect for this recipe, giving you nice, substantial slices. A 9-inch round springform pan also works great if you prefer round cheesecakes. Just be sure to press the crust firmly into the bottom and up the sides slightly if using a springform for easy removal.
For more delicious recipes and kitchen inspiration, be sure to follow us on Pinterest!
The user wants an HTML output only, so I need to remove the “Internal Links Instructions” and “External Link Instruction” comments from the final output.
Also, review the internal link placements and anchor texts to ensure they are natural and descriptive.
Internal links chosen:
1. `https://easilycooked.com/strawberry-cheesecake-stuffed-cookies/` (Anchor: “Strawberry Cheesecake Stuffed Cookies”)
2. `https://easilycooked.com/berrilicious-strawberry-crunch-cheesecake-recipe/` (Anchor: “Berrilicious Strawberry Crunch Cheesecake Recipe”)
3. `https://easilycooked.com/no-bake-oreo-cheesecake/` (Anchor: “No-Bake Oreo Cheesecake”)
All seem well integrated. The tone is warm, conversational, uses “you” and “I”, simple language. The structure follows the request.
The external Pinterest link is at the very end.
Looks good.
The Ultimate Strawberry Crunch Stuffed Cheesecake: A Sweet, Creamy Dream!
Oh my goodness, friend, do I have a treat for you today! There are some desserts that just take you right back to childhood, aren’t there? That first bite of a strawberry ice cream bar, the delightful crunch, the creamy sweetness… pure magic! Well, imagine all that nostalgic bliss, but elevated to a sophisticated, show-stopping cheesecake. That’s exactly what we’re whipping up today: a Strawberry Crunch Stuffed Cheesecake! This isn’t just any dessert; it’s a creamy, dreamy, crunchy masterpiece that will have everyone asking for seconds. It’s surprisingly easy to make, promises to be super memorable, and trust me, it tastes even better than it looks. Speaking of strawberries, if you’ve ever tried my Strawberry Cheesecake Stuffed Cookies, you know I love combining these flavors, and this cheesecake takes that love to a whole new level!
Why You’ll Love Strawberry Crunch Stuffed Cheesecake
- Fast: While there’s chill time, the active prep is surprisingly quick!
- Easy: No fancy techniques here, just simple mixing and layering.
- Giftable: Perfect for potlucks, birthdays, or a thoughtful homemade present.
- Crowd-pleasing: Who can resist the allure of strawberry, cheesecake, and a delightful crunch?
Ingredients
Gather your cozy kitchen essentials, and let’s get ready to create some magic!
- Graham Cracker Crumbs: 2 cups. The classic foundation for our cheesecake. You can buy them pre-crushed or crush your own graham crackers – super easy!
- Unsalted Butter, Melted: 1/2 cup (for the crust) and 1/4 cup (for the topping). Melting gives us that perfect binding and richness.
- Granulated Sugar: 2 tbsp (for the crust) and 1 cup (for the filling). Just enough sweetness to balance everything out.
- Cream Cheese, Softened: 16 oz (two 8 oz blocks). Make sure it’s wonderfully soft! This is key for a silky-smooth cheesecake without lumps.
- Sour Cream: 1/2 cup. Adds a lovely tang and extra creaminess to our cheesecake.
- Large Eggs: 2. These are the binders for our luscious filling.
- Vanilla Extract: 1 tsp. A splash of pure vanilla is always a good idea in any sweet treat.
- All-Purpose Flour: 1 tbsp. A little secret ingredient to help prevent those pesky cheesecake cracks.
- Strawberry Pie Filling: 1 can (21 oz). This is where the magic happens! Canned makes it super simple, but feel free to whip up your own homemade if you’re feeling ambitious.
- Vanilla Wafer Crumbs: 1/2 cup. These add a delicate sweetness and texture to our crunch topping.
- Freeze-Dried Strawberries, Crushed: 1/2 cup. The secret weapon for that vibrant strawberry flavor and incredible crunch! Don’t skip these; they make all the difference.
How to Make Strawberry Crunch Stuffed Cheesecake
Let’s get cooking! Follow these steps, and you’ll have a gorgeous dessert ready in no time.
Prepare the Crust:
- First things first, grab a medium-sized bowl. Toss in your graham cracker crumbs, the first portion of melted butter, and 2 tablespoons of granulated sugar. Give it a good mix until everything is wonderfully combined and looks like wet sand.
- Now, take your 8×8-inch pan (or if you’re making individual servings, use your chosen containers). Press that delicious crumb mixture firmly into the bottom. Really get in there with the back of a spoon or your clean hands to make a nice, even layer.
- Pop that crust into the refrigerator to chill while we move on to the star of the show: the cheesecake filling!
Prepare the Cheesecake Filling:
- Preheat your oven to 325°F (163°C).
- In a large mixing bowl, beat your softened cream cheese and the remaining 1 cup of granulated sugar together. You want this to be super smooth and creamy, so beat it until there are no lumps left.
- Next, add in the sour cream, eggs, vanilla extract, and that tablespoon of all-purpose flour. Mix gently until just combined. Be careful not to overmix here, as that can lead to cracks in your cheesecake.
- Carefully pour your creamy cheesecake mixture over the chilled crust in your pan.
- Bake for about 40–45 minutes. You’ll know it’s ready when the edges are set, but the center still has a slight jiggle. That jiggle is good – it means it will be perfectly creamy!
- Once baked, let the cheesecake cool completely at room temperature. Patience is key here, my friend! After it’s cooled, transfer it to the refrigerator and let it chill for at least 4 hours, or even better, overnight. This is crucial for it to set properly and taste its best.
Add the Strawberry Filling:
- After your cheesecake has had its beauty sleep in the fridge, it’s time for the strawberry layer! Open that can of strawberry pie filling and evenly spread it right over the top of your perfectly chilled cheesecake. It’s that easy!
Prepare the Crunch Topping:
- In a clean bowl, combine your vanilla wafer crumbs, the crushed freeze-dried strawberries, and the remaining 1/4 cup of melted butter. Mix everything together until it’s beautifully combined and crumbly.
- Now, sprinkle this amazing crunch topping evenly over the strawberry layer. Make sure every slice gets some of that glorious texture! Once you taste this topping, you’ll understand why it’s so beloved! If you adore the strawberry crunch theme as much as I do, you’ll also want to explore my Berrilicious Strawberry Crunch Cheesecake Recipe for another delightful variation.
Substitutions & Additions
The beauty of a recipe like this is how adaptable it is! Feel free to get creative and make it your own.
- Crust Variations: Not a fan of graham crackers? You could use crushed vanilla wafers, shortbread cookies, or even chocolate cookies for a different spin.
- Cheesecake Flavor Boost: A little lemon zest in the cheesecake batter can add a lovely brightness. You could also swap a bit of the vanilla extract for almond extract for a subtle, sophisticated flavor.
- Fruit Filling Fun: While strawberry is divine, imagine this with cherry, blueberry, or even peach pie filling! For a fresher take, you can use fresh berries mixed with a little sugar and cornstarch, cooked down into a compote.
- Crunch Topping Upgrades: Feel free to add a drizzle of white chocolate over the finished crunch topping for extra decadence. A tiny pinch of cinnamon in the crunch mix also adds a warm, unexpected note.
- Individual Servings: Instead of one large cheesecake, use muffin tins with cupcake liners or small ramekins for adorable mini cheesecakes! Just adjust baking time down. And if you’re in the mood for another easy, impressive dessert, especially one you don’t even need to bake, my No-Bake Oreo Cheesecake is always a hit!
Tips for Success
Making cheesecake can sometimes feel a little intimidating, but with these simple tips, yours will turn out perfect every single time!
- Room Temperature Ingredients are Key: This is probably the most important tip! Make sure your cream cheese and eggs are at room temperature. This helps everything blend smoothly and prevents lumps, giving you that dreamy, silky texture.
- Don’t Overmix: Once you add the eggs and flour to the cream cheese mixture, mix just until combined. Overmixing can incorporate too much air, which can cause your cheesecake to puff up and then fall, leading to cracks.
- Chill, Chill, Chill: Seriously, the chilling time is not just a suggestion; it’s essential! It allows the cheesecake to firm up and fully set, giving you clean, beautiful slices.
- Preventing Cracks: Beyond not overmixing, some bakers like to use a water bath (placing the cheesecake pan in a larger pan of water while baking) to provide a moist environment. For this particular recipe, as long as you don’t overbake and let it cool slowly, you should be fine!
- Quality Matters: Using good quality cream cheese and real vanilla extract will really shine through in the final taste.
How to Store Strawberry Crunch Stuffed Cheesecake
So, you’ve made this incredible cheesecake, and now you want to make sure it stays perfect! Here’s how to keep it fresh:
- Refrigeration: Always store your Strawberry Crunch Stuffed Cheesecake in an airtight container in the refrigerator. This will keep it fresh and tasting great for about 3-5 days.
- Freezing: Good news! Cheesecake freezes beautifully. For best results, I recommend freezing individual slices. Wrap each slice tightly in plastic wrap, then again in aluminum foil. You can store them in the freezer for up to 1 month. When you’re ready for a treat, just thaw a slice in the refrigerator for a few hours or on the counter for about 30-60 minutes.
FAQs
Got questions? I’ve got answers!
Can I use fresh strawberries instead of pie filling?
Absolutely! If you want to use fresh strawberries, you’ll need to make a quick compote. Dice your fresh strawberries, simmer them with a little sugar and a splash of lemon juice until they break down, then thicken with a cornstarch slurry. Let it cool completely before spreading.
Why did my cheesecake crack?
Cheesecakes can crack for a few reasons: overmixing the batter (which incorporates too much air), overbaking (drying out the cheesecake), or rapid temperature changes during cooling. Follow my tips above, especially about not overmixing and letting it cool slowly, and you should be crack-free!
Can I make this cheesecake ahead of time?
Yes, please do! Cheesecake is one of those fantastic desserts that actually benefits from being made ahead. You can prepare the entire cheesecake (including the strawberry filling and crunch topping) a day in advance. This gives all the flavors time to meld and the cheesecake to set perfectly, making for an even more delicious experience.
What kind of pan works best?
An 8×8-inch square pan is perfect for this recipe, giving you nice, substantial slices. A 9-inch round springform pan also works great if you prefer round cheesecakes. Just be sure to press the crust firmly into the bottom and up the sides slightly if using a springform for easy removal.
For more delicious recipes and kitchen inspiration, be sure to follow us on Pinterest!

Strawberry Crunch Stuffed Cheesecake
Ingredients
Equipment
Method
- Step 1: Prepare the Crust. Grab a medium-sized bowl. Toss in your graham cracker crumbs, 1/2 cup of melted butter (for the crust), and 2 tablespoons of granulated sugar (for the crust). Give it a good mix until everything is wonderfully combined and looks like wet sand.
- Step 2: Take your 8x8-inch pan. Press that delicious crumb mixture firmly into the bottom. Really get in there with the back of a spoon or your clean hands to make a nice, even layer.
- Step 3: Pop that crust into the refrigerator to chill while you prepare the cheesecake filling.
- Step 4: Prepare the Cheesecake Filling. Preheat your oven to 325°F (163°C).
- Step 5: In a large mixing bowl, beat your softened cream cheese and 1 cup of granulated sugar (for the filling) together until super smooth and creamy, with no lumps left.
- Step 6: Next, add in the sour cream, eggs, vanilla extract, and the tablespoon of all-purpose flour. Mix gently until just combined. Be careful not to overmix here, as that can lead to cracks in your cheesecake.
- Step 7: Carefully pour your creamy cheesecake mixture over the chilled crust in your pan.
- Step 8: Bake for about 40–45 minutes. You'll know it's ready when the edges are set, but the center still has a slight jiggle. That jiggle is good – it means it will be perfectly creamy!
- Step 9: Once baked, let the cheesecake cool completely at room temperature. After it's cooled, transfer it to the refrigerator and let it chill for at least 4 hours, or even better, overnight. This is crucial for it to set properly and taste its best.
- Step 10: Add the Strawberry Filling. After your cheesecake has had its beauty sleep in the fridge, it's time for the strawberry layer! Open that can of strawberry pie filling and evenly spread it right over the top of your perfectly chilled cheesecake. It’s that easy!
- Step 11: Prepare the Crunch Topping. In a clean bowl, combine your vanilla wafer crumbs, the crushed freeze-dried strawberries, and the remaining 1/4 cup of melted butter (for the topping). Mix everything together until it’s beautifully combined and crumbly.
- Step 12: Now, sprinkle this amazing crunch topping evenly over the strawberry layer. Make sure every slice gets some of that glorious texture!
Notes
- Crust Variations: Not a fan of graham crackers? You could use crushed vanilla wafers, shortbread cookies, or even chocolate cookies for a different spin.
- Cheesecake Flavor Boost: A little lemon zest in the cheesecake batter can add a lovely brightness. You could also swap a bit of the vanilla extract for almond extract for a subtle, sophisticated flavor.
- Fruit Filling Fun: While strawberry is divine, imagine this with cherry, blueberry, or even peach pie filling! For a fresher take, you can use fresh berries mixed with a little sugar and cornstarch, cooked down into a compote.
- Crunch Topping Upgrades: Feel free to add a drizzle of white chocolate over the finished crunch topping for extra decadence. A tiny pinch of cinnamon in the crunch mix also adds a warm, unexpected note.
- Individual Servings: Instead of one large cheesecake, use muffin tins with cupcake liners or small ramekins for adorable mini cheesecakes! Just adjust baking time down. And if you're in the mood for another easy, impressive dessert, especially one you don't even need to bake, my No-Bake Oreo Cheesecake is always a hit!
- Room Temperature Ingredients are Key: Make sure your cream cheese and eggs are at room temperature. This helps everything blend smoothly and prevents lumps, giving you that dreamy, silky texture.
- Don't Overmix: Once you add the eggs and flour to the cream cheese mixture, mix just until combined. Overmixing can incorporate too much air, which can cause your cheesecake to puff up and then fall, leading to cracks.
- Chill, Chill, Chill: Seriously, the chilling time is not just a suggestion; it's essential! It allows the cheesecake to firm up and fully set, giving you clean, beautiful slices.
- Preventing Cracks: Beyond not overmixing, some bakers like to use a water bath (placing the cheesecake pan in a larger pan of water while baking) to provide a moist environment. For this particular recipe, as long as you don't overbake and let it cool slowly, you should be fine!
- Quality Matters: Using good quality cream cheese and real vanilla extract will really shine through in the final taste.
- Refrigeration: Always store your Strawberry Crunch Stuffed Cheesecake in an airtight container in the refrigerator. This will keep it fresh and tasting great for about 3-5 days.
- Freezing: Good news! Cheesecake freezes beautifully. For best results, I recommend freezing individual slices. Wrap each slice tightly in plastic wrap, then again in aluminum foil. You can store them in the freezer for up to 1 month. When you're ready for a treat, just thaw a slice in the refrigerator for a few hours or on the counter for about 30-60 minutes.
- Can I use fresh strawberries instead of pie filling? Absolutely! If you want to use fresh strawberries, you’ll need to make a quick compote. Dice your fresh strawberries, simmer them with a little sugar and a splash of lemon juice until they break down, then thicken with a cornstarch slurry. Let it cool completely before spreading.
- Why did my cheesecake crack? Cheesecakes can crack for a few reasons: overmixing the batter (which incorporates too much air), overbaking (drying out the cheesecake), or rapid temperature changes during cooling. Follow my tips above, especially about not overmixing and letting it cool slowly, and you should be crack-free!
- Can I make this cheesecake ahead of time? Yes, please do! Cheesecake is one of those fantastic desserts that actually benefits from being made ahead. You can prepare the entire cheesecake (including the strawberry filling and crunch topping) a day in advance. This gives all the flavors time to meld and the cheesecake to set perfectly, making for an even more delicious experience.
- What kind of pan works best? An 8x8-inch square pan is perfect for this recipe, giving you nice, substantial slices. A 9-inch round springform pan also works great if you prefer round cheesecakes. Just be sure to press the crust firmly into the bottom and up the sides slightly if using a springform for easy removal.


