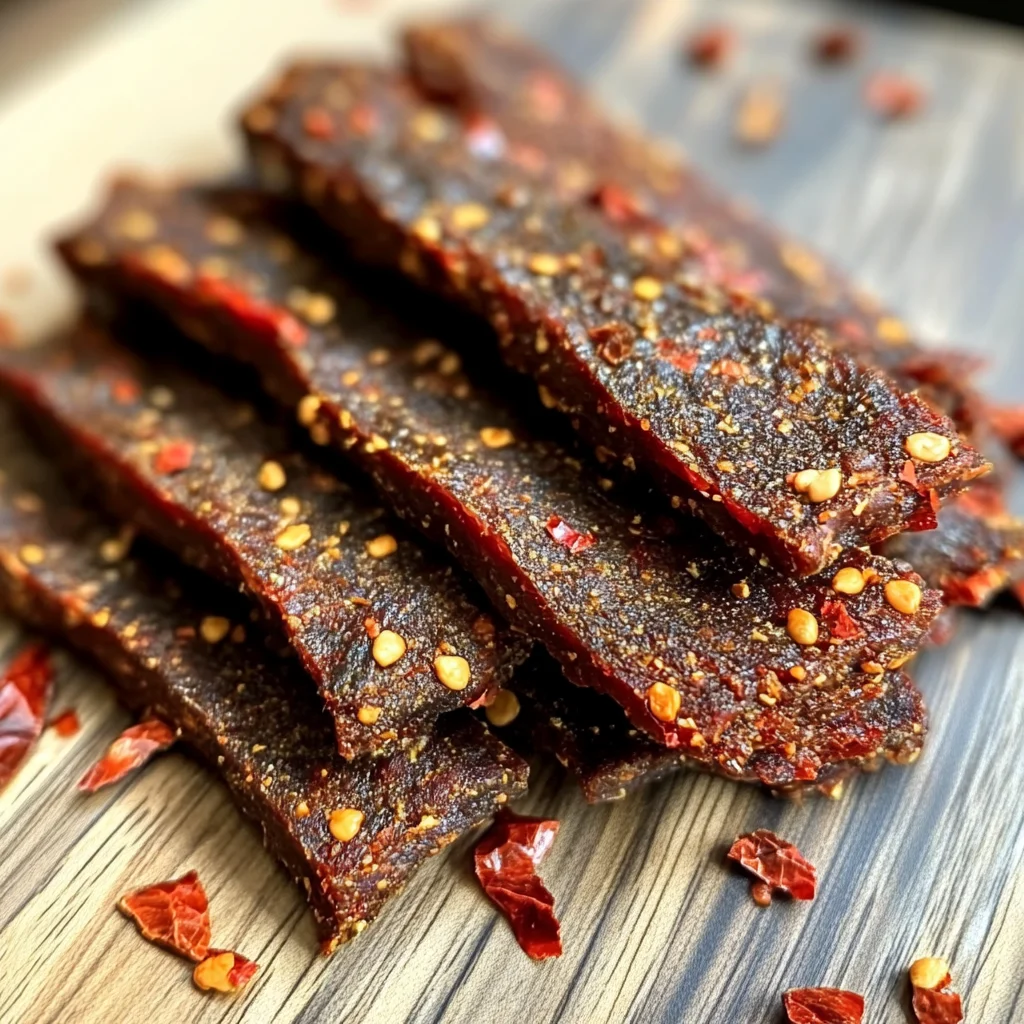
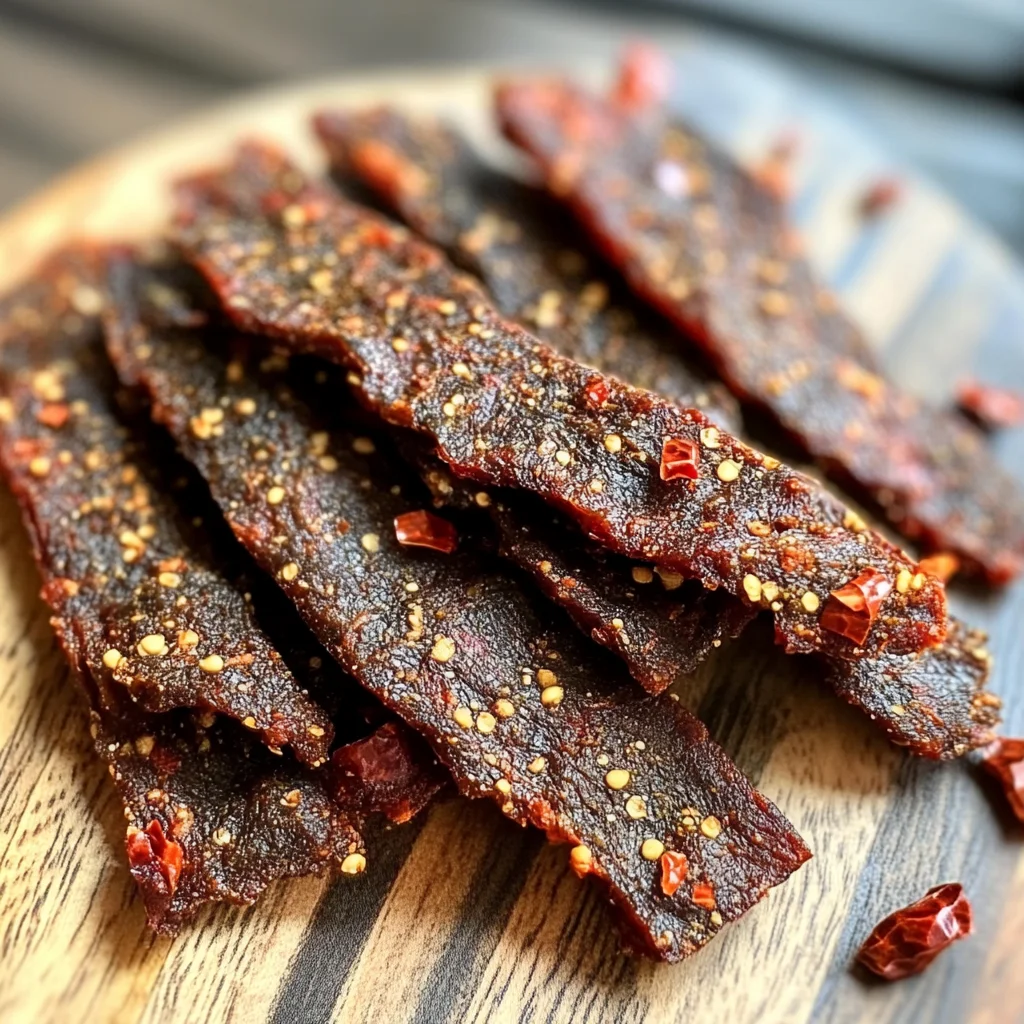
There’s just something incredibly satisfying about homemade jerky, isn’t there? For me, it evokes memories of crisp autumn days, the smell of woodsmoke, and the simple pleasure of a wholesome, flavorful snack after a long hike or a day spent outdoors. But even if your “wild game” comes from the local butcher, this recipe for Spicy Wild Game Jerky with Red Pepper Flakes will transport you straight to that cozy, rustic feeling. It’s an absolute game-changer, turning lean meat into a delicious, chewy, and perfectly spiced treat that’s unbelievably easy to make. Trust me, once you try homemade, you’ll never go back to store-bought!
Why You’ll Love Spicy Wild Game Jerky with Red Pepper Flakes
- Fast (mostly hands-off!)
- Easy (seriously, anyone can do it!)
- Giftable (the perfect homemade present!)
- Crowd-pleasing (watch it disappear!)
Ingredients
- 1 lb wild game meat, thinly sliced: Think venison, elk, or even lean beef if wild game isn’t available. The thinner, the better for drying!
- 1/2 cup soy sauce: This gives us that essential umami and savory depth.
- 1/4 cup Worcestershire sauce: Adds a beautiful tang and complexity that’s classic in jerky.
- 2 tbsp brown sugar: Just enough sweetness to balance the salty and spicy notes.
- 1 tsp garlic powder: A pantry staple for a reason – provides a warm, savory base.
- 1 tsp onion powder: Enhances the savory flavor without adding chunky bits of onion.
- 1 tsp red pepper flakes: Here’s where our “spicy” comes in! Feel free to adjust to your heat preference.
- 1/2 tsp black pepper: A simple touch to round out the spice profile.
How to Make Spicy Wild Game Jerky with Red Pepper Flakes
Alright, let’s get this jerky party started! You’re going to be amazed at how simple this process is. Just follow these steps, and soon you’ll have a batch of incredibly flavorful, homemade jerky ready to enjoy.
- Whip Up the Marinade: Grab a nice, non-reactive bowl – that’s just a fancy way of saying glass or ceramic, not metal, so your marinade doesn’t react. Into this bowl, you’re going to whisk together your soy sauce, Worcestershire sauce, brown sugar, garlic powder, onion powder, red pepper flakes, and black pepper. Give it a good whisk until everything is nicely combined and the brown sugar has dissolved. This is the heart and soul of your jerky!
- Marinate the Meat: Now, take your beautifully thinly sliced wild game meat and add it to the marinade. Make sure every single piece gets thoroughly coated. You can use your hands (gloves recommended, especially if you have sensitive skin and the chili flakes are strong!), or a pair of tongs to really work it in.
- Let the Flavors Mingle: Cover your bowl – plastic wrap works perfectly – and pop it into the refrigerator. This is where the magic happens! Let it chill for at least 6-8 hours, or if you can plan ahead, leaving it overnight is even better. The longer it marinates, the more those amazing flavors will sink deep into the meat.
- Prep for Drying: Once your meat has had its flavor bath, take it out of the fridge. Remove the meat from the marinade, letting any excess liquid drip off. Critically, you need to pat that meat thoroughly dry with paper towels. I can’t stress this enough! Removing surface moisture is key to getting good, dry jerky and preventing it from cooking instead of dehydrating. Discard any leftover marinade.
- Arrange for Dehydration: Lay your marinated and patted-dry meat in a single layer on your dehydrator trays or oven racks. The trick here is to make sure there’s enough space between each piece for air to circulate properly. Don’t overcrowd the trays; if you have too much meat, work in batches.
- Dehydrate ’til Perfect: Now for the drying!
- Using a Food Dehydrator: Set your dehydrator to 160°F (71°C). Let it run until your jerky is dry, pliable, and when you bend a piece, it tears rather than snaps cleanly. This usually takes about 3-6 hours, but thinner slices will be quicker.
- Using an Oven: If you’re using an oven, preheat it to its lowest setting, usually around 160-170°F (71-77°C). To ensure air circulation, prop the oven door slightly ajar with a wooden spoon. Arrange your meat directly on oven racks with a baking sheet underneath to catch any drips. This method can take a bit longer, often 4-8 hours. Check frequently!
You’ll know it’s done when it’s firm, chewy, and looks like, well, jerky! There shouldn’t be any soft, raw spots.
- Cool and Store: Once your jerky is perfectly dehydrated, let it cool completely to room temperature. This is important for preventing condensation and maintaining freshness.
Substitutions & Additions
The beauty of homemade jerky is how adaptable it is! Don’t be afraid to make it your own.
- Meat Swaps: Not a wild game enthusiast? No problem! This recipe works wonderfully with lean cuts of beef like top round or flank steak. You can even try it with turkey breast, sliced thinly.
- Spice It Up (or Down!): If you love a serious kick, double up on those red pepper flakes or add a dash of cayenne pepper. For a smoky flavor, a teaspoon of smoked paprika would be amazing. If you’re looking for something less spicy, simply reduce or omit the red pepper flakes.
- Flavor Boosters: A splash of liquid smoke can add a campfire aroma. A teaspoon of honey or maple syrup could enhance the sweetness, creating a sweet and spicy jerky. For an Asian twist, a hint of ginger powder or a tablespoon of sesame oil in the marinade would be fantastic. If you’re a fan of bold, savory flavors like this, you might also love whipping up some Spicy Honey Mustard Chicken Strips for dinner sometime.
- Herbaceous Notes: While we’re celebrating wild game here, don’t be shy about experimenting! A pinch of dried thyme or rosemary can complement certain wild game beautifully, just like how versatile our Egg Roll in a Bowl recipe is for various proteins.
Tips for Success
- Slice it Thin and Even: This is probably the most crucial tip! Uniformly thin slices (about 1/8 to 1/4 inch thick) ensure that all your jerky dries at the same rate, preventing some pieces from being over-dried while others are still too moist. Partially freezing the meat for 30-60 minutes before slicing can make this task much easier.
- Pat Dry, Pat Dry, Pat Dry! I’m going to say it again because it’s that important. Removing as much surface moisture as possible before dehydrating helps reduce drying time and improves the texture and shelf life of your jerky.
- Don’t Overcrowd: Give your meat pieces their space! Proper air circulation is essential for even drying. If your dehydrator or oven racks are too full, the air won’t be able to reach all surfaces, leading to uneven drying. Work in batches if necessary.
- Check for Doneness: Jerky shouldn’t be brittle, but it also shouldn’t feel soft or squishy. It should be pliable, but when you bend it, it should crack rather than snap. If you see any white fibers when you bend it, it’s a good sign it’s done.
- Rotate Trays: If using a dehydrator or oven, rotating the trays or flipping the jerky halfway through the drying process can help ensure even drying, especially if your equipment has hot spots.
How to Store Spicy Wild Game Jerky with Red Pepper Flakes
Once you’ve gone to all the effort to make this incredible jerky, you want to make sure it stays fresh and delicious!
- Cool Completely: Before storing, ensure your jerky has cooled completely to room temperature. Storing warm jerky can create condensation, which leads to spoilage.
- Airtight is Key: Store your jerky in an airtight container or a resealable freezer bag. This prevents moisture from getting in (or out!) and keeps it fresh.
- Room Temperature: For up to two weeks, homemade jerky can be stored at room temperature in a cool, dark pantry. If you live in a very humid environment, or if you’re unsure about how dry your jerky truly is, I lean towards refrigeration.
- Refrigeration: For extended storage, up to 1-2 months, keep your jerky in the refrigerator.
- Freezing: For the longest shelf life, you can freeze jerky for up to 6 months. Just be sure it’s in a freezer-safe bag or container to prevent freezer burn. Thaw at room temperature when you’re ready for a snack.
FAQs
What kind of wild game meat is best for jerky?
Lean cuts are always best for jerky! Venison, elk, moose, and even antelope are fantastic choices because they have very little fat, which can go rancid and shorten your jerky’s shelf life. If you’re using beef, opt for lean cuts like top round, bottom round, or flank steak.
How thinly should I slice the meat?
Aim for slices about 1/8 to 1/4 inch thick. Consistency is key for even drying! If your meat is a bit tricky to slice, try popping it in the freezer for about 30 minutes to an hour until it’s firm but not fully frozen. This makes slicing much easier.
Can I make this jerky without a dehydrator?
Absolutely! Your oven can do the trick. Just set it to its lowest temperature (usually around 160-170°F or 71-77°C) and prop the door open slightly with a wooden spoon. This allows moisture to escape and prevents the meat from cooking. You’ll need to keep a closer eye on it, as oven drying can be a bit faster or slower depending on your particular oven.
Why is patting the meat dry so important?
Patting the meat dry with paper towels removes excess surface moisture, which significantly reduces the drying time. Less moisture means less chance of bacteria growth and a better, chewier texture for your finished jerky. It’s a small step that makes a big difference!
For more delicious recipes and kitchen tips, follow us on Pinterest!
Spicy Wild Game Jerky with Red Pepper Flakes
Ingredients
Equipment
Method
- Step 1: Whip Up the Marinade: In a non-reactive bowl (glass or ceramic), whisk together soy sauce, Worcestershire sauce, brown sugar, garlic powder, onion powder, red pepper flakes, and black pepper until nicely combined and the brown sugar has dissolved.
- Step 2: Marinate the Meat: Add your thinly sliced wild game meat to the marinade. Ensure every piece is thoroughly coated, using hands (gloves recommended) or tongs to work it in.
- Step 3: Let the Flavors Mingle: Cover the bowl with plastic wrap and refrigerate for at least 6-8 hours, or preferably overnight, to allow the flavors to sink into the meat.
- Step 4: Prep for Drying: Remove the marinated meat from the refrigerator. Take the meat out of the marinade, letting any excess liquid drip off. Critically, pat the meat thoroughly dry with paper towels to remove surface moisture. Discard any leftover marinade.
- Step 5: Arrange for Dehydration: Lay your marinated and patted-dry meat in a single layer on your dehydrator trays or oven racks. Ensure there’s enough space between each piece for air to circulate properly. Don't overcrowd the trays; work in batches if necessary.
- Step 6: Dehydrate 'til Perfect: For a food dehydrator, set to 160°F (71°C) and dry for 3-6 hours. If using an oven, preheat to its lowest setting (160-170°F / 71-77°C), prop the door slightly ajar with a wooden spoon for air circulation, and dry for 4-8 hours. The jerky is done when it's firm, chewy, pliable (tears rather than snaps cleanly), and has no soft, raw spots.
- Step 7: Cool and Store: Once perfectly dehydrated, let the jerky cool completely to room temperature. This prevents condensation and maintains freshness. Store in an airtight container or a resealable freezer bag at room temperature for up to two weeks, in the refrigerator for 1-2 months, or frozen for up to 6 months.