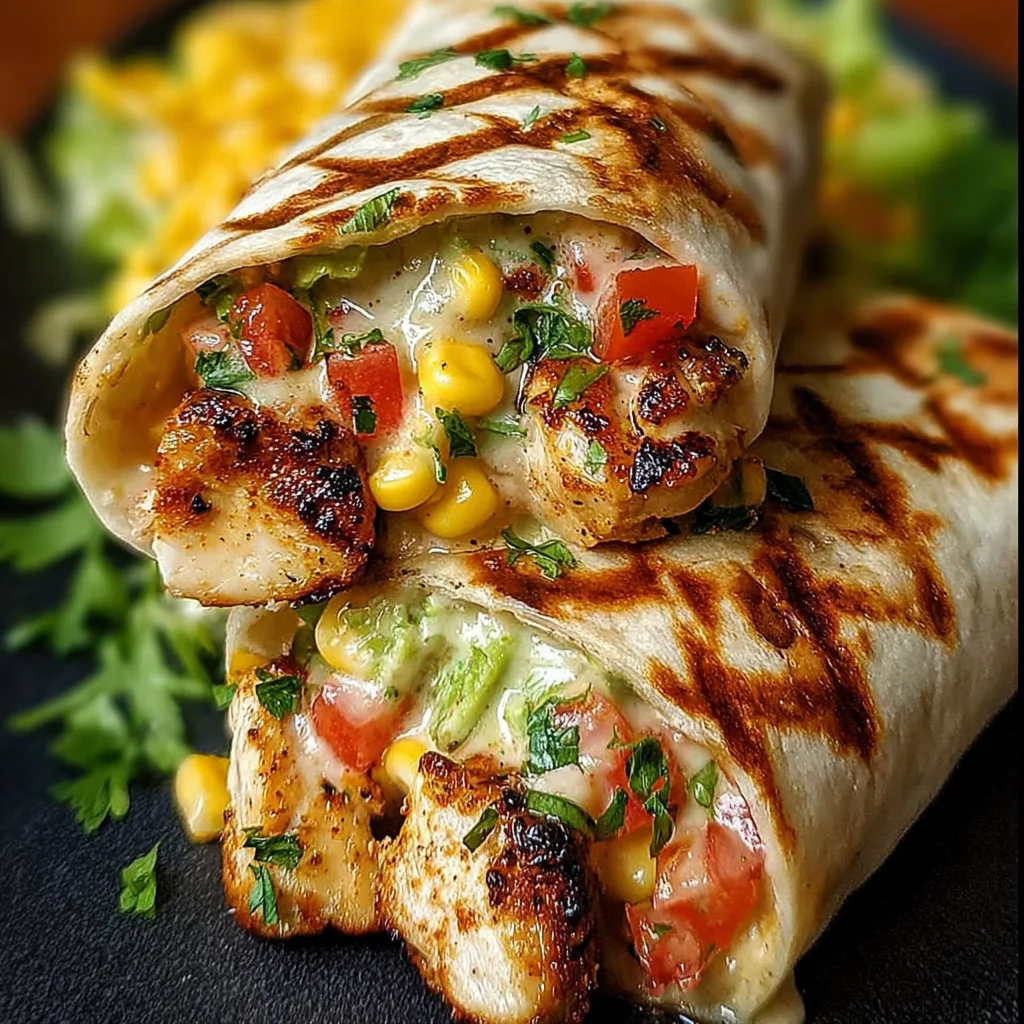
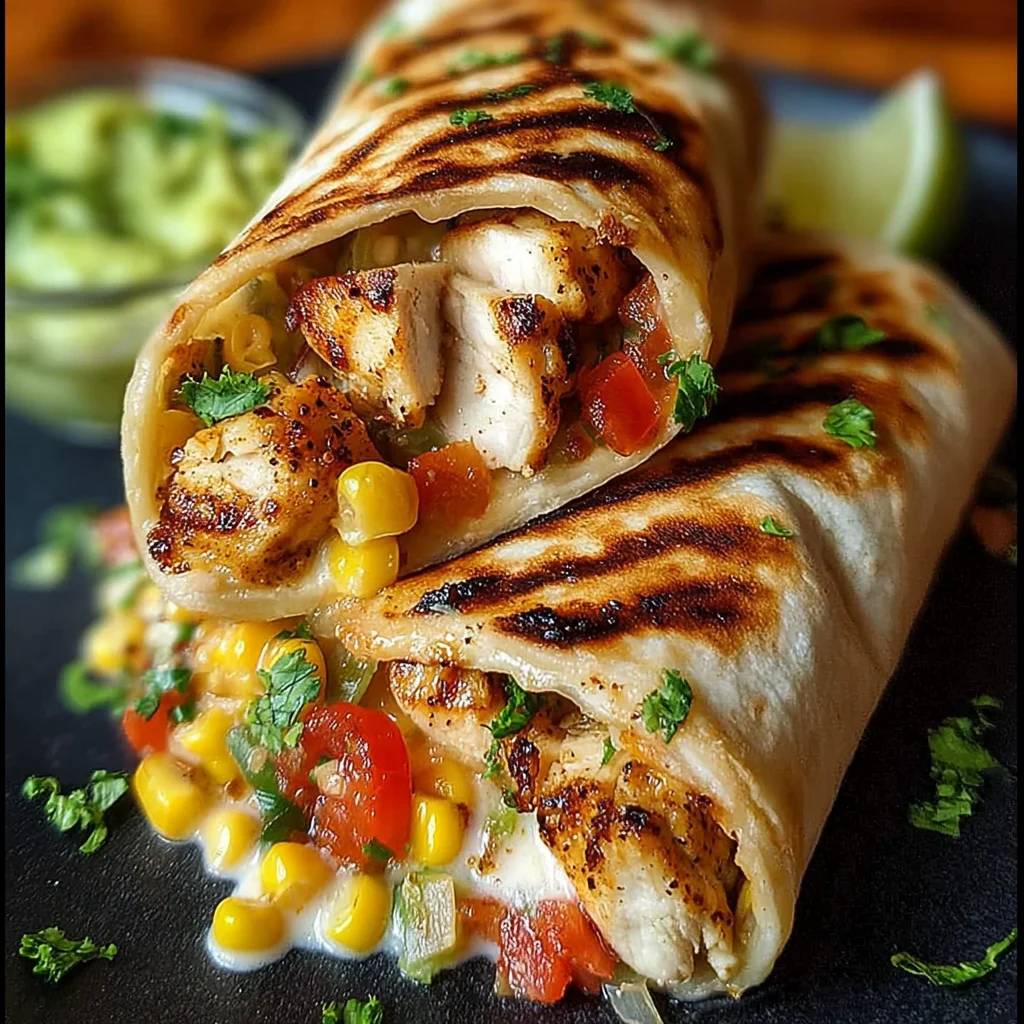
Hey there, friend! Let’s talk about those meals that just hit the spot, you know? The kind that are packed with vibrant flavors, feel fresh and satisfying, and somehow come together in a flash. For me, these Southwest Grilled Chicken Wraps are exactly that. They remind me of sunny days, maybe a favorite food truck discovery, but honestly, they’re even better because you can make them right in your own kitchen with minimal fuss. They’re spicy, smoky, creamy, and crunchy – basically, everything you want in a bite! Trust me, once you try these, they’re going to be on repeat in your dinner rotation.
Why You’ll Love This Recipe
- Fast & Easy: Seriously, dinner is on the table in under 30 minutes. Perfect for busy weeknights!
- Packed with Flavor: The combination of smoky grilled chicken, zesty salsa, creamy dressing, and fresh veggies is just unbeatable.
- Perfect for Lunchboxes or Picnics: Wrap them up and take them on the go! A much-needed upgrade from a sad desk salad.
- Crowd-Pleasing: Kids and adults alike devour these. Set up a little topping bar and let everyone customize!
- Healthyish & Fresh: Full of lean protein, veggies, and fiber. You feel good eating them.
Ingredients
Gathering your ingredients for these wraps is a breeze. Most of these are probably already hanging out in your pantry and fridge!
- Boneless, Skinless Chicken Breasts: About 2 medium ones. These grill up quickly and are perfect for slicing.
- Olive Oil: Just a tablespoon to help that gorgeous spice rub stick and keep the chicken moist.
- Chili Powder, Cumin, Garlic Powder, Paprika: Your dream team for that classic Southwest smoky, savory flavor. Don’t be shy with these!
- Salt and Pepper: The essentials! Season generously to make those flavors pop.
- Large Flour Tortillas: Get the soft, pliable kind that are easy to roll. Mission-style or similar works great.
- Cooked Corn: About a cup. Canned, frozen (thawed), or fresh off the cob – whatever you have is fine. Adds a little sweetness and texture.
- Black Beans: A cup, rinsed and drained. Earthy, satisfying, and full of fiber.
- Shredded Lettuce: Adds that essential crunch and freshness. Romaine or iceberg works well.
- Diced Tomatoes or Salsa: About half a cup. Adds juicy brightness. Use your favorite salsa for an extra kick!
- Shredded Cheese: Half a cup of cheddar or a Mexican blend. Because cheese makes everything better, right?
- Sour Cream or Ranch Dressing: A quarter cup for that creamy, cool element that brings it all together. Use your preferred swirl!
- Optional: Avocado Slices or Guacamole: Highly, highly recommended! Adds creamy richness.
How to Make It
Okay, let’s get cooking! This part is super straightforward.
-
First things first, let’s get that chicken marinated! Grab a bowl and toss your boneless, skinless chicken breasts in there. Drizzle with the olive oil, then sprinkle generously with the chili powder, cumin, garlic powder, paprika, salt, and pepper. Get your hands in there (or use tongs!) and make sure the chicken is really well coated in all those yummy spices. Let it hang out for at least 10 minutes while you get your grill ready. If you have more time, you can let it marinate in the fridge for a few hours for even deeper flavor!
-
Heat up your grill pan or outdoor grill over medium heat. You want it nice and hot so you get those beautiful grill marks. Carefully place the seasoned chicken breasts on the hot grill. Cook them for about 5–6 minutes per side. The exact time depends on the thickness, but you want them cooked through (no pink inside!) and nicely charred on the outside. I always recommend using a meat thermometer – chicken is done at 165°F (74°C). Once cooked, transfer the chicken to a cutting board and let it rest for about 5 minutes. This is crucial! It keeps the chicken juicy. After resting, slice the chicken thinly against the grain.
-
While the chicken rests, give your tortillas a quick warm-up. You can do this in a dry skillet over low heat for 15-30 seconds per side until they’re soft and pliable, or wrap them in a damp paper towel and microwave for about 20-30 seconds. Warm tortillas are key to easy rolling without tearing!
-
Now for the fun part – assembly! Lay a warm tortilla flat. Start layering your fillings down the center, leaving space on the sides for folding. I like to start with a bed of shredded lettuce, then pile on the corn, black beans, tomatoes (or salsa), shredded cheese, and finally, those gorgeous slices of grilled chicken.
-
Time for the creamy goodness! Drizzle your sour cream or ranch dressing over the fillings. If you’re using avocado slices or guacamole (and I hope you are!), add those now too.
-
Alright, time to roll! This takes a little practice, but you’ll get the hang of it. Fold in the sides of the tortilla first, just enough to tuck in the fillings. Then, starting from the end closest to you, roll the tortilla up tightly, tucking the filling in as you go. Once rolled, slice it in half with a sharp knife. Now, behold your beautiful Southwest Grilled Chicken Wrap! Repeat with the remaining tortillas and fillings. Serve immediately and watch them disappear!
Substitutions & Additions
One of the best things about wraps is how customizable they are! Feel free to mix and match based on what you have or what you love.
- Protein Swap: Not feeling chicken? Try grilled shrimp, steak, or even crispy baked tofu. For a vegetarian option, double up on the black beans and add some roasted sweet potatoes or peppers and onions.
- Tortilla Talk: Use whole wheat tortillas for extra fiber, or even gluten-free wraps. If you’re brave and can roll them, warm corn tortillas offer a different flavor profile (they tend to break easier though!).
- Veggie Power: Add diced bell peppers (fresh or sautéed), thinly sliced red onion, or roasted zucchini. Swap diced tomatoes for a scoop of fresh pico de gallo.
- Cheese Please: Pepper Jack cheese would add a nice little kick! Cotija cheese is also fantastic.
- Sauce It Up: Instead of sour cream or ranch, try chipotle mayo, a simple lime crema (sour cream mixed with lime juice), or just a squeeze of fresh lime over everything. A dash of your favorite hot sauce is always a good idea!
- Add Crunch: Crumble a few tortilla chips inside before rolling for a fun texture contrast.
- Make it a Bowl: Skip the tortilla and pile all the ingredients over a bed of rice or quinoa for a delicious and hearty bowl!
Tips for Success
A few little pointers to make sure your wraps are absolutely perfect every time!
- Don’t Skip the Rest! Letting the chicken rest after grilling is key to juicy chicken. Cutting it too soon lets all the juices run out.
- Warm Tortillas are Happy Tortillas: Cold tortillas tear easily when you try to roll them. A quick warm-up makes them pliable and easy to handle.
- Don’t Overstuff: It’s tempting to cram them full, but overstuffing makes rolling difficult and messy. Spread your fillings strategically down the center.
- Prep Ahead: You can cook and slice the chicken, chop the lettuce and tomatoes, and rinse the beans ahead of time. Store everything separately in the fridge, and assembly is even faster!
- Adjust the Spice: The spice rub is pretty mild, but feel free to add a pinch of cayenne pepper if you like more heat. Or drizzle with a spicy salsa!
How to Store It
These wraps are definitely best enjoyed fresh when the tortillas are soft and the fillings are crisp. However, if you have leftovers or are meal prepping, here’s the best way to handle them:
- Components Separate: The absolute best way to store is to keep the grilled chicken, veggies, cheese, and sauces in separate airtight containers in the fridge. This keeps everything fresh and prevents the tortillas from getting soggy. They’ll last 3-4 days stored this way.
- Assembled Wraps: If you have a fully assembled wrap leftover, wrap it tightly in plastic wrap or foil and store in the fridge. It will still be good the next day, but the lettuce might wilt slightly, and the tortilla can soften. It’s still perfectly edible and tasty though!
FAQs
Got questions? I’ve got answers!
Can I bake the chicken instead of grilling?
Absolutely! Toss the seasoned chicken on a baking sheet lined with parchment paper. Bake at 400°F (200°C) for 20-25 minutes, or until cooked through, flipping halfway. Let it rest before slicing.
Can I make these vegetarian?
Yes! Simply omit the chicken and add extra black beans, corn, and maybe some roasted sweet potatoes, bell peppers, or onions tossed with the same Southwest spices. They are delicious meatless!
Are these good for meal prep?
Definitely! Cook the chicken, chop the veggies, and portion everything into separate containers. Then, just grab a tortilla and assemble your wrap fresh when you’re ready to eat. It keeps everything much fresher.
What kind of salsa should I use?
Any kind you love! A fresh pico de gallo is great, a mild chunky salsa works perfectly, or use a spicier roasted salsa if you like heat. It’s all about your preference!

Southwest Grilled Chicken Wraps
Ingredients
Equipment
Method
- Step 1: Season chicken breasts: In a bowl, toss chicken with olive oil, chili powder, cumin, garlic powder, paprika, salt, and pepper, ensuring they are well coated. Marinate for at least 10 minutes while you heat the grill.
- Step 2: Grill chicken: Heat a grill pan or outdoor grill over medium heat. Grill chicken for about 5–6 minutes per side, or until cooked through (internal temperature of 165°F / 74°C) and nicely charred. Transfer to a cutting board and let rest for about 5 minutes before slicing thinly against the grain.
- Step 3: Warm tortillas: While the chicken rests, warm the tortillas in a dry skillet over low heat for 15-30 seconds per side, or wrap in a damp paper towel and microwave for 20-30 seconds, until soft and pliable.
- Step 4: Assemble wraps: Lay a warm tortilla flat. Layer shredded lettuce, corn, black beans, diced tomatoes or salsa, shredded cheese, and sliced grilled chicken down the center, leaving space on the sides for folding.
- Step 5: Add creamy elements: Drizzle sour cream or ranch dressing over the fillings. Add avocado slices or guacamole if using.
- Step 6: Roll and serve: Fold in the sides of the tortilla, then roll up tightly from the bottom. Slice in half with a sharp knife. Repeat with remaining tortillas and fillings. Serve immediately.