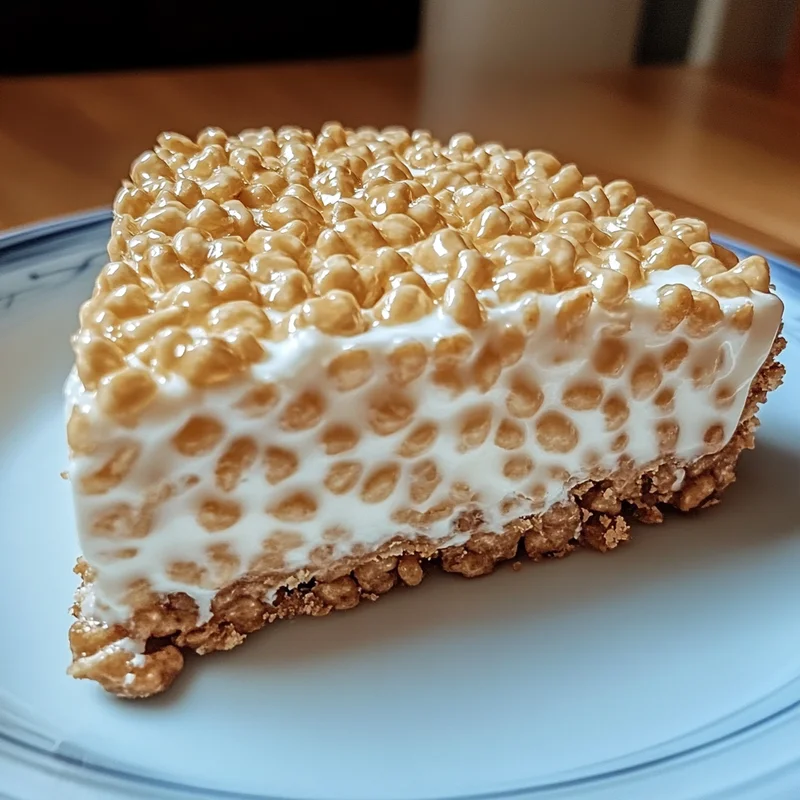
There’s something truly magical about Rice Krispie treats, isn’t there? As a kid, I remember sneaking into the kitchen to grab a gooey, crunchy square fresh from the pan, the marshmallow sweetness sticking just a little to my fingers. Now, imagine taking that nostalgic favorite and turning it into a dreamy, no-bake cheesecake that’s creamy, light, and perfect for any occasion. That’s exactly what this Rice Krispie Treat No-Bake Cheesecake delivers—a perfect blend of childhood memories and grown-up indulgence, without ever turning on your oven.
This recipe is not only a breeze to put together, but it’s also incredibly quick, making it an ideal go-to for last-minute parties, family gatherings, or a cozy weekend treat. The best part? You only need a handful of ingredients, and it’s a guaranteed crowd-pleaser. So, roll up your sleeves and let’s dive into this fun, no-fuss dessert that brings the best of both worlds to your table.
Why You’ll Love Rice Krispie Treat No-Bake Cheesecake
- Fast: From start to fridge, you’re looking at under 30 minutes of hands-on time.
- Easy: No baking, no complicated steps—just simple mixing and chilling.
- Giftable: Wrapped in a pretty box or with a cute ribbon, this cheesecake makes a sweet homemade gift.
- Crowd-pleasing: Kids and adults alike will be reaching for seconds (or thirds!).
Ingredients
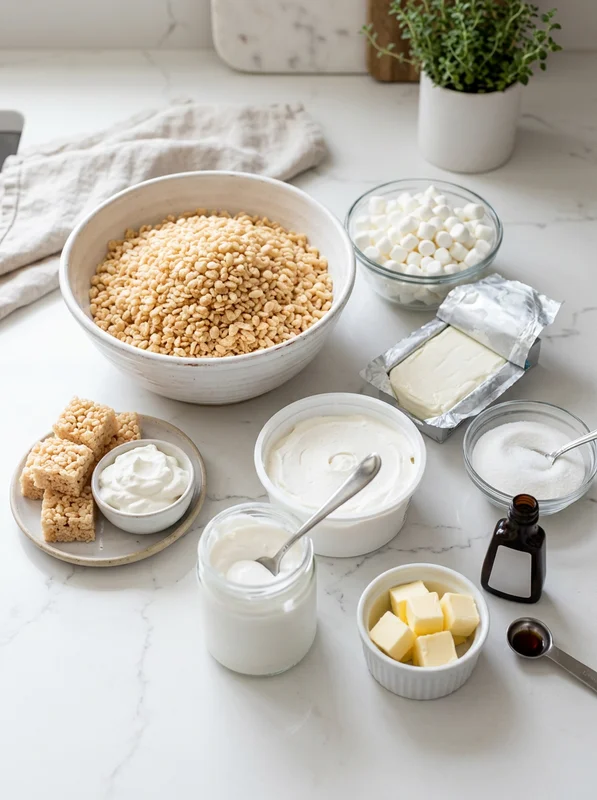
Let’s break down what you’ll need to create this delightful cheesecake. Each ingredient plays a special role:
- 6 cups Rice Krispies cereal: The crunchy base that brings that classic crispy texture.
- 1/4 cup butter: Adds richness and helps melt the marshmallows smoothly.
- 10 oz mini marshmallows: The glue that holds the crust together, giving it that gooey hug.
- 8 oz cream cheese, softened: The creamy heart of the filling, providing that rich, tangy cheesecake flavor.
- 1/2 cup granulated sugar: Sweetens the filling just right without overpowering.
- 1 tsp vanilla extract: Adds warmth and depth to the flavor.
- 7 oz marshmallow creme: Keeps the filling light and fluffy, adding a lovely sweetness.
- 8 oz whipped topping: Creates a smooth, airy finish for that perfect cheesecake texture.
- Optional: whipped cream and extra Rice Krispie cubes: For garnish and adding a fun crunch on top.
Before you start, make sure your cream cheese is soft to the touch. I usually take it out of the fridge about 30 minutes beforehand, or pop it in the microwave for 10-15 seconds if I’m in a hurry—it makes mixing so much easier!
How to Make Rice Krispie Treat No-Bake Cheesecake
Ready to get your hands sticky with some marshmallow magic? Follow these steps carefully, and I promise you’ll have a delicious cheesecake in no time!
- Grease your pan: Start by greasing a 9-10 inch springform pan. This will make it much easier to remove the cheesecake later. If you don’t have a springform pan, a regular pie dish works too, but springform is ideal for clean slices.
- Prepare the Rice Krispie crust: Pour the 6 cups of Rice Krispies cereal into a large mixing bowl. In a saucepan over low heat, melt the butter and mini marshmallows together. Stir constantly until smooth and fully melted. Be patient here; low and slow works best to avoid burning.
- Combine cereal and marshmallow mixture: Pour the melted marshmallow mixture over the cereal. Stir quickly but gently until every bit of cereal is fully coated in that luscious marshmallow gloss.
- Press the crust: Transfer the sticky mixture into your greased pan. Use a spatula or your fingers (lightly greased with butter or cooking spray to avoid sticking) to press the mixture evenly across the bottom and slightly up the sides, creating a sturdy crust. Don’t be shy—press firmly so it holds together well.
- Set the crust: Let the crust sit for about 20 minutes at room temperature. This allows it to firm up enough to hold the cheesecake filling without crumbling.
- Make the cheesecake filling: In a clean bowl, beat together the softened cream cheese, sugar, and vanilla extract until smooth and creamy—no lumps! Then add the marshmallow creme and mix well until fully incorporated. Finally, gently fold in the whipped topping. Take your time here; folding keeps the filling light and fluffy rather than dense.
- Assemble the cheesecake: Spread the creamy filling evenly over the set Rice Krispie crust. Smooth the top with a spatula for a lovely finish.
- Chill: Refrigerate your cheesecake for at least 2 hours, or until firm. This step is crucial for that perfect sliceable texture.
- Garnish and serve: Just before serving, decorate with dollops of whipped cream and sprinkle extra Rice Krispie cubes on top for crunch and charm. Slice carefully and enjoy chilled.
I love this cheesecake because it’s so versatile—you can get creative with toppings or even add a drizzle of chocolate or caramel sauce for extra indulgence. But honestly, it’s delicious as-is, too!
Substitutions & Additions
If you’re feeling adventurous or need to adapt the recipe, here are some fun swaps and upgrades that work beautifully:
- Cereal swap: Try using Cocoa Krispies or Fruity Pebbles for a colorful twist and added flavor.
- Butter alternative: Coconut oil can be a great dairy-free substitute if you’re avoiding butter.
- Sweetener changes: Swap granulated sugar for honey or maple syrup in the filling for a natural sweetness variation.
- Flavor boosts: Add a splash of lemon juice or zest to the cream cheese mixture for a bright, tangy note.
- Mix-ins: Fold in mini chocolate chips, crushed nuts, or chopped dried fruit into the filling for extra texture and flavor.
- Toppings: Fresh berries, chocolate shavings, or caramel drizzle take this cheesecake to restaurant-level decadence.
Personally, I once made this with a swirl of peanut butter in the filling and topped it with chopped peanuts—it was an instant hit at a family barbecue!
Tips for Success
To make sure your Rice Krispie Treat No-Bake Cheesecake turns out perfectly every time, keep these pointers in mind:
- Don’t skip softening the cream cheese: It ensures your filling is smooth without lumps.
- Use low heat for melting marshmallows: High heat can scorch them, creating a burnt taste.
- Press the crust firmly: This helps it hold its shape when you slice the cheesecake.
- Folding is key: When adding whipped topping, gently fold it in rather than stirring to keep the filling airy.
- Chill time matters: At least 2 hours in the fridge is essential for the cheesecake to set properly.
- Prep ahead: You can make the crust and filling a day in advance and refrigerate overnight for convenience.
One little trick I use: I line the pan with parchment paper before greasing it. It makes removing the cheesecake a breeze and keeps the sides looking neat!
How to Store Rice Krispie Treat No-Bake Cheesecake
After enjoying your cheesecake, it’s great to know how to keep it fresh and delicious for later. This cheesecake stores best in the refrigerator. Cover it tightly with plastic wrap or transfer it to an airtight container to prevent it from absorbing any fridge odors or drying out.
You can safely keep it refrigerated for up to 4 days. Beyond that, the crust may start to lose its crispness and the filling might separate a little. If you want to freeze it, slice it first and wrap individual pieces in plastic wrap and foil. Frozen cheesecake pieces keep well for up to a month—just thaw overnight in the fridge before enjoying.
Leftover Rice Krispie cubes on top? Keep those in an airtight container at room temperature—they’re best fresh but can last a few days crisp.
FAQs
Can I use regular marshmallows instead of mini marshmallows?
Absolutely! If you only have regular-sized marshmallows, just use about the same weight. They’ll melt just fine; you might want to chop them slightly to help them melt faster.
Do I have to use a springform pan?
While a springform pan is ideal for neat slices and easy removal, you can use a regular pie dish or cake pan. Just be aware that serving might be a bit messier.
Can I make this dairy-free?
Yes! Use a dairy-free butter substitute and a vegan cream cheese alternative. Also, check that your marshmallow creme is vegan-friendly, or substitute with a homemade marshmallow fluff recipe.
What’s the best way to slice this cheesecake?
Use a sharp knife dipped in hot water and wiped dry before slicing. This prevents sticking and helps you get clean, beautiful slices every time.
This recipe is such a comforting blend of textures and flavors. It’s the kind of dessert you’ll find yourself craving when you want something sweet, nostalgic, and fuss-free all at once. Whether you’re sharing it with family or gifting it to a friend, this no-bake cheesecake is sure to bring smiles around the table.
Don’t forget to follow my Pinterest for more delicious and easy recipes like this one!
Delightfully Easy Rice Krispie Treat No-Bake Cheesecake
Ingredients
Equipment
Method
- Step 1: Grease a 9-10 inch springform pan or pie dish to prepare for the crust.
- Step 2: In a large mixing bowl, pour the 6 cups of Rice Krispies cereal.
- Step 3: In a saucepan over low heat, melt the butter and mini marshmallows together, stirring constantly until smooth and fully melted without burning.
- Step 4: Pour the melted marshmallow mixture over the cereal and stir quickly but gently until all cereal is fully coated.
- Step 5: Transfer the sticky mixture into the greased pan and press firmly and evenly across the bottom and slightly up the sides to form a sturdy crust.
- Step 6: Let the crust sit at room temperature for about 20 minutes to firm up.
- Step 7: In a clean bowl, beat together softened cream cheese, sugar, and vanilla extract until smooth and creamy with no lumps.
- Step 8: Add marshmallow creme and mix well until fully incorporated.
- Step 9: Gently fold in whipped topping to keep the filling light and fluffy.
- Step 10: Spread the creamy filling evenly over the set Rice Krispie crust and smooth the top with a spatula.
- Step 11: Refrigerate the cheesecake for at least 2 hours or until firm.
- Step 12: Before serving, garnish with dollops of whipped cream and sprinkle extra Rice Krispie cubes on top. Slice carefully and serve chilled.