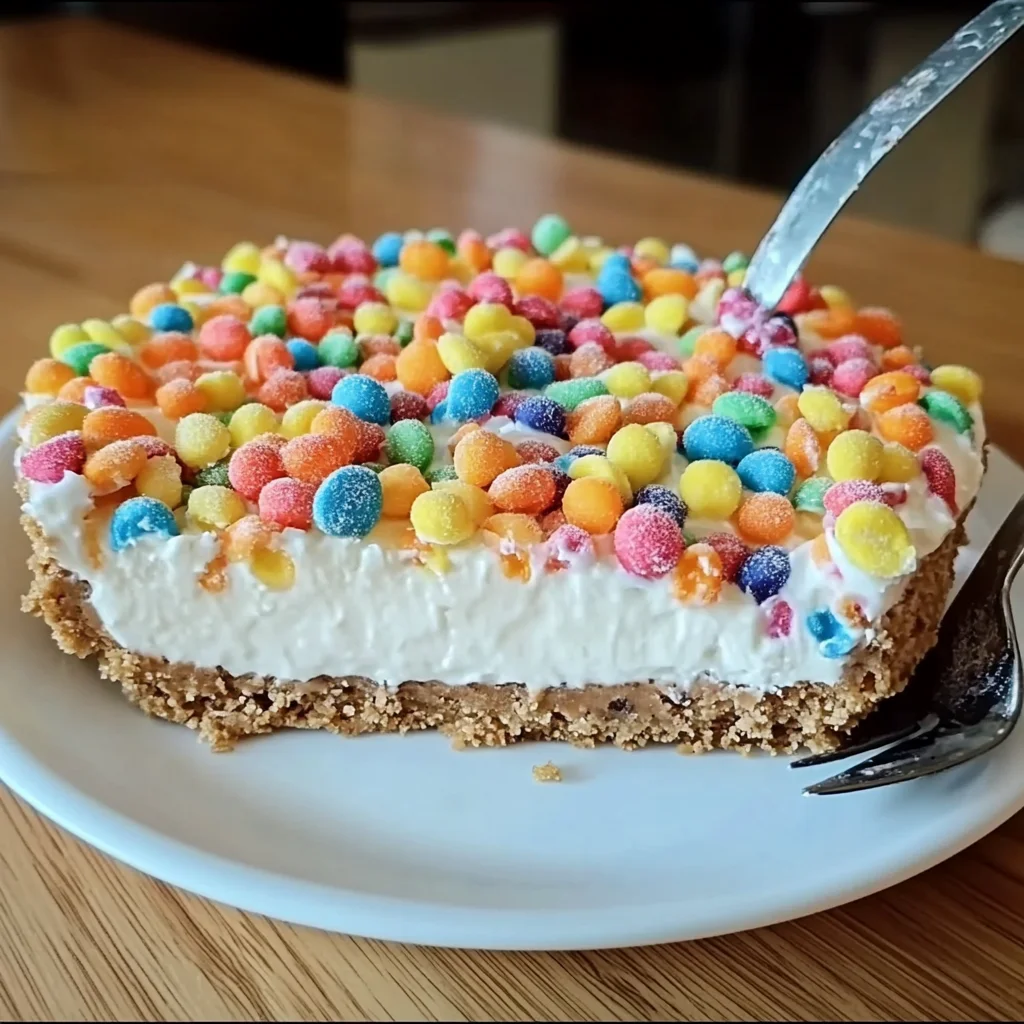
Remember those carefree mornings as a kid, eagerly pouring a bowl full of Fruity Pebbles cereal and watching the vibrant colors dance in your milk? That nostalgic joy of sweet, crunchy cereal combined with creamy textures is exactly what this No-Bake Fruity Pebbles Cheesecake brings back—but with an adult twist that’s still fun and playful. This cheesecake is not just a feast for the eyes, but it’s also incredibly easy to make, requiring no baking at all. It’s a perfect dessert to whip up quickly and impress family or friends with a unique, memorable treat.
Whether you’re craving a fun dessert for a birthday party, a holiday gathering, or just a special weekend indulgence, this cheesecake hits all the right notes. It’s creamy, colorful, and loaded with that iconic Fruity Pebbles crunch in every bite. Plus, it’s no-bake, so you can avoid heating up your kitchen on a hot day. I love how this recipe brings a little childhood magic into the kitchen while keeping things simple and manageable.
Why You’ll Love No-Bake Fruity Pebbles Cheesecake
- Fast – No baking means you can have this ready in just a few hours with minimal hands-on time.
- Easy – With just a handful of ingredients and straightforward steps, it’s a breeze even for beginner bakers.
- Giftable – This colorful cheesecake makes a delightful and unexpected gift for friends or neighbors.
- Crowd-pleasing – The fun colors and creamy texture make it a hit with kids and adults alike.
Ingredients
Here’s what you’ll need to bring this bright and creamy cheesecake to life:
- 1 cup Fruity Pebbles cereal (plus extra for garnish) – The star ingredient that adds vibrant color and sweet crunch.
- 1½ cups graham cracker crumbs – A classic base for cheesecakes, providing a buttery, slightly sweet crust.
- ½ cup unsalted butter, melted – Binds the crust crumbs together and adds richness.
- 2 packages (8 oz each) cream cheese, softened – The creamy foundation for the cheesecake filling.
- 1 cup powdered sugar – Sweetens the cream cheese without any graininess.
- 1 tsp vanilla extract – Enhances flavor with warm, comforting notes.
- 1 cup heavy whipping cream – Whipped to fluffy peaks to lighten the filling.
- ½ cup sour cream – Adds a subtle tang and creamy texture to balance the sweetness.
Each ingredient plays a crucial role here: the graham cracker crust forms a crunchy yet tender base, the cream cheese and sour cream make the filling luxuriously smooth, and the Fruity Pebbles bring in that unmistakable childhood fun. If you love desserts that combine texture and flavor, this cheesecake will quickly become a favorite. For more no-bake cheesecake inspiration, you might also enjoy the No-Bake Oreo Bars, which are equally simple yet decadent.
How to Make No-Bake Fruity Pebbles Cheesecake
Now, let’s roll up those sleeves and make this beautiful dessert step-by-step. Don’t worry—it’s a straightforward process, and I’ll walk you through it like I’m right there in the kitchen with you.
- Prepare the crust: In a medium bowl, mix the graham cracker crumbs, melted butter, and 1 cup of Fruity Pebbles cereal. The butter helps everything stick together, while the cereal adds a fun twist to the traditional crust. Press this mixture firmly into the bottom of a greased 9-inch springform pan. Make sure it’s packed tight and even—this will give your cheesecake a sturdy base. Once done, pop it in the refrigerator to chill while you prepare the filling.
- Make the cream cheese filling: In a large mixing bowl, beat the softened cream cheese and powdered sugar together until smooth and creamy. I like to use a hand mixer for this step to get the perfect silky texture without lumps. Then add the vanilla extract and sour cream, mixing well until everything is fully combined.
- Whip the heavy cream: In a separate bowl, whip the heavy cream until stiff peaks form. This means when you lift the whisk, the peaks stand tall without collapsing. This fluffy whipped cream is key to making the cheesecake light and airy.
- Combine filling and whipped cream: Gently fold the whipped cream into the cream cheese mixture using a spatula. Take your time here—folding instead of stirring maintains the airiness of the whipped cream, giving your cheesecake a perfect, creamy texture.
- Add the remaining Fruity Pebbles: Stir in the remaining cup of Fruity Pebbles cereal to the filling. This adds bursts of color and crunch throughout the cheesecake, creating a delightful surprise with every bite.
- Assemble the cheesecake: Spread the filling evenly over the chilled crust, smoothing the top with a spatula. Sprinkle extra Fruity Pebbles on top as a playful garnish that makes the cheesecake look as fun as it tastes.
- Chill and serve: Refrigerate the cheesecake for at least 4 hours or overnight. This allows the filling to set firmly so it slices beautifully. When ready, carefully release the springform pan sides and enjoy!
This cheesecake is a fantastic no-fuss dessert that comes together quickly, but the chilling time is where the magic happens. The creamy filling firms up just right, and the Fruity Pebbles maintain their crunchiness without getting soggy. If you love colorful treats, this is a wonderful companion to the playful vibe of Bubblegum Fruity Pebbles Cookies, sharing that same nostalgic cereal charm.
Substitutions & Additions
Feel free to get creative with this recipe! Here are some of my favorite swaps and upgrades you can try to customize your No-Bake Fruity Pebbles Cheesecake:
- Crust variations: Swap the graham cracker crumbs for crushed vanilla wafers or even digestive biscuits for a different flavor profile.
- Butter alternatives: Use browned butter for a nutty twist that adds depth to the crust.
- Cheese options: Mix half the cream cheese with mascarpone for an extra luxurious filling.
- Yogurt swap: Replace the sour cream with Greek yogurt for a lighter tang and added protein.
- Flavor boosts: Add a teaspoon of lemon zest or a splash of almond extract to the filling for a fresh twist.
- Extra mix-ins: Fold in mini chocolate chips or rainbow sprinkles alongside the Fruity Pebbles for an even more festive dessert.
- Garnish ideas: Top with fresh berries, whipped cream rosettes, or drizzle with white chocolate for an elegant finish.
Don’t be afraid to try something new! I once added a layer of homemade strawberry jam beneath the filling for a fruity surprise, inspired by my love for layered cheesecakes like the ones you see in the Berrylicious Strawberry Crunch Cheesecake. It was a hit!
Tips for Success
To make sure your No-Bake Fruity Pebbles Cheesecake turns out perfectly every time, here are some tips I’ve learned from experience:
- Soften cream cheese properly: Let it sit out at room temperature for at least 30 minutes before mixing. This avoids lumps and ensures a silky filling.
- Don’t overmix whipped cream: Whip just until stiff peaks form to keep your filling light and fluffy.
- Press the crust firmly: This helps it hold together and supports the creamy filling without crumbling.
- Be gentle when folding: Fold whipped cream into the cream cheese mixture slowly to keep the airiness intact.
- Chill thoroughly: The fridge time is crucial for setting the cheesecake properly. Plan ahead for at least 4 hours, but overnight is best.
- Use a springform pan: It makes removing the cheesecake so much easier and keeps the crust intact.
- Prep ahead: This cheesecake is perfect to make a day before your event. Just garnish with extra Fruity Pebbles right before serving to keep them crunchy.
For more no-bake dessert tips and tricks, you might also find the ideas in the Easy No-Bake Caramel Pretzel Bars post helpful—they share some great insights on handling whipped fillings and crusts.
How to Store No-Bake Fruity Pebbles Cheesecake
Storing this cheesecake properly is key to keeping that creamy texture and colorful crunch just right. Here’s what you need to know:
- Refrigerate: Always keep the cheesecake refrigerated. Cover it loosely with plastic wrap or use the lid of the springform pan if it has one.
- Shelf life: The cheesecake stays fresh for up to 4 days in the fridge. Beyond that, the crust might start to soften excessively, and the Fruity Pebbles can lose their crunch.
- Freezing: You can freeze the cheesecake for up to 1 month. Wrap it tightly in plastic wrap and foil to prevent freezer burn. Thaw in the fridge overnight before serving.
- Garnish timing: If you want to keep the top Fruity Pebbles crunchy, add the garnish just before serving instead of before refrigeration.
Keeping these storage tips in mind ensures your cheesecake is as delightful the first time you serve it as the last. For other make-ahead dessert ideas that hold up beautifully, check out the No-Bake Banana Split Cheesecake, which is another favorite of mine for easy entertaining.
FAQs
Q: Can I use a different cereal instead of Fruity Pebbles?
A: Absolutely! You can swap Fruity Pebbles for any colorful, crunchy cereal like Trix or even Fruity Cheerios. Just keep in mind the flavor and texture might vary slightly.
Q: What if I don’t have a springform pan?
A: You can use a regular cake pan lined with parchment paper, but removing the cheesecake can be trickier. Chilling it well and carefully loosening the edges with a knife helps.
Q: Can I make this cheesecake vegan or dairy-free?
A: This recipe relies on cream cheese, sour cream, and heavy cream, which are dairy-based. For a dairy-free version, you’d need vegan substitutes like cashew cream cheese and coconut cream, but the texture and taste will differ. It’s a fun experiment if you’re up for it!
Q: How do I prevent the Fruity Pebbles from getting soggy?
A: Adding them right before serving as garnish keeps them crunchy. Inside the filling, they’ll soften a bit but still give bursts of texture. Avoid leaving the cheesecake uncovered in the fridge, as moisture can accelerate sogginess.
I hope these tips help you feel confident making this fun and tasty dessert. If you love colorful treats and easy no-bake recipes, be sure to explore more recipes on Easily Cooked—there’s always something delicious and approachable waiting for you!
Enjoy making and sharing this No-Bake Fruity Pebbles Cheesecake—it’s sure to brighten up your dessert table and bring smiles to everyone’s faces.
Don’t forget to follow my Pinterest for more colorful and creative recipes you’ll love!

No-Bake Fruity Pebbles Cheesecake
Ingredients
Equipment
Method
- Step 1: In a medium bowl, mix graham cracker crumbs, melted butter, and 1 cup Fruity Pebbles cereal until well combined. Press firmly into the bottom of a greased 9-inch springform pan. Chill in the refrigerator while preparing the filling.
- Step 2: In a large mixing bowl, beat softened cream cheese and powdered sugar together until smooth and creamy. Add vanilla extract and sour cream, mixing until fully combined.
- Step 3: In a separate bowl, whip heavy cream until stiff peaks form.
- Step 4: Gently fold the whipped cream into the cream cheese mixture to maintain airiness.
- Step 5: Stir in remaining 1 cup Fruity Pebbles cereal into the filling for bursts of color and crunch.
- Step 6: Spread the filling evenly over the chilled crust and smooth the top. Garnish with extra Fruity Pebbles on top.
- Step 7: Refrigerate for at least 4 hours or overnight to allow the cheesecake to set firmly before serving.