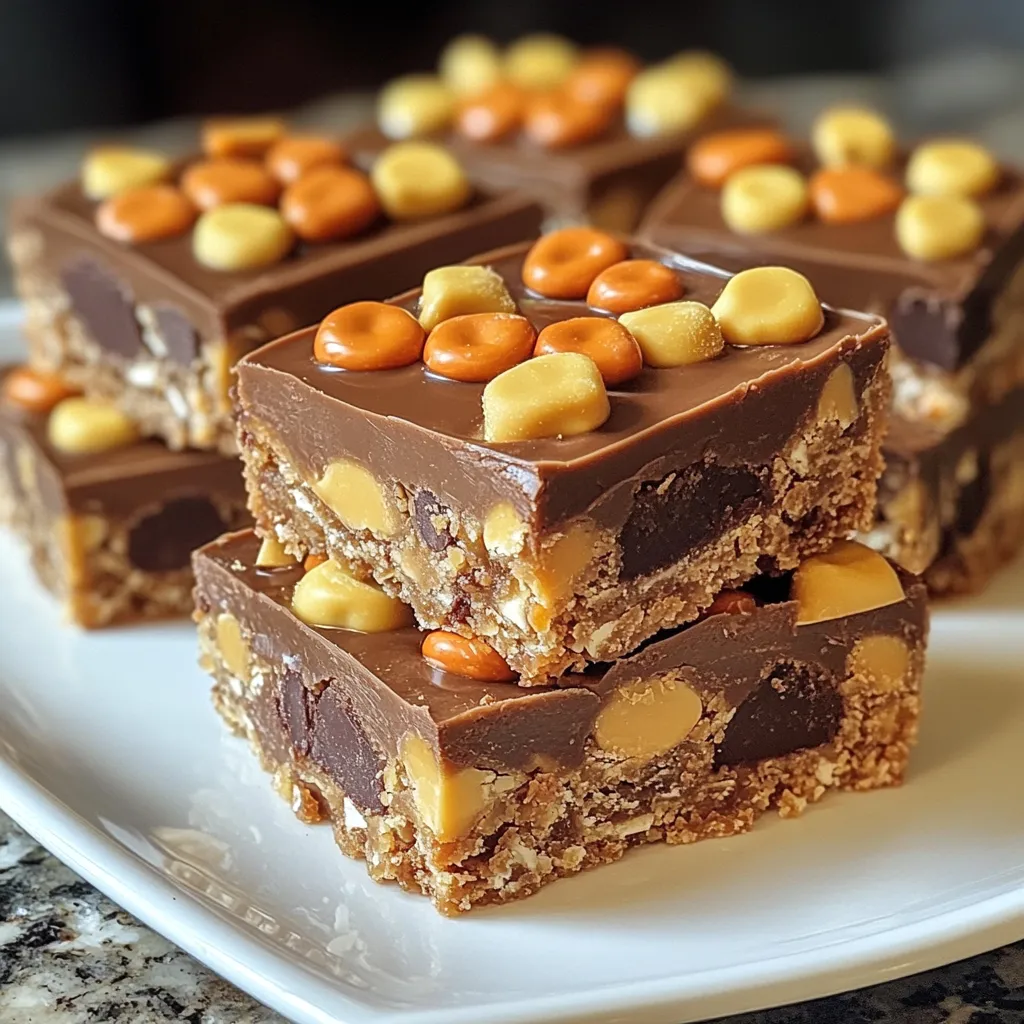
Some desserts just have a way of bringing out pure joy. You know the kind—simple, nostalgic treats that make you feel like a kid again after just one bite. These Reese’s Crunchy Pretzel Peanut Butter No-Bake Bars are exactly that kind of dessert. They combine creamy peanut butter, crunchy pretzels, smooth chocolate, and the colorful pop of Reese’s Pieces into a dessert that feels both comforting and exciting at the same time.
If you love the magical combination of sweet and salty flavors, you’re in for something special. The salty crunch of pretzels balances perfectly with the rich peanut butter and silky chocolate topping. The best part? You don’t even have to turn on your oven. Everything comes together in one bowl and a baking dish, making this recipe perfect for busy days, last-minute gatherings, or whenever your sweet tooth strikes.
I’ve made these bars countless times for family movie nights, holiday trays, and even quick gifts for neighbors. Every time, someone asks for the recipe. They’re quick, easy, and incredibly satisfying. Once you make them, you’ll see why these no-bake bars quickly become a staple in so many kitchens.
Why You’ll Love Reese’s Crunchy Pretzel Peanut Butter No-Bake Bars
- Fast – You can have these bars assembled in about 15 minutes, then the fridge does the rest of the work.
- Easy – No baking, no complicated steps, and only a handful of simple ingredients.
- Giftable – These bars package beautifully and make wonderful homemade treats for friends and neighbors.
- Crowd-pleasing – The irresistible sweet and salty combo makes them a guaranteed hit at parties, potlucks, and family gatherings.
Another reason these bars are so lovable is their texture. The crushed pretzels create an incredible crunch that contrasts with the smooth peanut butter layer and creamy chocolate topping. Every bite gives you a little bit of everything—salty, sweet, crunchy, creamy, and chocolatey. It’s the kind of balance that makes desserts unforgettable.
If you enjoy easy treats that don’t require an oven, you might also love recipes like creamy fudge-style desserts or simple layered sweets. For example, a recipe like this easy no-bake chocolate peanut butter dessert follows a similar idea of minimal effort with maximum flavor, which makes it perfect for busy home bakers.
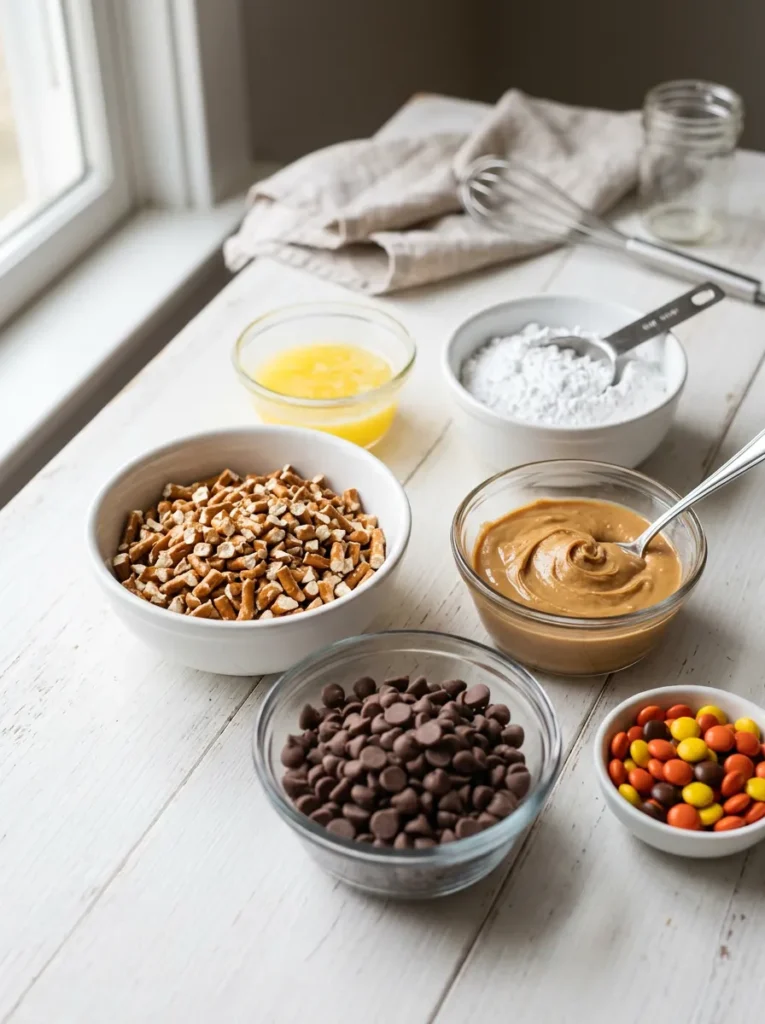
Ingredients
One of my favorite things about this recipe is how simple the ingredient list is. You probably already have several of these items in your pantry. Each ingredient plays an important role in creating the perfect texture and flavor balance.
- 1 1/2 cups crushed pretzels – These provide the signature crunch and a salty contrast that balances the sweetness of the chocolate and peanut butter.
- 1 cup creamy peanut butter – The star ingredient. Creamy peanut butter gives the bars structure and rich flavor. Choose a smooth variety for the best texture.
- 1/2 cup unsalted butter, melted – Butter helps bind everything together while adding richness to the peanut butter layer.
- 1 cup powdered sugar – This sweetens the mixture and helps create a soft, fudge-like consistency.
- 1 1/2 cups milk chocolate chips – Melted chocolate forms the smooth top layer that makes these bars feel like a candy shop treat.
- 1/2 cup Reese’s Pieces (optional) – These colorful candies add extra peanut butter flavor and a fun, crunchy topping.
If you love recipes that mix crunchy textures with chocolate, you might also enjoy exploring desserts like these chocolate peanut butter dessert bars, which offer a similar flavor combination but with a slightly different twist.
How to Make Reese’s Crunchy Pretzel Peanut Butter No-Bake Bars
This recipe is wonderfully straightforward, which makes it perfect even if you’re not an experienced baker. You’ll only need one mixing bowl, a baking dish, and a microwave to melt the chocolate. In just a few simple steps, you’ll have a dessert that tastes like something from a bakery.
Step 1: Mix the Base
Start by grabbing a large mixing bowl. Add the crushed pretzels, creamy peanut butter, melted butter, and powdered sugar. Stir everything together until the mixture becomes thick and evenly combined.
You want the pretzels to be crushed but not turned into powder. Small chunks create the perfect crunchy texture. I usually place pretzels in a zip-top bag and gently crush them with a rolling pin. It’s quick, easy, and oddly satisfying.
Step 2: Prepare the Pan
Line an 8×8-inch baking dish with parchment paper. This step might seem small, but it makes a big difference when it’s time to remove the bars later. The parchment paper allows you to lift the entire dessert out of the pan easily, making slicing neat and simple.
Step 3: Press the Mixture
Transfer the peanut butter pretzel mixture into the lined baking dish. Use a spatula or the back of a spoon to press it down firmly and evenly.
This layer should be compact so the bars hold together once chilled. I sometimes place another sheet of parchment paper on top and press with my hands to create a smooth, even surface.
Step 4: Melt the Chocolate
Add the milk chocolate chips to a microwave-safe bowl. Microwave them in 20-second intervals, stirring after each round until the chocolate becomes completely smooth.
Be patient during this step. Chocolate can burn easily if overheated, so short intervals and frequent stirring are key.
Step 5: Add the Chocolate Layer
Pour the melted chocolate over the peanut butter pretzel base. Use a spatula to spread it evenly across the surface.
This glossy chocolate layer is what gives the bars their candy-like finish. It also helps hold the toppings in place.
Step 6: Add Reese’s Pieces
Sprinkle the Reese’s Pieces across the melted chocolate. Gently press them down so they stick while the chocolate is still soft.
Besides adding flavor, they also make the bars look colorful and festive.
Step 7: Chill the Bars
Place the dish in the refrigerator and let it chill for at least one hour. During this time, the chocolate will firm up and the peanut butter layer will set.
If you’re in a hurry, you can place the bars in the freezer for about 30 minutes instead.
Step 8: Slice and Serve
Once the bars are fully set, lift them out of the pan using the parchment paper. Place the slab on a cutting board and slice it into squares.
You can cut them into large dessert bars or smaller bite-sized squares depending on the occasion.
Substitutions & Additions
One of the best parts about this recipe is how customizable it is. Once you understand the basic structure, you can easily tweak the ingredients to create new flavors.
- Use dark chocolate instead of milk chocolate if you prefer a richer, less sweet topping.
- Add chopped peanuts for even more crunch and nutty flavor.
- Swap pretzels for graham crackers if you want a slightly sweeter base.
- Add mini peanut butter cups on top instead of Reese’s Pieces for a more indulgent finish.
- Drizzle melted white chocolate over the bars for a bakery-style decoration.
If you love experimenting with easy desserts, recipes like this peanut butter chocolate treat idea can inspire even more creative combinations.
Tips for Success
Even though this recipe is very simple, a few small tips can make the difference between good bars and absolutely amazing ones.
- Don’t crush the pretzels too finely. Small chunks create the best crunchy texture.
- Use parchment paper. This makes removing the bars from the pan effortless.
- Press the base firmly. Compacting the mixture helps the bars hold their shape when sliced.
- Let the chocolate cool slightly before slicing. This prevents cracks in the top layer.
- Use a warm knife for clean cuts. Run the knife under warm water and wipe it dry before slicing.
Another helpful trick is to chill the bars slightly longer than one hour if your kitchen is warm. A firmer chocolate layer makes slicing much easier and keeps the bars looking picture-perfect.
How to Store Reese’s Crunchy Pretzel Peanut Butter No-Bake Bars
These bars store wonderfully, which makes them perfect for making ahead of time.
Place the sliced bars in an airtight container and store them in the refrigerator. They’ll stay fresh for about 5 days. The chilled texture actually enhances the flavor and keeps the chocolate topping firm.
If you want to store them longer, you can freeze them. Wrap the bars individually or layer them between sheets of parchment paper in a freezer-safe container. They can last up to two months in the freezer.
To enjoy frozen bars, simply let them sit at room temperature for about 10 minutes before serving.
FAQs
Can I use crunchy peanut butter?
Yes, you can. Crunchy peanut butter will add even more texture to the bars. However, creamy peanut butter creates a smoother base that many people prefer.
Can I make these bars gluten-free?
Absolutely. Simply use gluten-free pretzels. Everything else in the recipe is naturally gluten-free.
Do these bars need to stay refrigerated?
They hold their shape best when stored in the refrigerator. At room temperature, the chocolate layer can soften.
Can I double the recipe?
Yes! Just double the ingredients and press the mixture into a 9×13-inch baking dish instead of an 8×8 pan.
If you enjoy discovering easy homemade desserts like this one, be sure to follow our recipe inspiration on Pinterest where we share even more sweet treats and kitchen ideas every day.
Reese’s Crunchy Pretzel Peanut Butter No-Bake Bars
Ingredients
Equipment
Method
- Step 1: In a large mixing bowl, combine the crushed pretzels, creamy peanut butter, melted butter, and powdered sugar. Stir until the mixture is thick and evenly combined.
- Step 2: Line an 8×8-inch baking dish with parchment paper to make removing the bars easier later.
- Step 3: Press the peanut butter pretzel mixture firmly and evenly into the bottom of the prepared baking dish.
- Step 4: Place the chocolate chips in a microwave-safe bowl and microwave in 20-second intervals, stirring after each interval, until completely melted and smooth.
- Step 5: Pour the melted chocolate over the peanut butter layer and spread it evenly with a spatula.
- Step 6: Sprinkle Reese’s Pieces on top and gently press them into the chocolate so they stick.
- Step 7: Refrigerate the bars for at least 1 hour until the chocolate and peanut butter layers are firm.
- Step 8: Lift the dessert from the pan using the parchment paper, place on a cutting board, and slice into squares before serving.