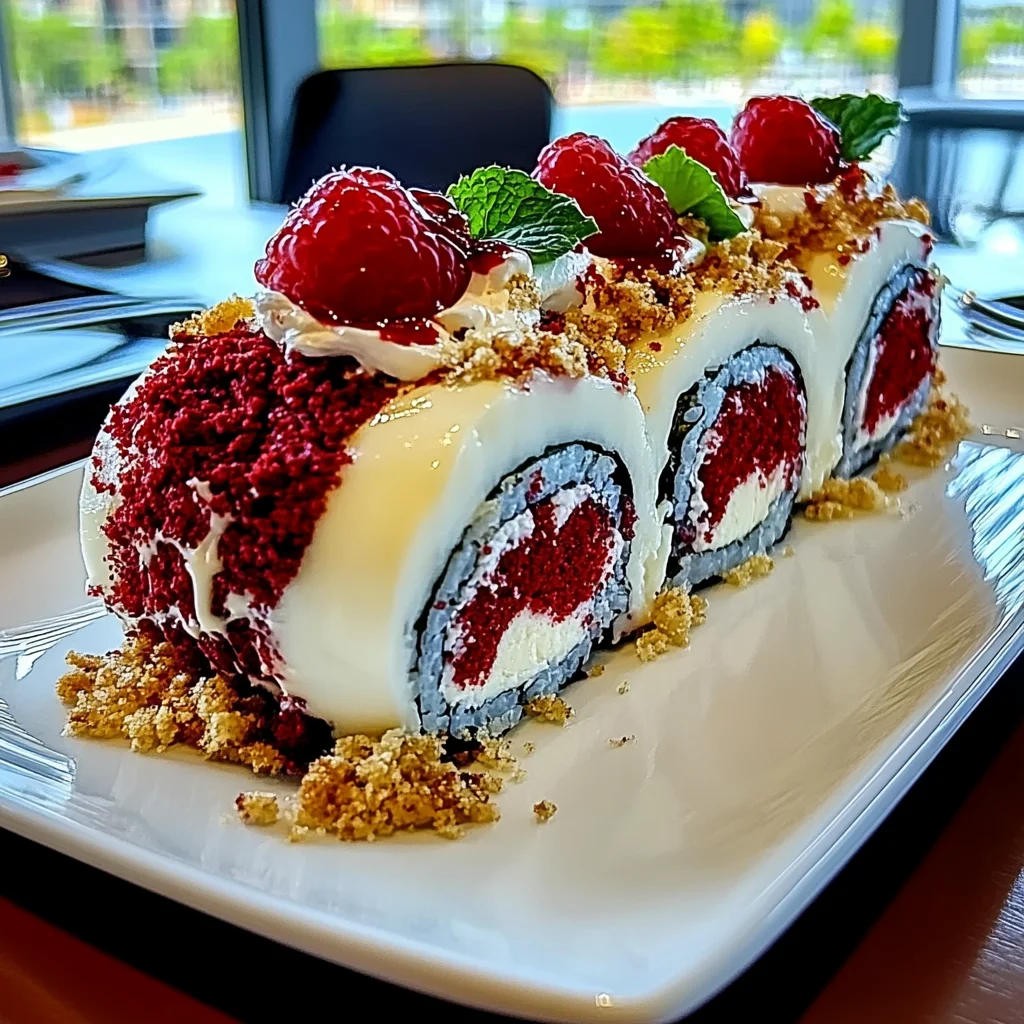
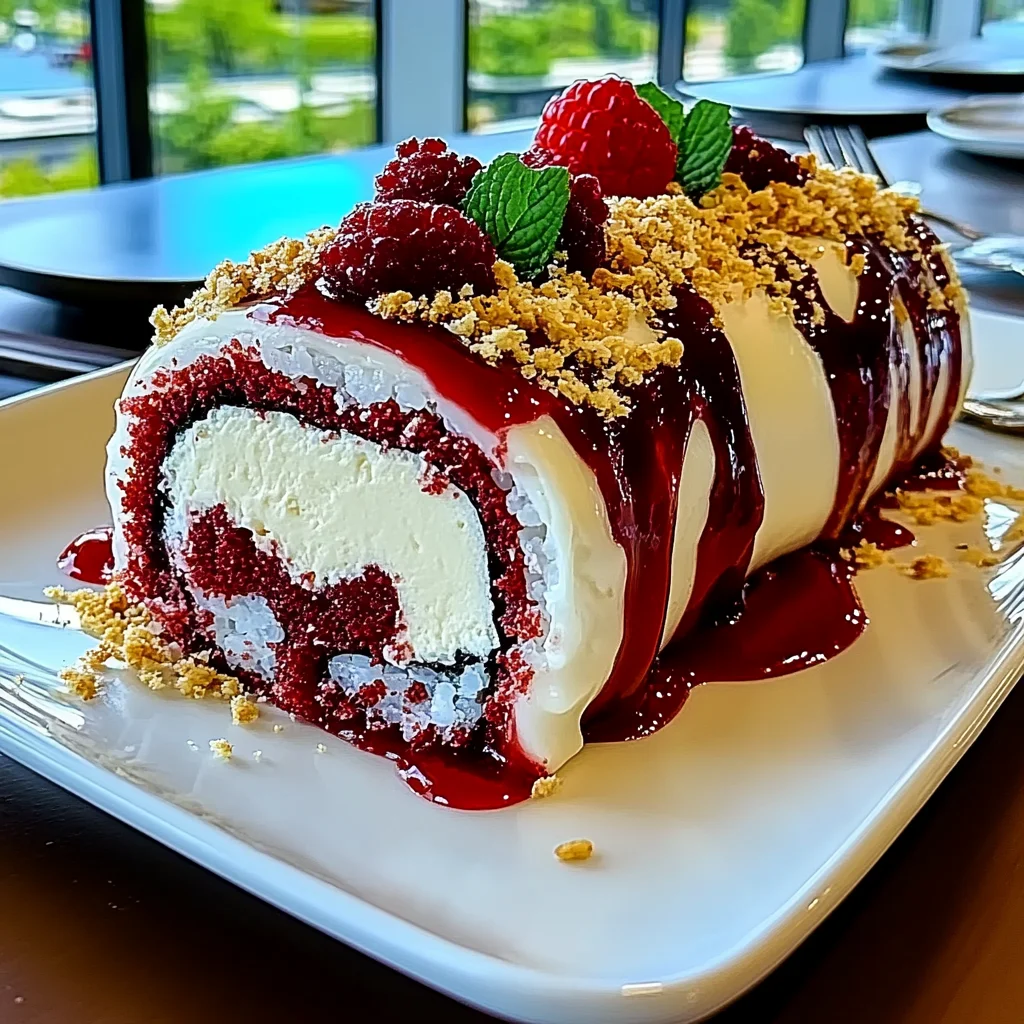
Remember those childhood birthday parties, overflowing with sugary delights? This Red Velvet Cheesecake Sushi Roll recipe captures that same magical feeling, but with an elegant, grown-up twist. It’s surprisingly easy to make, yet it looks and tastes incredibly impressive – perfect for impressing your friends or adding a touch of whimsy to your next gathering!
Why You’ll Love This Recipe
- Fast – Ready in under 30 minutes (plus chilling time).
- Easy – No special skills or equipment needed!
- Giftable – These beautiful rolls make a stunning and delicious gift.
- Crowd-pleasing – Everyone loves red velvet and cheesecake!
Ingredients
“Rice” Layer:
- 8 ounces cream cheese, softened (I prefer full-fat for the best flavor and texture)
- 1/4 cup powdered sugar (confectioners’ sugar)
“Filling” Layer:
- 1 cup red velvet cake crumbs (you can easily make these yourself by crumbling leftover cake or buying a bag of crumbs)
- 1/2 cup heavy cream, whipped to stiff peaks (this adds a lovely lightness)
- 1/4 cup red velvet cake crumb filling (from the inside of a store-bought red velvet cake – adds extra flavor!)
Garnish:
- Melted white chocolate (for drizzling – adds a beautiful contrast)
- Fresh raspberries (optional, but they add a pop of color and tartness)
- Red velvet cake crumbs (optional, for extra texture and visual appeal)
How to Make It
Prepare the “Rice” Layer:
- Beat cream cheese in a medium bowl until smooth and creamy. I use an electric mixer for this, but a good whisk works too!
- Gradually add powdered sugar, beating until combined and fluffy. Set aside.
Assemble the Sushi Rolls:
- Line a baking sheet with parchment paper. This makes cleanup a breeze.
- Spread a thin layer of cream cheese mixture onto parchment paper, forming a 12×6 inch rectangle (about 1/4 inch thick).
- Distribute red velvet cake crumbs evenly over cream cheese, leaving a 1/2-inch border. This border helps the roll hold its shape.
- Spread whipped cream evenly over crumbs.
- Sprinkle red velvet cake crumb filling over whipped cream.
- Using the parchment paper as an aid, gently roll into a log. Don’t worry if it’s a little imperfect – it adds to the charm!
- Press the seam to seal. You can even gently run a knife along the seam to ensure it’s secure.
- Wrap tightly in plastic wrap and chill for at least 2 hours. This allows the roll to firm up.
Garnish and Serve:
- Unwrap the roll.
- Slice into 1-inch thick pieces using a sharp knife. Wipe the knife between slices for clean cuts.
- Drizzle with melted white chocolate.
- Garnish with raspberries and/or cake crumbs (optional).
- Serve immediately and enjoy!
Substitutions & Additions
Feel free to experiment! Try different cake crumb flavors (chocolate, funfetti), add a layer of fruit preserves, or use a different type of cream cheese (like mascarpone).
Tips for Success
- Make sure your cream cheese is softened to room temperature for easy mixing.
- Whip the heavy cream until stiff peaks form – this is crucial for a light and airy filling.
- Chill the rolls for at least 2 hours to allow them to firm up before slicing. Longer is better!
- For easier rolling, slightly moisten your hands with water.
How to Store It
Store leftover rolls in an airtight container in the refrigerator for up to 3 days. They’re best served cold!
FAQs
Q: Can I make this ahead of time? A: Absolutely! Make the rolls and chill them up to 2 days in advance. Garnish and serve just before serving.
Q: Can I freeze these? A: I don’t recommend freezing these rolls, as the texture may change.
Q: What if I don’t have red velvet cake crumbs? A: You can use any type of cake crumbs you like, or even crushed cookies!
Q: How can I make the white chocolate drizzle look extra fancy? A: Use a piping bag or zip-top bag with a corner snipped off for a more controlled drizzle.

Red Velvet Cheesecake Sushi Rolls
Ingredients
Equipment
Method
- Beat cream cheese in a medium bowl until smooth and creamy. I use an electric mixer for this, but a good whisk works too!
- Gradually add powdered sugar, beating until combined and fluffy. Set aside.
- Line a baking sheet with parchment paper. This makes cleanup a breeze.
- Spread a thin layer of cream cheese mixture onto parchment paper, forming a 12x6 inch rectangle (about 1/4 inch thick).
- Distribute red velvet cake crumbs evenly over cream cheese, leaving a 1/2-inch border. This border helps the roll hold its shape.
- Spread whipped cream evenly over crumbs.
- Sprinkle red velvet cake crumb filling over whipped cream.
- Using the parchment paper as an aid, gently roll into a log. Don’t worry if it’s a little imperfect – it adds to the charm!
- Press the seam to seal. You can even gently run a knife along the seam to ensure it’s secure.
- Wrap tightly in plastic wrap and chill for at least 2 hours. This allows the roll to firm up.
- Unwrap the roll.
- Slice into 1-inch thick pieces using a sharp knife. Wipe the knife between slices for clean cuts.
- Drizzle with melted white chocolate.
- Garnish with raspberries and/or cake crumbs (optional).
- Serve immediately and enjoy!