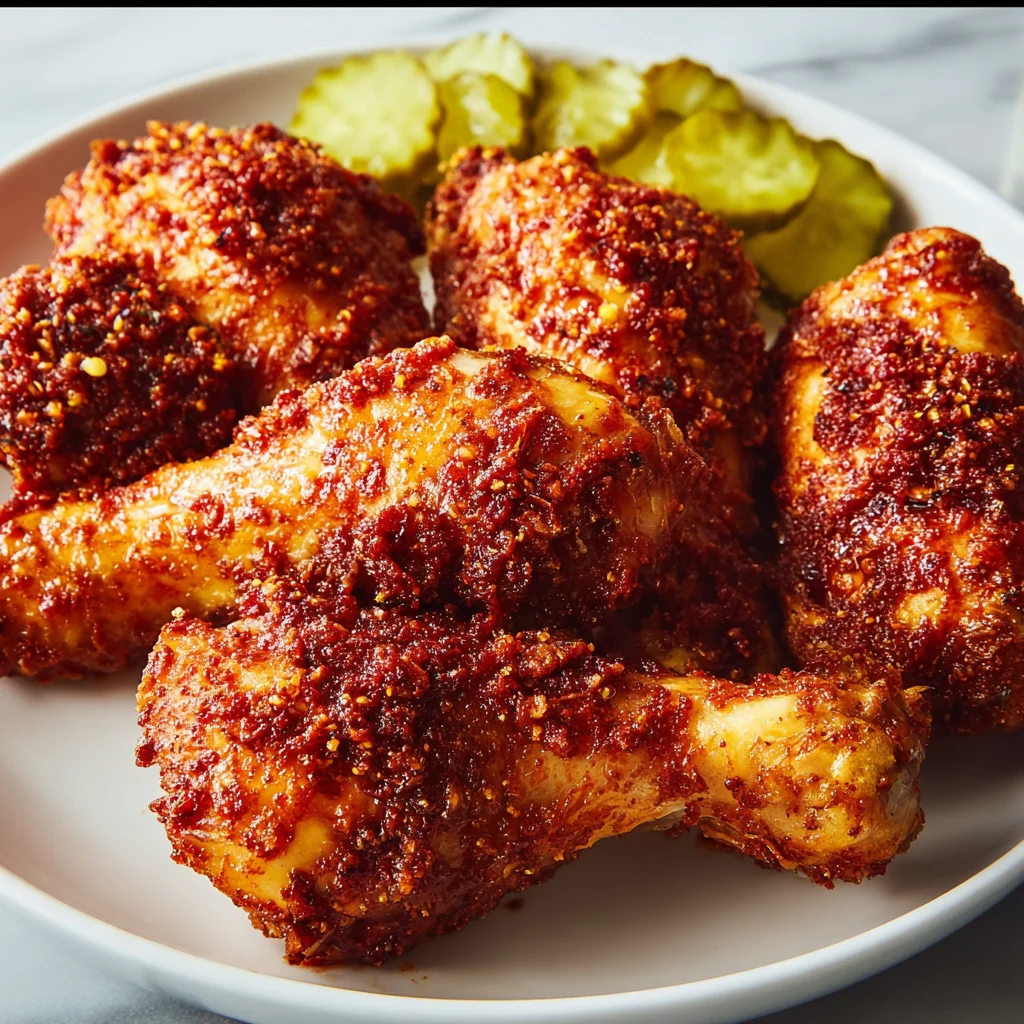
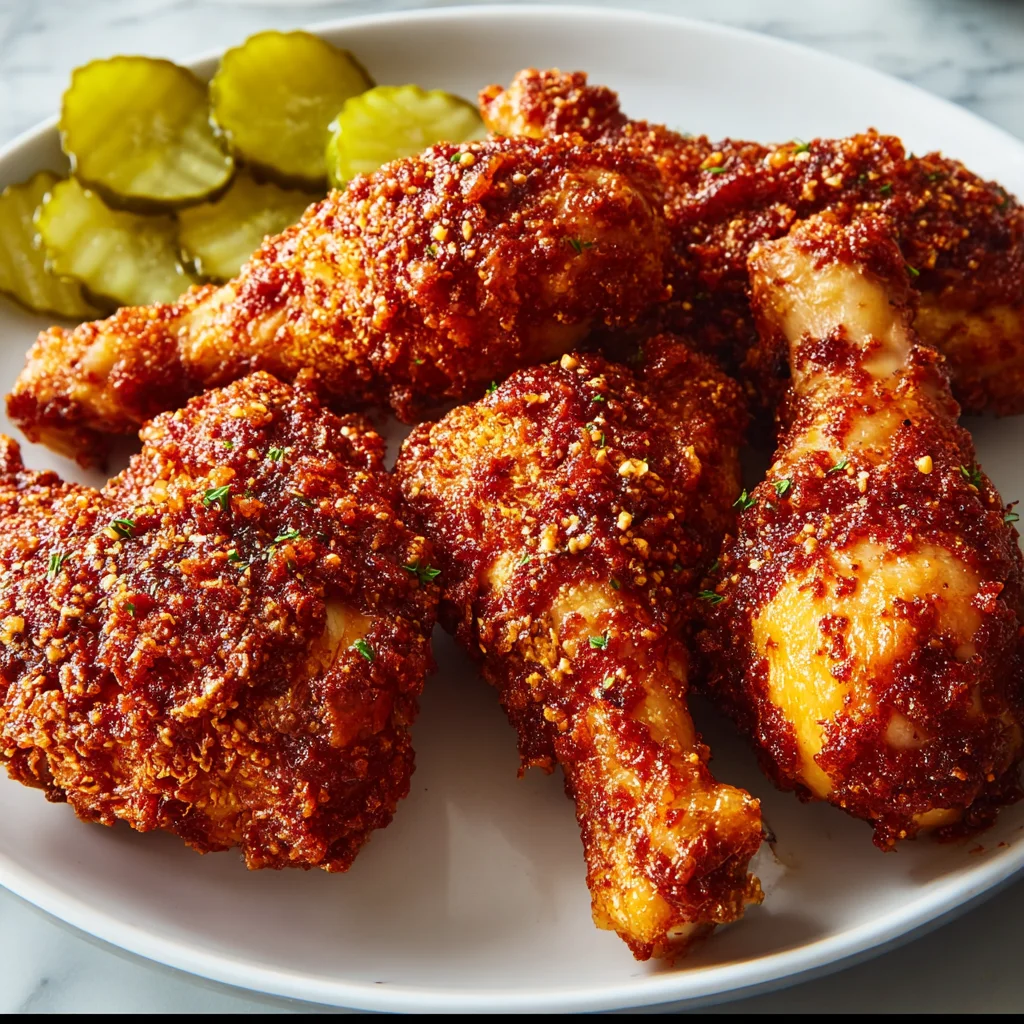
Oh, friends. Let’s talk chicken. Specifically, that iconic, fiery, crispy, juicy Nashville Hot Chicken. There’s just something about that perfect combination of crunchy coating and spicy, buttery glaze that hits just right, isn’t there? For the longest time, I thought enjoying this Southern treasure at home meant wrestling with a deep fryer, endless oil splatters, and a kitchen that smelled like a greasy spoon for days. But guess what? You absolutely do not need all that fuss to get that incredible flavor and texture.
I’ve cracked the code for making mouthwatering Nashville Hot Chicken right in your oven. It’s got that beautiful crisp coating, incredibly juicy meat thanks to a little trick (hello, buttermilk!), and that unmistakable fiery kick from the hot oil glaze. This recipe is seriously easy, much less messy than the traditional method, and delivers flavor that will make you feel like you took a trip down to Tennessee without leaving your kitchen. Get ready to fall in love!
Why You’ll Love This Recipe
- Fast (well, faster than deep-frying!): Less active time means you can tackle other things while your chicken crisps up.
- Easy: Simple steps, common ingredients, and way less cleanup than traditional frying.
- Giftable (sort of!): While not a typical gift, bringing a platter of this to a potluck will make you everyone’s favorite person.
- Crowd-pleasing: Who doesn’t love crispy, flavorful chicken? Just be ready for a little heat!
Ingredients
Here’s what you’ll need to make this magic happen. Most of these are pantry staples, which is always a win in my book!
- For the Chicken:
- 8 pieces bone-in chicken (drumsticks, thighs, or breasts): Bone-in works best here for maximum flavor and juicy results, but feel free to mix and match your favorite cuts.
- 1 cup buttermilk: This is our secret weapon for tender, juicy chicken! Don’t skip it.
- 1 large egg: Helps the buttermilk mixture cling to the chicken.
- 2 cups all-purpose flour: Our base for that glorious crispy coating.
- 2 tablespoons smoked paprika: Adds depth and that lovely reddish hue.
- 1 tablespoon garlic powder: Because everything is better with garlic.
- 1 tablespoon onion powder: Adds another layer of savory flavor.
- 1 teaspoon cayenne pepper (or more, to taste): This is where the heat starts! Adjust based on how brave you’re feeling.
- 1 teaspoon salt: Essential for seasoning.
- 1/2 teaspoon black pepper: A classic pairing with chicken.
- For the Hot Oil Glaze:
- 1/2 cup unsalted butter: The rich base for our spicy glaze.
- 1/4 cup hot sauce (such as Frank’s RedHot): Adds tang and heat. Use your favorite!
- 2 tablespoons cayenne pepper: Turning up the heat! This glaze is meant to be spicy.
- 2 tablespoons brown sugar: A touch of sweetness balances the heat beautifully.
- 1 teaspoon smoked paprika: More depth of flavor.
- 1/2 teaspoon garlic powder: Can you tell I love garlic?
- 1/2 teaspoon black pepper: Finishing touch for the glaze.
How to Make It
Okay, let’s get cooking! Follow these simple steps, and you’ll be enjoying amazing Nashville Hot Chicken in no time.
-
Give that chicken a bath: In a large bowl, whisk together the buttermilk and the egg until they’re well combined. Plop your chicken pieces into the bowl, making sure they’re completely submerged in the creamy mixture. This buttermilk bath is going to tenderize the chicken and make it incredibly juicy. Cover the bowl and pop it in the fridge for at least 2 hours. If you can plan ahead, leaving it overnight gives the best results – trust me on this!
-
Whip up the crispy coating: While your chicken is chilling, grab a shallow dish or a large resealable bag (the bag method makes cleanup a breeze!). Pour in the flour, smoked paprika, garlic powder, onion powder, cayenne pepper (add a little extra if you like it really hot!), salt, and black pepper. Give it a good stir or shake to make sure all those delicious spices are evenly distributed throughout the flour.
-
Prep for baking: Time to get the oven ready! Preheat your oven to a nice hot 425°F (220°C). Line a large baking sheet with foil – this will save you so much scrubbing later! Place an oven-safe wire rack on top of the foil-lined sheet. This is key to getting that crispy bottom without flipping a million times. Lightly spray the wire rack with cooking spray so your chicken doesn’t stick.
-
Coat the chicken: Take your chicken out of the buttermilk mixture, letting any excess drip back into the bowl. Now, one piece at a time, place it in the flour mixture. Really get in there and press the flour onto the chicken, making sure you get a nice thick, even coating. You want every inch covered for maximum crispiness!
-
Bake ’em up: Place the dredged chicken pieces onto your prepared wire rack on the baking sheet. Make sure there’s a little space between each piece so they can get crispy on all sides. Slide the sheet into your preheated oven and bake for 30 minutes. After 30 minutes, carefully flip each piece of chicken. Continue baking for another 20-30 minutes, or until the chicken is cooked through and reaches an internal temperature of 165°F (74°C) and the coating is beautifully golden and crispy. Total baking time will depend on the size and type of chicken pieces you use.
-
Make the hot glaze: While your chicken is having its oven spa treatment, melt the butter in a small saucepan over low heat. Once melted, stir in the hot sauce, cayenne pepper, brown sugar, smoked paprika, garlic powder, and black pepper. Whisk everything together until it’s combined and warm. Don’t let it boil, just get it nice and hot so it’s easy to brush. Give it a taste and add a pinch more cayenne or hot sauce if you crave more heat!
-
Glaze and serve: As soon as the chicken comes out of the oven, immediately brush each piece generously with that beautiful hot oil glaze. Don’t be shy! Get every nook and cranny. The heat of the chicken will help the glaze really seep in and adhere. Serve it hot and get ready for some serious flavor!
Substitutions & Additions
Want to switch things up? Here are a few ideas:
- Gluten-Free? Swap the all-purpose flour for your favorite gluten-free flour blend. Rice flour or a mix of rice and potato starch can also work well for crispiness.
- Different Heat Levels: If cayenne is too much, reduce it or omit it. If you want more heat, add a pinch of ground habanero powder or a dash of a spicier hot sauce to the glaze.
- Different Chicken Cuts: Boneless chicken breasts or tenders can be used, but they will cook faster. Adjust baking time accordingly (likely 20-30 minutes total). Bone-in works best for juiciness in my opinion!
- Make it a Meal: Serve your Nashville Hot Chicken with classic sides like pickles (essential!), white bread (also classic!), coleslaw, mac and cheese, or potato salad.
- Spice it Up: Add a pinch of ground mustard or ginger to the flour dredge or the glaze for extra complexity.
Tips for Success
Here are a few little tricks I’ve learned along the way to make sure your oven-fried chicken turns out perfectly every time:
- Don’t Rush the Brine: The longer the chicken sits in the buttermilk, the more tender and flavorful it will be. Overnight really is best if you can swing it.
- Get a Good Coat: Make sure you really press that flour mixture onto the chicken. A thick, even coating is what gives you that satisfying crunch.
- Use a Wire Rack: This is crucial for getting the bottom of the chicken crispy. Without it, the bottom will steam and get soggy.
- Don’t Crowd the Pan: Give the chicken pieces room to breathe on the baking sheet. If they’re too close, they’ll steam instead of getting crispy. Use two baking sheets if necessary.
- Check the Temp: The best way to know chicken is safely cooked is by temperature. Use an instant-read thermometer in the thickest part of the meat (avoiding the bone) to ensure it reaches 165°F (74°C).
- Glaze Immediately: Brushing the hot glaze onto the hot chicken helps it soak in and stick better.
How to Store It
If you actually have any leftovers (a big IF in my house!), here’s how to keep them:
Let the chicken cool completely before storing. Place it in an airtight container in the refrigerator for up to 3-4 days.
To reheat and keep that glorious crispiness, it’s best to avoid the microwave. Reheat the chicken on a wire rack set over a baking sheet in a preheated oven (around 350°F / 175°C) or in an air fryer until heated through and crispy again. This usually takes about 10-15 minutes depending on the size of the pieces.
FAQs
Got questions? I’ve got answers!
Can I use boneless chicken breasts?
Yes, absolutely! Just note that boneless breasts or tenders will cook much faster in the oven, likely needing only 20-30 minutes total. Keep an eye on them so they don’t dry out.
How spicy is this recipe?
It has a definite kick! The amount of cayenne in both the dredge and the glaze provides noticeable heat, typical of Nashville Hot style. If you’re sensitive to spice, reduce the cayenne in both steps. If you love heat, feel free to add more!
Can I prepare parts of this recipe ahead of time?
Yes! You can definitely brine the chicken in the buttermilk mixture overnight. You can also mix the flour dredge ingredients ahead of time and store them in an airtight container or bag. The hot oil glaze is best made right before the chicken comes out of the oven.
Ready to dive into some seriously delicious, crispy, spicy chicken without the deep-fryer hassle? Give this recipe a try and let me know what you think! Happy cooking, friends!
Crispy Oven-Fried Nashville Hot Chicken (No Deep Fryer Needed!)
Ingredients
Equipment
Method
- Step 1: Give that chicken a bath: In a large bowl, whisk together the buttermilk and the egg until they're well combined. Place your chicken pieces into the bowl, making sure they're completely submerged. Cover and refrigerate for at least 2 hours (overnight is best).
- Step 2: Whip up the crispy coating: In a shallow dish or large resealable bag, combine the flour, smoked paprika, garlic powder, onion powder, cayenne pepper, salt, and black pepper. Stir or shake to combine.
- Step 3: Prep for baking: Preheat your oven to 425°F (220°C). Line a large baking sheet with foil and place an oven-safe wire rack on top. Lightly spray the wire rack with cooking spray.
- Step 4: Coat the chicken: Remove chicken from the buttermilk mixture, letting excess drip off. Place one piece at a time into the flour mixture, pressing to get a thick, even coating. Place coated chicken onto the prepared wire rack, leaving space between pieces.
- Step 5: Bake 'em up: Bake for 30 minutes. Carefully flip each piece and bake for another 20-30 minutes, or until cooked through (internal temperature 165°F / 74°C) and golden and crispy.
- Step 6: Make the hot glaze: While the chicken bakes, melt the butter in a small saucepan over low heat. Stir in the hot sauce, cayenne pepper, brown sugar, smoked paprika, garlic powder, and black pepper. Whisk until combined and warm. Taste and adjust heat if needed.
- Step 7: Glaze and serve: As soon as the chicken comes out of the oven, immediately brush each piece generously with the hot oil glaze. Serve hot.