Oh my goodness, friends. Do you ever get hit with a sudden craving for something that tastes exactly like childhood sunshine? For me, that’s an Orange Creamsicle. That smooth, creamy vanilla with a burst of tangy orange… pure bliss! And today, we’re taking that nostalgic flavor and turning it into the most adorable, delicious mini cheesecakes you’ve ever made. Seriously, these little bites of heaven are ridiculously easy and disappear in minutes!
I remember summer days, running around with sticky fingers from those orange and white pops. This recipe brings all that happy memory right into your kitchen, but in a grown-up (but still totally fun!) dessert form. They’re perfect for parties, potlucks, or just a Tuesday treat because they’re so quick and simple to whip up. Get ready to fall in love!
Why You’ll Love This Recipe
- Fast: Seriously, you can be munching on these sooner than you think!
- Easy: No fancy water baths or complicated steps required.
- Giftable: Pack these up for friends or family – they make the sweetest homemade gift!
- Crowd-pleasing: Who doesn’t love a mini dessert that tastes like a classic?
Ingredients
Let’s gather our goodies! Everything you need is probably already in your pantry and fridge, or just a quick trip away.
- Graham Cracker Crumbs: The base for our perfect crumbly crust. You can buy them pre-crushed or make your own by buzzing graham crackers in a food processor.
- Granulated Sugar: Just a touch to sweeten the crust and the filling.
- Unsalted Butter, Melted: This binds our crust together into a glorious, buttery base.
- Cream Cheese, Softened: The heart of our cheesecake! Make sure it’s lovely and soft so you get a smooth filling. Leave it on the counter for an hour or two, or gently soften it in the microwave on low power for 20-30 seconds.
- Vanilla Extract: Enhances that creamy “creamsicle” flavor. Use the good stuff if you have it!
- Orange Zest: This is where the pop of orange comes from! Zest from one medium orange should be plenty.
- Orange Juice: Adds a little extra orange flavor and liquid to the filling. Freshly squeezed is best, but bottled works too.
- Large Eggs, Room Temperature: Eggs help set the cheesecake. Having them at room temp helps them incorporate smoothly into the filling, reducing the chance of cracks.
- Whipped Topping (like Cool Whip): The classic creamsicle finish! Make sure it’s thawed if using frozen.
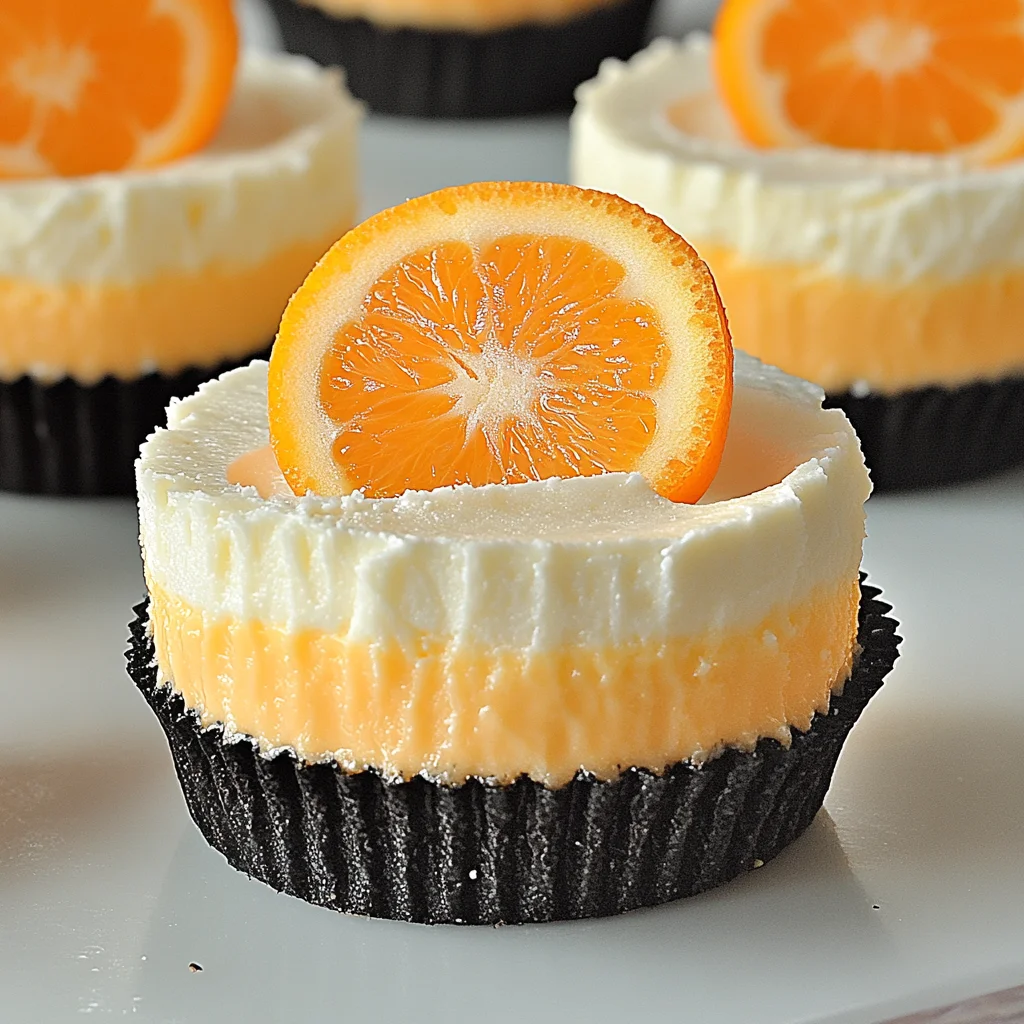
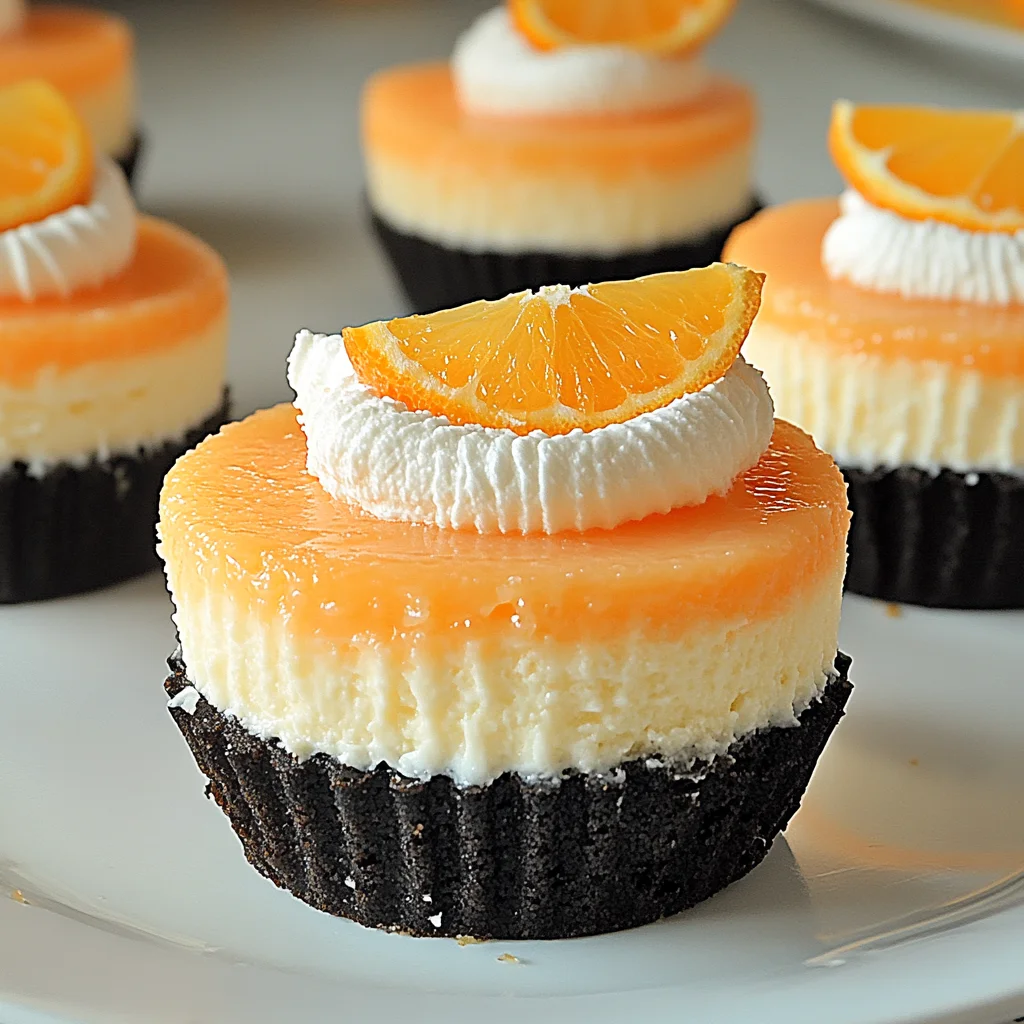
- Orange Slices or Zest (optional): For a pretty little garnish that tells everyone exactly what flavor they’re about to enjoy.
How to Make It
Alright, let’s get cooking! Follow these simple steps and you’ll have delightful mini cheesecakes in no time.
- First things first, let’s get the oven ready. Preheat your oven to 325°F (160°C). Now, grab your favorite 12-count muffin tin and line each cup with a paper liner. This makes them super easy to get out!
- Let’s make the crust! In a small bowl, combine your graham cracker crumbs, granulated sugar, and that lovely melted butter. Stir it all together until every crumb is coated in buttery goodness. It should look like wet sand.
- Spoon about 1 tablespoon of this yummy crumb mixture into the bottom of each paper-lined muffin cup. Use the back of a spoon or even a small glass to press it down firmly. This creates a nice, solid foundation for your cheesecake.
- Pop those crusts into the preheated oven for just 5 minutes. This helps set the crust so it doesn’t crumble when you add the filling. While they’re baking, you can start on the filling.
- Okay, time for the star: the cheesecake filling! In a large bowl, take your softened cream cheese and beat it with an electric mixer (or a whisk and some elbow grease!) until it’s super smooth and creamy. No lumps allowed!
- Add the sugar, vanilla extract, fragrant orange zest, and that little splash of orange juice to the bowl. Mix it all together until everything is just combined and smells heavenly.
- Now, gently beat in the eggs, one at a time. Be careful not to overmix here! Overmixing can whip too much air into the batter and cause the cheesecakes to crack as they cool. Mix just until the egg is incorporated.
- Spoon or pour your beautiful, smooth filling over the pre-baked crusts in each muffin cup. Fill them up about 3/4 of the way – you want room for the topping!
- Carefully place the muffin tin back into the oven. Bake for 18–20 minutes. You’ll know they’re ready when the edges look set and the centers still have a slight jiggle when you gently nudge the pan. Don’t wait for the centers to be completely firm, they’ll finish setting as they cool.
- Take the tin out of the oven and let the cheesecakes cool right there in the pan for about 10 minutes. This slow cooling helps prevent cracking.
- After 10 minutes, carefully remove the mini cheesecakes from the muffin tin (leaving them in their liners) and place them on a wire rack to cool completely to room temperature. Patience is key here!
- Once they’re totally cool, pop them into the refrigerator for at least 2 hours. This chilling time is essential for the cheesecake to firm up properly and develop that perfect texture. I often make these the day before I need them.
- Just before you’re ready to serve, grab your thawed whipped topping. Spoon or pipe a lovely swirl on top of each chilled mini cheesecake. Add a little piece of orange slice or a sprinkle of fresh zest if you’re feeling fancy!
- Serve and watch them disappear!
Substitutions & Additions
Feeling creative? Here are a few ways you can play with this recipe!
- Different Crusts: Instead of graham cracker crumbs, try crushed vanilla wafers, shortbread cookies, or even gingersnaps for a fun twist.
- Boost the Orange: Add a tiny drop (and I mean tiny, like 1/8 to 1/4 teaspoon) of orange extract to the filling along with the zest and juice for an extra punch of citrus.
- Swirl In: Before baking, swirl a little bit of orange marmalade or even raspberry jam into the top of the filling for a pop of extra flavor and color.
- Garnishes: Besides whipped topping and orange, consider adding a tiny dollop of orange curd, a fresh berry, or a sprinkle of white chocolate shavings.
- Make it Lemon: Swap the orange zest and juice for lemon zest and juice for a delicious Lemon Meringue Pie vibe (use whipped cream or meringue topping!).
Tips for Success
Making cheesecake can seem intimidating, but mini cheesecakes are super forgiving! Here are a few pointers to make sure yours turn out perfect every time.
- Softened Cream Cheese is Key: I can’t stress this enough! Cold cream cheese is lumpy cream cheese. Make sure it’s truly soft before you start beating.
- Don’t Overmix: Especially after adding the eggs. Mixing too much incorporates air, which expands in the oven and then contracts as it cools, leading to those dreaded cracks. Mix until just combined.
- Room Temperature Eggs: Like the cream cheese, room temp eggs incorporate more smoothly and evenly.
- Slight Jiggle is Good: When they’re done baking, the centers should look a little soft and jiggly. They will continue to set as they cool and chill. Overbaking will make them tough and potentially cracked.
- Cooling Process: Letting them cool gradually (first in the pan, then on the wire rack) is important for texture and preventing cracks. Don’t rush this step!
- Prep Ahead: These are fantastic for making in advance! You can make the cheesecakes (steps 1-11) a day or two ahead of time and store them chilled. Add the topping just before serving.
How to Store It
If by some miracle you have any leftovers, storing these is easy!
Keep the mini cheesecakes (without the whipped topping) in an airtight container in the refrigerator for up to 3-4 days. If you’ve already added the whipped topping, they’re best enjoyed within 1-2 days, as the topping can sometimes break down slightly over time. For longer storage, you can freeze the plain, baked cheesecakes (without topping) in an airtight container for up to 1-2 months. Thaw them in the refrigerator before adding the topping and serving.
FAQs
Got questions? Let’s see if I can help!
Q: Can I use reduced-fat cream cheese?
A: I really recommend using full-fat cream cheese for the best texture and richness. Reduced-fat versions can sometimes result in a less stable or creamy cheesecake.
Q: My cheesecake tops cracked! What happened?
A: Don’t worry, this is super common! Usually, it’s caused by overmixing the batter (adding too much air) or by cooling too quickly. The good news? With these mini cheesecakes, you just cover it up with whipped topping anyway! Nobody will ever know.
Q: Can I use fresh whipped cream instead of store-bought whipped topping?
A: Absolutely! Freshly whipped cream would be divine. Just whip heavy cream with a little sugar and vanilla until you get stiff peaks. Add it right before serving.
Q: Do I have to use paper liners?
A: While you could heavily grease a muffin tin, liners make these so incredibly easy to remove cleanly. I highly recommend using them for the best result!

Dreamy Orange Creamsicle Mini Cheesecakes
Ingredients
Equipment
Method
- Step 1: Preheat your oven to 325°F (160°C). Line a 12-count muffin tin with paper liners.
- Step 2: In a small bowl, combine graham cracker crumbs, granulated sugar, and melted butter. Stir until every crumb is coated and mixture resembles wet sand.
- Step 3: Spoon about 1 tablespoon of the crumb mixture into the bottom of each lined muffin cup. Press down firmly with the back of a spoon or small glass.
- Step 4: Bake the crusts in the preheated oven for 5 minutes to help them set. While baking, prepare the filling.
- Step 5: In a large bowl, beat the softened cream cheese with an electric mixer (or whisk) until super smooth and creamy.
- Step 6: Add the sugar, vanilla extract, orange zest, and orange juice to the bowl. Mix until just combined.
- Step 7: Gently beat in the eggs, one at a time, mixing just until each egg is incorporated. Be careful not to overmix.
- Step 8: Spoon or pour the filling over the pre-baked crusts in each muffin cup, filling them about 3/4 of the way.
- Step 9: Carefully place the muffin tin back into the oven. Bake for 18–20 minutes, or until the edges are set and the centers have a slight jiggle.
- Step 10: Take the tin out of the oven and let the cheesecakes cool in the pan for about 10 minutes.
- Step 11: After 10 minutes, carefully remove the mini cheesecakes (in liners) and place them on a wire rack to cool completely to room temperature.
- Step 12: Once completely cool, refrigerate the cheesecakes for at least 2 hours to firm up. They can be made a day or two ahead.
- Step 13: Just before serving, top each chilled cheesecake with a swirl of thawed whipped topping. Garnish with an orange slice or fresh zest if desired. Serve immediately.