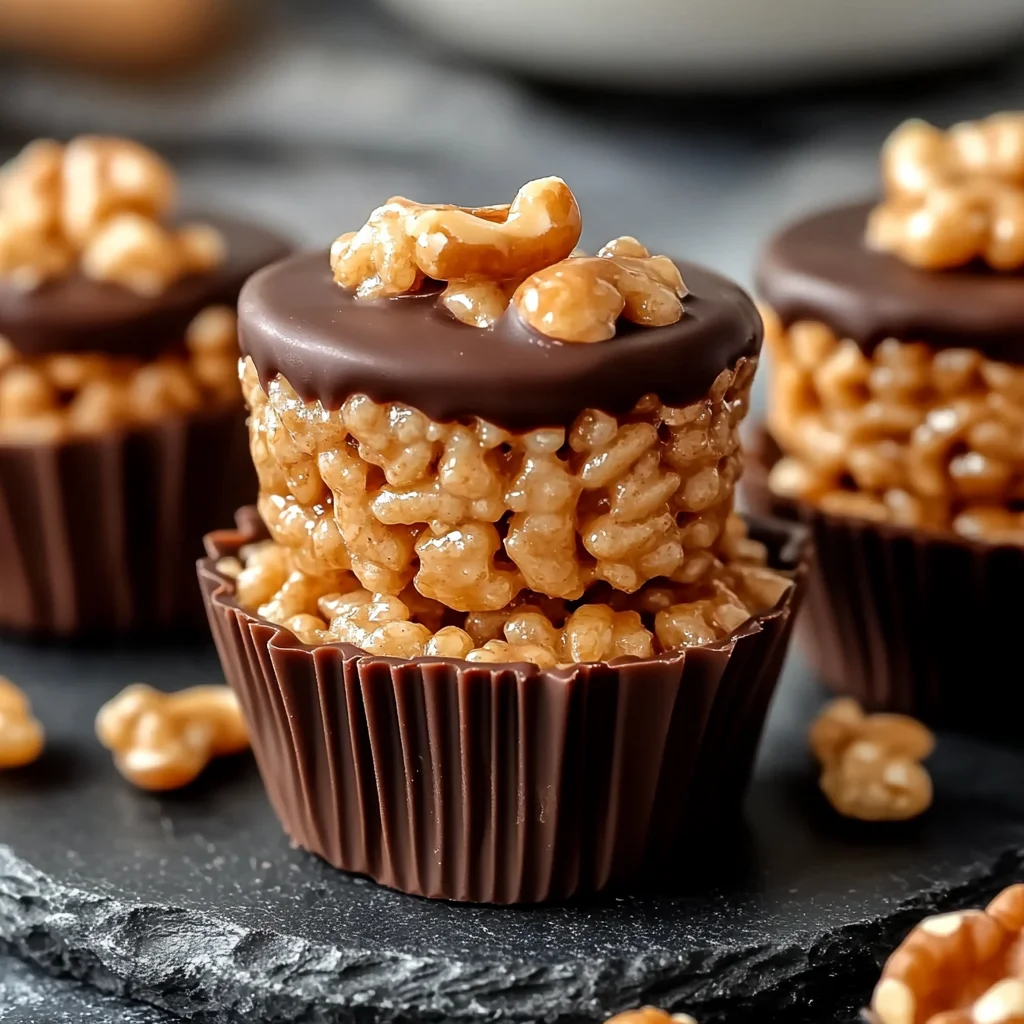
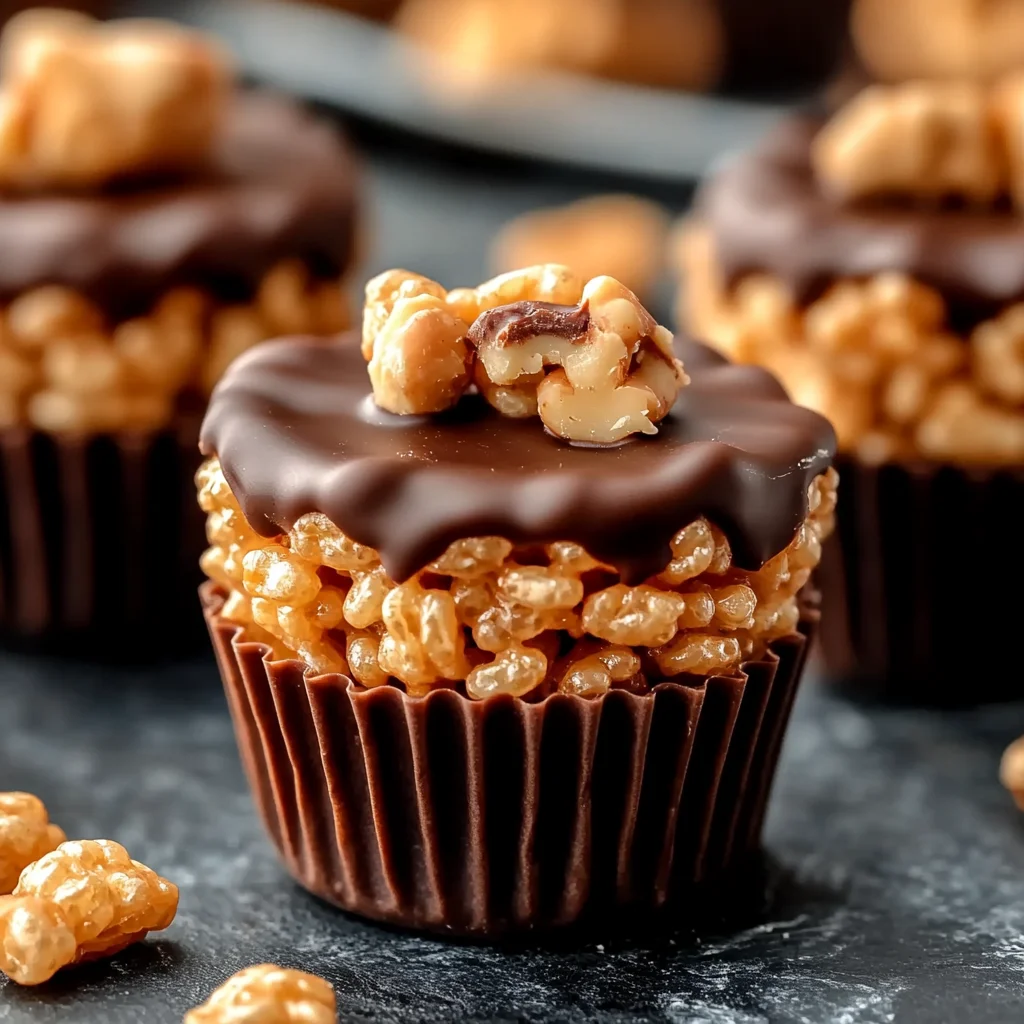
Oh, friend, there are just some tastes that instantly transport you back to simpler times, aren’t there? For me, it’s that dreamy combo of creamy peanut butter and rich chocolate, especially when it’s wrapped up in a crispy, chewy bite. And if you’re anything like me, you probably have fond memories of classic Rice Krispies treats. Well, get ready to combine those two beloved flavors into something truly magical, incredibly easy, and utterly unforgettable: Chocolate Peanut Butter Rice Krispie Cups! These little beauties are the ultimate no-bake indulgence, coming together in minutes and disappearing even faster. Seriously, your taste buds are about to thank you!
Why You’ll Love Chocolate Peanut Butter Rice Krispie Cups
- Fast: From pantry to plate in about 15 minutes of active time! Perfect for those spontaneous sweet cravings.
- Easy: No oven required! Just a saucepan and a microwave, making it a fantastic recipe for beginners or a fun project with the kids.
- Giftable: These cute little cups are perfect for packaging up as homemade gifts or party favors. They look adorable in mini cupcake liners!
- Crowd-pleasing: Who doesn’t love the classic duo of chocolate and peanut butter? These are always a guaranteed hit at potlucks, parties, or just for a family treat. Plus, if you’re a fan of super simple, delightful desserts, you might also adore these easy no-bake caramel pretzel bars!
Ingredients
Gather your ingredients, my friend! You’ll be surprised how few you need for such a delicious outcome.
- 3 cups Rice Krispies cereal: The star of the show, providing that signature crispy crunch.
- 1 cup creamy peanut butter: Your favorite brand will do! I find creamy works best for a smooth texture, but if you’re feeling adventurous, crunchy could add another layer of texture.
- ½ cup unsalted butter: This helps bind everything together and adds a rich, buttery flavor.
- 1 cup mini marshmallows: These are essential for that classic gooey, chewy base. They melt down perfectly!
- 1 cup chocolate chips: Milk, semi-sweet, or even dark chocolate chips work wonderfully here. Use what you love!
- ½ tsp vanilla extract (optional): A little splash of vanilla really enhances the flavors and adds a hint of warmth. Don’t skip it if you have it!
- Pinch of sea salt (optional): Trust me on this one! A tiny sprinkle on top of the chocolate layer elevates the whole experience, making the chocolate and peanut butter sing.
How to Make Chocolate Peanut Butter Rice Krispie Cups
Let’s get cooking! Or, well, no-cooking!
- Melt the Base: Grab a medium saucepan and set it over low heat. Add your unsalted butter and mini marshmallows. Now, this is important: stir consistently! You want everything to melt down into a beautiful, smooth, gooey mixture without burning. Patience is key here, my friend.
- Add Peanut Butter: Once your butter and marshmallows are perfectly smooth, take the saucepan off the heat. Stir in the creamy peanut butter and your optional vanilla extract. Keep stirring until the mixture is fully combined and looks lusciously creamy. It should be a uniform, light brown color.
- Mix with Cereal: Now, for the crunch! Pour your Rice Krispies cereal into a large bowl. Add the warm peanut butter mixture on top. Gently fold everything together with a spatula. You want to coat all those little rice crisps evenly without crushing them too much. I like to be gentle here to keep their airy texture!
- Shape the Cups: Line a standard muffin tin with paper liners. Spoon the cereal mixture evenly into each cup. Then, using the back of a spoon or even your fingers (lightly greased if it’s too sticky!), gently press down on the mixture in each cup to create a flat, compact surface. This forms the perfect base for your chocolate layer.
- Add Chocolate Layer: Time for the grand finale! Place your chocolate chips in a microwave-safe bowl. Microwave them in 20-second intervals, stirring well between each one, until the chocolate is completely smooth and melted. Spoon this glorious melted chocolate over each Rice Krispie cup, spreading it evenly to cover the top. If you’re using it, sprinkle a tiny pinch of sea salt on top of each cup – it’s a game-changer!
- Set and Serve: The hardest part: waiting! Let the cups cool at room temperature for about 20 minutes to set. If you’re impatient (like me!), pop them in the refrigerator for 10-15 minutes to speed things up. Once they’re firm, carefully remove the paper liners and dig in!
Substitutions & Additions
This recipe is super versatile, so feel free to play around!
- Nut Butter Swap: Not a peanut butter fan? Try almond butter or cashew butter for a different flavor profile. Just make sure it’s a creamy variety for the best texture.
- Chocolate Choices: Experiment with different types of chocolate! White chocolate, dark chocolate, or even a mix can be delicious. You could also drizzle a little extra melted peanut butter on top for a swirled effect.
- Extra Crunch: Fold in a handful of chopped peanuts, mini chocolate candies, or even some crushed pretzels (for that sweet and salty combo!) with the Rice Krispies.
- Fun Toppings: Before the chocolate sets, sprinkle with colorful sprinkles, shredded coconut, or a few extra mini marshmallows.
- Make it a Bar: Instead of cups, press the entire mixture into a greased 8×8 inch pan, top with chocolate, and slice into bars once set.
Tips for Success
Even though this is an easy recipe, a few little tips can make it absolutely perfect!
- Low and Slow Melting: When melting the butter and marshmallows, keep the heat on low. This prevents the marshmallows from hardening or burning, ensuring a smooth, pliable base.
- Don’t Overmix the Cereal: Be gentle when folding in the Rice Krispies. Overmixing can break the cereal and make the cups less crispy.
- Press Firmly: When pressing the mixture into the muffin liners, make sure you press down firmly but gently. This ensures the cups hold their shape well and aren’t crumbly.
- Quality Ingredients Matter: While simple, using good quality peanut butter and chocolate chips will really make a difference in the final taste.
- Parchment Paper is Your Friend: If you’re worried about sticking, you can lightly grease your muffin liners or even use silicone muffin cups.
How to Store Chocolate Peanut Butter Rice Krispie Cups
These treats are best enjoyed fresh, but they store well too!
- Countertop: You can store them in an airtight container at room temperature for up to 2-3 days. They might get a little softer over time.
- Refrigerator: For a firmer, chewier bite and extended freshness, store them in an airtight container in the refrigerator for up to 5-7 days. Just let them come to room temperature for a few minutes before serving if you prefer a softer texture.
- Freezer: Yes, you can freeze them! Place the set cups in a single layer on a baking sheet and freeze until solid. Then transfer them to a freezer-safe bag or container for up to 2 months. Thaw at room temperature for about 15-30 minutes before enjoying.
FAQs
Got questions? I’ve got answers!
- Q: Can I use crunchy peanut butter?
A: You can, but it will change the texture of the base from creamy to more chunky. If you love extra crunch, go for it! Just be aware it might not spread quite as smoothly. - Q: Do these really need to be refrigerated?
A: Not strictly, but refrigerating helps them set faster and keeps them firmer, especially if your home is warm. It also extends their shelf life. - Q: How can I make these for a crowd?
A: This recipe easily doubles! Just use a larger saucepan and a bigger bowl for mixing. You’ll need two muffin tins or make them in a 9×13 inch pan as bars. - Q: Can I use different types of chocolate?
A: Absolutely! While milk chocolate is classic, feel free to experiment with semi-sweet or dark chocolate chips. If you love a good peanut butter and chocolate combo, you should definitely check out our easy peanut butter cup dump cake too!
I hope you fall head over heels for these delightful Chocolate Peanut Butter Rice Krispie Cups. They’re proof that sometimes the simplest treats are the most satisfying. Happy no-baking, my friends!
For more delicious and easy recipes, be sure to follow us on Pinterest!

Chocolate Peanut Butter Rice Krispie Cups
Ingredients
Equipment
Method
- Step 1: Melt the Base: Grab a medium saucepan and set it over low heat. Add your unsalted butter and mini marshmallows. Stir consistently until everything melts down into a beautiful, smooth, gooey mixture without burning. Patience is key here.
- Step 2: Add Peanut Butter: Once your butter and marshmallows are perfectly smooth, take the saucepan off the heat. Stir in the creamy peanut butter and your optional vanilla extract. Keep stirring until the mixture is fully combined and looks lusciously creamy. It should be a uniform, light brown color.
- Step 3: Mix with Cereal: Pour your Rice Krispies cereal into a large bowl. Add the warm peanut butter mixture on top. Gently fold everything together with a spatula. You want to coat all those little rice crisps evenly without crushing them too much. Be gentle to keep their airy texture!
- Step 4: Shape the Cups: Line a standard muffin tin with paper liners. Spoon the cereal mixture evenly into each cup. Then, using the back of a spoon or even your fingers (lightly greased if it's too sticky!), gently press down on the mixture in each cup to create a flat, compact surface. This forms the perfect base for your chocolate layer.
- Step 5: Add Chocolate Layer: Place your chocolate chips in a microwave-safe bowl. Microwave them in 20-second intervals, stirring well between each one, until the chocolate is completely smooth and melted. Spoon this glorious melted chocolate over each Rice Krispie cup, spreading it evenly to cover the top. If you're using it, sprinkle a tiny pinch of sea salt on top of each cup.
- Step 6: Set and Serve: Let the cups cool at room temperature for about 20 minutes to set. If you're impatient, pop them in the refrigerator for 10-15 minutes to speed things up. Once they're firm, carefully remove the paper liners and dig in!.