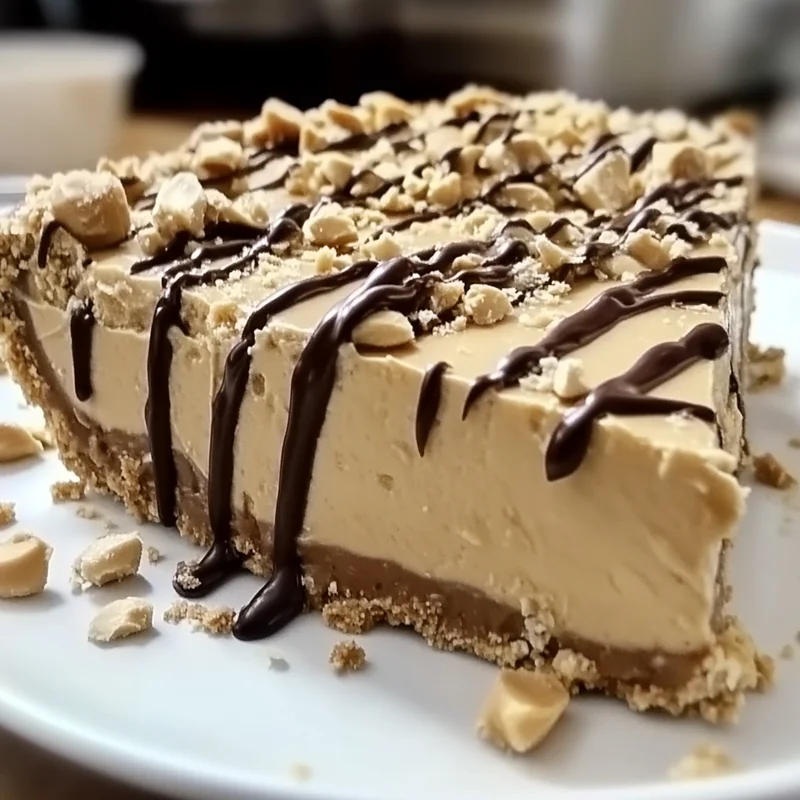
There’s something truly magical about peanut butter pie. Maybe it’s the creamy, dreamy texture or the way the rich peanut butter flavor instantly takes you back to childhood afternoons spent sneaking spoonfuls of your favorite peanut butter jar. This no bake peanut butter pie has that nostalgic charm but with a modern twist—it’s incredibly easy to make, doesn’t require turning on the oven, and comes together in no time. Whether you’re whipping it up for a family gathering, a casual potluck, or just because you deserve a little something sweet, this recipe is a keeper.
I remember the first time I made this pie; I was nervous about the no bake part, but once chilled, it set perfectly with a silky texture that melted in your mouth. It’s one of those desserts that feels fancy but is so simple, you’ll want to make it again and again. If you love peanut butter and creamy pies but hate complicated recipes, this is your new best friend.
Why You’ll Love No Bake Peanut Butter Pie
- Fast: From start to fridge, it only takes about 15 minutes to prep.
- Easy: No baking skills required—just mix, press, and chill.
- Giftable: Perfect for sharing with friends or bringing to parties.
- Crowd-pleasing: Peanut butter fans and dessert lovers alike will ask for seconds.
Ingredients
Let’s talk about the stars of this pie. You don’t need a pantry full of fancy ingredients—just some everyday staples that come together beautifully.
- Graham cracker crumbs (1 ½ cups): The base of your crust, giving it a buttery crunch and subtle sweetness.
- Unsalted butter, melted (½ cup): This binds the graham crackers together and adds richness.
- Creamy peanut butter (1 cup): Choose your favorite brand, creamy for smooth texture and classic flavor.
- Powdered sugar (1 cup): Adds sweetness and helps thicken the filling without grittiness.
- Cream cheese, softened (8 oz): Brings a lovely tang and creamy body to the filling.
- Vanilla extract (1 tsp): Just a touch to elevate all the flavors.
- Whipped topping (1 cup): Something like Cool Whip or homemade whipped cream for lightness and fluff.
- Optional garnish: Chocolate shavings or mini chocolate chips for that extra little pop of texture and flavor.
Using softened cream cheese is key here. If it’s too cold, you’ll end up with lumps in your filling. Also, I love adding a bit of vanilla extract to round out the flavors—it’s a small touch but makes a big difference.
How to Make No Bake Peanut Butter Pie
Ready to dive in? I’ll walk you through the process step-by-step so you’re confident from crust to final garnish.
- Make the crust: In a large mixing bowl, combine the graham cracker crumbs and the melted unsalted butter. Stir them together until the crumbs look like wet sand—moist enough to hold together but not soggy. Now, press this mixture firmly into the bottom and up the sides of a 9-inch pie dish. Don’t rush this step; use the bottom of a glass or even your fingers to compact the crust evenly. Pop it in the fridge to chill while you prepare the filling. This helps the crust set up nice and firm.
- Prepare the filling: In a separate bowl, beat the softened cream cheese with a hand mixer or a sturdy whisk until completely smooth and creamy. Next, add the peanut butter, powdered sugar, and vanilla extract. Mix it all together until you have a luscious, even mixture. The powdered sugar sweetens and thickens the filling, balancing the peanut butter’s saltiness.
- Fold in the whipped topping: Gently fold the whipped topping into the peanut butter mixture. Take your time here—folding (instead of stirring) keeps the filling light and fluffy. If you stir too vigorously, you might lose that airy texture.
- Assemble the pie: Spoon the creamy filling into the chilled crust, smoothing the surface with a spatula or the back of a spoon. Cover the pie tightly with plastic wrap and place it in the refrigerator for at least 4 hours, but ideally overnight. This chilling time lets the filling firm up perfectly so your pie slices cleanly.
- Garnish and serve: Just before serving, add your optional chocolate shavings or mini chocolate chips on top for a pretty and tasty finish. Slice and serve chilled for the best experience.
This pie is such a crowd-pleaser at potlucks and family dinners. If you’re a fan of other no bake desserts, you might also enjoy the easy no bake caramel pretzel bars here on the blog, which offer a fun salty-sweet combo perfect for snack time or dessert.
Substitutions & Additions
One of the best things about this no bake peanut butter pie is how flexible it is. Feel free to switch things up based on what you have or your flavor preferences:
- Crust: Instead of graham cracker crumbs, try crushed chocolate cookies or even crushed pretzels for a salty twist.
- Peanut Butter: Use natural peanut butter for a more intense, less sweet flavor. Almond or cashew butter can also work beautifully if you want a nutty variation.
- Sweetener: If powdered sugar isn’t your thing, try a bit of honey or maple syrup, although the texture will be different.
- Whipped topping: Homemade whipped cream is a delicious upgrade if you have the time; it adds an extra fresh taste.
- Chocolate layer: For a richer pie, melt some chocolate and spread a thin layer on the crust before adding the filling—it’s like a peanut butter cup in pie form!
- Crunch: Add chopped peanuts or toffee bits to the filling or as a topping for added texture.
For another dessert that pairs well with peanut butter pie, you might want to check out the No Bake Oreo Bars—they’re just as simple and delicious, perfect for a dessert spread.
Tips for Success
Though this recipe is pretty forgiving, here are some of my personal tips to make sure your no bake peanut butter pie turns out perfectly every time:
- Use softened cream cheese: This is a must for a smooth, lump-free filling. Leave it out for 30-60 minutes before mixing if you’re short on time, or microwave in 5-second increments.
- Don’t skip chilling: The pie needs at least 4 hours in the fridge to set properly. Overnight is best for clean slices and a firm texture.
- Press the crust firmly: A well-packed crust means a sturdy base that won’t crumble when you slice the pie.
- Fold whipped topping gently: To keep the airy texture, fold in the whipped topping slowly instead of stirring vigorously.
- Prep ahead: This pie is a fantastic make-ahead dessert. Prepare it the day before your event and keep it covered in the fridge. It tastes even better after sitting overnight!
- Serving tip: Use a warm knife to slice the pie for cleaner edges—just run the knife under hot water and dry it off before cutting.
If you love desserts that are easy but feel special, you might also enjoy the Easy No Bake Peanut Butter Cup Poke Cake—it’s a fun twist with similar flavors.
How to Store No Bake Peanut Butter Pie
Storage is simple and convenient with this pie. Because it’s made with dairy and whipped topping, you’ll want to keep it refrigerated at all times.
- Refrigerator: Cover the pie tightly with plastic wrap or keep it in an airtight container. It will stay fresh for up to 4 days. Just remember the longer it sits, the softer the crust may get, so best enjoyed within a few days.
- Freezer: You can freeze the pie for up to 1 month. Wrap it well in plastic wrap and then in aluminum foil to prevent freezer burn. Thaw overnight in the fridge before serving. The texture will be slightly different but still delicious!
This pie is a wonderful option for weeks when you want a quick dessert ready to go, much like some other no bake favorites you’ll find on this site.
FAQs
Q: Can I make this pie gluten-free?
A: Absolutely! Just swap the graham cracker crumbs for gluten-free graham crumbs or crushed gluten-free cookies, and you’re good to go.
Q: Can I use crunchy peanut butter instead of creamy?
A: You can, but keep in mind the texture will be chunkier. It adds a nice crunch if you like that, but creamy peanut butter gives the smoothest filling.
Q: What if I don’t have a pie dish?
A: No worries! You can make this in a springform pan or even in individual dessert cups for a fun presentation.
Q: Can I substitute the whipped topping with heavy cream?
A: Yes! Whip heavy cream with a bit of sugar until stiff peaks form and fold it in just as you would the whipped topping.
If you want to explore more easy, no bake dessert ideas or other quick sweet treats, be sure to visit Easily Cooked—there’s always something comforting and delicious waiting for you.
Thanks for spending time in the kitchen with me today. If you try this no bake peanut butter pie, I’d love to hear how it turns out! And if you’re looking for more cozy dessert inspiration, you might enjoy the Giant No Bake Reese’s Peanut Butter Pie for an extra indulgent peanut butter experience.
Don’t forget to follow me on Pinterest for more scrumptious recipes and kitchen inspiration!
No Bake Peanut Butter Pie
Ingredients
Equipment
Method
- Step 1: In a large mixing bowl, combine graham cracker crumbs and melted unsalted butter. Stir until mixture resembles wet sand. Press firmly into the bottom and up the sides of a 9-inch pie dish. Chill in fridge while preparing filling.
- Step 2: In a separate bowl, beat softened cream cheese until smooth. Add peanut butter, powdered sugar, and vanilla extract, mixing until even and creamy.
- Step 3: Gently fold whipped topping into the peanut butter mixture, taking care to keep the filling light and fluffy.
- Step 4: Spoon the filling into the chilled crust and smooth the surface. Cover tightly with plastic wrap and refrigerate for at least 4 hours, preferably overnight, to set.
- Step 5: Before serving, garnish with chocolate shavings or mini chocolate chips if desired. Slice and serve chilled for best texture and flavor.