There’s something undeniably nostalgic about a creamy, chocolatey pie that doesn’t require an oven. Maybe it takes you back to childhood afternoons spent sneaking bites of chocolate or those warm family gatherings where simple desserts stole the show. The No Bake Hershey Pie is one of those timeless treasures—rich, velvety, and utterly comforting, yet surprisingly easy to make. If you’ve ever wished for a dessert that feels indulgent but won’t tie you up in the kitchen, this recipe is your new best friend.
What I love most about this pie is how it combines the classic Hershey’s chocolate flavor with the fluffy softness of marshmallows and the lightness of Cool Whip, all nestled in a crunchy Oreo crumb crust. It’s quick to whip up, doesn’t heat up your kitchen, and makes a memorable treat for any occasion—whether it’s a holiday potluck, a casual weeknight dessert, or a sweet surprise for someone special. Let me walk you through every detail, so you can enjoy this luscious pie with zero stress and maximum smiles.
Why You’ll Love No Bake Hershey Pie
- Fast: From start to fridge, this pie comes together in under 10 minutes, giving you more time to relax or entertain.
- Easy: No complicated steps, no baking skills needed—perfect for beginners or anyone craving a no-fuss dessert.
- Giftable: Wrapped up in a pretty pie plate, it’s a thoughtful, homemade gift that friends and family will adore.
- Crowd-pleasing: Chocolate lovers of all ages will be lining up for seconds, making it a hit at gatherings big and small.
Ingredients
Before you dive in, let’s take a look at what you’ll need. Each ingredient plays an important role in creating that perfect balance of flavors and textures.
- 16 large marshmallows: These melt down to create a light, fluffy base that gives the pie its signature airy texture.
- ½ cup milk: Just enough to help melt the marshmallows smoothly without making the mixture too thin.
- 8 ounces Hershey’s chocolate bars (about 6 regular-sized bars): The star of the show! Hershey’s gives this pie that classic, rich chocolate flavor we all love.
- 8 ounces Cool Whip whipped topping: Adds creaminess and a soft finish, keeping the pie light and dreamy.
- 1 Oreo crumb crust: The crunchy, chocolatey base that contrasts beautifully with the silky filling. You can find these pre-made in stores or make your own.
If you’re curious about homemade crusts or alternative no-bake desserts, you might enjoy exploring other quick treats like No Bake Oreo Bars for inspiration.
How to Make No Bake Hershey Pie
Ready to get started? Here’s a detailed, step-by-step guide that will help you craft this delicious pie with ease.
- Break chocolate bars into small pieces. Take about six regular Hershey’s bars and snap them into bite-sized chunks. Don’t forget to set aside about 8 small pieces for garnish later—this little touch makes all the difference when serving.
- Combine marshmallows and milk in a saucepan. Use a medium saucepan and place it over medium-low heat. Stir constantly as the marshmallows melt into the milk. This process usually takes about 5 to 7 minutes, and you’ll notice the mixture turning smooth and glossy. Be patient here—low heat and steady stirring prevent burning.
- Remove from heat and stir in the chocolate. Once your marshmallow mixture is smooth, add the chocolate pieces. Stir gently but thoroughly until the chocolate melts completely and the mixture becomes silky and uniform. This step creates that luscious chocolate base that’s so hard to resist.
- Let the mixture cool for about 30 minutes. Cooling is key here—it prevents the whipped topping from melting when you fold it in. I usually place the saucepan in a cool spot or near an open window to speed this up, but avoid the fridge as it might harden the mixture too quickly.
- Fold in the Cool Whip gently. You want to maintain as much fluffiness as possible, so fold the whipped topping in carefully using a spatula. The goal is a smooth, creamy filling that’s light but still holds together nicely.
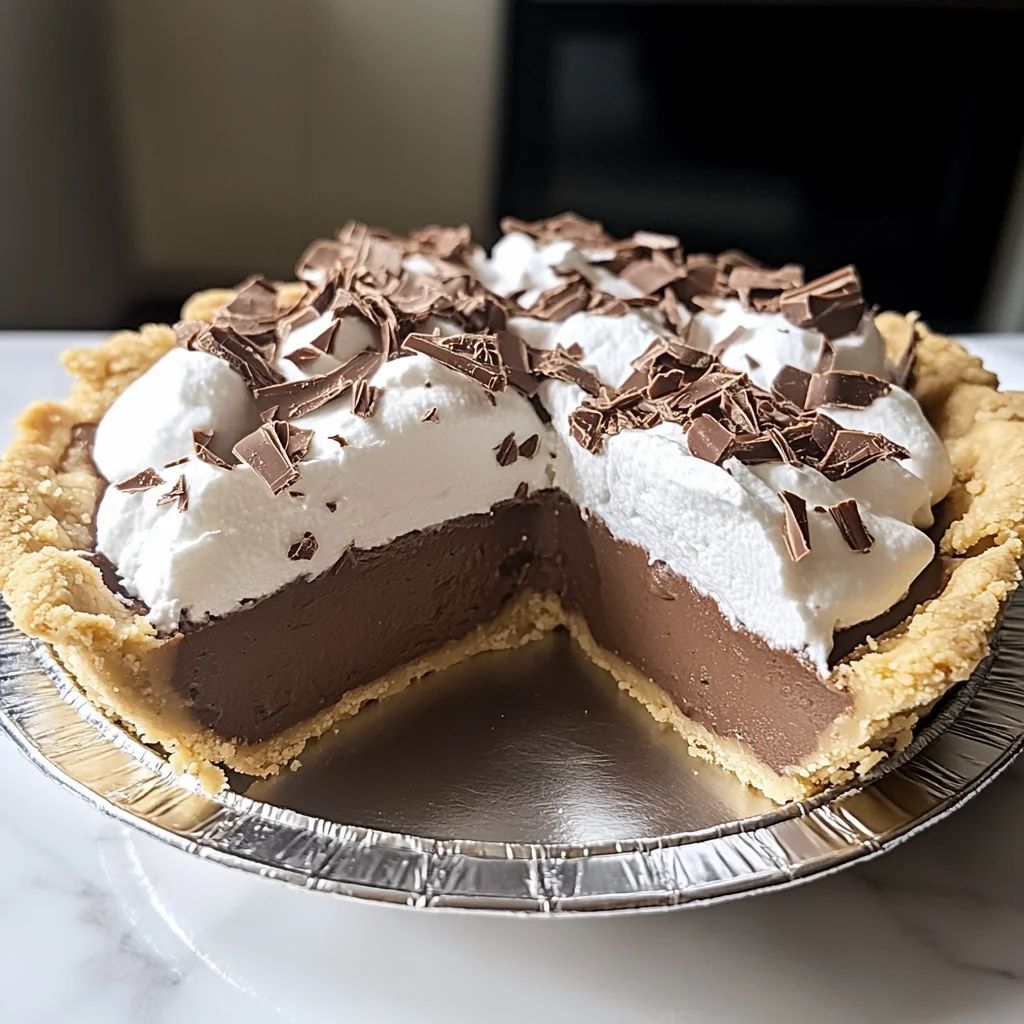
- Spoon the filling into the Oreo crust. Pour the mixture into your Oreo crumb crust and spread it evenly with the back of a spoon or an offset spatula. The contrast between the crunchy crust and the creamy filling is one of my favorite parts of this pie.
- Cover and refrigerate. Lightly spray a piece of plastic wrap with nonstick spray before covering the pie—this prevents it from sticking to the surface. Pop it into the fridge for at least 4 hours, though overnight is even better to let the flavors meld and the filling set perfectly.
- Garnish and serve. Right before serving, add a dollop of whipped topping on each slice and sprinkle the reserved chocolate pieces on top. It’s a simple but elegant finishing touch that makes the pie look as good as it tastes.
This pie pairs wonderfully with a cup of coffee or a glass of cold milk, and it’s always a hit at parties. If you’re looking for more no-bake dessert ideas to impress, be sure to check out this crowd-pleasing Easy No Bake Caramel Pretzel Bars—they’re perfect for when you want to try something just as effortless but a little different.
Substitutions & Additions
One of the great things about this recipe is how adaptable it is. Whether you’re catering to dietary needs or just want to mix things up, here are some ideas to make this pie your own.
- Marshmallows: If you’re not a fan of marshmallows or want to avoid them, you can substitute with 1 cup of mini marshmallows or use a marshmallow fluff. For a dairy-free option, try a vegan marshmallow brand.
- Milk: Whole milk gives the best creamy texture, but you can swap in almond milk, oat milk, or any milk alternative you prefer.
- Chocolate: While Hershey’s bars are classic, feel free to use semi-sweet or dark chocolate bars if you want a richer or less sweet flavor. You can even try mixing in some chocolate chips for texture.
- Whipped topping: Cool Whip works beautifully, but homemade whipped cream or coconut whipped cream is a delightful alternative for extra creaminess or to accommodate dietary preferences.
- Crust: Oreo crumb crust is my favorite for the chocolate-chocolate combo, but you could try a graham cracker crust or even a nut-based crust for a different flavor profile. For a fun twist, add some chopped nuts or a sprinkle of sea salt on top before serving.
- Add-ins: For a little crunch, sprinkle chopped pecans or toasted coconut into the filling before chilling. You might also swirl in some peanut butter or caramel sauce for a decadent upgrade.
Feeling adventurous? This pie’s versatility reminds me of other no-bake treats like the No Bake Oreo Mud Pie, which adds a playful twist with cookie chunks and a fudgy filling. It’s fun to experiment and find your perfect chocolate pie match!
Tips for Success
Making a no bake pie might seem straightforward, but a few simple tips can make your dessert turn out perfectly every time. Here’s what I’ve learned from making this pie countless times.
- Don’t rush cooling. Letting the chocolate mixture cool for about 30 minutes before adding the whipped topping is crucial. Adding it while warm will cause the topping to melt and lose its fluffy texture.
- Stir gently but thoroughly. When folding in Cool Whip, use a gentle hand to keep the air in but make sure everything is evenly combined. Overmixing can deflate the filling.
- Use a nonstick spray on plastic wrap. This simple trick prevents the wrap from sticking to your pie’s surface, keeping it smooth and pretty.
- Chill adequately. Refrigerate the pie for at least 4 hours to let it set properly. If you’re short on time, chilling overnight is even better and makes slicing easier.
- Prep ahead. This pie is a great make-ahead dessert. You can prepare it a day in advance, freeing up your time on the day of your event.
- Use quality ingredients. Since the recipe is simple, every ingredient shines through. Using real Hershey’s chocolate bars and fresh whipped topping makes a noticeable difference.
If you want to master more easy, no-fuss desserts, I highly recommend browsing through the wide range of recipes over at Easily Cooked—there’s always something new and delicious to try!
How to Store No Bake Hershey Pie
Storing your No Bake Hershey Pie correctly ensures it stays fresh and delicious for when you’re ready to indulge or share.
- Refrigerate: Keep the pie covered and stored in the refrigerator. It will stay fresh for up to 2 days, though I highly recommend enjoying it within the first 24 hours for the best texture.
- Cover properly: Use plastic wrap sprayed lightly with nonstick spray or a pie container with a lid to avoid drying out the surface and absorbing fridge odors.
- Freezing: While you can freeze this pie, the texture of the whipped topping might change slightly upon thawing. If you do freeze it, wrap tightly in plastic and foil, then thaw overnight in the fridge before serving.
- Serving after storage: Let the pie sit at room temperature for about 10 minutes before slicing to soften slightly and enhance flavor.
For more tips on no-bake and make-ahead desserts, consider trying other chilled pies like the Holiday Eggnog Pie, which also stores beautifully and brings festive flavors to the table.
FAQs
Q: Can I use chocolate chips instead of Hershey’s bars?
A: Absolutely! Semi-sweet or milk chocolate chips work well. Just use the same amount and melt them as directed.
Q: What if I don’t have an Oreo crust?
A: You can make your own by crushing Oreos and mixing them with melted butter, then pressing into a pie dish. Or try a graham cracker crust for a lighter option.
Q: Can I make this pie dairy-free?
A: Yes! Use dairy-free milk alternatives and vegan marshmallows. For the whipped topping, coconut whipped cream is a great substitute.
Q: How do I get clean slices when serving?
A: Chill the pie well and use a sharp knife dipped in hot water before slicing. Wipe the knife clean between cuts for neat slices.
Making a pie like this always brings a little bit of joy and comfort, kind of like the feeling you get with classic desserts like the Ultimate Classic Carrot Cake. Simple ingredients, a little patience, and a lot of love go a long way in creating something truly special.
So grab your ingredients, put on your favorite music, and enjoy the process of creating your own No Bake Hershey Pie. It’s a delicious way to make memories and treat yourself and your loved ones to something sweet and satisfying.
Happy baking (or rather, no baking!) and enjoy every decadent bite.
Don’t forget to follow my Pinterest for more delicious recipes and kitchen inspiration!
No Bake Hershey Pie
Ingredients
Equipment
Method
- Step 1: Break Hershey’s chocolate bars into small pieces, reserving about 8 small pieces for garnish.
- Step 2: Combine marshmallows and milk in a medium saucepan over medium-low heat. Stir constantly until marshmallows melt and mixture is smooth, about 5 to 7 minutes.
- Step 3: Remove from heat and stir in the chocolate pieces until completely melted and silky.
- Step 4: Let the mixture cool for about 30 minutes to prevent melting the whipped topping.
- Step 5: Gently fold in the Cool Whip using a spatula to maintain fluffiness.
- Step 6: Spoon the filling into the Oreo crumb crust and spread evenly.
- Step 7: Cover the pie with plastic wrap sprayed with nonstick spray and refrigerate for at least 4 hours or overnight.
- Step 8: Before serving, garnish each slice with a dollop of whipped topping and sprinkle the reserved chocolate pieces on top.