Hey friend! Let’s talk pie. Remember those effortless desserts that still felt incredibly special? The ones that appeared on the table almost like magic, bringing smiles all around? This Chocolate Cherry Cream Pie is exactly that kind of dessert. It’s the perfect mix of rich chocolate, sweet cherries, and creamy goodness, and honestly, it’s so simple to put together, you’ll wonder where it’s been all your life. It’s the kind of pie you can whip up for a last-minute get-together, a weeknight treat, or just because you deserve a little slice of heaven. No complicated steps, no fancy techniques – just pure, delicious comfort.
Why You’ll Love This Recipe
- Fast
- Easy
- Giftable
- Crowd-pleasing
Ingredients
Gathering your ingredients for this pie is a breeze. You likely have some of these already!
- 1 pre-baked 9-inch pie crust: Use your favorite! Store-bought is totally fine and keeps things super simple, but if you have a killer homemade crust recipe, go for it. Just make sure it’s fully baked and completely cooled.
- 1 can (21 oz) cherry pie filling: This is the star of the fruit layer. I love the classic canned stuff for its ease, but if you have a fantastic homemade cherry filling, that would be amazing too!
- 1 box (3.9 oz) chocolate pudding mix (instant or cook and serve): Either type works! Just follow the box directions for preparing it as pudding. We’re going for that smooth, creamy chocolate layer.
- 2 cups cold milk (for pudding mix): Make sure it’s nice and cold – it helps the pudding set up beautifully. Whole milk or 2% usually gives the best texture.
- 1 ½ cups whipped cream (homemade or good quality store-bought): This adds a light, airy contrast to the rich chocolate and cherry. Freshly whipped is always lovely, but a good quality store-bought tub is a fantastic shortcut!
- ½ cup chocolate chips (semi-sweet or dark): For that extra little sprinkle of chocolatey goodness on top. Semi-sweet or dark add a nice depth of flavor.
- Fresh cherries for garnish (optional): Not required for taste, but they make the pie look absolutely stunning!
How to Make It
Okay, let’s get this deliciousness assembled. It’s so easy, you’ll barely break a sweat!
First things first, double-check that your 9-inch pie crust is all pre-baked and completely cooled down. A warm crust is not your friend here!
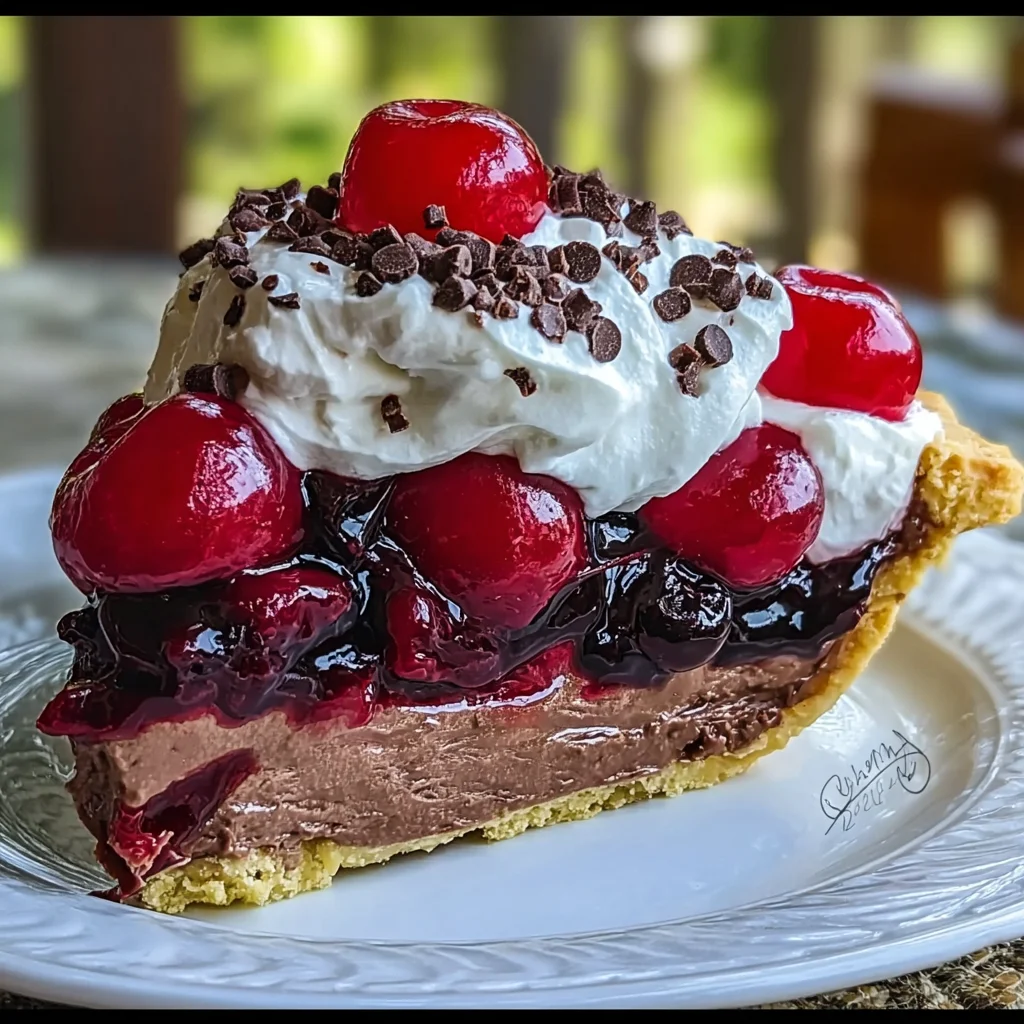
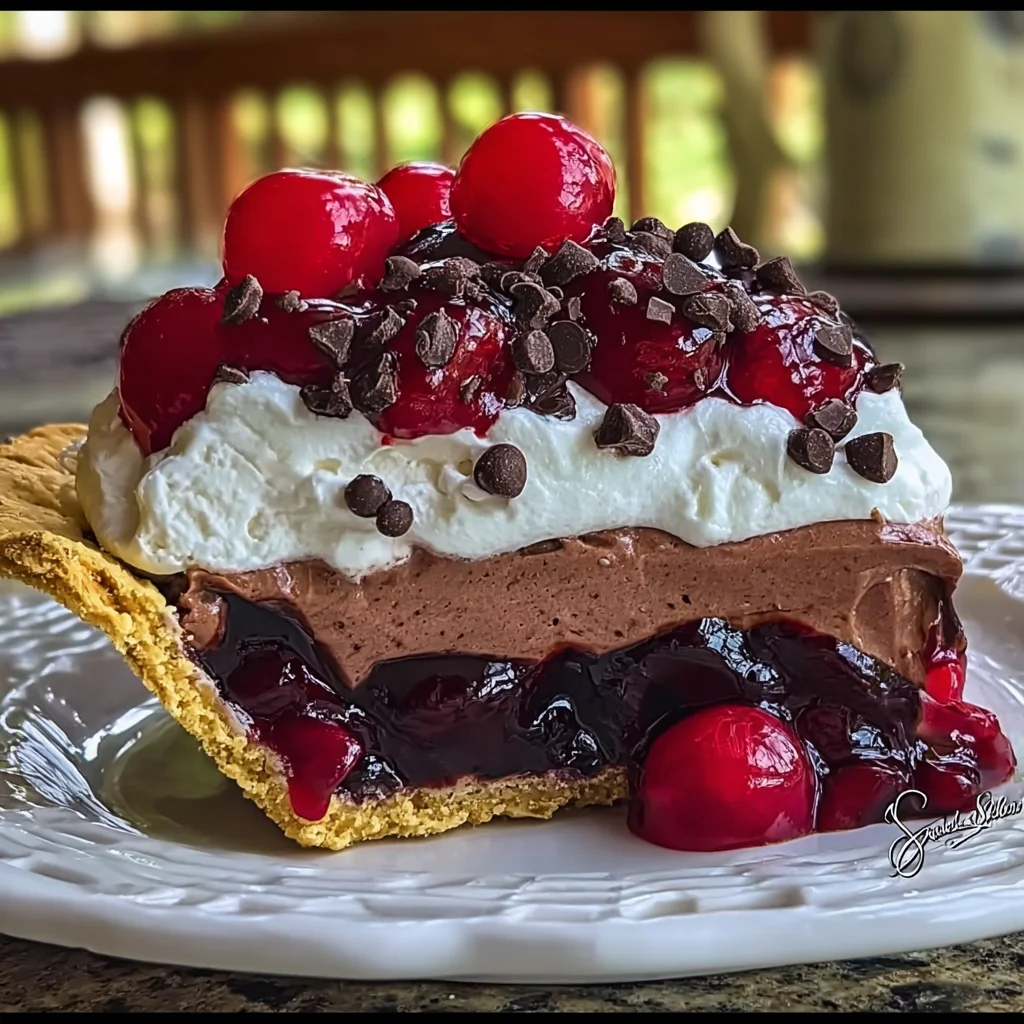
Next, grab that can of cherry pie filling. Open it up and spoon the whole delicious mess evenly across the bottom of your cool pie crust. Get it spread out nicely so every slice gets plenty of cherries.
Now for the chocolate magic! In a medium bowl, whisk up that chocolate pudding mix with the 2 cups of cold milk. Follow the package instructions exactly for whisking time. You want it to be nice and thickened – smooth and glossy.
Carefully pour the smooth, rich chocolate pudding over the cherry layer in the pie crust. Gently spread it out evenly using a spatula or the back of a spoon, making sure it completely covers the cherries.
Now for the creamy cloud! Gently spread the 1 ½ cups of whipped cream over the chocolate pudding layer. Take your time with this so you don’t mix the layers too much. You want distinct stripes of cherry, chocolate, and cream!
Time for the final touch before chilling! Sprinkle the ½ cup of chocolate chips evenly over the whipped cream layer. This adds a lovely texture and extra chocolate punch.
If you have some fresh cherries on hand and want to make your pie look extra special, arrange them artfully on top of the chocolate chips.
Now, the hardest part: waiting! Pop this beautiful assembled pie into the refrigerator to chill for at least 2 hours. This time is crucial for the layers to set and the flavors to meld together.
Finally, when you simply can’t wait another minute (I don’t blame you!), take the pie out, slice it up, and serve it chilled. Enjoy every single bite!
Substitutions & Additions
Want to put your own spin on this pie? Go for it! Here are a few ideas:
- Change the fruit: Not a cherry fan? Try blueberry, strawberry, or even apple pie filling!
- Switch the pudding: Vanilla pudding or even cheesecake flavored pudding would be delightful with the cherry layer.
- Easy Cream Topping: Instead of whipping cream yourself, a tub of frozen whipped topping (like Cool Whip) is a super easy substitute. Thaw it in the fridge first!
- Add Nuts: Sprinkle toasted chopped almonds, pecans, or walnuts over the whipped cream along with the chocolate chips for extra crunch.
- Chocolate Drizzle: Melt some extra chocolate chips with a tiny bit of oil or butter and drizzle it over the top before serving.
- Make it Richer: Fold a few tablespoons of softened cream cheese into your whipped cream for a richer, slightly tangy topping.
Tips for Success
Even though this pie is easy, a couple of simple tips will ensure it turns out perfectly every time:
- Cool Crust is Key: Seriously, make sure that pie crust is completely cooled before adding the fillings. A warm crust can make your layers messy.
- Whisk Pudding Well: Follow the package directions and whisk the pudding until it starts to thicken. You want it smooth and not lumpy.
- Be Gentle with the Whipped Cream: When spreading the whipped cream, use a gentle hand so you don’t accidentally mix it into the chocolate layer below.
- Don’t Skip the Chill Time: The 2-hour chilling period is essential. It allows the pudding to firm up completely and lets all the flavors get happy together.
- Use Quality Ingredients: Since there are only a few ingredients, using ones you like (like a good quality pie filling and chocolate chips) will make a difference in the final taste.
How to Store It
This pie needs to stay cool! Once assembled, keep the pie covered loosely with plastic wrap or aluminum foil in the refrigerator. It’s best enjoyed within 2-3 days. The crust might soften a bit over time, but the filling will stay delicious.
FAQs
Got questions? I’ve got answers!
- Can I use a graham cracker crust? Absolutely! A pre-made graham cracker crust works perfectly and makes this an even easier “no-bake” dessert.
- Can I use sugar-free ingredients? Yes, you can often find sugar-free cherry pie filling, pudding mix, and whipped topping. Just be sure to check the package instructions for the pudding, as the liquid ratio might differ slightly.
- Why do I need to chill the pie for so long? Chilling allows the chocolate pudding layer to set up properly and helps all the layers firm up, making the pie much easier to slice and serve neatly. It also gives the flavors time to really meld together.
- Can I freeze this pie? I don’t recommend freezing this specific pie. The textures of the pudding and whipped cream can change significantly when frozen and thawed, often becoming watery or grainy. It’s truly best enjoyed fresh from the fridge!

Easy No-Bake Chocolate Cherry Cream Pie
Ingredients
Equipment
Method
- Step 1: Double-check that your 9-inch pie crust is all pre-baked and completely cooled down. A warm crust is not your friend here!
- Step 2: Grab that can of cherry pie filling. Open it up and spoon the whole delicious mess evenly across the bottom of your cool pie crust. Get it spread out nicely so every slice gets plenty of cherries.
- Step 3: In a medium bowl, whisk up that chocolate pudding mix with the 2 cups of cold milk. Follow the package instructions exactly for whisking time. You want it to be nice and thickened – smooth and glossy.
- Step 4: Carefully pour the smooth, rich chocolate pudding over the cherry layer in the pie crust. Gently spread it out evenly using a spatula or the back of a spoon, making sure it completely covers the cherries.
- Step 5: Gently spread the 1 ½ cups of whipped cream over the chocolate pudding layer. Take your time with this so you don't mix the layers too much. You want distinct stripes of cherry, chocolate, and cream!
- Step 6: Sprinkle the ½ cup of chocolate chips evenly over the whipped cream layer. This adds a lovely texture and extra chocolate punch.
- Step 7: If you have some fresh cherries on hand and want to make your pie look extra special, arrange them artfully on top of the chocolate chips.
- Step 8: Pop this beautiful assembled pie into the refrigerator to chill for at least 2 hours. This time is crucial for the layers to set and the flavors to meld together.
- Step 9: When you simply can't wait another minute, take the pie out, slice it up, and serve it chilled. Enjoy every single bite!