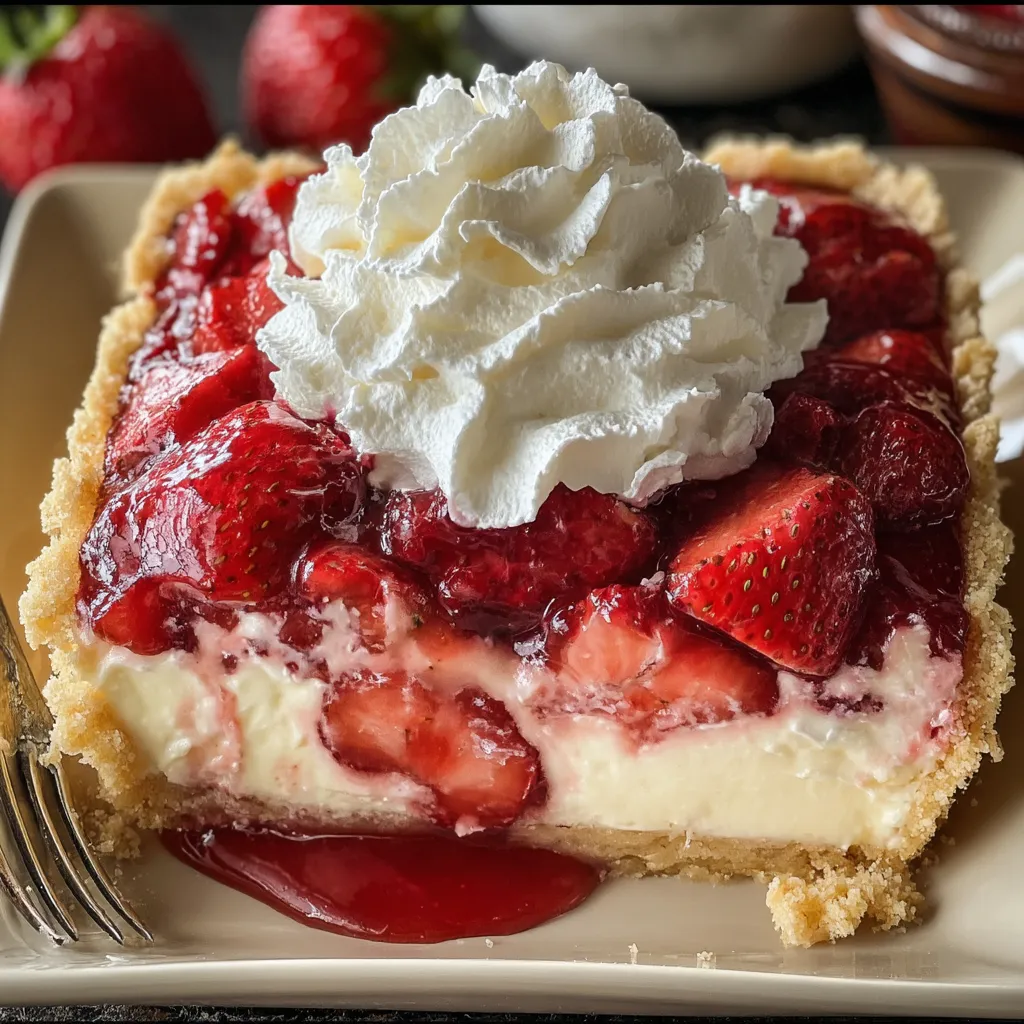
There’s something about the smell of strawberries and warm cake baking in the oven that instantly brings comfort. It reminds me of slow weekends, family gatherings, and those moments when you just want to make something sweet without overthinking it. If you’ve ever craved a dessert that feels homemade and special—but without the stress—this Strawberry Cheesecake Dump Cake is exactly what you need.
This recipe is one of those magical creations that feels almost too easy to be true. You don’t need fancy techniques, and you don’t need to spend hours in the kitchen. You simply layer, bake, and enjoy. Yet the result? A rich, creamy, fruity dessert that tastes like you spent all day making it. Whether you’re baking for guests, your family, or just yourself (no judgment here!), this recipe is quick, comforting, and absolutely unforgettable.
Why You’ll Love Strawberry Cheesecake Dump Cake
- Fast – You can have everything ready for the oven in under 15 minutes.
- Easy – No complicated steps, no special skills required.
- Giftable – Perfect for bringing to gatherings or sharing with neighbors.
- Crowd-pleasing – Creamy cheesecake + sweet strawberries = guaranteed success.
What I personally love most about this dessert is how forgiving it is. Even if you’re not super confident in the kitchen, this recipe makes you feel like a pro. It’s also one of those desserts that looks simple but tastes incredibly indulgent—like a mix between a classic cheesecake and a cozy fruit cobbler.
Ingredients
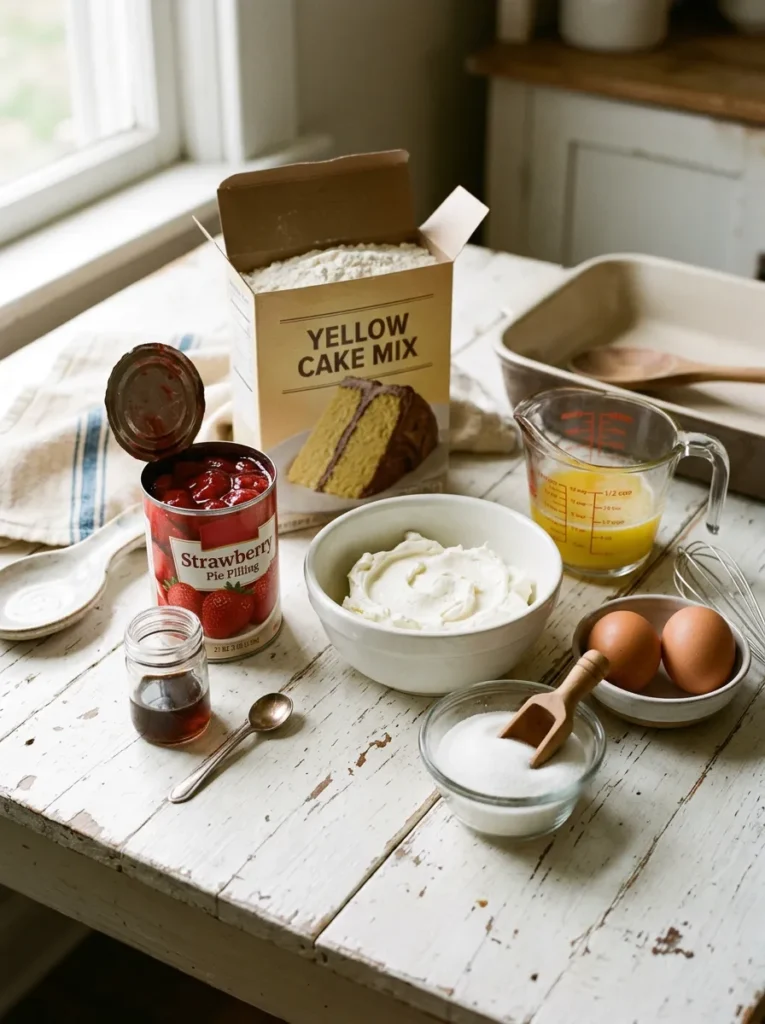
Let’s take a closer look at what you’ll need. Each ingredient plays an important role, but don’t worry—everything is simple and easy to find.
- Cream cheese (8 oz, softened) – This is the heart of the cheesecake layer. Make sure it’s softened so it blends smoothly without lumps.
- Granulated sugar (3/4 cup) – Adds sweetness and balances the tanginess of the cream cheese.
- Large eggs (2) – These help create that rich, creamy cheesecake texture.
- Vanilla extract (1 teaspoon) – Adds warmth and depth to the flavor.
- Strawberry pie filling (1 can, 21 oz) – This brings the fruity, jammy sweetness that makes the dessert shine.
- Yellow cake mix (1 box) – The shortcut that makes this a “dump cake”—no mixing required.
- Unsalted butter (1/2 cup, melted) – Helps create that golden, slightly crisp topping.
If you love easy layered desserts like this, you might also enjoy something like a cozy apple-based bake or a creamy no-bake treat. I often rotate this recipe with other simple desserts depending on the season, which keeps things exciting without adding extra effort.
How to Make Strawberry Cheesecake Dump Cake
This is where the magic happens. You’ll see just how simple this process is, and I’ll walk you through each step so you feel completely confident.
Step 1: Prepare Your Baking Dish
Start by preheating your oven to 350°F (175°C). Lightly grease a 9×13-inch baking dish. I usually use a bit of butter or non-stick spray. This helps prevent sticking and makes serving much easier later.
Step 2: Make the Cheesecake Filling
In a mixing bowl, beat the softened cream cheese and sugar together until smooth and creamy. Take your time here—this step ensures you won’t have lumps in your cheesecake layer. Then, add the eggs one at a time, mixing well after each addition. Finally, stir in the vanilla extract. The mixture should be silky and slightly thick.
Step 3: Layer the Strawberries
Spread half of the strawberry pie filling evenly across the bottom of your prepared baking dish. This forms the base layer and gives every bite that sweet, fruity flavor.
Step 4: Add the Cheesecake Layer
Spoon the cream cheese mixture over the strawberries. Don’t worry about making it perfect—just try to distribute it as evenly as possible. It will settle beautifully as it bakes.
Step 5: Add More Strawberry Goodness
Spoon the remaining strawberry pie filling on top of the cheesecake layer. This creates a gorgeous layered effect and ensures every bite has both creamy and fruity elements.
Step 6: Sprinkle the Cake Mix
Now comes the “dump cake” part. Sprinkle the dry yellow cake mix evenly over the entire surface. No mixing needed—just spread it out gently.
Step 7: Drizzle the Butter
Pour the melted butter evenly over the cake mix. Try to cover as much of the surface as possible so the topping bakes up golden and slightly crisp.
Step 8: Bake to Perfection
Bake for 50 to 60 minutes, or until the top is golden and the center is set. Your kitchen will smell absolutely amazing at this point—warm, sweet, and comforting.
Step 9: Cool Before Serving
Let the cake cool for at least 20–30 minutes before slicing. This helps the layers set and makes serving easier. Trust me, it’s worth the wait.
If you enjoy desserts that combine creamy textures with fruity layers, you might also love exploring other comforting recipes like a rich berry crumble or a simple baked custard-style dessert that feels just as cozy.
Substitutions & Additions
One of the best things about this recipe is how flexible it is. You can easily adapt it based on what you have or what you’re craving.
- Different fruit fillings – Try blueberry, cherry, or raspberry pie filling for a fun twist.
- Chocolate lovers – Add white chocolate chips or drizzle melted chocolate on top after baking.
- Crunchy topping – Sprinkle chopped nuts like almonds or pecans over the cake mix before baking.
- Flavor boost – Add a bit of lemon zest to the cheesecake mixture for a fresh, tangy touch.
I personally love experimenting with seasonal fruits. In the summer, I stick with strawberries, but in cooler months, I switch to apple or cherry for a more cozy vibe.
Tips for Success
Even though this recipe is simple, a few small tips can make a big difference in the final result.
- Use softened cream cheese – This ensures a smooth, creamy texture without lumps.
- Don’t overmix the eggs – Mix just until combined to keep the texture light and creamy.
- Even butter distribution – Make sure the melted butter covers most of the cake mix for an even golden top.
- Let it cool – This step is key for clean slices and better texture.
One mistake I made early on was cutting into the cake too soon. It tasted amazing, but it didn’t hold its shape. Once I started letting it cool properly, everything changed—it became perfectly layered and much easier to serve.
How to Store Strawberry Cheesecake Dump Cake
If you somehow have leftovers (which is rare in my house!), storing this cake is simple.
- Refrigerator – Store in an airtight container for up to 4 days.
- Freezer – You can freeze portions for up to 2 months. Just thaw overnight in the fridge.
- Reheating – Warm in the microwave for a few seconds if you prefer it slightly warm.
I actually love it both ways—warm with a scoop of vanilla ice cream, or cold straight from the fridge when the cheesecake layer is extra firm and creamy.
FAQs
Can I make this ahead of time?
Yes! You can bake it a day in advance and store it in the refrigerator. It actually tastes even better the next day as the flavors settle.
Do I have to use strawberry filling?
Not at all. You can use any pie filling you like—blueberry, cherry, or even peach work beautifully.
Why is it called a dump cake?
Because you “dump” the ingredients into the pan without mixing layers like traditional cakes. It’s all about simplicity and convenience.
Can I use a different cake mix?
Absolutely. White cake mix or even vanilla-flavored mix works great if you want a slightly lighter taste.
This Strawberry Cheesecake Dump Cake is one of those recipes you’ll come back to again and again. It’s simple, comforting, and always a hit. Whether you’re baking for a special occasion or just treating yourself after a long day, this dessert never disappoints.
And if you’re like me and love collecting easy, cozy recipes, don’t forget to follow along on Pinterest for even more delicious inspiration!
Strawberry Cheesecake Dump Cake
Ingredients
Equipment
Method
- Step 1: Preheat oven to 350°F (175°C) and grease a 9×13-inch baking dish.
- Step 2: Beat cream cheese and sugar until smooth. Add eggs one at a time, then mix in vanilla extract.
- Step 3: Spread half of the strawberry pie filling evenly in the baking dish.
- Step 4: Spoon the cream cheese mixture evenly over the strawberry layer.
- Step 5: Add the remaining strawberry pie filling on top.
- Step 6: Sprinkle the dry cake mix evenly over the surface.
- Step 7: Drizzle melted butter evenly over the cake mix.
- Step 8: Bake for 50–60 minutes until golden and set.
- Step 9: Let cool before slicing and serving.