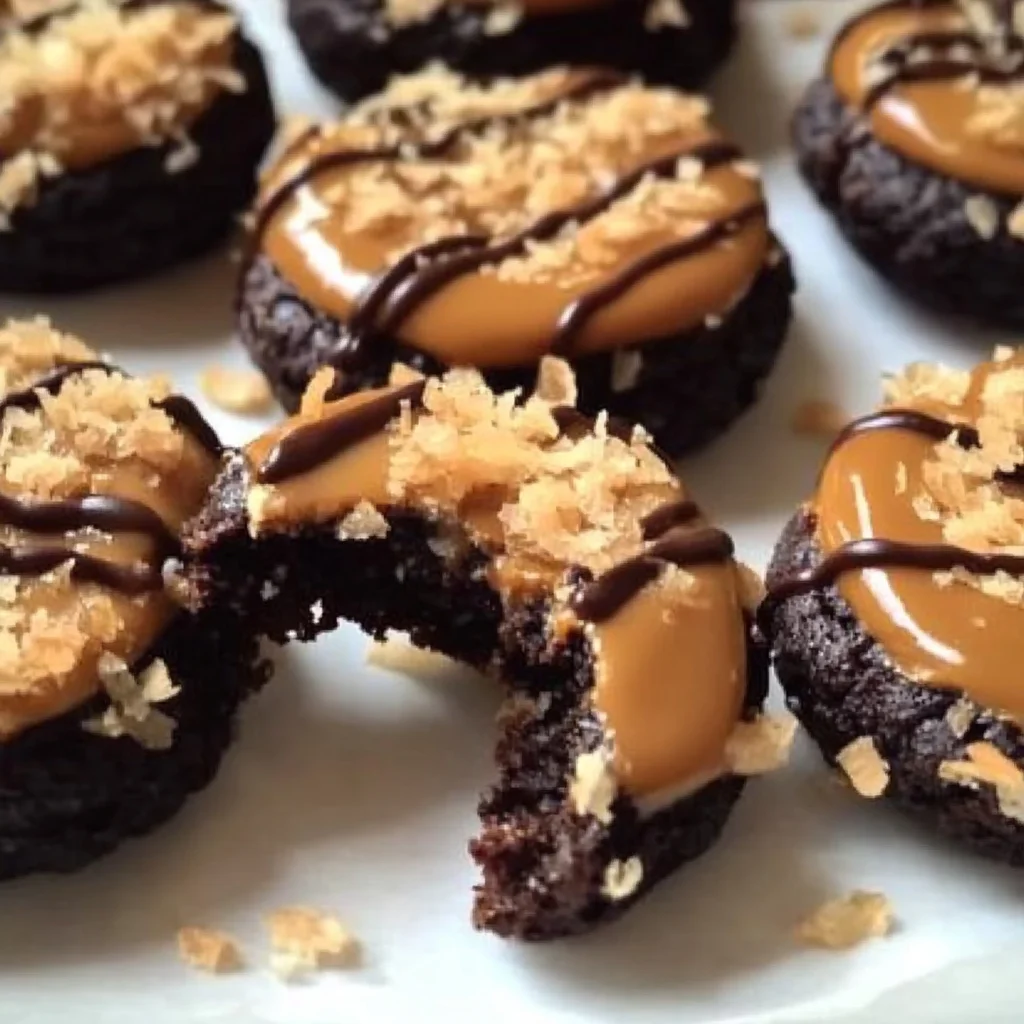
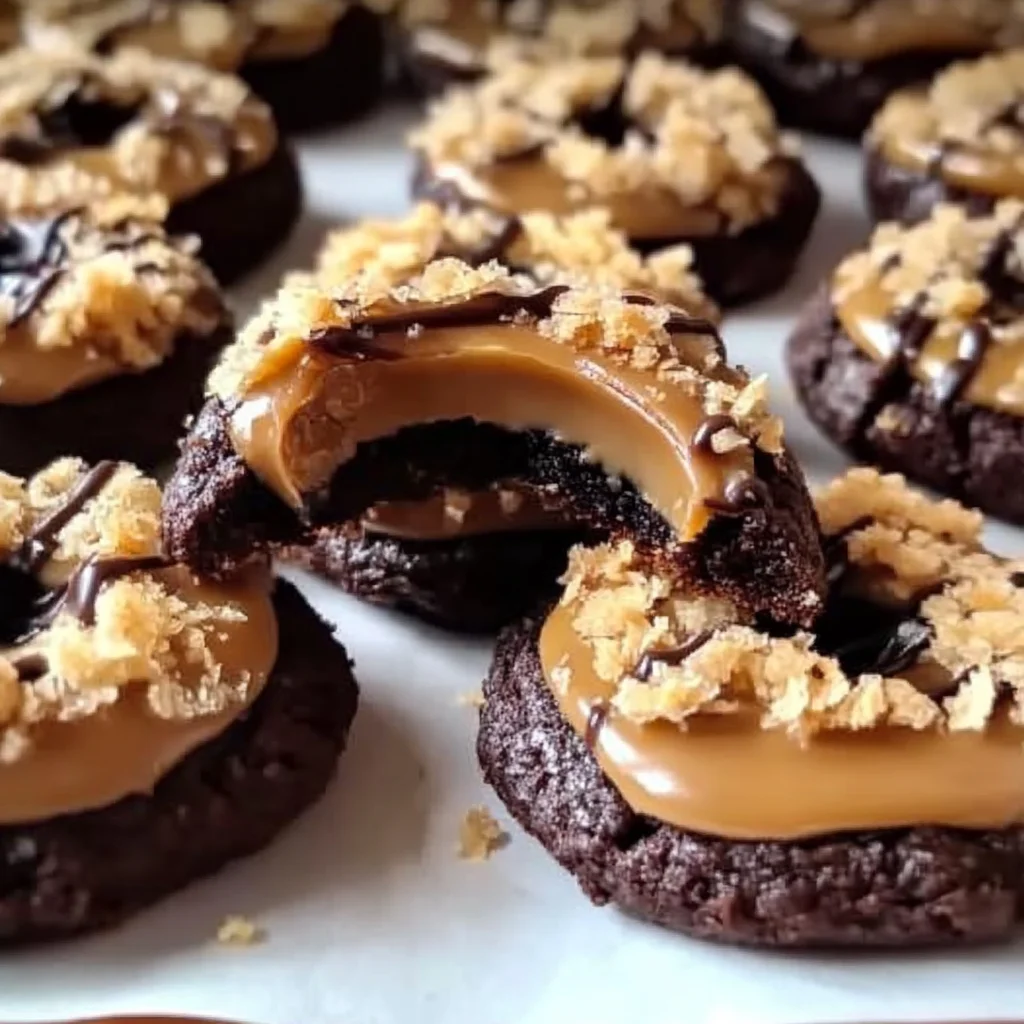
Oh, friend, do you remember that glorious time of year when those delightful Girl Scout Cookies would arrive at your door? For me, it was always a mad dash to grab the Samoas – those irresistible rings of crispy cookie, chewy caramel, toasted coconut, and a drizzle of chocolate. Pure bliss in every bite! But let’s be real, waiting for cookie season can feel like an eternity. What if I told you that you don’t have to wait anymore? You can recreate that magic right in your own kitchen with this incredibly easy and utterly memorable homemade Samoas recipe! It’s quicker than you think, tastes just like the real deal (some might say even better!), and will have you feeling like a baking superstar in no time. Forget those annual cravings; now you can satisfy them whenever the mood strikes!
Why You’ll Love Homemade Samoas Girl Scout Cookies
- Fast
- Easy
- Giftable
- Crowd-pleasing
Ingredients
Gather your kitchen essentials, my friend! Here’s what you’ll need to bring these beauties to life:
- 1 cup unsalted butter, softened: Make sure it’s nice and soft, but not melted, for that perfect creamy start to your cookie dough.
- 1/2 cup granulated sugar: Just enough sweetness to make our cookie base happy.
- 2 cups all-purpose flour: The backbone of our delicious cookie!
- 1/4 teaspoon baking powder: A tiny bit for that perfect lift.
- 1/4 teaspoon salt: Don’t skip this! It balances all the sweet flavors.
- 2 tablespoons milk: Helps bring our dough together into a smooth, workable consistency.
- 1/2 teaspoon vanilla extract: A splash of warmth and classic cookie flavor.
For the Topping:
- 3 cups shredded sweetened coconut: The star of our show! Sweet and ready for toasting.
- 12 ounces chewy caramels (store-bought or homemade): You can grab a bag of those individually wrapped caramels from the store for a super easy route, or if you’re feeling ambitious, homemade caramel is always a treat!
- 3 tablespoons heavy cream: This helps our caramel melt down into a luscious, pourable dream.
- 1/4 teaspoon salt: A little touch of sea salt takes the caramel-coconut flavor to the next level.
- 8 ounces semi-sweet chocolate chips: For that iconic chocolatey base and drizzle.
How to Make Homemade Samoas Girl Scout Cookies
Alright, apron on, let’s get baking! You’ll be amazed at how simple this process is:
- First things first, get your oven ready. Preheat it to a cozy 350°F (175°C). While it’s warming up, grab a baking sheet and line it with parchment paper. This makes for easy cleanup and prevents sticking!
- In a large mixing bowl, take your softened butter and granulated sugar, and cream them together until they’re light and fluffy. This step is key for a tender cookie, so give it a good mix!
- Now, gradually add your flour, baking powder, and salt to the butter mixture. Mix them in until they’re just combined. Then, pour in the milk and vanilla extract. Keep mixing until you have a beautiful, cohesive dough ball. Don’t overmix, though; we want these cookies to be delicate!
- Lightly dust your counter or a clean surface with a little flour. Roll out your cookie dough to about 1/4-inch thickness. This is the perfect thickness for a sturdy yet tender cookie.
- Time for the signature Samoa shape! Use a 2-inch round cookie cutter to cut out your circles. For the center, you can use a smaller round cutter, like a mini donut cutter, or even the cap of a bottle (a trick I picked up from my grandma!). This creates those iconic rings.
- Carefully place your cookie rings on your prepared baking sheet. Bake them for 10–12 minutes, or until they’re just lightly golden around the edges. You want them cooked through but not overly crispy. Once baked, let them cool completely on a wire rack. Patience is a virtue here!
- While your cookies are cooling, let’s get that coconut perfectly toasted. Spread your shredded sweetened coconut evenly on another baking sheet. Pop it into the oven (still at 350°F) for 5–7 minutes, but keep a close eye on it! Stir it halfway through to ensure it toasts evenly to a beautiful golden brown. This step is non-negotiable for that classic Samoa flavor!
- Next up: the dreamy caramel. In a saucepan, combine your chewy caramels, heavy cream, and that pinch of salt. Place it over low heat and stir continuously until the caramels are completely melted and the mixture is smooth and glossy. This sticky, sweet goodness is what truly makes a Samoa, much like the gooey caramel in these easy no-bake caramel pretzel bars.
- Once your caramel is smooth, take it off the heat and gently fold in all that perfectly toasted coconut. Mix it until every strand of coconut is coated in glorious caramel.
- Now for the fun part! Take each cooled cookie ring and, using a small spoon or your fingers, spread the warm caramel-coconut mixture on top. Gently press it down so it adheres nicely to the cookie.
- Almost there! Melt your semi-sweet chocolate chips. You can do this in the microwave (in 30-second intervals, stirring in between) or using a double boiler on the stovetop.
- Dip the bottom of each caramel-coconut-coated cookie into the melted chocolate. Then, using a fork or a small spoon, drizzle more melted chocolate over the top of the cookies. This creates those signature stripes!
- Place your finished cookies back on parchment paper and pop them into the fridge for 10–15 minutes. This chilling time helps the chocolate set quickly, so you can enjoy your masterpiece sooner!
Substitutions & Additions
One of my favorite things about baking at home is making a recipe truly yours! Here are some ideas to play with:
- Coconut Fun: If you’re not a fan of toasted coconut, you can certainly use untoasted for a milder flavor. For an extra tropical twist, try a mix of sweetened and unsweetened coconut.
- Chocolate Choices: While semi-sweet is traditional, feel free to experiment! Dark chocolate will give you a richer, less sweet cookie, while milk chocolate makes them extra indulgent. You could even use white chocolate for a pretty contrast.
- Caramel Creativity: Want to add a gourmet touch? A pinch of flaky sea salt sprinkled over the melted chocolate drizzle adds a fantastic sweet and salty balance.
- Quick Cookie Base: In a real pinch for time? While I love the homemade cookie base, you could use store-bought shortbread cookies as a shortcut. Just make sure they’re sturdy enough to hold the toppings.
- Nutty Notes: For a textural crunch, finely chop some pecans or walnuts and sprinkle them onto the caramel layer before the chocolate sets.
Tips for Success
To ensure your homemade Samoas turn out absolutely perfect, keep these little pointers in mind:
- Don’t Overbake the Cookies: The cookie base should be lightly golden, not dark brown. An overbaked cookie will be too hard and won’t complement the soft caramel.
- Toast That Coconut! This step is crucial for flavor. Keep an eye on your coconut in the oven; it can go from perfectly golden to burnt in a flash. Stirring it helps ensure even browning.
- Low Heat for Caramel: When melting the caramels, use low heat and stir constantly. High heat will cause the caramel to seize up or burn, and nobody wants that!
- Clean Cuts: For neat cookie rings, dip your cookie cutters in flour between cuts. This prevents sticking.
- Chill Time is Your Friend: Don’t skip chilling the cookies after adding the chocolate. It helps the chocolate set beautifully and prevents a messy situation.
- Prep Ahead: You can bake the cookie bases a day in advance and store them in an airtight container. You can also toast the coconut ahead of time. This makes assembly day a breeze! If you’re looking for another quick and delightful dessert that won’t have you firing up the oven, you might love whipping up some no-bake Oreo bars.
How to Store Homemade Samoas Girl Scout Cookies
These delicious cookies are best enjoyed fresh, but they also store wonderfully!
- Room Temperature: You can store your homemade Samoas in an airtight container at room temperature for up to 3-4 days. Layer them between sheets of parchment paper to prevent sticking.
- Refrigerator: If you prefer them a little firmer, or for longer storage, keep them in an airtight container in the refrigerator for up to a week. The chocolate and caramel will be a bit chewier straight from the fridge.
- Freezer: Yes, you can freeze them! Place cooled cookies in a single layer on a baking sheet and freeze until firm. Then, transfer them to a freezer-safe airtight container or bag, separating layers with parchment paper. They’ll keep in the freezer for up to 2-3 months. Thaw at room temperature for about 30 minutes before enjoying.
FAQs
Q: Can I use unsweetened coconut?
A: You can, but the flavor will be less sweet and slightly different from the classic Samoa. If you use unsweetened, you might want to add an extra tablespoon of sugar to the caramel mixture to compensate.
Q: My caramel seized up! What happened?
A: This usually happens if the heat was too high or if you didn’t stir consistently. Make sure to melt the caramels and cream over low heat and keep stirring until smooth. Unfortunately, if it’s seized, it’s hard to salvage, so you’ll likely need to start fresh.
Q: Do I really need to cut out the centers?
A: To get that authentic Samoa look, yes! But if you’re just looking for the flavor, you can make them as solid round cookies. They’ll still be delicious, just not traditional rings.
Q: Can I use store-bought cookie dough for the base?
A: While I always recommend homemade for the best flavor, you absolutely can! Just roll it out and cut it as directed, keeping an eye on baking times as they might vary slightly.
For more mouth-watering recipes and behind-the-scenes peeks, be sure to follow us on Pinterest!

Homemade Samoas Girl Scout Cookies
Ingredients
Equipment
Method
- Step 1: Preheat oven to 350°F (175°C). Line a baking sheet with parchment paper.
- Step 2: In a large mixing bowl, cream softened butter and granulated sugar until light and fluffy.
- Step 3: Gradually add flour, baking powder, and salt to the butter mixture; mix until just combined. Pour in milk and vanilla extract and mix until a cohesive dough ball forms. Do not overmix.
- Step 4: Lightly dust a counter or clean surface with flour. Roll out the cookie dough to about 1/4-inch thickness.
- Step 5: Use a 2-inch round cookie cutter to cut out circles. Use a smaller round cutter (like a mini donut cutter or bottle cap) to create the center holes, forming rings.
- Step 6: Carefully place cookie rings on the prepared baking sheet. Bake for 10–12 minutes, or until lightly golden around the edges. Let them cool completely on a wire rack.
- Step 7: While cookies cool, spread shredded sweetened coconut evenly on another baking sheet. Toast in the oven (still at 350°F) for 5–7 minutes, stirring halfway through, until golden brown. Watch closely to prevent burning.
- Step 8: In a saucepan, combine chewy caramels, heavy cream, and salt. Place over low heat and stir continuously until completely melted, smooth, and glossy.
- Step 9: Remove caramel from heat and gently fold in the toasted coconut. Mix until every strand is coated.
- Step 10: Take each cooled cookie ring and spread the warm caramel-coconut mixture on top, pressing gently to adhere.
- Step 11: Melt semi-sweet chocolate chips (in the microwave in 30-second intervals, stirring, or using a double boiler).
- Step 12: Dip the bottom of each caramel-coconut-coated cookie into the melted chocolate. Then, drizzle more melted chocolate over the top to create signature stripes.
- Step 13: Place finished cookies back on parchment paper and refrigerate for 10–15 minutes to set the chocolate. Serve immediately or store as directed.