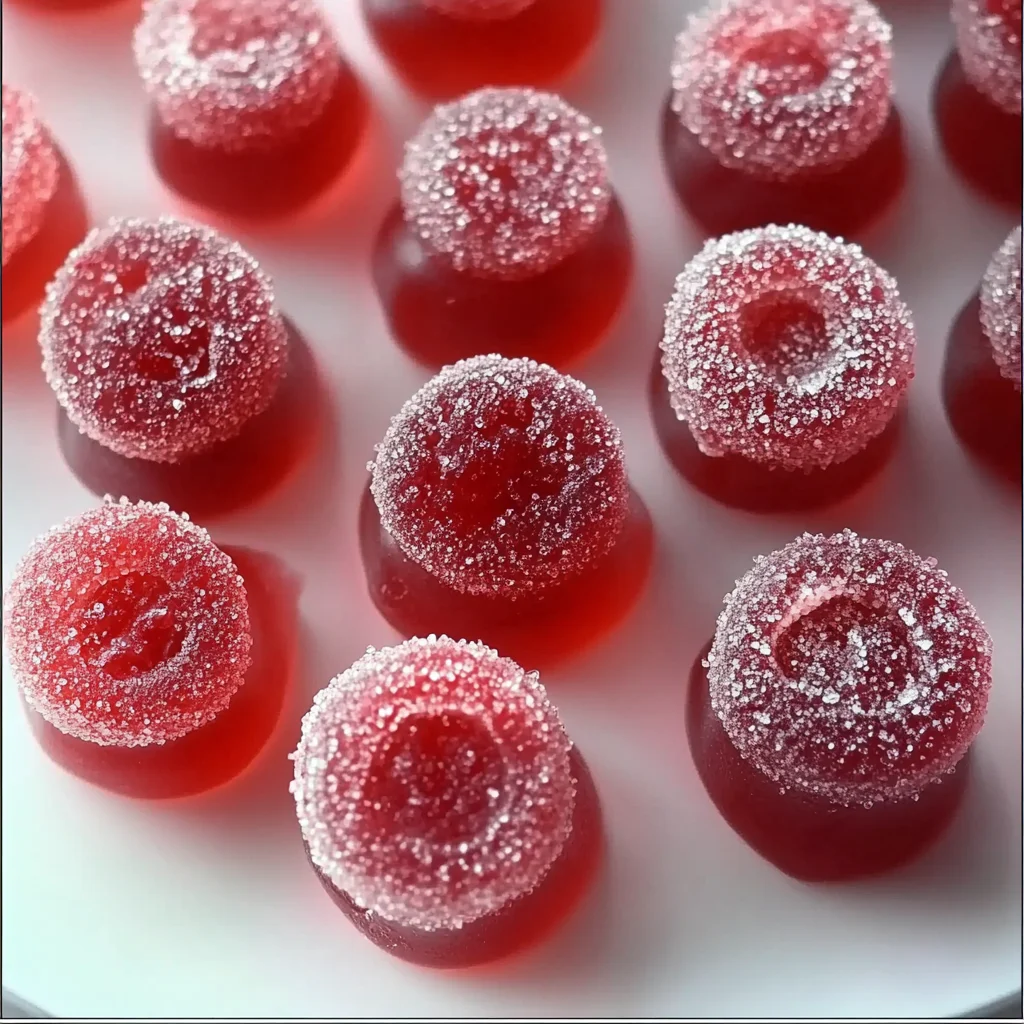
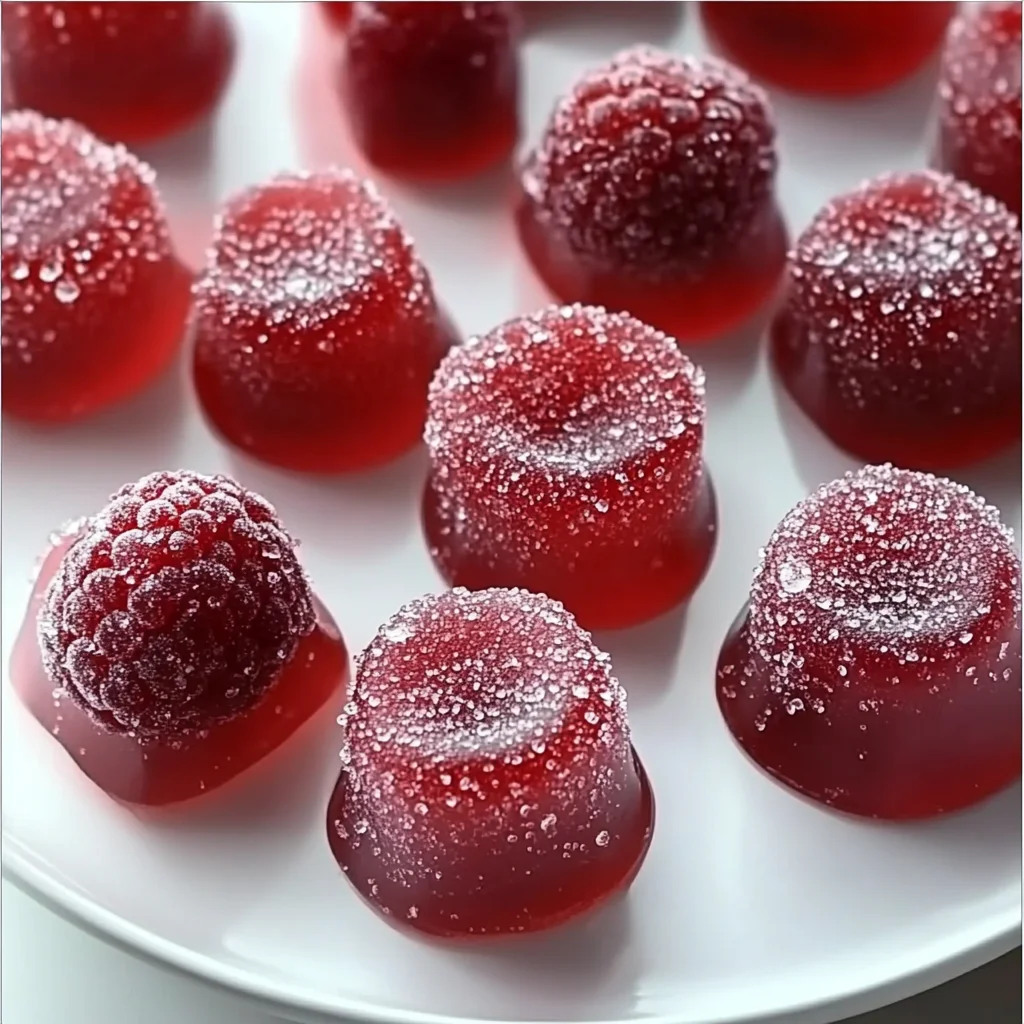
Remember those days when a simple sweet treat could brighten your whole day? For me, it was always something fruity and wonderfully chewy, a little burst of sunshine in every bite. Today, I’m so excited to share a recipe that brings all those nostalgic feelings right back to my kitchen: homemade Raspberry Pectin Gummies! These aren’t just any gummies; they’re packed with real raspberry flavor, have that perfect bouncy chew, and are surprisingly simple to whip up. Whether you’re making them for a special occasion, a sweet gift, or just a little pick-me-up for yourself, these gummies are sure to become a new favorite. Get ready to fall in love with making your own delightful treats – it’s quicker and easier than you might think!
Why You’ll Love Raspberry Pectin Gummies
- Fast: From prep to pour, these gummies come together in a flash.
- Easy: No complicated techniques here, just straightforward steps for perfect results.
- Giftable: Pack them in cute jars or bags for a thoughtful, handmade present.
- Crowd-pleasing: Kids and adults alike adore these flavorful, chewy candies!
Ingredients
Gathering your ingredients is the first step to creating these delightful little bites. Here’s what you’ll need:
- 18-20 oz fresh raspberries (or 20-22 oz frozen raspberries, thawed): The star of our show! Fresh raspberries will give you the brightest, most vibrant flavor, but thawed frozen ones work just as beautifully.
- 1 ¾ cup granulated sugar, plus more for coating: This sweetens our gummies and gives them that classic, sparkling finish. Don’t skimp on it, as it’s crucial for the texture.
- 3 tbsp corn syrup: A little corn syrup is key to preventing crystallization and achieving that lovely chewy texture.
- 6 tbsp regular fruit pectin (e.g., Sure Jell Original): Pectin is what gives our gummies their jiggle and firm set. Make sure it’s regular fruit pectin, not instant or low-sugar pectin, as the ratios are different.
- ½ cup filtered water (for citric acid): Used to dissolve the citric acid, ensuring it mixes smoothly into the hot mixture.
- 1 tsp baking soda: This works with the pectin to help achieve the proper set.
- ¼ cup filtered water (for pectin): Used to hydrate the pectin and baking soda before they join the raspberry mixture.
- 1 tsp powdered citric acid: This magic ingredient brightens the raspberry flavor and adds that characteristic sour tang you expect from a great gummy.
How to Make Raspberry Pectin Gummies
Ready to create some magic? Follow these steps, and you’ll have a batch of incredible raspberry gummies in no time!
- Get Your Molds Ready: First things first, grab your silicone molds or a silicone cake pan. Place them directly onto a cookie sheet. Trust me on this one – once that hot mixture is ready, you’ll want to move it swiftly, and a sturdy cookie sheet makes handling a full, wobbly mold so much easier!
- Puree Your Raspberries: Take your fresh (or thawed frozen) raspberries and pop them into a blender or food processor. Blend them until they’re a smooth puree. Now, here’s a crucial step for that silky-smooth gummy texture: strain the puree through a fine-mesh sieve. This removes all those tiny seeds, leaving you with 1 ½ cups of gorgeous, seedless raspberry goodness.
- Combine & Cook the Fruit Base: In a medium saucepan, pour in your luscious raspberry puree. Add the 1 ¾ cup granulated sugar and the corn syrup. Stir everything together over medium heat until the sugar dissolves and the mixture comes to a full, rolling boil. Keep stirring to make sure nothing sticks to the bottom!
- Activate the Pectin: In a separate, smaller saucepan, combine the fruit pectin, baking soda, and the ¼ cup of filtered water. Whisk it well to combine, then bring this mixture to a gentle simmer. Once it’s simmering, immediately add it to your boiling raspberry mixture. This quick addition helps the pectin activate properly.
- Reach the Perfect Temperature: Now for the critical part: insert a candy thermometer into the raspberry mixture. Continue cooking over medium heat, stirring frequently. You’re looking for the mixture to reach 230-240°F (110-116°C). This temperature range is essential for the gummies to set correctly. Patience is a virtue here, but it’s totally worth it for that perfect chewy texture. If you’re looking for another delightful fruity treat that uses a similar no-bake approach, you might love making Easy Homemade Strawberry Sorbet!
- Add the Zing: While your mixture is cooking, dissolve the powdered citric acid in the remaining ½ cup filtered water. Once your raspberry mixture hits the target temperature, remove it from the heat and stir in the dissolved citric acid. Work quickly here!
- Pour and Set: Immediately and carefully pour the hot mixture into your prepared silicone molds. Fill them up, but try not to overfill.
- Cool Down: Now comes the hardest part: waiting! Allow your gummies to cool undisturbed for at least 2 hours. For the absolute best texture and firmness, I really recommend letting them sit overnight. It makes such a difference!
- Unmold & Coat: Once fully cooled and set, gently unmold your beautiful raspberry gummies. For that classic candy store look and feel, roll each gummy in additional granulated sugar. This adds a lovely sparkle and prevents sticking.
- Enjoy! Your homemade Raspberry Pectin Gummies are ready to be savored!
Substitutions & Additions
Part of the fun of making your own treats is customizing them! Here are a few ideas to get your creativity flowing:
- Other Fruits: While raspberry is fantastic, feel free to experiment with other fruit purees! Strawberry, blueberry, or even peach would be delicious. Just make sure to adjust the sugar content if your chosen fruit is significantly sweeter or more tart. If you love raspberry, you should also check out this amazing Grandma’s Easy Elegant Raspberry Mousse Recipe for another fantastic dessert!
- Flavor Boosters: A tiny drop of food-grade raspberry extract can intensify the flavor if you want an even bigger punch. A pinch of ground ginger or a tiny splash of rosewater could also add an unexpected, sophisticated twist.
- Less Sweet: If you prefer a less sweet gummy, you can try reducing the initial sugar by about ¼ cup, but be aware it might slightly alter the texture and shelf life. For truly low-sugar options, you’d need a different pectin specifically designed for low-sugar recipes.
- Fun Shapes: Don’t limit yourself to basic squares! Use fun silicone molds like little hearts, stars, or even animal shapes to make these gummies extra special, especially if you’re gifting them.
- Spice it Up: For an adventurous palate, a tiny pinch of cayenne pepper mixed in with the citric acid can give a subtle, warming kick!
Tips for Success
- Accurate Temperatures are Key: Investing in a good candy thermometer is crucial for this recipe. Hitting the correct temperature (230-240°F) ensures your gummies set perfectly – not too soft, not too hard.
- Work Quickly at the End: Once the citric acid is added, the mixture will start to set very rapidly. Have your molds ready and pour immediately!
- Don’t Rush Cooling: Seriously, resist the urge to pop them out early. The longer they cool, the firmer and chewier they’ll become. Overnight is truly best for that ideal gummy texture.
- Cleanliness Matters: Make sure your equipment is clean. Any stray bits of sugar or impurities can cause crystallization.
- Double Check Pectin: As mentioned, use regular fruit pectin. Low-sugar or instant pectin won’t work the same way and will likely result in a runny or overly firm batch.
- Prep Ahead: You can puree and strain the raspberries a day in advance and keep the puree in the fridge. This saves a little time on gummy-making day!
How to Store Raspberry Pectin Gummies
Proper storage will keep your homemade gummies fresh and delicious for longer!
- Room Temperature: If you plan to eat them within a few days, you can store them in an airtight container at room temperature. They’ll retain a softer chew this way. They should last about 5-7 days.
- Refrigerator: For a firmer texture and extended shelf life (up to 2-3 weeks), store your gummies in an airtight container in the refrigerator. They might get a little sticky, so an extra dusting of sugar before serving can help.
- Freezer: Yes, you can freeze gummies! Place them in a single layer on a parchment-lined baking sheet and freeze until firm, then transfer them to a freezer-safe bag or container. They can last for several months. Thaw at room temperature for a few minutes before enjoying.
- Prevent Sticking: If storing for more than a day or two, especially in humid conditions, I sometimes toss them with a little extra granulated sugar or a tiny bit of cornstarch to prevent them from sticking together.
FAQs
Q: Can I use fresh lemon juice instead of citric acid?
A: While lemon juice adds tartness, it won’t provide the same intense, bright sourness or stability as powdered citric acid, which is specifically formulated for confectionery. It’s best to stick with citric acid for that authentic gummy flavor.
Q: My gummies are too soft/not setting. What went wrong?
A: The most common culprit is not reaching the correct temperature (230-240°F) or not using regular fruit pectin. Make sure your candy thermometer is accurate and that you’re using the right type of pectin. Humidity can also play a small role, but temperature is usually the main factor.
Q: Can I half or double this recipe?
A: You can halve the recipe, but be careful with the cooking time and temperature, as smaller batches heat faster. Doubling can be tricky with pectin-based recipes as it affects setting time and temperature distribution. If you do double, consider doing two separate batches for best results.
Q: How many gummies does this recipe make?
A: This depends entirely on the size of your molds! A standard silicone mold with small cavities (like mini ice cube trays or candy molds) will yield anywhere from 50-80 small gummies. If you use a silicone cake pan and cut them into squares, you’ll get a larger quantity of bigger pieces.
For more delicious and easy recipes, be sure to follow us on Pinterest!
If you’re looking for more delightful treats, check out our collection of Easy to Cook Recipes!
Another sweet indulgence you might enjoy are these delightful Strawberry Cheesecake Stuffed Cookies!
And for even more fruity goodness, don’t miss our Easy Homemade Raspberry Sorbet.
For more delicious and easy recipes, be sure to follow us on Pinterest!

Homemade Raspberry Pectin Gummies
Ingredients
Equipment
Method
- Step 1: First things first, grab your silicone molds or a silicone cake pan. Place them directly onto a cookie sheet. This makes handling a full, wobbly mold so much easier!
- Step 2: Take your fresh (or thawed frozen) raspberries and pop them into a blender or food processor. Blend them until they’re a smooth puree. Strain the puree through a fine-mesh sieve to remove all seeds, leaving you with 1 ½ cups of seedless raspberry goodness.
- Step 3: In a medium saucepan, pour in your raspberry puree. Add the 1 ¾ cup granulated sugar and the corn syrup. Stir everything together over medium heat until the sugar dissolves and the mixture comes to a full, rolling boil. Keep stirring to make sure nothing sticks to the bottom!
- Step 4: In a separate, smaller saucepan, combine the fruit pectin, baking soda, and the ¼ cup of filtered water. Whisk it well to combine, then bring this mixture to a gentle simmer. Once it's simmering, immediately add it to your boiling raspberry mixture. This quick addition helps the pectin activate properly.
- Step 5: Insert a candy thermometer into the raspberry mixture. Continue cooking over medium heat, stirring frequently. You’re looking for the mixture to reach 230-240°F (110-116°C). This temperature range is essential for the gummies to set correctly.
- Step 6: While your mixture is cooking, dissolve the powdered citric acid in the remaining ½ cup filtered water. Once your raspberry mixture hits the target temperature, remove it from the heat and stir in the dissolved citric acid. Work quickly here!
- Step 7: Immediately and carefully pour the hot mixture into your prepared silicone molds. Fill them up, but try not to overfill.
- Step 8: Allow your gummies to cool undisturbed for at least 2 hours. For the absolute best texture and firmness, let them sit overnight.
- Step 9: Once fully cooled and set, gently unmold your beautiful raspberry gummies. For that classic candy store look and feel, roll each gummy in additional granulated sugar. This adds a lovely sparkle and prevents sticking.
- Step 10: Your homemade Raspberry Pectin Gummies are ready to be savored!