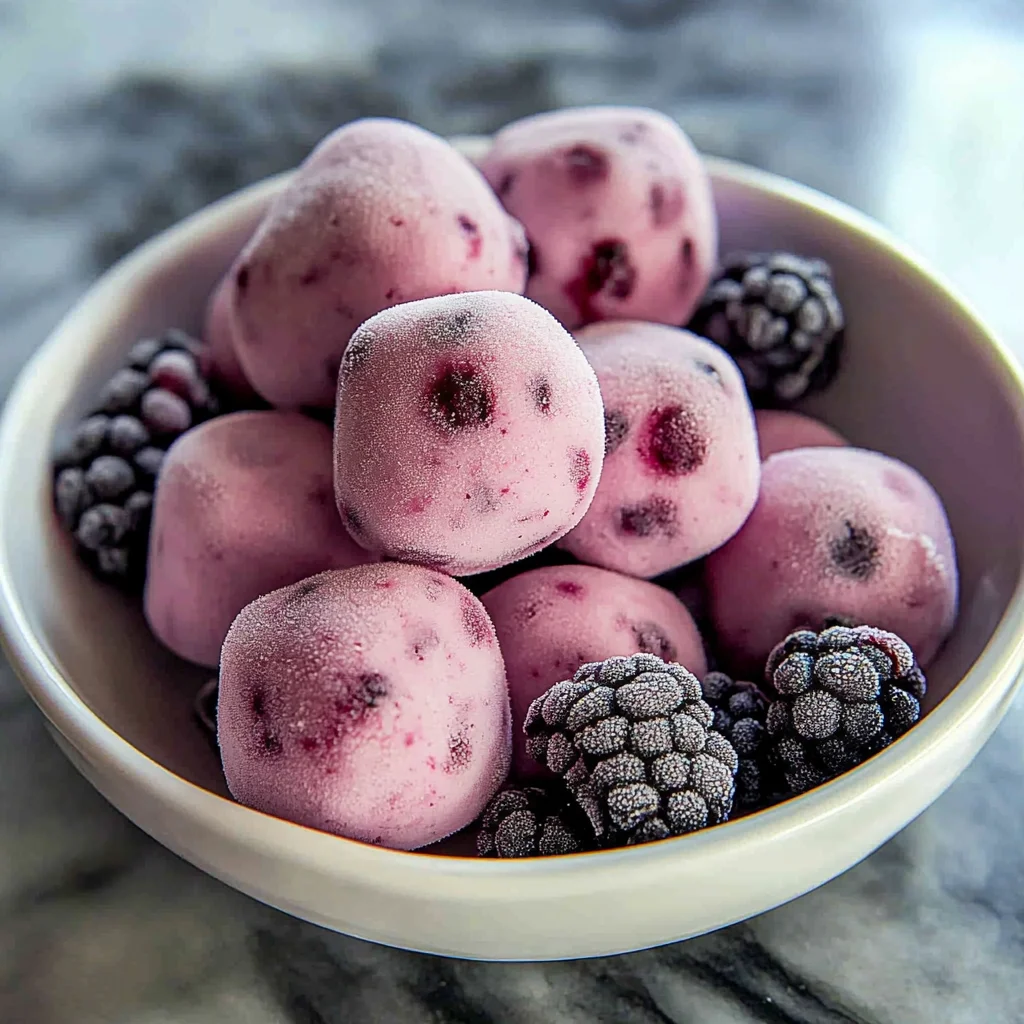
Hey there, friend! Remember those perfect summer days, or maybe just that moment when you really crave something sweet and refreshing but don’t want to dive headfirst into a pint of ice cream? Yep, I know the feeling! Well, let me tell you about these little gems: Frozen Yogurt Berry Bites. They are seriously SO easy to make, incredibly delicious, and just the perfect pop of cool, creamy, fruity goodness. Whip up a batch, and you’ll have a healthy-ish treat ready in the freezer whenever the craving strikes. No fuss, just pure deliciousness!
Why You’ll Love This Recipe
- Fast: We’re talking minimal hands-on time here. Mix, spoon, freeze – that’s pretty much it!
- Easy: Anyone can make these. No fancy techniques, no complicated steps. Perfect for beginners or even getting the kids involved.
- Giftable: Pop these in a cute container, and you’ve got a thoughtful, homemade gift (if you can bear to give them away!).
- Crowd-pleasing: Kids and adults alike adore these. They’re like mini frozen pops of happiness!
Ingredients
Gathering your ingredients is the first fun step! You only need a few simple things to make these magical bites:
- 1 cup whole-fat Greek yogurt: This is your base! Whole-fat gives you the best creamy texture and helps prevent ice crystals. Trust me, go for the good stuff here.
- 1/2 cup fresh raspberries: Sweet, slightly tart, and beautiful.
- 1/2 cup fresh blackberries: Deeply colored and wonderfully flavorful. Using fresh berries gives you that perfect texture when lightly mashed.
- 1 tablespoon raw honey: Your natural sweetener. You can adjust this depending on how sweet your berries are and how sweet you like things. Maple syrup is another option!
- 1 teaspoon pure vanilla extract: A little touch of vanilla just makes everything better, adding a subtle warmth to the yogurt base.
- 1/4 cup almond milk: This helps thin the yogurt just enough if needed. Start with less and add tablespoon by tablespoon until it’s the right consistency for easy spooning. Any milk will work!
How to Make It
Alright, let’s get these little frozen wonders made! It’s super simple, I promise.
- Prepare the Berries: First up, give your beautiful raspberries and blackberries a gentle wash. Pat them really dry with a paper towel. Soggy berries can make your mixture icy! Pop them in a bowl and use a fork to lightly mash them. You’re not making a puree here – you want some lovely chunks and pieces for texture and pops of color.
- Mix the Yogurt Base: Grab a mixing bowl and spoon in that lovely Greek yogurt. Add the honey and the vanilla extract. Give it a good stir until everything is smooth and nicely combined. Now, check the consistency. Is it super thick? If so, gradually add the almond milk, one tablespoon at a time, stirring well after each addition, until it’s smooth and easy to spoon, but not runny. You want it thick enough to hold its shape in the mold.
- Combine Berries and Yogurt: This is where the magic happens! Gently fold the mashed berries into your creamy yogurt mixture. Don’t overmix! Just give it a few stirs until the berries are distributed and you see beautiful swirls and streaks of color. This “marbled” effect looks so pretty in the final bites.
- Fill the Molds: Now, grab your silicone ice cube molds. Spoon the berry-yogurt mixture into each cavity, filling them about 3/4 full. Don’t overfill, or they’ll be tricky to unmold. Once they’re filled, gently tap the molds on the counter. This helps settle the mixture and get rid of any pesky air bubbles. You can use the back of a spoon to level the tops a bit.
- Freeze: Place the filled molds carefully onto a flat surface (like a small baking sheet or cutting board) so they stay level. Pop them into the freezer. Let them freeze for at least 3 hours, or until they are completely solid all the way through. Patience is key here!
- Unmold and Store: Once they’re solid, it’s time to free your frozen treasures! Silicone molds make this easy – just push up from the bottom. If you’re using plastic trays, you might need to let them sit at room temperature for literally 30 seconds to a minute to loosen up. Transfer the released bites into an airtight freezer-safe container. To prevent them from sticking together, place a piece of parchment paper between layers. They’ll keep well in the freezer for up to 2 months (if they last that long!).
- Serve: Grab a few straight from the freezer and enjoy that instant burst of cool, creamy, berry flavor! If you prefer them slightly softer, let them sit out for just a minute or two before popping them in your mouth. Delicious!

Substitutions & Additions
Want to mix things up? Great! This recipe is super flexible.
- Other Fruits: Swap out the berries for other soft fruits like mashed banana, diced mango, or even pureed peaches. Just make sure whatever fruit you use isn’t too watery.
- Sweetener: Not a fan of honey? Use maple syrup, agave, or even a sugar-free sweetener alternative. Adjust to your taste!
- Milk: Any kind of milk works here – dairy, oat, soy, coconut – just use it sparingly to adjust consistency.
- Make it Dairy-Free: Use a thick, plain, dairy-free yogurt alternative (like coconut or almond-based).
- Add-ins: Stir in a sprinkle of mini chocolate chips, a little granola for crunch, shredded coconut, or even a swirl of peanut butter before freezing!
Tips for Success
A few little pointers to make sure your frozen bites turn out perfectly:
- Use Thick Yogurt: This is crucial! Thick Greek yogurt (or a thick dairy-free alternative) gives the best texture and prevents iciness.
- Don’t Over-Mash Berries: Leave some chunks! It adds texture and flavor bursts.
- Adjust Sweetness: Taste your yogurt mixture before adding the berries. Add more sweetener if you like.
- Silicone Molds are Best: They make unmolding a breeze. If using plastic, a super quick dip or sit at room temp helps.
- Store Properly: An airtight container is key to preventing freezer burn. Parchment paper prevents sticking.
- Prep Ahead: You can mix the yogurt base and even mash the berries a day ahead and keep them separate in the fridge. Combine and freeze when you’re ready!
How to Store It
These little bites are happiest in the freezer! Once they’re completely frozen and you’ve popped them out of the molds, transfer them to an airtight, freezer-safe container. Layer them with parchment paper to stop them from freezing into one giant block. They’ll keep beautifully in the freezer for up to two months. Just grab them straight from the freezer whenever you need a cool treat!
FAQs
Can I use frozen berries?
You can, but fresh is better for texture. If you use frozen, let them thaw slightly and drain off any excess liquid before mashing. The texture might be slightly different.
What if I don’t have ice cube molds?
No problem! You can spread the mixture onto a small baking sheet lined with parchment paper in about a 1/2-inch layer. Once frozen, you can break it into bark-like pieces or cut it into squares.
Can I make a bigger batch?
Absolutely! Just double or triple the ingredients and use more molds or trays. They store well, so making a large batch is a great idea!
Are these suitable for babies or toddlers?
Yes, they can be a fantastic healthy snack for little ones! Just make sure they can handle the texture of frozen items and adjust the sweetness (or omit honey for babies under one) as needed. Always supervise children while eating.

Easy & Healthy Frozen Yogurt Berry Bites
Ingredients
Equipment
Method
- Step 1: Prepare the Berries: First up, give your beautiful raspberries and blackberries a gentle wash. Pat them really dry with a paper towel. Soggy berries can make your mixture icy! Pop them in a bowl and use a fork to lightly mash them. You're not making a puree here – you want some lovely chunks and pieces for texture and pops of color.
- Step 2: Mix the Yogurt Base: Grab a mixing bowl and spoon in that lovely Greek yogurt. Add the honey and the vanilla extract. Give it a good stir until everything is smooth and nicely combined. Now, check the consistency. Is it super thick? If so, gradually add the almond milk, one tablespoon at a time, stirring well after each addition, until it's smooth and easy to spoon, but not runny. You want it thick enough to hold its shape in the mold.
- Step 3: Combine Berries and Yogurt: This is where the magic happens! Gently fold the mashed berries into your creamy yogurt mixture. Don't overmix! Just give it a few stirs until the berries are distributed and you see beautiful swirls and streaks of color. This "marbled" effect looks so pretty in the final bites.
- Step 4: Fill the Molds: Now, grab your silicone ice cube molds. Spoon the berry-yogurt mixture into each cavity, filling them about 3/4 full. Don't overfill, or they'll be tricky to unmold. Once they're filled, gently tap the molds on the counter. This helps settle the mixture and get rid of any pesky air bubbles. You can use the back of a spoon to level the tops a bit.
- Step 5: Freeze: Place the filled molds carefully onto a flat surface (like a small baking sheet or cutting board) so they stay level. Pop them into the freezer. Let them freeze for at least 3 hours, or until they are completely solid all the way through. Patience is key here!
- Step 6: Unmold and Store: Once they're solid, it's time to free your frozen treasures! Silicone molds make this easy – just push up from the bottom. If you're using plastic trays, you might need to let them sit at room temperature for literally 30 seconds to a minute to loosen up. Transfer the released bites into an airtight freezer-safe container. To prevent them from sticking together, place a piece of parchment paper between layers. They'll keep well in the freezer for up to 2 months (if they last that long!).
- Step 7: Serve: Grab a few straight from the freezer and enjoy that instant burst of cool, creamy, berry flavor! If you prefer them slightly softer, let them sit out for just a minute or two before popping them in your mouth. Delicious!