Do you ever look for that perfect little something to spark joy and wonder on a slow afternoon? Something that’s super simple to put together but feels utterly magical? Well, my friend, you’ve stumbled upon a real gem today! I remember rainy days as a kid, wishing for a touch of lightning in a bottle, and now, we can actually make it happen (safely, of course!). These Electrified Thunder Glow Jars aren’t just a craft; they’re a tiny, glowing universe in your hands, perfect for lighting up a bedroom, a cozy nook, or just chasing away the blues. Get ready to create something truly spectacular with almost no effort at all!
Why You’ll Love Electrified Thunder Glow Jars
- Fast: You’ll be watching your thunder glow in minutes!
- Easy: No complicated steps, just simple mixing and pouring.
- Giftable: Wrap one up for a unique, homemade present.
- Crowd-pleasing: Kids and adults alike are mesmerized by the glowing effect!
Ingredients
Gathering your supplies for these magical jars is a breeze. Most of these you might already have around the house!
- 1 clear glass jar with lid: Mason jars work perfectly, or any clean glass jar you have on hand. The clearer, the better for that dazzling glow!
- 1/2 cup water: Just regular tap water will do the trick.
- 1/2 cup vegetable oil (or baby oil): This is key to creating those mesmerizing “thunderclouds” and the cool separation effect. Baby oil gives a slightly clearer, more ethereal look.
- A few drops blue or purple food coloring: To give your “thunder” its stormy, electric hue. Don’t be shy, but don’t overdo it either – a few drops are usually enough.
- 1 teaspoon non-toxic glow-in-the-dark paint or glowing powder: This is where the real magic happens! Make sure it’s non-toxic, especially if little ones will be handling the jars. You can find this at most craft stores.
- 1 teaspoon silver or holographic glitter: For that extra spark and shimmer, mimicking tiny lightning flashes.
- 1 small LED tea light or flashlight: To “charge” and illuminate your glow, especially in a dark room.
How to Make Electrified Thunder Glow Jars
Alright, let’s get our craft on! Follow these simple steps, and you’ll have your own glowing wonder in no time.
- Color Your Water: First things first, grab a small bowl and pour in your 1/2 cup of water. Add a few drops of your blue or purple food coloring. Stir it gently until the color is beautifully blended. You want a nice, vibrant base for your thunder.
- Unleash the Glow: Now for the really exciting part! Mix in your 1 teaspoon of glow-in-the-dark paint or glowing powder. Stir, stir, stir until it’s fully dissolved and you can see that magical glowing potential. You might need to stir for a minute or two to ensure it’s well incorporated.
- Halfway There: Carefully pour your glowing, colored water into your clear glass jar until it’s about halfway full. Take your time with this, we don’t want any spills!
- Add the Oil: Next, slowly pour the vegetable or baby oil into the jar. You’ll notice it creating a distinct layer over the water. Keep pouring until the jar is almost full, leaving just a little bit of space at the top. This gap is important for when you shake it up later. If you’re looking for other fun, easy crafts, you might also enjoy making some DIY Rain Cloud Jars for another mesmerizing visual experience!
- Sparkle Time: Now, for the glitter! Sprinkle in your silver or holographic glitter. Watch as it drifts down, catching the light and already hinting at the enchantment to come. I always think a little extra glitter never hurts!
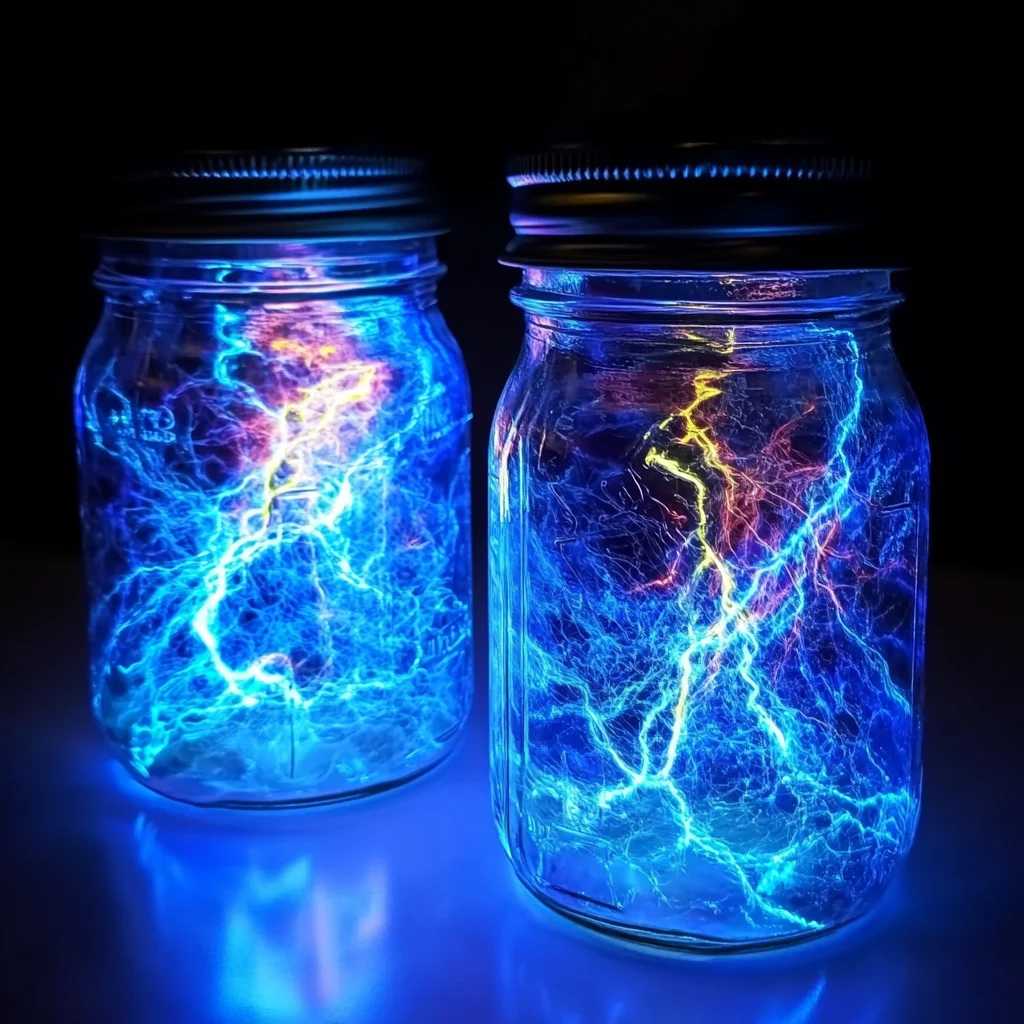
- Activate the Glow: Head into a dark room or dim the lights significantly. Place your small LED tea light or flashlight underneath or behind the jar. This will illuminate the glow-in-the-dark elements and really bring your thunder to life.
- Shake and Swirl: Secure the lid tightly on your jar. Now, gently shake or swirl the jar. Watch in amazement as the oil and water mix momentarily, creating incredible, shimmering “thunderclouds” and “lightning” flashes within your jar. It’s truly a sight to behold! This reminds me of how much fun kids have with easy 3-ingredient slime, which also offers a fantastic sensory experience.
Substitutions & Additions
The beauty of DIY projects is making them your own! Here are a few ideas to customize your glow jars:
- Different Colors: Don’t limit yourself to blue or purple! Try green for a neon glow, yellow for a sunny lightning effect, or even red for a fiery storm.
- Extra Sparkle: Beyond glitter, consider adding tiny star sequins or iridescent craft confetti for varied textures and light reflection.
- Themed Jars: Imagine a galaxy jar with darker food coloring and extra star glitter, or a lava lamp effect with red food coloring and a larger oil-to-water ratio.
- Essential Oils: For a calming sensory jar, you could add a drop or two of lavender essential oil to the water (if not for small children who might try to open it).
Tips for Success
Even though this recipe is super easy, a few tricks can make your Electrified Thunder Glow Jars even more spectacular!
- Non-Toxic is Key: Always ensure your glow paint or powder is labeled non-toxic, especially if these are for kids. Safety first!
- Oil and Water Don’t Mix (Perfectly): Pour the oil slowly to get that distinct layering effect before you shake. This separation is what creates the cool “thunder” look when agitated.
- The Darker, The Better: For the most dramatic effect, view your glow jars in a truly dark room. The LED light will really make the glow elements pop.
- Tight Lid: Double-check that your lid is on tightly before shaking, especially if little hands are involved! A leaky jar can make a mess.
- Customize the Light Source: If you don’t have an LED tea light, a small flashlight works great. You can even experiment with colored flashlights for different effects. For more creative light-play projects, you might love making some melted crayon stars!
How to Store Electrified Thunder Glow Jars
These magical jars are quite durable! Simply keep the lid tightly sealed and store them at room temperature. They don’t need refrigeration. The glow-in-the-dark paint will continue to work for a long time, though you might need to “recharge” it by holding it under a bright light for a few minutes before viewing in the dark if it hasn’t been used in a while. The oil and water layers will re-separate over time, so give it a good shake whenever you want to see the “thunder” again.
FAQs
Got questions? I’ve got answers!
Q: Can I use cooking oil instead of baby oil?
A: Yes, vegetable oil works perfectly fine! Baby oil tends to be a bit clearer, which some people prefer for visual clarity, but cooking oil will still give you a fantastic effect.
Q: How long does the glow last?
A: The glow-in-the-dark paint or powder will glow after being “charged” by light. The intensity and duration depend on the quality of the glow product you use, but typically it will glow brightly for several minutes, then slowly fade. You can recharge it indefinitely with light!
Q: Is this safe for young children?
A: Yes, as long as you use non-toxic glow paint/powder and ensure the lid is sealed tightly to prevent accidental ingestion. It’s a wonderful sensory activity for all ages!
Q: Can I reuse the jar for other things after this craft?
A: You certainly can! Just wash the jar thoroughly with soap and warm water. The oil and food coloring should come off easily. Make sure to rinse well to remove any glow residue.
For more dazzling recipes and DIY fun, be sure to follow us on Pinterest!

Electrified Thunder Glow Jars
Ingredients
Equipment
Method
- Step 1: In a small bowl, pour in 1/2 cup of water. Add a few drops of blue or purple food coloring and stir gently until beautifully blended.
- Step 2: Mix in 1 teaspoon of non-toxic glow-in-the-dark paint or glowing powder into the colored water. Stir until fully dissolved and well incorporated.
- Step 3: Carefully pour the glowing, colored water into your clear glass jar until it's about halfway full.
- Step 4: Slowly pour the vegetable or baby oil into the jar, creating a distinct layer over the water. Fill the jar almost full, leaving a small space at the top.
- Step 5: Sprinkle in the silver or holographic glitter.
- Step 6: In a dark room or with dimmed lights, place your small LED tea light or flashlight underneath or behind the jar to illuminate the glow-in-the-dark elements.
- Step 7: Secure the lid tightly on your jar. Gently shake or swirl to mix the oil and water momentarily, creating shimmering 'thunderclouds' and 'lightning' flashes.