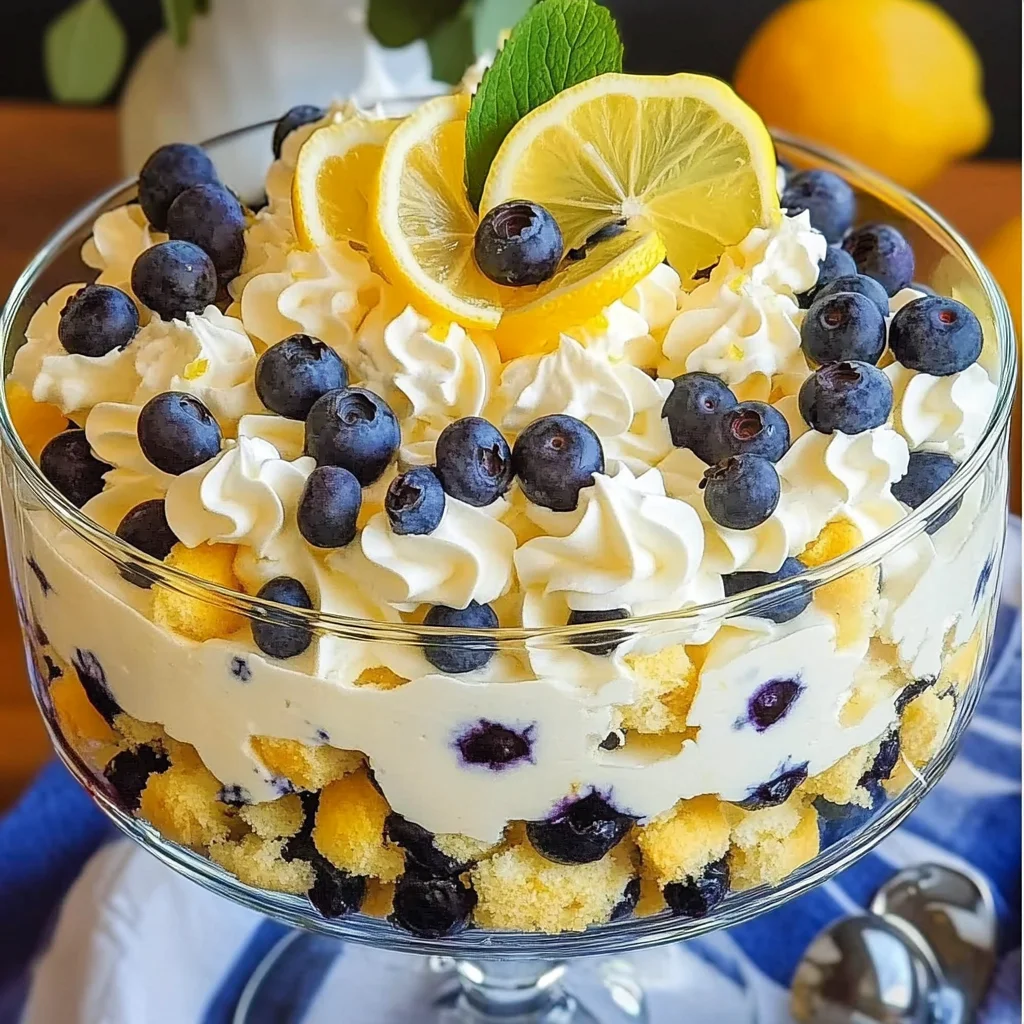
Oh, friends! If there’s one dessert that screams sunshine, lazy afternoons, and pure, unadulterated joy, it’s a gorgeous trifle. Piled high with layers of tender cake, creamy filling, and bursts of juicy fruit, it’s always a showstopper. And this Easy Lemon Blueberry Trifle? It’s not just a showstopper; it’s a flavor stopper! Think bright, tangy lemon dancing with sweet, plump blueberries, all nestled in a cloud of luscious cream. It’s the kind of dessert that makes memories, whether it’s the centerpiece at a summer BBQ, a potluck hero, or just a special treat for a cozy evening in. And trust me, making it is way simpler than it looks. Ready to dig in?
Why You’ll Love This Recipe
- Fast: Especially if you use store-bought components! Less time in the kitchen, more time enjoying!
- Easy: No finicky techniques here – just mixing, layering, and chilling. Anyone can do this!
- Giftable: Assemble it in a pretty container (like smaller jars for individual servings!) and you’ve got a beautiful, delicious homemade gift.
- Crowd-pleasing: This combination of flavors is a universal hit. Get ready for rave reviews!
Ingredients
Gather your goodies! Here’s what you’ll need to bring this sunny dessert to life:
- Lemon Pound Cake: You can absolutely use a store-bought pound cake or even angel food cake here to save time, and it will be delicious! But if you have a favorite homemade lemon pound cake recipe, that adds an extra special touch. Cut it into nice, bite-sized cubes.
- Limoncello: This sweet Italian lemon liqueur is optional but adds a wonderful pop of lemon flavor and moisture to the cake layers. Just a little brush goes a long way!
- Blueberries: Fresh, plump blueberries are perfect here! You’ll need a good amount – the more, the merrier, I say!
- Blueberry Preserves: This concentrated blueberry goodness adds another layer of fruit flavor and a lovely jammy texture.
- Lemon Curd: Again, store-bought is totally fine and convenient! Look for a good quality one. If you love making homemade lemon curd, that’s fantastic too – just make sure it’s cooled completely before using.
- Cream Cheese: Make sure it’s softened to room temperature! This is the base for our incredibly creamy filling.
- Vanilla Extract: Just a splash enhances all the sweet flavors.
- More Limoncello (optional): A tablespoon mixed into the filling adds a little extra lemon zing and sophistication.
- Lemon Zest: Zesting fresh lemons brings that bright, aromatic lemon oil into the filling. It’s key for that vibrant lemon flavor!
- More Lemon Curd: We’re adding some lemon curd into the cream cheese mixture too, for extra lemon flavor and lovely texture.
- Confectioner’s Sugar: Sweetens our creamy filling to perfection.
- Heavy Cream: Make sure it’s well-chilled! This is what makes our filling light, airy, and stable when whipped with the cream cheese mixture.
- Mint Leaves & Sliced Lemons (optional garnish): For a beautiful, fresh finishing touch that makes your trifle look as good as it tastes!
How to Make It
Alright, let’s put this masterpiece together! It’s all about layering the goodness.
- Get Your Cake Ready: If you made your own cake, let it cool completely. Then, whether it’s homemade or store-bought, cut the cake into bite-sized cubes. They don’t have to be perfect squares, just easy to spoon!
- Prep the Lemon Curd: If using homemade lemon curd, ensure it’s fully cooled. Store-bought is ready to go!
- Start the Creamy Filling: In a large mixing bowl, take your softened cream cheese, vanilla extract, that optional tablespoon of limoncello, and the fresh lemon zest. Beat them together until the mixture is super smooth and there are no lumps. An electric mixer works wonders here!
- Sweeten and Add More Lemon: Now, add the ½ cup of lemon curd and the confectioner’s sugar to the cream cheese mixture. Mix again until everything is perfectly smooth and combined. Taste it – is it lemony and sweet enough for you?
- Whip in the Heavy Cream: This is where the magic happens! Pour in your well-chilled heavy cream. Start your mixer on a low speed to combine, then gradually increase to high. Whip until stiff peaks form. This usually takes about 5 minutes, but keep an eye on it – you want it thick enough to hold its shape for layering, but not curdled. If you’re not assembling right away, pop this glorious filling in the fridge.
- Begin the Layering: Find your beautiful trifle bowl! Start by placing a single layer of those cubed cake pieces at the bottom.
- Give the Cake a Spritz: Lightly brush or drizzle the cake layer with some of the 1/3 cup limoncello. Just enough to moisten, you don’t want it soggy! If you’re skipping the alcohol, you could use a little simple syrup or lemon juice mixed with a touch of water.
- Add Some Berry Jam: Dollop several spoonfuls of the blueberry preserves over the cake layer. Spread it gently.
- Next, More Lemon Curd: Add about ½ cup of the plain lemon curd (not the stuff mixed into the cream cheese) over the blueberry preserves.
- Layer on the Blueberries: Now, add a generous layer of fresh blueberries over the lemon curd. Really pile them on – they’re key!
- Top with the Creamy Filling: Spoon about 1 ½ to 2 cups of your prepared lemon cream cheese filling over the blueberry layer. Carefully spread it out evenly, covering the berries completely.
- Repeat the Layers: Keep going! Add another layer of cake cubes, brush with limoncello, add preserves, then lemon curd, then blueberries, then the creamy filling. Repeat this process until your trifle bowl is full.
- Finish with Flair: Make the top layer look beautiful! Arrange a final scattering of fresh blueberries. You can also add extra dollops of the lemon filling using a spoon or a piping bag if you’re feeling fancy. For that extra touch of elegance and freshness, tuck in some fresh mint leaves and perhaps a few thin slices of lemon.
- Chill Time! While you can serve it right away, the flavors really meld and the cake softens perfectly if you refrigerate it for at least 1 hour before serving. This also helps the layers set up nicely.

Substitutions & Additions
Get creative and make this trifle your own! Here are a few ideas:
- Change the Cake: Any plain or lemon-flavored cake works! Shortcake, sponge cake, or even ladyfingers are great alternatives.
- Swap the Berries: Raspberries, strawberries, or a mix of berries would be delicious with lemon!
- Skip the Limoncello: Replace the limoncello soak with lemon simple syrup (equal parts sugar and water heated until sugar dissolves, then cooled, with a squeeze of lemon) or even just a splash of lemon juice mixed with a little water.
- Add a Different Liqueur: Instead of limoncello, try a berry liqueur, orange liqueur (like Grand Marnier), or even a splash of rum if you like!
- Boost the Texture: Add some crumbled shortbread cookies or granola between layers for a little crunch!
- Dairy-Free? Look for dairy-free cream cheese alternatives, vegan lemon curd, and coconut cream or other plant-based whipping creams. Ensure your cake is also dairy-free.
- Chocolate Lover? While not traditional for this recipe, you could experiment with white chocolate shavings layered in!
Tips for Success
Here are a few pointers to help you make the perfect trifle every time:
- Soften Cream Cheese Properly: This is crucial for a smooth filling. Take it out of the fridge at least an hour before you start mixing.
- Chill That Cream: Heavy cream whips best when it’s very cold. Keep it in the fridge until you’re ready to whip it.
- Don’t Over-Soak the Cake: You want the cake moist, not mushy. Just a light brush or drizzle is usually enough.
- Let it Chill: While the layers are pretty right away, chilling allows the flavors to meld and the creamy layers to firm up, making it much easier to serve neatly.
- Prep Ahead: You can make the cake and the creamy filling a day in advance. Keep them covered in the fridge. Assemble the trifle a few hours before you plan to serve it for best results, especially if using the limoncello soak, to allow the cake to soften.
How to Store It
Trifle is best enjoyed within a day or two of assembling, as the cake can start to get quite soft.
- Keep the trifle covered tightly with plastic wrap or a lid in the refrigerator.
- It will last for 2-3 days in the fridge. The layers will continue to soften over time.
- Freezing is generally not recommended for assembled trifles because the texture of the whipped cream and cake changes significantly upon thawing.
FAQs
- Can I use frozen blueberries?
- You can, but fresh are preferred for texture and appearance in the layers. If using frozen, make sure they are completely thawed and drained well to avoid excess liquid. You might want to reserve them only for the very top layer or mix them into the preserves layer.
- Can I make this in individual servings?
- Absolutely! Layer the ingredients in clear glasses, jars, or small bowls for adorable individual trifles. Adjust the layering amounts accordingly.
- My filling isn’t getting stiff enough. What went wrong?
- Make sure your heavy cream was very cold when you whipped it. Also, ensure you whipped it long enough to reach stiff peaks. If it’s still a bit soft, don’t panic – it will firm up in the fridge as it chills. You can still layer it, it just won’t have quite the same defined lines.
Easy Lemon Blueberry Trifle
Ingredients
Equipment
Method
- Step 1: Get Your Cake Ready: If you made your own cake, let it cool completely. Then, whether it's homemade or store-bought, cut the cake into bite-sized cubes.
- Step 2: Prep the Lemon Curd: If using homemade lemon curd, ensure it's fully cooled. Store-bought is ready to go!
- Step 3: Start the Creamy Filling: In a large mixing bowl, take your softened cream cheese, vanilla extract, that optional tablespoon of limoncello, and the fresh lemon zest. Beat them together until the mixture is super smooth and there are no lumps, using an electric mixer.
- Step 4: Sweeten and Add More Lemon: Now, add the ½ cup of lemon curd and the confectioner's sugar to the cream cheese mixture. Mix again until everything is perfectly smooth and combined. Taste it.
- Step 5: Whip in the Heavy Cream: Pour in your well-chilled heavy cream. Start your mixer on a low speed to combine, then gradually increase to high. Whip until stiff peaks form. This usually takes about 5 minutes. If you're not assembling right away, pop this filling in the fridge.
- Step 6: Begin the Layering: Find your beautiful trifle bowl! Start by placing a single layer of those cubed cake pieces at the bottom.
- Step 7: Give the Cake a Spritz: Lightly brush or drizzle the cake layer with some of the 1/3 cup limoncello. If skipping the alcohol, use a little simple syrup or lemon juice mixed with a touch of water.
- Step 8: Add Some Berry Jam: Dollop several spoonfuls of the blueberry preserves over the cake layer. Spread it gently.
- Step 9: Next, More Lemon Curd: Add about ½ cup of the plain lemon curd (not the stuff mixed into the cream cheese) over the blueberry preserves.
- Step 10: Layer on the Blueberries: Now, add a generous layer of fresh blueberries over the lemon curd.
- Step 11: Top with the Creamy Filling: Spoon about 1 ½ to 2 cups of your prepared lemon cream cheese filling over the blueberry layer. Carefully spread it out evenly.
- Step 12: Repeat the Layers: Keep going! Add another layer of cake cubes, brush with limoncello, add preserves, then lemon curd, then blueberries, then the creamy filling. Repeat this process until your trifle bowl is full.
- Step 13: Finish with Flair: Arrange a final scattering of fresh blueberries on top. You can also add extra dollops of the lemon filling. For elegance and freshness, tuck in some fresh mint leaves and perhaps a few thin slices of lemon.
- Step 14: Chill Time! Refrigerate for at least 1 hour before serving to allow flavors to meld and layers to set.