Oh my goodness, do you ever just crave that classic pairing? You know, the one that instantly brings back memories of special occasions, fancy chocolates, and pure joy? For me, that’s chocolate and strawberries. There’s something just magical about that sweet, slightly tart fruit nestled against rich, deep chocolate.
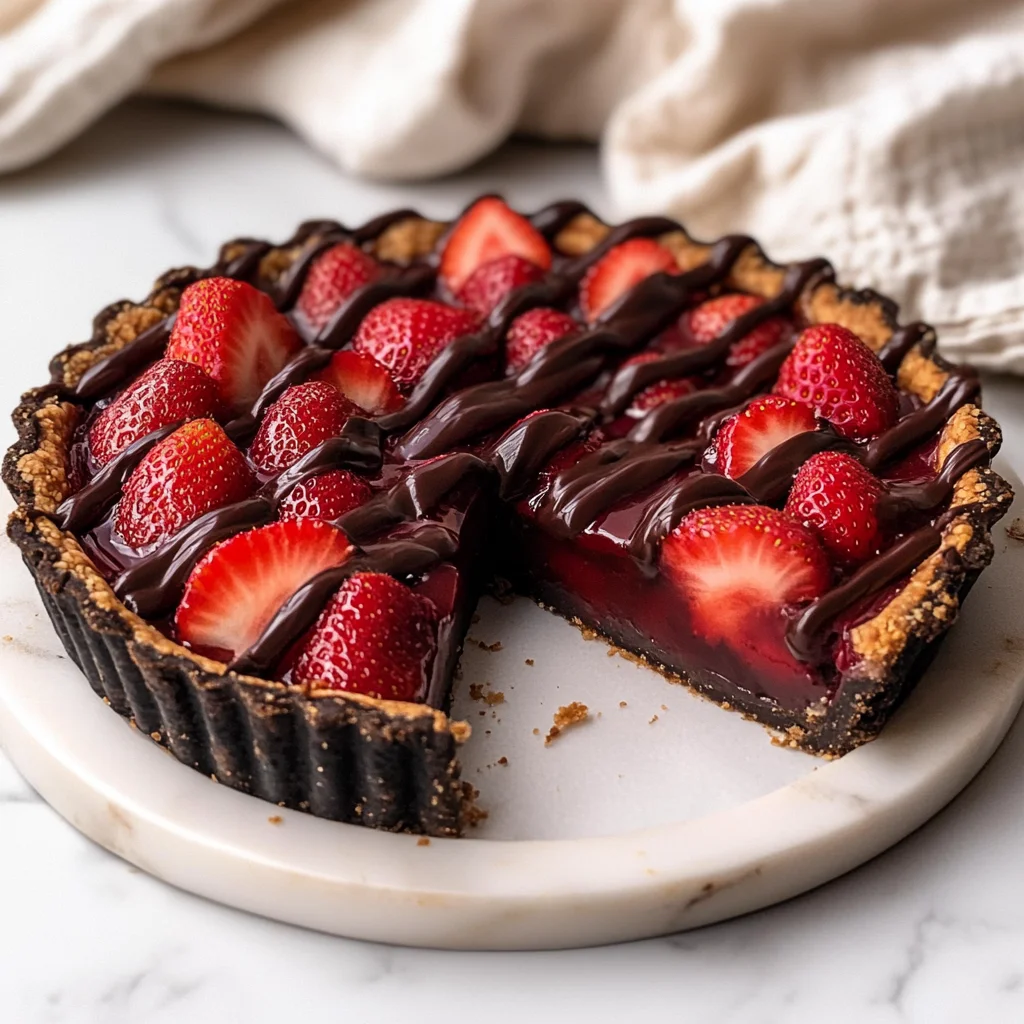
While those fancy chocolate-dipped strawberries are amazing, what if we turned that incredible flavor combination into a pie? A pie with a tender, chocolatey crust, a silky smooth ganache filling, and a vibrant, fresh strawberry topping? Yes, please! And guess what? It’s way easier than you might think. This Chocolate Covered Strawberry Pie is a showstopper, but secretly, it’s incredibly simple to put together. It’s the kind of dessert that disappears fast, leaves everyone asking for the recipe, and makes you feel like a total rockstar baker. Let’s get this pie party started!
Why You’ll Love This Recipe
- Fast(ish! The chilling is the longest part)
- Easy to follow steps
- Beautiful and Giftable
- Always a Crowd-pleaser!
Ingredients
Here’s what you’ll need to whip up this dreamy pie. Most of these are likely already in your pantry or fridge!
For the Crust:
- 1 1/4 cups (150g) all-purpose flour: Our base! Gives the crust its structure.
- 1/4 cup (25g) unsweetened cocoa powder: Hello, chocolatey goodness in every bite!
- 1/4 cup (50g) granulated sugar: Just a touch of sweetness to balance the cocoa.
- 1/2 teaspoon salt: Don’t skip this! It enhances all the flavors.
- 1/2 cup (113g) cold unsalted butter, cut into 1/2 inch cubes: Keeping that butter cold is KEY to a flaky, tender crust. Little pockets of butter melt in the oven and create steam.
- 3-5 tablespoons ice cold water: Helps bring the dough together without making it tough. Start with less, you can always add more!
For the Ganache Filling:
- 8 ounces (226g) semi-sweet chocolate, chopped: Use good quality chocolate chips or a chopped bar. The better the chocolate, the better the ganache!
- 1 cup (240ml) heavy cream: This richness is what makes the ganache so smooth and decadent.
For the Strawberry Topping:
- 1 pound fresh strawberries, hulled and halved: Choose bright, ripe strawberries for the best flavor.
- 1/4 cup (50g) granulated sugar: Sweetens the berries and helps create that lovely glaze.
- 2 tablespoons cornstarch: Our thickening agent to make that beautiful jam-like sauce.
- 1/4 cup (60ml) water: Helps dissolve the cornstarch and sugar.
- 1 tablespoon lemon juice: A little bit of acidity brightens the strawberry flavor and balances the sweetness.
How to Make It
Alright, deep breaths! We’re tackling this one layer at a time. You’ve got this!
To Make the Crust:
This is a simple chocolate pastry crust, and a food processor makes it extra quick!
- First, gather your dry ingredients. In your food processor, pulse together the flour, cocoa powder, sugar, and salt until everything is just combined.
- Now, add in that cold, cubed butter. Pulse it a few times, just until the mixture looks like coarse crumbs. You’ll still see some pieces of butter, maybe pea-sized or a little bigger. That’s exactly what you want!
- Time for the ice water. Add 3 tablespoons to start and pulse again. The dough should just start to come together when you pinch a little bit. If it still seems super dry and crumbly, add another tablespoon of ice water, pulse, and check again. Repeat up to 5 tablespoons total, but stop as soon as it starts to look cohesive. Don’t overmix!
- Turn the dough out onto a clean surface. Gently bring it together with your hands, form it into a disk about an inch thick, wrap it tightly in plastic wrap, and pop it in the fridge for at least 30 minutes. This chill time is important for rolling!
- When you’re ready to bake, preheat your oven to 375°F (190°C).
- Lightly flour your rolling surface and the top of the dough disk. Roll the dough out into a circle about 12 inches in diameter. Carefully transfer the dough to a 9-inch pie plate. Gently press it into the plate and up the sides. Trim off any excess dough from the edges and then crimp or flute the edges however you like!
- Using a fork, gently prick the bottom and sides of the crust all over. This is called “docking” and it helps prevent the crust from puffing up while baking.
- To “blind bake” the crust (bake it before the filling goes in), line the inside of the raw crust with parchment paper and fill it with pie weights, dried beans, or even dry rice. Make sure they fill the bottom and go up the sides a bit to hold the shape.
- Bake the crust for 15 minutes with the weights. Carefully remove the parchment and weights. Now, bake it for another 10-12 minutes, or until the crust looks firm and matte (not shiny). Let it cool completely on a wire rack before you add any filling.
To Make the Ganache:
Silky smooth ganache coming right up! It’s incredibly simple.
- Put your chopped semi-sweet chocolate in a heatproof bowl.
- Pour the heavy cream into a small saucepan and heat it over medium heat. Watch it closely! You want it to just barely start simmering around the edges. Don’t let it boil rapidly.
- Pour the hot cream directly over the chopped chocolate in the bowl. This is important – let it sit for 5 minutes without touching it! The heat from the cream needs time to melt the chocolate.
- After 5 minutes, grab a whisk and start whisking the mixture from the center outwards. It might look separated or weird at first, but keep whisking gently. Soon, it will come together into a beautiful, smooth, and glossy chocolate filling. Magic!
- Pour the ganache into your cooled pie crust. Spread it out evenly with a spatula.
- Pop the pie into the refrigerator for at least 1 hour. This gives the ganache time to set up and become firm.
To Make the Strawberry Topping:
This topping is part fresh berries, part luscious berry sauce!
- Grab your hulled and halved strawberries. In a medium saucepan, combine about 1/4 of the strawberries (about 1/4 pound) with the sugar, cornstarch, water, and lemon juice.
- Place the saucepan over medium heat. Stir constantly and use a spoon or potato masher to gently mash the strawberries as they cook. Keep cooking and stirring until the mixture thickens into a lovely, jam-like sauce. This should take about 5-7 minutes.
- Remove the saucepan from the heat. Add the remaining fresh, un-cooked strawberry halves into the hot sauce. Stir gently to coat them. The heat of the sauce will soften them slightly and make them glossy.
- Let the strawberry topping cool slightly. It doesn’t need to be cold, just not piping hot.
- Once the ganache layer in the pie crust is set, carefully pour the strawberry topping over the top. Spread it out evenly over the chocolate layer.
- Now comes the hardest part: waiting! Put the entire pie back in the refrigerator for at least 4 hours (or ideally longer, like overnight) so everything can chill and set up beautifully.
Once it’s fully chilled, slice yourself a generous piece and enjoy! You earned it.
Substitutions & Additions
Want to tweak things a little? Here are some ideas:
- Different Berries: While chocolate and strawberries are a classic, this topping method works wonderfully with raspberries, blueberries, or a mix of berries! Adjust sugar slightly depending on the sweetness of the fruit.
- Easier Crust: Short on time? You can absolutely use a store-bought chocolate pie crust. Just follow the package directions for pre-baking if necessary, then proceed with the ganache and topping steps.
- Add Some Crunch: Sprinkle some toasted slivered almonds or chopped pecans over the ganache before adding the strawberries. Or add a layer of crushed shortbread cookies to the bottom of the crust before the ganache.
- Different Chocolate: If you love dark chocolate, use bittersweet chocolate in the ganache! For a sweeter pie, use milk chocolate (you might need slightly less cream, start with 3/4 cup).
- A Hint of Vanilla: Stir a teaspoon of vanilla extract into the ganache just before pouring it into the crust for an extra layer of flavor.
Tips for Success
A few little pointers to help you make this pie perfectly:
- Keep Crust Ingredients COLD: Seriously, cold butter and ice water are essential for a flaky crust. Don’t handle the dough too much – the warmth of your hands can melt the butter.
- Don’t Overwork the Dough: Mix just until it comes together. Overmixing develops gluten and leads to a tough crust.
- Chill Time is Your Friend: Don’t rush the chilling steps. The dough needs time to relax, the ganache needs to set, and the finished pie needs time for the layers to meld and firm up for clean slicing.
- Watch the Cream for Ganache: Heat it until it just starts to simmer, don’t let it boil rapidly. Too hot can sometimes cause the chocolate to seize or the ganache to be greasy.
- Mash Some Berries for Topping: Mashing about a quarter of the strawberries helps create that lovely, thick, glossy sauce that coats the fresh berries beautifully.
- Make Ahead: You can make the crust a day or two ahead and store it wrapped in the fridge. You can also make the ganache a day ahead and gently rewarm it slightly (very low heat or double boiler) before pouring if it’s too firm. The strawberry topping is best made closer to assembly, but it can be made a few hours ahead and kept at room temp. The assembled pie needs the full chill time, so making it the day before you want to serve is perfect!
How to Store It
Once the pie is fully chilled and set, cover it loosely with plastic wrap or foil. Store it in the refrigerator. It will stay delicious for 3-4 days. Honestly, it rarely lasts that long in my house!
I don’t typically recommend freezing cream or ganache-based pies, as the texture can sometimes change upon thawing. This pie is best enjoyed fresh from the fridge!
FAQs
Got questions? I’ve got a few answers!
Q: Can I use frozen strawberries?
A: I highly recommend using fresh strawberries for this recipe, especially for the portion that goes into the topping uncooked. Frozen berries release a lot more water when thawed, which can make the topping watery. If you absolutely must use frozen, thaw them completely and drain them very well before using them, especially the ones you cook down for the sauce part.
Q: My ganache looks lumpy or separated! What did I do wrong?
A: Don’t panic! This sometimes happens if the cream wasn’t hot enough or if you started whisking too soon. Try adding a tablespoon of hot cream (or even just hot water, carefully) and whisking vigorously from the center. Sometimes this will bring it back together. If it’s really stubborn, you can try gently heating the bowl over a pan of simmering water (a double boiler) and whisking until smooth, then removing from heat and continuing to whisk.
Q: Can I make this pie without the chocolate crust?
A: Absolutely! You can use a standard all-butter or shortening pie crust recipe. Just omit the cocoa powder and sugar from the crust ingredients and follow the same method for mixing, chilling, and blind baking.
Q: Is this pie very sweet?
A: It has sweetness from the sugar and chocolate, but the cocoa in the crust and the slight tang from the lemon juice and strawberries balance it out really well. It’s rich and decadent, but not overly cloying.

Decadent & Easy Chocolate Covered Strawberry Pie Recipe
Ingredients
Equipment
Method
- Step 1: For the crust, pulse together the flour, cocoa powder, sugar, and salt in a food processor until just combined.
- Step 2: Add the cold, cubed butter and pulse a few times until the mixture looks like coarse crumbs with some pea-sized butter pieces.
- Step 3: Add 3 tablespoons of ice cold water and pulse. If the dough is still dry, add more water, 1 tablespoon at a time (up to 5 total), pulsing until it just starts to come together when pinched.
- Step 4: Turn the dough out onto a clean surface, gently bring it together, form into a 1-inch thick disk, wrap tightly in plastic wrap, and refrigerate for at least 30 minutes.
- Step 5: When ready to bake, preheat your oven to 375°F (190°C).
- Step 6: Lightly flour your rolling surface and the top of the dough disk. Roll the dough out into a circle about 12 inches in diameter. Carefully transfer the dough to a 9-inch pie plate. Gently press it into the plate and up the sides. Trim off any excess dough and crimp or flute the edges.
- Step 7: Using a fork, gently prick the bottom and sides of the crust all over (docking).
- Step 8: Line the inside of the raw crust with parchment paper and fill it with pie weights, dried beans, or rice. Bake for 15 minutes.
- Step 9: Carefully remove the parchment and weights. Bake for another 10-12 minutes, or until the crust looks firm and matte. Let it cool completely on a wire rack.
- Step 10: For the ganache, put your chopped semi-sweet chocolate in a heatproof bowl.
- Step 11: Pour the heavy cream into a small saucepan and heat it over medium heat until it just barely starts simmering around the edges (do not boil rapidly).
- Step 12: Pour the hot cream directly over the chopped chocolate in the bowl. Let it sit for 5 minutes without touching it.
- Step 13: After 5 minutes, whisk the mixture gently from the center outwards until it comes together into a beautiful, smooth, and glossy chocolate filling.
- Step 14: Pour the ganache into your cooled pie crust. Spread it out evenly with a spatula.
- Step 15: Pop the pie into the refrigerator for at least 1 hour to set up and become firm.
- Step 16: For the strawberry topping, in a medium saucepan, combine about 1/4 of the hulled and halved strawberries with the sugar, cornstarch, water, and lemon juice.
- Step 17: Place the saucepan over medium heat. Stir constantly and use a spoon or potato masher to gently mash the strawberries as they cook. Keep cooking and stirring until the mixture thickens into a lovely, jam-like sauce (about 5-7 minutes).
- Step 18: Remove the saucepan from the heat. Add the remaining fresh, un-cooked strawberry halves into the hot sauce. Stir gently to coat them.
- Step 19: Let the strawberry topping cool slightly (it doesn't need to be cold, just not piping hot).
- Step 20: Once the ganache layer in the pie crust is set, carefully pour the strawberry topping over the top. Spread it out evenly over the chocolate layer.
- Step 21: Put the entire pie back in the refrigerator for at least 4 hours (or ideally longer, like overnight) so everything can chill and set up beautifully.
- Step 22: Once it's fully chilled, slice yourself a generous piece and enjoy!