Oh, friend, there are just some smells that instantly transport you, aren’t there? For me, it’s often the aroma of a delicious takeout meal wafting through the kitchen. But what if I told you that you could capture all that incredible sweet, savory, and perfectly crispy magic right in your own home, with even better results and a fraction of the effort? Well, get ready, because this Honey Sesame Chicken recipe is about to become your family’s new favorite weeknight wonder. It’s so much easier and quicker than you think, and honestly, it tastes even better than what you’d get from your local spot. Forget those complicated dishes; this one is pure, memorable joy, just like when you discover another fantastic easy weeknight meal, like a hearty Egg Roll in a Bowl!
Why You’ll Love Honey Sesame Chicken
- Fast: From marinade to plate, you’ll be enjoying this delightful dish in under an hour. Perfect for those busy evenings!
- Easy: Simple ingredients and straightforward steps mean even beginner cooks can nail this. No fuss, just flavor.
- Giftable: While it’s best enjoyed fresh, the sauce can be made ahead, making it a thoughtful gift for a friend in need of a delicious, comforting meal.
- Crowd-pleasing: The irresistible combination of sweet honey and savory sesame is a guaranteed hit with kids and adults alike. Prepare for applause!
Ingredients
Alright, let’s gather our delicious bounty! You’ll find most of these staples are probably hanging out in your pantry already, which is just another reason to adore this recipe.
- 1 ½ lb chicken breast or thighs, cut into 1-inch pieces: I love using thighs for their extra juiciness, but breasts work beautifully too if you prefer a leaner option.
- 1 teaspoon chicken bouillon powder: This little secret ingredient boosts the chicken’s flavor profile right from the start.
- ½ teaspoon white pepper: A milder pepper that adds a subtle warmth without being overpowering.
- 1 tablespoon water: Just a touch to help the marinade seasonings coat the chicken evenly.
- 2 large eggs: The base of our crispy batter.
- ½ cup all-purpose flour: Provides structure to the batter.
- ½ cup cornstarch: This is key for that enviable crispiness!
- 2 teaspoons baking powder: Helps the batter get light and airy.
- ½ teaspoon salt: Balances out the flavors in the batter.
- ¼ cup water: Thins out the batter to the perfect consistency.
- 2 teaspoons vegetable oil (for batter) + 2-3 inches for frying + 1 teaspoon for sauce: We’re doing a bit of deep-frying here, so make sure you have enough. Any neutral oil like canola or sunflower works great.
- 3 tablespoons light soy sauce: The salty, umami backbone of our sauce.
- 1 tablespoon oyster sauce: Adds a beautiful depth and richness that you don’t want to skip.
- 2 tablespoons rice vinegar: Provides a lovely tang that cuts through the sweetness.
- 2 tablespoons ketchup: A surprising ingredient that adds a touch of sweetness and acidity, and a gorgeous reddish hue.
- ¼ cup honey: The star of the show, bringing that sticky sweetness we all crave.
- 3 tablespoons brown sugar: More sweetness, plus a lovely molasses note.
- 3 tablespoons water (for sauce): Helps bring the sauce together.
- 4 cloves garlic, minced: Fresh garlic is always best for that aromatic kick!
- 1 tablespoon sesame oil: Added at the end for its distinctive nutty fragrance and flavor.
- 2 teaspoons cornstarch (for slurry): Our trusty thickener for a perfectly glossy sauce.
- 3 tablespoons water (for slurry): To mix with the cornstarch.
- Green onion, sliced: For a pop of color and fresh, mild onion flavor.
- Toasted sesame seeds: The classic garnish that adds crunch and visual appeal.
How to Make Honey Sesame Chicken
Ready to get cooking? Follow these steps, and you’ll be amazed at how quickly this comes together!

1. Marinate the Chicken: Grab a medium bowl and toss your chicken pieces in there. Sprinkle in the chicken bouillon powder and white pepper, then add that tablespoon of water. Give it a good mix, ensuring every piece is coated. Now, let it sit for at least 10 minutes. While it’s marinating, you can move on to the next step and save yourself some time!
2. Prepare the Sauce: In a separate small bowl, whisk together the light soy sauce, oyster sauce, rice vinegar, ketchup, honey, brown sugar, and the 3 tablespoons of water for the sauce. Stir it until everything is nicely combined and smooth. Set this aside for a moment.
3. Make the Batter: In a medium bowl, crack in your two large eggs. Add the all-purpose flour, ½ cup of cornstarch, baking powder, salt, the ¼ cup of water for the batter, and the 2 teaspoons of vegetable oil. Whisk everything together until you have a smooth, lump-free batter. Now, pour this beautiful batter over your marinated chicken and toss it gently until each and every piece is lovingly coated.
4. First Fry: This is where the magic starts to happen! In a sturdy wok or a deep pot, heat about 2-3 inches of vegetable oil. You’re aiming for 365°F (185°C). If you don’t have a thermometer, a good test is to drop a tiny bit of batter in – it should sizzle immediately and float to the top. Carefully add your battered chicken pieces in batches. Don’t overcrowd the pot, or your oil temperature will drop too much, leading to soggy chicken. Fry each batch for about 3 minutes, or until the chicken is cooked through and lightly golden. Use a slotted spoon or spider to remove the chicken and place it on a wire rack set over a baking sheet to drain any excess oil. This first fry cooks the chicken through and sets the batter.
5. Second Fry: This is the secret to ultimate crispiness! Increase your oil temperature to 375°F (190°C). Once it’s hot enough, fry the chicken again in batches for just 2 minutes, or until they’re beautifully golden brown and super crispy. Transfer them back to the wire rack to drain. Trust me, this double-fry step makes all the difference for that amazing texture!
6. Cook the Sauce: Now for that irresistible sticky sauce! If your wok is looking a little messy, give it a quick wipe out (or use a clean one). Heat 1 teaspoon of fresh oil over medium heat. Add your minced garlic and sauté it for about 30 seconds until it’s fragrant – be careful not to burn it! Pour in your prepared sauce mixture and stir everything to combine. Bring it to a gentle simmer and let it cook for about 2 minutes. While that’s simmering, quickly whisk together the 2 teaspoons of cornstarch and 3 tablespoons of water in a small separate bowl to create your cornstarch slurry. Slowly pour the slurry into the simmering sauce, stirring constantly. You’ll see it magically thicken up in about 1 minute. Once it’s thick and glossy, turn off the heat and stir in the tablespoon of sesame oil. That aroma is just heavenly!
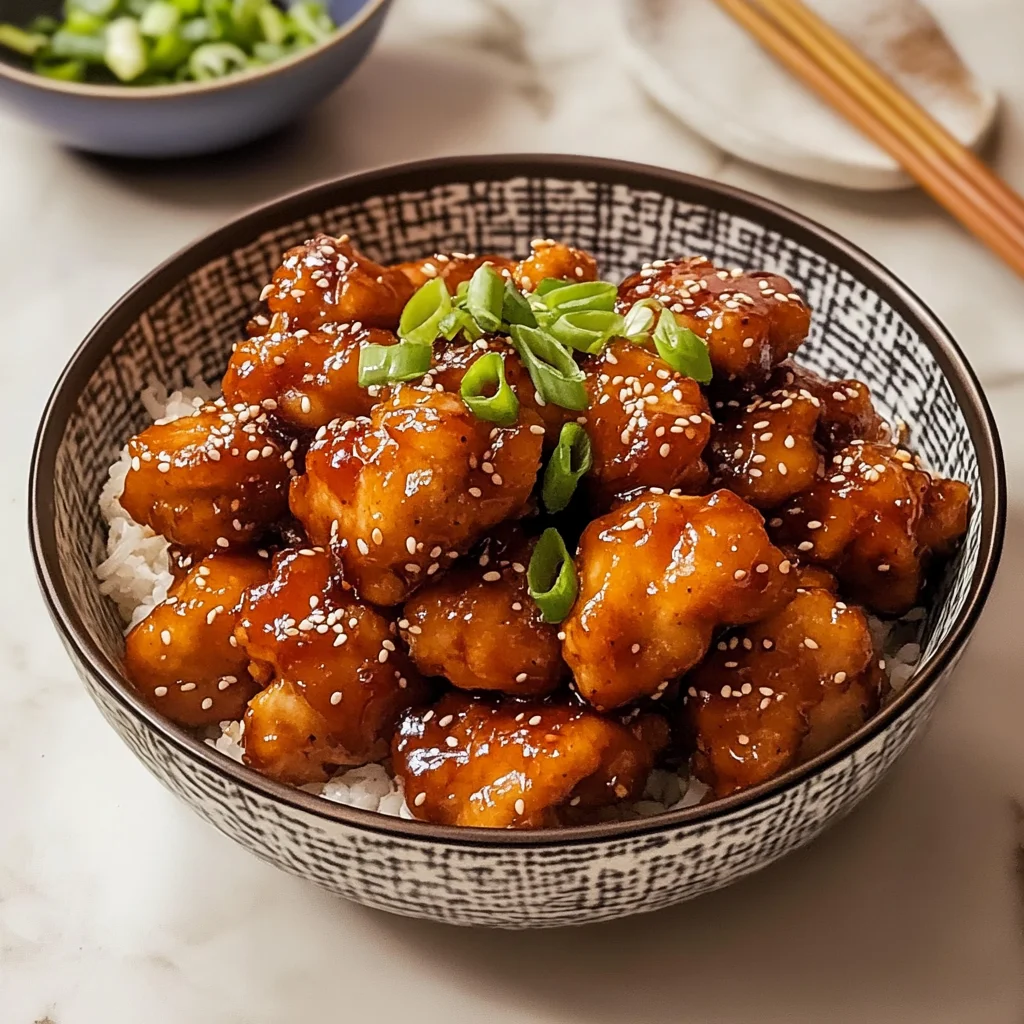
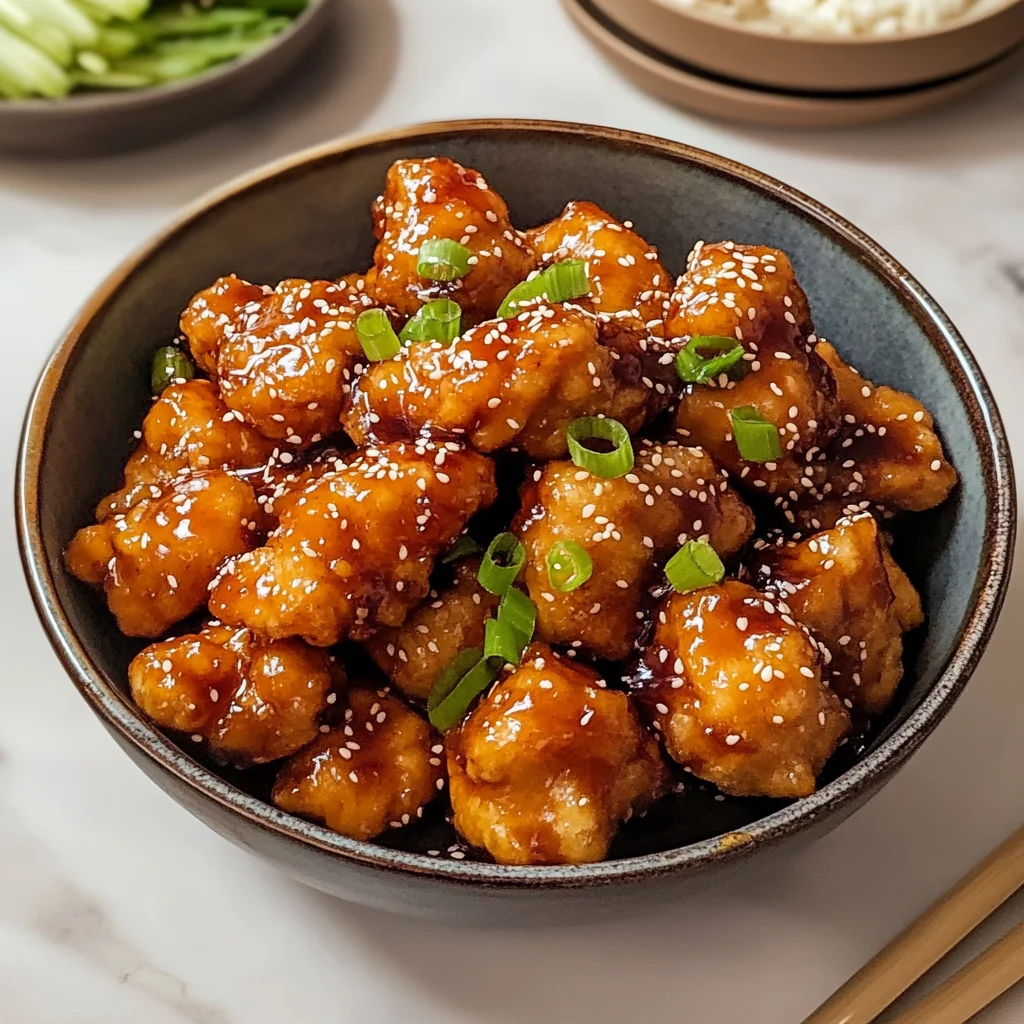
7. Combine and Serve: Here’s the grand finale! Add all your crispy fried chicken pieces to the wok with the warm honey sesame sauce. Toss gently but thoroughly until every piece of chicken is glistening and evenly coated in that glorious sticky sauce. Transfer to a serving platter and finish with a sprinkle of toasted sesame seeds and sliced green onions. Serve it up immediately, perhaps with some steamed rice or a side of easy chicken teriyaki noodles, and watch it disappear!
Substitutions & Additions
One of the best things about home cooking is making it your own! Don’t be afraid to experiment with this Honey Sesame Chicken recipe:
- Protein Power: Not feeling chicken? This sauce is incredibly versatile! Try it with crispy pan-fried shrimp, or for a fantastic vegetarian option, make some crispy air fryer garlic tofu nuggets and toss them in the sauce.
- Veggie Boost: Stir-fry some blanched broccoli florets, sliced bell peppers, or snap peas with the garlic before adding the sauce for a complete meal in one pan.
- Spice It Up: If you like a little heat, add a pinch of red pepper flakes to the sauce, or a drizzle of sriracha right before serving.
- Different Sugars: While brown sugar adds depth, you can certainly use granulated sugar or even maple syrup in a pinch for the sweetness.
- Garnish Galore: Beyond green onions and sesame seeds, a sprinkle of chopped peanuts or cashews can add extra crunch and flavor.
Tips for Success
Achieving that perfect takeout-style Honey Sesame Chicken at home is totally doable with these few tips:
- Don’t Overcrowd the Fryer: This is probably the most important tip for crispy chicken! Frying in batches ensures the oil temperature stays high, resulting in a golden, crispy crust rather than a greasy, soggy one.
- The Double Fry is King: Seriously, don’t skip this step! The first fry cooks the chicken, and the second fry, at a higher temperature, gets it incredibly crispy and locks in that amazing texture.
- Temperature Matters: Investing in a good kitchen thermometer is a game-changer for frying. Precise oil temperatures prevent burning or undercooking and ensure consistent results.
- Marinade Time: Even 10 minutes helps, but if you have the time, let your chicken marinate for 30 minutes to an hour in the fridge. The longer it sits, the more flavor it absorbs.
- Prep Ahead: You can whisk together your sauce ingredients ahead of time and store them in the fridge. You can also cut your chicken and have it ready to go. This makes dinner assembly a breeze!
- Toss Quickly: Once the sauce is ready and the chicken is re-fried, toss them together immediately. The hot chicken will absorb the sauce beautifully, and it prevents the chicken from getting soggy as it cools.
How to Store Honey Sesame Chicken
While this dish is absolutely best enjoyed fresh and hot off the wok, you might find yourself with some delicious leftovers (a rare but welcome occurrence!).
- Refrigerator: Store any leftover Honey Sesame Chicken in an airtight container in the refrigerator for up to 3-4 days.
- Freezer: You can freeze the cooked chicken (without the sauce, if possible, for best texture) or the fully sauced chicken in an airtight freezer-safe container for up to 2-3 months. The chicken might lose a bit of its crispiness after freezing and reheating, but the flavor will still be fantastic.
- Reheating: For best results, reheat in a skillet over medium heat until warmed through, or pop it in an air fryer or oven at 350°F (175°C) for 10-15 minutes to help crisp it up again. The microwave works in a pinch but won’t bring back the crispiness.
FAQs
Q: Can I bake or air fry the chicken instead of deep frying?
A: Yes, you can! For baking, coat the chicken in batter, arrange on a wire rack over a baking sheet, and bake at 400°F (200°C) for 20-25 minutes, flipping halfway, until golden and cooked through. For air frying, preheat your air fryer to 375°F (190°C), spray the basket, and cook in batches for 10-15 minutes, shaking halfway, until crispy and cooked. While it won’t be quite the same as deep-fried, it’s still delicious!
Q: Is this recipe spicy?
A: No, the classic Honey Sesame Chicken recipe is sweet and savory, not spicy. However, you can easily add heat by including red pepper flakes in the sauce or a dash of sriracha to your plate.
Q: What should I serve with Honey Sesame Chicken?
A: Steamed white or brown rice is a classic pairing. You could also serve it with lo mein noodles, a simple side salad, or some stir-fried vegetables like broccoli or snap peas for a complete meal.
Q: Can I use pre-cooked chicken?
A: While this recipe is designed for raw chicken to get that crispy batter, you could use pre-cooked rotisserie chicken in a pinch. However, you would skip the frying steps and just toss the shredded chicken directly into the prepared sauce to warm through. The texture will be different, but the flavor will still be there!
Don’t miss out on more delicious and easy recipes! Be sure to follow us on Pinterest for daily inspiration.
Sticky Sweet & Crispy: Your New Favorite Easy Honey Sesame Chicken Recipe!
Oh, friend, there are just some smells that instantly transport you, aren’t there? For me, it’s often the aroma of a delicious takeout meal wafting through the kitchen. But what if I told you that you could capture all that incredible sweet, savory, and perfectly crispy magic right in your own home, with even better results and a fraction of the effort? Well, get ready, because this Honey Sesame Chicken recipe is about to become your family’s new favorite weeknight wonder. It’s so much easier and quicker than you think, and honestly, it tastes even better than what you’d get from your local spot. Forget those complicated dishes; this one is pure, memorable joy, just like when you discover another fantastic easy weeknight meal, like a hearty Egg Roll in a Bowl!
Why You’ll Love Honey Sesame Chicken
- Fast: From marinade to plate, you’ll be enjoying this delightful dish in under an hour. Perfect for those busy evenings!
- Easy: Simple ingredients and straightforward steps mean even beginner cooks can nail this. No fuss, just flavor.
- Giftable: While it’s best enjoyed fresh, the sauce can be made ahead, making it a thoughtful gift for a friend in need of a delicious, comforting meal.
- Crowd-pleasing: The irresistible combination of sweet honey and savory sesame is a guaranteed hit with kids and adults alike. Prepare for applause!
Ingredients
Alright, let’s gather our delicious bounty! You’ll find most of these staples are probably hanging out in your pantry already, which is just another reason to adore this recipe.
- 1 ½ lb chicken breast or thighs, cut into 1-inch pieces: I love using thighs for their extra juiciness, but breasts work beautifully too if you prefer a leaner option.
- 1 teaspoon chicken bouillon powder: This little secret ingredient boosts the chicken’s flavor profile right from the start.
- ½ teaspoon white pepper: A milder pepper that adds a subtle warmth without being overpowering.
- 1 tablespoon water: Just a touch to help the marinade seasonings coat the chicken evenly.
- 2 large eggs: The base of our crispy batter.
- ½ cup all-purpose flour: Provides structure to the batter.
- ½ cup cornstarch: This is key for that enviable crispiness!
- 2 teaspoons baking powder: Helps the batter get light and airy.
- ½ teaspoon salt: Balances out the flavors in the batter.
- ¼ cup water: Thins out the batter to the perfect consistency.
- 2 teaspoons vegetable oil (for batter) + 2-3 inches for frying + 1 teaspoon for sauce: We’re doing a bit of deep-frying here, so make sure you have enough. Any neutral oil like canola or sunflower works great.
- 3 tablespoons light soy sauce: The salty, umami backbone of our sauce.
- 1 tablespoon oyster sauce: Adds a beautiful depth and richness that you don’t want to skip.
- 2 tablespoons rice vinegar: Provides a lovely tang that cuts through the sweetness.
- 2 tablespoons ketchup: A surprising ingredient that adds a touch of sweetness and acidity, and a gorgeous reddish hue.
- ¼ cup honey: The star of the show, bringing that sticky sweetness we all crave.
- 3 tablespoons brown sugar: More sweetness, plus a lovely molasses note.
- 3 tablespoons water (for sauce): Helps bring the sauce together.
- 4 cloves garlic, minced: Fresh garlic is always best for that aromatic kick!
- 1 tablespoon sesame oil: Added at the end for its distinctive nutty fragrance and flavor.
- 2 teaspoons cornstarch (for slurry): Our trusty thickener for a perfectly glossy sauce.
- 3 tablespoons water (for slurry): To mix with the cornstarch.
- Green onion, sliced: For a pop of color and fresh, mild onion flavor.
- Toasted sesame seeds: The classic garnish that adds crunch and visual appeal.
How to Make Honey Sesame Chicken
Ready to get cooking? Follow these steps, and you’ll be amazed at how quickly this comes together!
1. Marinate the Chicken: Grab a medium bowl and toss your chicken pieces in there. Sprinkle in the chicken bouillon powder and white pepper, then add that tablespoon of water. Give it a good mix, ensuring every piece is coated. Now, let it sit for at least 10 minutes. While it’s marinating, you can move on to the next step and save yourself some time!
2. Prepare the Sauce: In a separate small bowl, whisk together the light soy sauce, oyster sauce, rice vinegar, ketchup, honey, brown sugar, and the 3 tablespoons of water for the sauce. Stir it until everything is nicely combined and smooth. Set this aside for a moment.
3. Make the Batter: In a medium bowl, crack in your two large eggs. Add the all-purpose flour, ½ cup of cornstarch, baking powder, salt, the ¼ cup of water for the batter, and the 2 teaspoons of vegetable oil. Whisk everything together until you have a smooth, lump-free batter. Now, pour this beautiful batter over your marinated chicken and toss it gently until each and every piece is lovingly coated.
4. First Fry: This is where the magic starts to happen! In a sturdy wok or a deep pot, heat about 2-3 inches of vegetable oil. You’re aiming for 365°F (185°C). If you don’t have a thermometer, a good test is to drop a tiny bit of batter in – it should sizzle immediately and float to the top. Carefully add your battered chicken pieces in batches. Don’t overcrowd the pot, or your oil temperature will drop too much, leading to soggy chicken. Fry each batch for about 3 minutes, or until the chicken is cooked through and lightly golden. Use a slotted spoon or spider to remove the chicken and place it on a wire rack set over a baking sheet to drain any excess oil. This first fry cooks the chicken through and sets the batter.
5. Second Fry: This is the secret to ultimate crispiness! Increase your oil temperature to 375°F (190°C). Once it’s hot enough, fry the chicken again in batches for just 2 minutes, or until they’re beautifully golden brown and super crispy. Transfer them back to the wire rack to drain. Trust me, this double-fry step makes all the difference for that amazing texture!
6. Cook the Sauce: Now for that irresistible sticky sauce! If your wok is looking a little messy, give it a quick wipe out (or use a clean one). Heat 1 teaspoon of fresh oil over medium heat. Add your minced garlic and sauté it for about 30 seconds until it’s fragrant – be careful not to burn it! Pour in your prepared sauce mixture and stir everything to combine. Bring it to a gentle simmer and let it cook for about 2 minutes. While that’s simmering, quickly whisk together the 2 teaspoons of cornstarch and 3 tablespoons of water in a small separate bowl to create your cornstarch slurry. Slowly pour the slurry into the simmering sauce, stirring constantly. You’ll see it magically thicken up in about 1 minute. Once it’s thick and glossy, turn off the heat and stir in the tablespoon of sesame oil. That aroma is just heavenly!
7. Combine and Serve: Here’s the grand finale! Add all your crispy fried chicken pieces to the wok with the warm honey sesame sauce. Toss gently but thoroughly until every piece of chicken is glistening and evenly coated in that glorious sticky sauce. Transfer to a serving platter and finish with a sprinkle of toasted sesame seeds and sliced green onions. Serve it up immediately, perhaps with some steamed rice or a side of easy chicken teriyaki noodles, and watch it disappear!
Substitutions & Additions
One of the best things about home cooking is making it your own! Don’t be afraid to experiment with this Honey Sesame Chicken recipe:
- Protein Power: Not feeling chicken? This sauce is incredibly versatile! Try it with crispy pan-fried shrimp, or for a fantastic vegetarian option, make some crispy air fryer garlic tofu nuggets and toss them in the sauce.
- Veggie Boost: Stir-fry some blanched broccoli florets, sliced bell peppers, or snap peas with the garlic before adding the sauce for a complete meal in one pan.
- Spice It Up: If you like a little heat, add a pinch of red pepper flakes to the sauce, or a drizzle of sriracha right before serving.
- Different Sugars: While brown sugar adds depth, you can certainly use granulated sugar or even maple syrup in a pinch for the sweetness.
- Garnish Galore: Beyond green onions and sesame seeds, a sprinkle of chopped peanuts or cashews can add extra crunch and flavor.
Tips for Success
Achieving that perfect takeout-style Honey Sesame Chicken at home is totally doable with these few tips:
- Don’t Overcrowd the Fryer: This is probably the most important tip for crispy chicken! Frying in batches ensures the oil temperature stays high, resulting in a golden, crispy crust rather than a greasy, soggy one.
- The Double Fry is King: Seriously, don’t skip this step! The first fry cooks the chicken, and the second fry, at a higher temperature, gets it incredibly crispy and locks in that amazing texture.
- Temperature Matters: Investing in a good kitchen thermometer is a game-changer for frying. Precise oil temperatures prevent burning or undercooking and ensure consistent results.
- Marinade Time: Even 10 minutes helps, but if you have the time, let your chicken marinate for 30 minutes to an hour in the fridge. The longer it sits, the more flavor it absorbs.
- Prep Ahead: You can whisk together your sauce ingredients ahead of time and store them in the fridge. You can also cut your chicken and have it ready to go. This makes dinner assembly a breeze!
- Toss Quickly: Once the sauce is ready and the chicken is re-fried, toss them together immediately. The hot chicken will absorb the sauce beautifully, and it prevents the chicken from getting soggy as it cools.
How to Store Honey Sesame Chicken
While this dish is absolutely best enjoyed fresh and hot off the wok, you might find yourself with some delicious leftovers (a rare but welcome occurrence!).
- Refrigerator: Store any leftover Honey Sesame Chicken in an airtight container in the refrigerator for up to 3-4 days.
- Freezer: You can freeze the cooked chicken (without the sauce, if possible, for best texture) or the fully sauced chicken in an airtight freezer-safe container for up to 2-3 months. The chicken might lose a bit of its crispiness after freezing and reheating, but the flavor will still be fantastic.
- Reheating: For best results, reheat in a skillet over medium heat until warmed through, or pop it in an air fryer or oven at 350°F (175°C) for 10-15 minutes to help crisp it up again. The microwave works in a pinch but won’t bring back the crispiness.
FAQs
Q: Can I bake or air fry the chicken instead of deep frying?
A: Yes, you can! For baking, coat the chicken in batter, arrange on a wire rack over a baking sheet, and bake at 400°F (200°C) for 20-25 minutes, flipping halfway, until golden and cooked through. For air frying, preheat your air fryer to 375°F (190°C), spray the basket, and cook in batches for 10-15 minutes, shaking halfway, until crispy and cooked. While it won’t be quite the same as deep-fried, it’s still delicious!
Q: Is this recipe spicy?
A: No, the classic Honey Sesame Chicken recipe is sweet and savory, not spicy. However, you can easily add heat by including red pepper flakes in the sauce or a dash of sriracha to your plate.
Q: What should I serve with Honey Sesame Chicken?
A: Steamed white or brown rice is a classic pairing. You could also serve it with lo mein noodles, a simple side salad, or some stir-fried vegetables like broccoli or snap peas for a complete meal.
Q: Can I use pre-cooked chicken?
A: While this recipe is designed for raw chicken to get that crispy batter, you could use pre-cooked rotisserie chicken in a pinch. However, you would skip the frying steps and just toss the shredded chicken directly into the prepared sauce to warm through. The texture will be different, but the flavor will still be there!
Don’t miss out on more delicious and easy recipes! Be sure to follow us on Pinterest for daily inspiration.
Honey Sesame Chicken
Ingredients
Equipment
Method
- Step 1: Marinate the Chicken: Grab a medium bowl and toss your chicken pieces in there. Sprinkle in the chicken bouillon powder and white pepper, then add that tablespoon of water. Give it a good mix, ensuring every piece is coated. Now, let it sit for at least 10 minutes. While it's marinating, you can move on to the next step and save yourself some time!
- Step 2: Prepare the Sauce: In a separate small bowl, whisk together the light soy sauce, oyster sauce, rice vinegar, ketchup, honey, brown sugar, and the 3 tablespoons of water for the sauce. Stir it until everything is nicely combined and smooth. Set this aside for a moment.
- Step 3: Make the Batter: In a medium bowl, crack in your two large eggs. Add the all-purpose flour, ½ cup of cornstarch, baking powder, salt, the ¼ cup of water for the batter, and the 2 teaspoons of vegetable oil. Whisk everything together until you have a smooth, lump-free batter. Now, pour this beautiful batter over your marinated chicken and toss it gently until each and every piece is lovingly coated.
- Step 4: First Fry: In a sturdy wok or a deep pot, heat about 2-3 inches of vegetable oil. You're aiming for 365°F (185°C). Carefully add your battered chicken pieces in batches. Fry each batch for about 3 minutes, or until the chicken is cooked through and lightly golden. Use a slotted spoon or spider to remove the chicken and place it on a wire rack set over a baking sheet to drain any excess oil. This first fry cooks the chicken through and sets the batter.
- Step 5: Second Fry: Increase your oil temperature to 375°F (190°C). Once it's hot enough, fry the chicken again in batches for just 2 minutes, or until they're beautifully golden brown and super crispy. Transfer them back to the wire rack to drain. This double-fry step makes all the difference for that amazing texture!
- Step 6: Cook the Sauce: If your wok is looking a little messy, give it a quick wipe out (or use a clean one). Heat 1 teaspoon of fresh oil over medium heat. Add your minced garlic and sauté it for about 30 seconds until it's fragrant. Pour in your prepared sauce mixture and stir everything to combine. Bring it to a gentle simmer and let it cook for about 2 minutes. Whisk together the 2 teaspoons of cornstarch and 3 tablespoons of water in a small separate bowl to create your cornstarch slurry. Slowly pour the slurry into the simmering sauce, stirring constantly. It will thicken up in about 1 minute. Once it's thick and glossy, turn off the heat and stir in the tablespoon of sesame oil.
- Step 7: Combine and Serve: Add all your crispy fried chicken pieces to the wok with the warm honey sesame sauce. Toss gently but thoroughly until every piece of chicken is glistening and evenly coated in that glorious sticky sauce. Transfer to a serving platter and finish with a sprinkle of toasted sesame seeds and sliced green onions. Serve it up immediately, perhaps with some steamed rice or lo mein noodles.