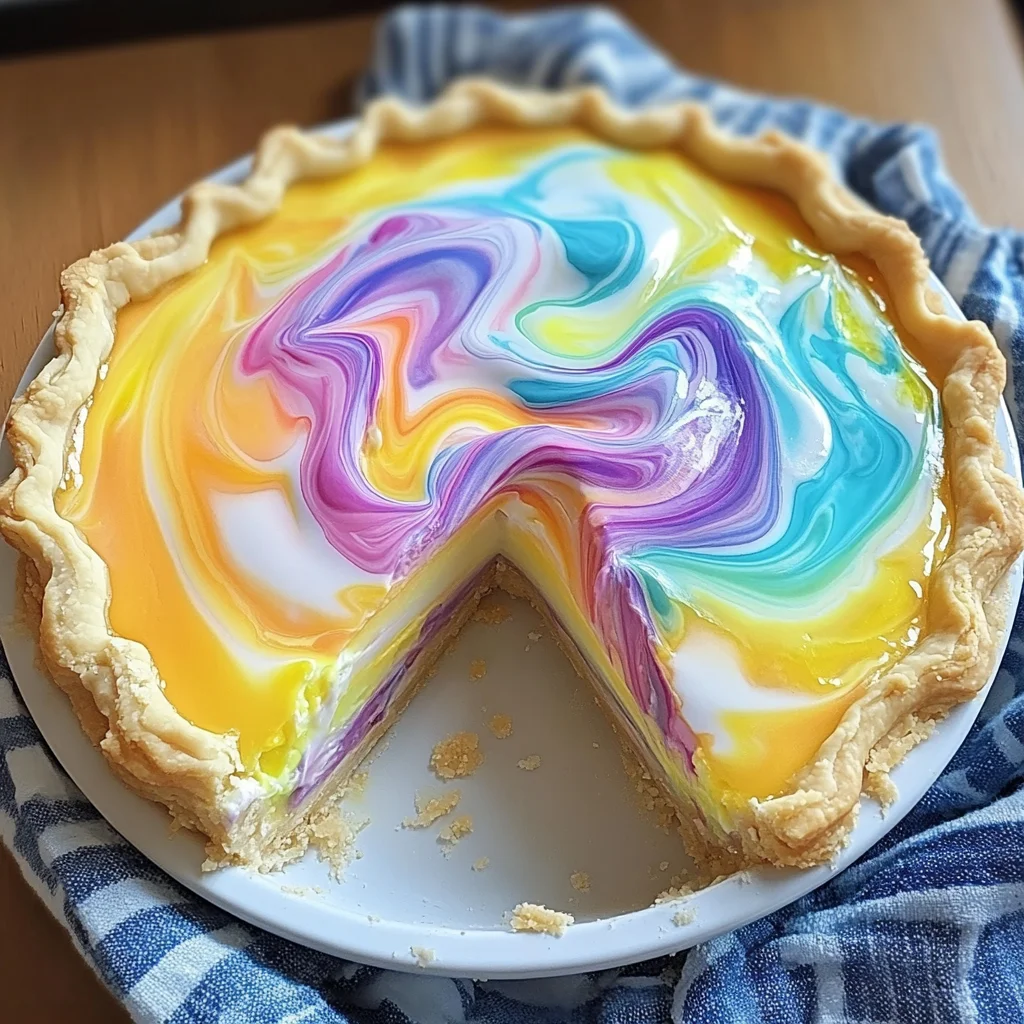
There’s something truly magical about Easter desserts, isn’t there? Maybe it’s the pastel colors, the hint of spring, or the cozy joy of gathering with loved ones after a long winter. I remember baking Easter treats with my family when I was little—flour everywhere, laughter filling the kitchen, and that warm anticipation of tasting something sweet and special. This Easter Swirl Pie brings all those nostalgic feelings right to your table, with a fun twist that’s as delightful to make as it is to eat.
If you’re looking for a dessert that’s not only visually stunning but also incredibly easy and quick to prepare, this pie is your new best friend. It’s creamy, colorful, and perfect for sharing on any spring occasion. Plus, it’s a wonderful conversation starter with its beautiful marbled pastel swirls. I’ve made it for Easter brunches and potlucks, and it’s always a hit. So, grab your mixing bowls and let’s dive into this charming recipe!
Why You’ll Love Easter Swirl Pie
- Fast: The crust and filling come together quickly, making it perfect for last-minute holiday prep.
- Easy: No complicated techniques or fancy ingredients—just simple steps anyone can follow.
- Giftable: This pie makes a lovely homemade gift that’s sure to brighten someone’s Easter celebration.
- Crowd-pleasing: The creamy texture and festive colors make it a favorite among kids and adults alike.
Ingredients
Before we get started, let’s take a look at what you’ll need. The ingredients are straightforward, but each one plays a crucial role in delivering that perfect balance of texture and flavor.
- 2 cups graham cracker crumbs: These form the buttery, slightly sweet base that holds everything together. You can make your own crumbs by crushing graham crackers or grab a pre-packaged option for convenience.
- 1/2 cup unsalted butter, melted: Butter binds the crust crumbs and adds richness. I always recommend unsalted so you can control the saltiness.
- 1/4 cup granulated sugar: Just enough to sweeten the crust without overpowering the filling.
- 16 oz cream cheese, softened: The star of the filling—makes it creamy and smooth. Make sure it’s softened to room temperature to avoid lumps.
- 1 cup granulated sugar: Sweetens the filling just right.
- 2 large eggs: These help set the filling into a luscious, sliceable pie.
- 1 teaspoon vanilla extract: Adds warmth and depth to the flavor.
- 1/2 cup sour cream: Provides tanginess and a silky texture that balances the sweetness.
- Gel food coloring (pastel pink, blue, yellow, and green): The fun ingredient that turns this pie into a colorful masterpiece. Gel colors are best because they’re vibrant without watering down the filling.
How to Make Easter Swirl Pie
Ready to bring this pie to life? I’ll walk you through it step-by-step with some tips to make sure your pie turns out picture-perfect every time.
- Preheat your oven to 325°F (163°C). Starting with the right temperature is key to getting a crust that’s firm but not burnt.
- Make the crust: In a medium bowl, combine the graham cracker crumbs, melted butter, and sugar. Mix it well so every crumb gets coated. Then, press this mixture firmly into the bottom of a 9-inch pie dish. I like to use the bottom of a glass or measuring cup to really compact the crust—it helps it hold together nicely after baking.
- Bake the crust: Pop the crust into the oven for 8 to 10 minutes. You want it to be lightly golden and fragrant—this step prevents a soggy crust later on. Once done, let it cool completely before adding the filling.
- Prepare the filling: In a large mixing bowl, beat the softened cream cheese and sugar together until silky smooth. This usually takes about 2-3 minutes with an electric mixer. Then, add the eggs one at a time, mixing well after each addition to keep the texture even. Stir in the vanilla extract and sour cream until everything is fully incorporated.
- Create your colorful layers: Divide the filling evenly into four smaller bowls. Add a few drops of gel food coloring to each bowl to create pastel pink, blue, yellow, and green portions. Don’t be shy with the gel—it’s concentrated, so start small and add more until you reach that perfect soft hue.
- Assemble the pie: Spoon the colored fillings in alternating dollops over the cooled crust. Don’t worry about perfection here—it’s the randomness that creates the beautiful swirl effect. Then, grab a toothpick or skewer and gently swirl through the colors, making fun marbled patterns. Be careful not to over-mix; you want distinct swirls, not a blended mess.
- Bake the pie: Place it in the oven for 35 to 40 minutes. You’re looking for the center to be just set but still slightly jiggly—think of it like a cheesecake in progress. Once done, turn off the oven and leave the pie inside with the door cracked open for 15 minutes. This helps prevent cracking as the pie cools down gently.
- Chill: Transfer the pie to the refrigerator for at least 4 hours or overnight. This chilling time allows the flavors to meld and the filling to firm up perfectly, making slicing a breeze.
Once chilled, slice into those beautiful pastel swirls and watch your guests’ faces light up. Trust me, this pie is as fun to look at as it is to eat!
Substitutions & Additions
Don’t have pastel gel food coloring on hand? No worries! Here are some easy swaps and creative ideas to make this pie your own.
- Natural food coloring: Try using beet juice for pink, spirulina powder for green, turmeric for yellow, and blueberry juice for blue. These give a more subtle, earthy color but add a hint of natural flavor.
- Crust options: You can swap graham cracker crumbs with crushed vanilla wafers or digestive biscuits for a slightly different flavor profile. For a gluten-free option, use gluten-free graham crackers or almond flour mixed with butter and sugar.
- Add texture: Sprinkle mini pastel-colored chocolate chips or chopped toasted nuts onto the filling before baking for a delightful crunch.
- Flavor twists: Add a teaspoon of lemon zest or almond extract to the filling for an extra burst of flavor. These subtle additions can brighten up the pie beautifully.
- Make it a cheesecake: For a richer dessert, top the pie with fresh berries or a drizzle of berry sauce before serving. It’s a lovely way to combine fresh fruit with a creamy base.
If you love vibrant desserts that bring joy to your table, you might also enjoy the colorful fun of making poke cakes or the bright, zesty flavors found in fluffy lemon ricotta pancakes. Both bring that same cheerful vibe to your cooking adventures!
Tips for Success
From my experience, these tips will help you master the Easter Swirl Pie and avoid any common pitfalls:
- Soften cream cheese properly: Try to leave it out at room temperature for at least 30 minutes before mixing. This makes the filling super smooth and lump-free.
- Don’t overmix after adding eggs: Once eggs go in, blend just until combined to prevent too much air from getting in, which can cause cracking.
- Use gel food coloring: Liquid colors can thin your batter, so gel or paste colors give the best vibrant, pastel results.
- Swirl gently: Use a light hand when swirling the colors. Overdoing it will blend the colors and lose that fun marbled effect.
- Chill thoroughly: The pie needs several hours in the fridge to set properly. I usually make mine the day before serving for the best results.
- Serve chilled: This pie is best enjoyed cold. If you want to prepare ahead, you can even freeze it for a couple of days—just thaw overnight in the fridge.
For more make-ahead dessert ideas that can brighten your holiday tables, check out this delicious easy no-bake caramel pretzel bars. They’re just as crowd-pleasing and super simple to whip up!
How to Store Easter Swirl Pie
Once your pie is made, storing it properly ensures it stays as fresh and creamy as the day you baked it.
- Refrigerate: Always keep the pie covered with plastic wrap or in an airtight container in the fridge. This keeps the filling moist and prevents it from absorbing other fridge odors.
- Shelf life: The pie will keep beautifully for up to 4 days refrigerated.
- Freezing: You can freeze the pie for up to 2 weeks. Wrap it tightly in plastic wrap and then foil before freezing. Thaw overnight in the fridge before serving.
- Serving tip: Bring the pie out about 10 minutes before serving to take the chill off slightly—it makes the flavors and texture more pronounced.
FAQs
Can I use a store-bought pie crust instead of the graham cracker crust?
Yes, you can! A simple pre-made pie crust works well, but the graham cracker crust adds a lovely texture and subtle sweetness that complements the creamy filling beautifully.
What if I don’t have gel food coloring?
If gel colors aren’t available, you can try liquid food coloring sparingly, but be careful not to add too much liquid to the filling. Alternatively, natural colorants like beet juice or turmeric can give a softer, more rustic look.
How do I know when the pie is done baking?
The center should be just set with a slight jiggle, similar to a cheesecake. Overbaking can cause cracks or a dry texture, so it’s better to err on the side of a little underdone.
Can I double this recipe for a larger crowd?
Absolutely! Just double the ingredients and use a larger pie dish or two 9-inch pies. Keep an eye on baking times, as a larger pie may need a bit longer in the oven.
Making this Easter Swirl Pie is a wonderful way to add a splash of color and a touch of joy to your holiday celebrations. It’s a dessert that feels homemade and special without requiring hours in the kitchen. If you want even more sweet inspiration, don’t miss the delightful ultimate classic carrot cake—a perfect companion for your spring dessert spread!
Thanks for spending some time with me in the kitchen today. Happy baking, and may your Easter be filled with sweet moments and even sweeter treats!
For more colorful and delicious recipes, be sure to follow my Pinterest board where I share all my favorite kitchen inspirations and seasonal ideas.

Easter Swirl Pie
Ingredients
Equipment
Method
- Step 1: Preheat your oven to 325°F (163°C).
- Step 2: In a medium bowl, combine graham cracker crumbs, melted butter, and 1/4 cup sugar. Mix well and press firmly into the bottom of a 9-inch pie dish. Use the bottom of a glass or measuring cup to compact the crust.
- Step 3: Bake the crust for 8 to 10 minutes until lightly golden and fragrant. Remove and let cool completely.
- Step 4: In a large mixing bowl, beat softened cream cheese and 1 cup sugar until silky smooth (about 2–3 minutes). Add eggs one at a time, mixing well after each. Stir in vanilla extract and sour cream until fully combined.
- Step 5: Divide the filling evenly into four smaller bowls. Add a few drops of gel food coloring to each bowl to create pastel pink, blue, yellow, and green. Adjust color intensity as desired.
- Step 6: Spoon colored filling in alternating dollops over the cooled crust. Use a toothpick or skewer to gently swirl the colors, creating a marbled pattern. Be careful not to overmix.
- Step 7: Bake the pie for 35 to 40 minutes until the center is just set but still slightly jiggly. Turn off the oven and leave the pie inside with the door cracked open for 15 minutes to cool gently.
- Step 8: Transfer the pie to the refrigerator and chill for at least 4 hours or overnight before slicing and serving.