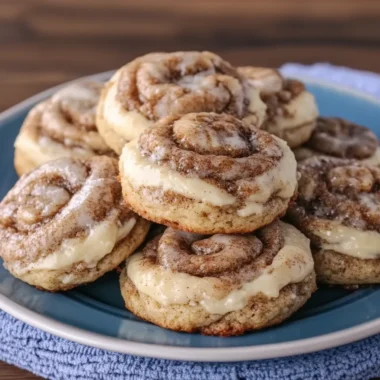
Remember those magical moments from your childhood when the carnival lights dazzled and the sweet scent of cotton candy filled the air? There was something so enchanting about the fluffy, sugary clouds that melted instantly on your tongue, sparking pure joy. Well, imagine capturing that nostalgia and turning it into a delightful dessert that’s just as fun to make as it is to eat. Enter these Cotton Candy Cheesecake Bombs—bite-sized pockets of creamy, dreamy cheesecake wrapped in golden fried dough and dusted with a sparkling cotton candy sugar coating.
These little bombs are not only a feast for the eyes but also a quick and easy recipe perfect for any occasion. Whether you’re looking to surprise your kids with a playful dessert, create a memorable party treat, or gift something sweet and homemade, these cheesecake bombs will steal the spotlight. Plus, they bring that carnival vibe right into your kitchen without the long lines or sticky fingers!
Why You’ll Love Cotton Candy Cheesecake Bombs
- Fast: Ready in under an hour from start to finish, including chilling time.
- Easy: Uses simple ingredients and straightforward steps—no fancy equipment needed!
- Giftable: Pack them in cute boxes or jars for delightful homemade gifts that everyone will adore.
- Crowd-pleasing: Their whimsical look and luscious flavor make them a hit at parties and family gatherings.
Ingredients
Before you dive in, let’s talk about the ingredients that make these cheesecake bombs so special and delicious.
- Cream Cheese: The base of your filling. Make sure it’s softened to get that smooth, creamy texture.
- Powdered Sugar: Adds sweetness without graininess, perfect for cheesecake filling.
- Vanilla Extract: Classic flavor booster that enhances the cream cheese’s richness.
- Cotton Candy Flavoring: The star of the show! This gives that nostalgic carnival taste. You can find it online or in specialty baking stores.
- Whipped Topping & Heavy Cream: These lighten up the filling, making it fluffy and airy—like a cloud!
- Refrigerated Biscuit Dough: This is your dough for wrapping the filling. It’s soft, easy to handle, and fries up golden and crispy.
- Flour: For dusting and preventing sticking when rolling out the dough.
- Vegetable Oil: Used for frying to get that perfect golden crust.
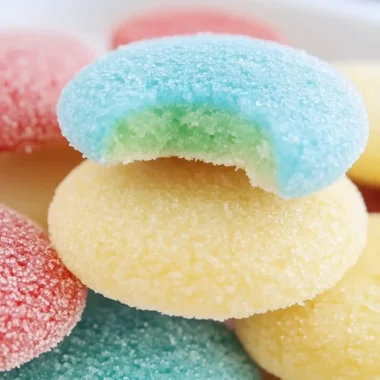
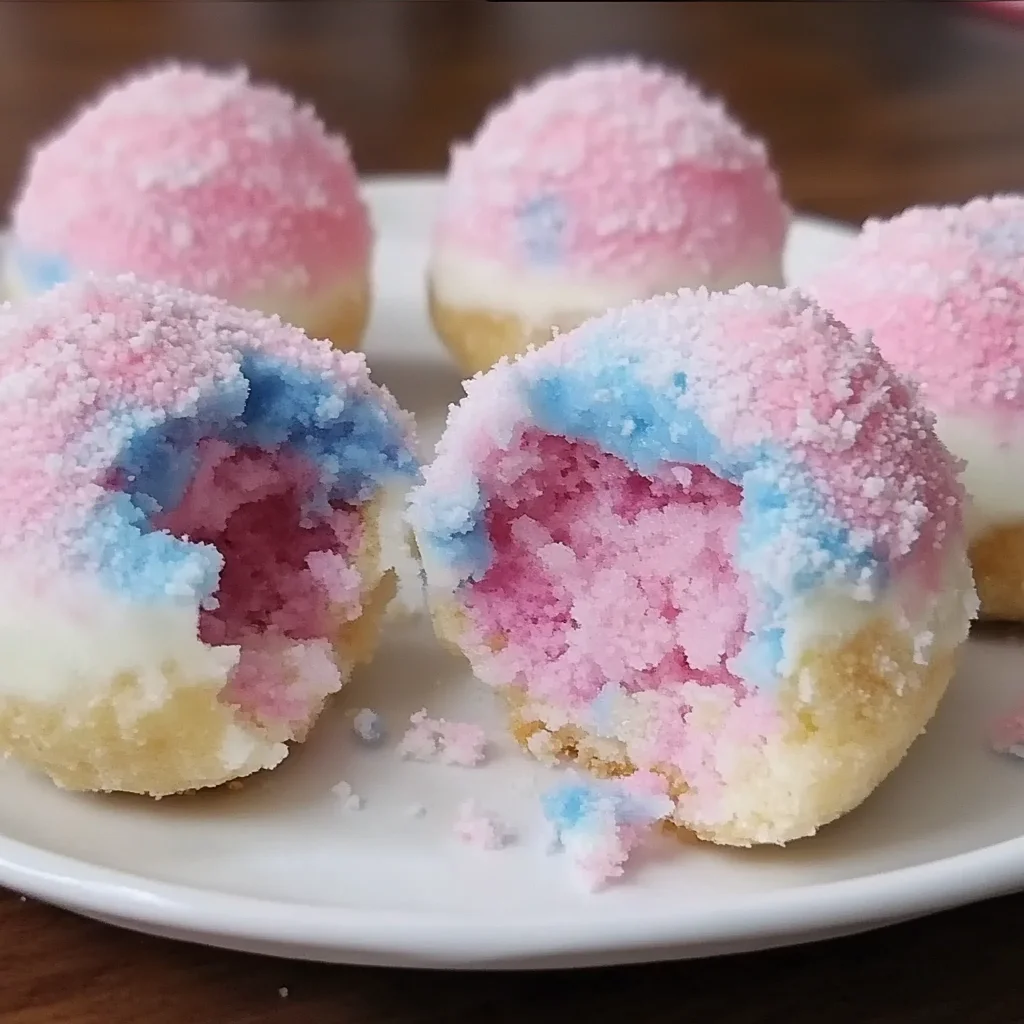
- Granulated Sugar & Optional Food Coloring: This sugar coating is where you can get creative—tint it pink and blue for a true cotton candy effect!
- Optional Garnishes: Cotton candy pieces, powdered sugar, whipped cream, or white chocolate drizzle add an extra touch of whimsy and flavor.
If you love whimsical desserts like this, you might also enjoy the strawberry cheesecake donut holes, which are similarly fun and packed with creamy goodness.
How to Make Cotton Candy Cheesecake Bombs
Now, let’s get to the heart of the matter—making these irresistible little bombs. Don’t worry, I’ll walk you through every step, so you feel confident and ready to create this carnival-inspired treat.
Step 1: Prepare the Cheesecake Filling
Start by beating 8 ounces of softened cream cheese in a mixing bowl until it’s smooth and creamy. This is key for that luscious texture—no lumps! Then, add 1/2 cup powdered sugar, 1 teaspoon vanilla extract, and 1/2 teaspoon cotton candy flavoring. Mix everything until well combined. Next, gently fold in 1/4 cup whipped topping and 2 tablespoons heavy cream. This step lightens the filling, making it fluffy and dreamy. Pop this mixture into the fridge for at least 30 minutes to firm up while you prepare the dough.
Step 2: Roll Out the Biscuit Dough
Take your package of refrigerated biscuit dough (usually 8 biscuits) and separate each biscuit. Lightly flour your work surface and roll each biscuit into a thin circle, roughly 5 inches across. This ensures you have enough dough to fully wrap the filling without any tears.
Step 3: Shape and Fill the Bombs
Scoop about 1 to 2 tablespoons of the chilled cheesecake filling and roll it into a small ball. Place this ball right in the center of your dough circle. Carefully fold the dough over the filling, pinching the edges tightly to seal the bomb completely. Once sealed, gently roll the ball in your hands to smooth out the seams and create a perfect sphere.
Step 4: Fry to Golden Perfection
Heat vegetable oil in a deep pan or fryer to 350°F (175°C). Fry the cheesecake bombs for 1 to 2 minutes on each side until they turn a beautiful golden brown. Use a slotted spoon to remove them and place them on paper towels to drain any excess oil. The frying step is where the magic happens—crispy on the outside, soft and creamy inside.
Step 5: Coat with Cotton Candy Sugar
While the bombs are still warm, mix 1 cup granulated sugar with 1/2 teaspoon cotton candy flavoring. If you want to get extra playful, add a few drops of pink and blue food coloring to the sugar for that iconic carnival look. Roll each fried bomb in the sugar mixture, coating it evenly. This sugary coat adds a sweet crunch and enhances that cotton candy vibe.
Step 6: Add Your Final Touches
Before serving, feel free to sprinkle powdered sugar, add small cotton candy pieces, or drizzle with whipped cream or melted white chocolate. These garnishes turn your bombs into a show-stopping dessert that’s just as fun to look at as it is to eat.
Want to try a twist on this? Check out how to make easy no-bake caramel pretzel bars for another sweet and slightly crunchy treat that’s perfect for sharing!
Substitutions & Additions
One of the best parts about these cheesecake bombs is how easy they are to customize. Here are some ideas to make this recipe your own:
- Dough swap: If you’re feeling adventurous, try using crescent roll dough or even a homemade sweet dough for a different texture and flavor.
- Flavored filling: Swap cotton candy flavoring with strawberry, raspberry, or even a hint of lemon extract for a fresh twist.
- Add mix-ins: Fold in mini sprinkles or crushed candy pieces into the cheesecake filling for added texture and color.
- Coating options: Instead of sugar, dust the bombs with cinnamon sugar, crushed freeze-dried berries, or cocoa powder for a new flavor profile.
- Healthier alternative: Use Greek yogurt whipped with cream cheese for a lighter filling, or bake the bombs instead of frying for a less oily version.
For a festive occasion, consider pairing these with a light, fruity beverage or even a coffee dessert like a holiday eggnog pie to keep the fun going.
Tips for Success
After making these a few times, I’ve picked up some handy tips that will help your cotton candy cheesecake bombs come out perfectly every time.
- Chill the filling well: This makes it easier to handle and helps prevent leaks during frying.
- Seal the dough tightly: Pinch and press the edges firmly to avoid the filling oozing out while frying.
- Don’t overcrowd the fryer: Fry in small batches to maintain oil temperature and ensure even cooking.
- Use a kitchen thermometer: Keeping the oil at a steady 350°F helps the dough cook through without burning the outside.
- Roll dough thin but not too thin: Too thick and the dough won’t cook properly; too thin and it might tear.
- Prep ahead: You can make the filling a day ahead and keep it chilled. Also, shape the bombs and freeze them before frying—they’ll cook beautifully from frozen.
If you enjoy prepping ahead, you might find the freezer-friendly tips on some of my other recipes helpful, like the freezer-friendly banana pudding cheesecake recipe.
How to Store Cotton Candy Cheesecake Bombs
These cheesecake bombs are best enjoyed fresh, right after frying and coating. However, life happens, and sometimes you need to store them.
Store leftover bombs in an airtight container in the refrigerator for up to 3 days. When ready to eat, warm them gently in a 300°F oven for about 5-7 minutes to bring back some crispness. Avoid microwaving if possible as it tends to make the dough soggy.
If you want to keep them longer, freeze the fried bombs after cooling completely. Place them in a single layer on a baking sheet to freeze first, then transfer to a freezer-safe bag or container for up to 2 months. Reheat from frozen in an oven at 350°F until warmed through and crispy.
For inspiration on other delicious make-ahead desserts, check out my post on easy no-bake cheesecake cups, which store beautifully and are always a crowd favorite.
FAQs
Can I bake these instead of frying?
Yes! Bake the bombs on a parchment-lined baking sheet at 375°F for about 12-15 minutes or until golden brown. Baking will result in a lighter, less crispy crust but still delicious.
Where can I find cotton candy flavoring?
Cotton candy flavoring is available online or in specialty baking stores. It’s a concentrated extract that adds that classic carnival taste without the mess of actual cotton candy.
Can I use homemade biscuit dough?
Absolutely! Homemade biscuit dough or any soft, pliable dough will work well. Just make sure it’s not too sticky to handle and can be rolled thin.
Is it okay to skip the coloring in the sugar coating?
Definitely! The food coloring is optional and mainly for visual fun. Your bombs will still taste amazing without it.
Feeling inspired to bake more sweet treats that bring smiles? You might enjoy exploring my collection of easy desserts over at Easily Cooked, where you’ll find everything from classic carrot cakes to no-bake cheesecake delights.
Thanks for stopping by the kitchen today! If you try these cotton candy cheesecake bombs, I’d love to hear how they turned out. Don’t forget to share your creations and follow me on Pinterest for more sweet inspiration and cozy recipes.

Cotton Candy Cheesecake Bombs
Ingredients
Equipment
Method
- Step 1: Beat softened cream cheese in a mixing bowl until smooth. Add powdered sugar, vanilla extract, and cotton candy flavoring; mix until combined. Gently fold in whipped topping and heavy cream. Chill mixture in the fridge for at least 30 minutes.
- Step 2: Separate refrigerated biscuit dough into individual biscuits. Lightly flour your work surface and roll each biscuit into a thin 5-inch circle.
- Step 3: Scoop 1 to 2 tablespoons of chilled cheesecake filling and roll into a small ball. Place it in the center of each dough circle. Fold the dough over the filling and pinch edges tightly to seal. Roll gently to smooth seams into a sphere.
- Step 4: Heat vegetable oil in a deep pan or fryer to 350°F (175°C). Fry the bombs for 1 to 2 minutes on each side until golden brown. Remove with slotted spoon and drain on paper towels.
- Step 5: While bombs are still warm, mix granulated sugar with cotton candy flavoring. Add optional pink and blue food coloring for a carnival look. Roll each bomb in the sugar mixture to coat evenly.
- Step 6: Add optional garnishes such as powdered sugar, cotton candy pieces, whipped cream, or melted white chocolate drizzle before serving.