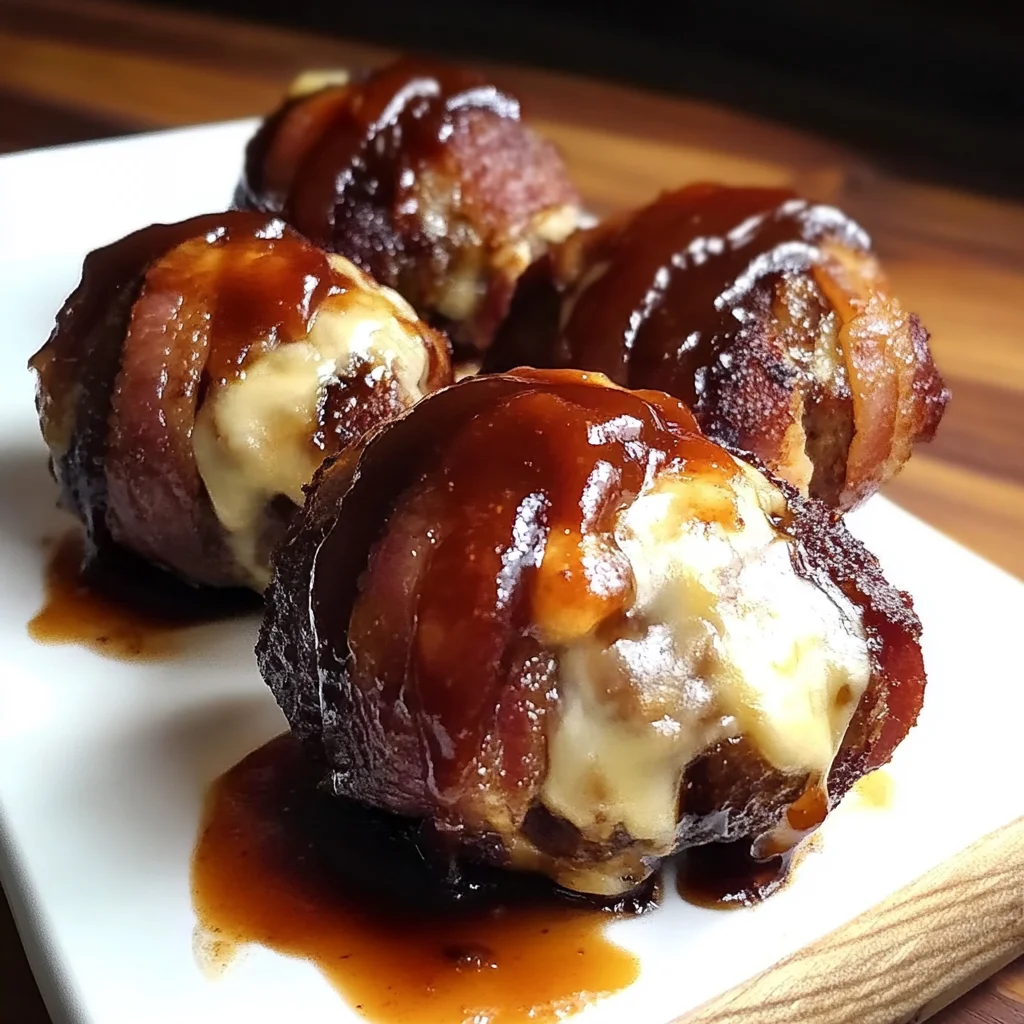
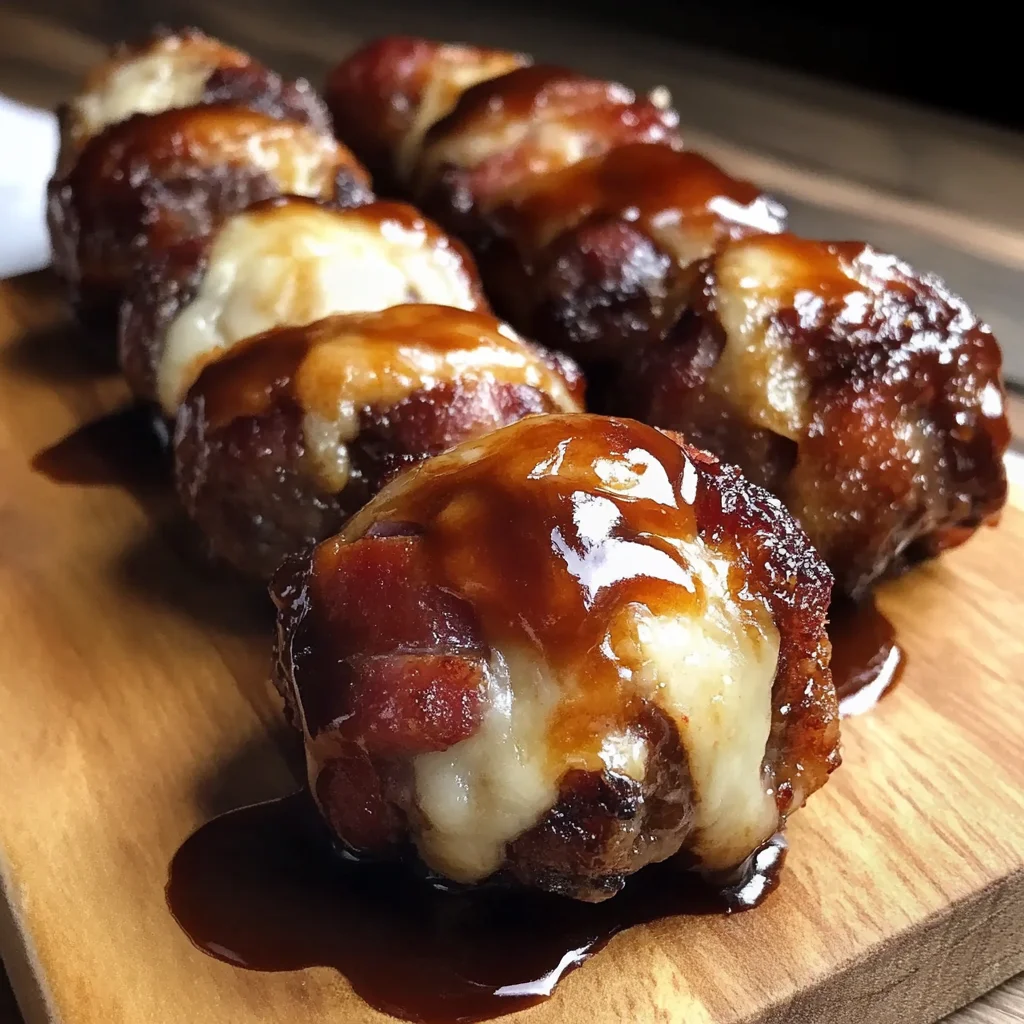
Oh honey, do you remember those perfect summer evenings, maybe a backyard barbecue or a game night with friends, when you just craved something truly satisfying? Something that hits all the right notes: savory, smoky, a little sweet, and oh-so-cheesy? Well, my friend, get ready to make new memories because these Cheddar-Stuffed BBQ Bacon Bombs are about to blow your mind! This recipe is a total game-changer – it’s incredibly easy to whip up, shockingly quick to bake, and trust me, everyone who tries them will be asking for the recipe. It’s the kind of memorable bite that makes you feel cozy and happy from the first taste.
Why You’ll Love Cheddar-Stuffed BBQ Bacon Bombs
- Fast: From mixing bowl to oven in minutes!
- Easy: Simple ingredients and straightforward steps make this a breeze.
- Giftable: While I doubt they’ll last long enough to be gifted, they make a fantastic potluck contribution!
- Crowd-pleasing: Bacon, cheese, and BBQ? What’s not to love? These disappear fast at any gathering!
Ingredients

Gather ’round, because these are the simple stars of our show!
- 1 pound ground beef: I usually go for a lean-ish ground beef (80/20) for flavor, but use what you love!
- 1/2 cup breadcrumbs: These help bind everything together and keep our bombs nice and moist.
- 1 large egg: Our trusty binding agent – the glue that holds all that deliciousness in place.
- 1 teaspoon salt: A must-have for seasoning our meat perfectly.
- 1/2 teaspoon black pepper: Just a touch of warmth and spice.
- 1/2 teaspoon garlic powder: Adds that wonderful aromatic kick we all adore.
- 1/2 teaspoon onion powder: Enhances the savory depth of our meat mixture.
- 1/2 cup shredded cheddar cheese: The glorious, gooey heart of our bombs! Sharp or mild, your choice!
- 8 slices beef bacon: Adds that incredible smoky, salty crisp. If you prefer, regular pork bacon works beautifully too.
- 1/4 cup barbecue sauce: Our sweet and tangy glaze that caramelizes perfectly in the oven. Use your favorite brand!
How to Make Cheddar-Stuffed BBQ Bacon Bombs
Let’s get cooking! You’ll be amazed at how quickly these come together.
- First things first, let’s get that oven warmed up. Set your oven to a cozy 375°F (190°C). While it’s heating, grab a baking sheet and line it with parchment paper for easy cleanup later. Trust me on this one, it’s a lifesaver!
- In a nice big mixing bowl, you’re going to combine your ground beef, breadcrumbs, egg, salt, black pepper, garlic powder, and onion powder. Now, don’t be shy – get those hands in there! Gently mix everything until it’s just combined. You want it fully integrated, but try not to overmix, as that can make your meat a little tough.
- Time for the magic! Divide your seasoned meat mixture into eight equal portions. You can eyeball it or use a kitchen scale for perfect uniformity if you’re feeling fancy. Flatten each portion into a little patty in the palm of your hand. Then, place a generous pinch of shredded cheddar cheese right in the center. Carefully cup your hands around the meat and shape it into a ball, making absolutely sure that all that yummy cheese is completely sealed inside. We don’t want any cheesy escapes!
- Now for the bacon! Take one slice of beef bacon and lovingly wrap it around each stuffed meatball. You want to make sure the ends of the bacon are tucked snugly underneath the ball. This helps prevent it from unraveling during baking.
- Place your beautifully wrapped bacon bombs onto your prepared parchment-lined baking sheet. Give them a little space so they can crisp up nicely on all sides.
- Next, grab that barbecue sauce! With a pastry brush (or even a spoon, if that’s what you’ve got), brush each bomb evenly with your chosen BBQ sauce. This creates a delicious, sticky, caramelized glaze as they bake.
- Into the preheated oven they go! Bake them for about 25–30 minutes. Keep an eye on them, you’re looking for that bacon to be wonderfully crisp and for the internal temperature of the meat to reach 160°F (71°C). A meat thermometer is your best friend here for perfectly cooked, juicy results.
- Once they’re golden, crispy, and cooked through, pull them out of the oven. Let them cool for just a minute or two before diving in. These are best served hot, with that cheese still gloriously melted. Enjoy your incredible creation!
Substitutions & Additions
This recipe is super versatile, so feel free to play around and make it your own!
- Meat Swap: Not a beef fan? You can easily use ground turkey, ground chicken, or even a mix of ground pork and beef. Just remember that leaner meats might need a touch more breadcrumbs or a slightly shorter cooking time.
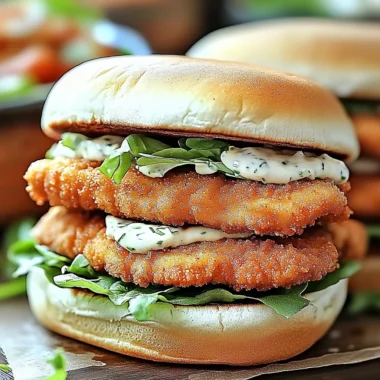
- Cheese Please: Cheddar is classic, but imagine the possibilities! Pepper Jack for a spicy kick, mozzarella for an extra stretch, Colby Jack for a milder creaminess, or even a blend of your favorites. If you’re looking for another cheesy meatball idea, you might love our Garlic Parmesan Cheeseburger Bombs – they’re a similar concept with a different flavor profile!
- Bacon Options: If beef bacon isn’t readily available or you prefer it, regular pork bacon works just as well! You could even use a thicker cut of bacon for extra crunch, just be sure it’s wrapped tightly.
- Sauce It Up: BBQ sauce is fantastic, but don’t stop there! Try a honey mustard glaze, a sweet chili sauce, or even a teriyaki sauce for a different flavor adventure. For a bit of extra oomph, I sometimes like to add a pinch of brown sugar to my BBQ sauce before brushing it on.
- Spice Things Up: Want a little heat? Finely diced jalapeños (seeds removed for less heat) can be mixed into the ground beef or even placed in the center with the cheese.
- Herbaceous Hints: A sprinkle of fresh chopped parsley or chives mixed into the meat, or even over the finished bombs, adds a lovely fresh touch.
Tips for Success
To ensure your BBQ Bacon Bombs are nothing short of perfect every time, keep these little nuggets of wisdom in mind:
- Don’t Overmix the Meat: When combining your ground beef and seasonings, mix just until everything is incorporated. Overmixing can lead to tough meatballs, and we want tender, juicy bombs!
- Seal the Cheese: This is crucial! Take your time to really seal the ground beef around the cheddar cheese. Any little gaps and that glorious cheese might ooze out during baking. While delicious, it makes for a messier bomb.
- Parchment Paper is Your Pal: Using parchment paper on your baking sheet prevents sticking and makes cleanup a breeze. Nobody wants to scrub baked-on bacon and BBQ sauce!
- Crispy Bacon, Happy Life: Keep an eye on your bacon during the last few minutes of baking. Ovens vary, and you want that bacon to be perfectly crisp, not burnt. If it’s not quite crisp enough, you can pop them under the broiler for a minute or two (watch very closely!).
- Prep Ahead: These are fantastic for meal prepping or party planning! You can assemble the bombs, wrap them in bacon, and then store them in an airtight container in the fridge for up to 24 hours. When you’re ready to bake, just brush with BBQ sauce and follow the baking instructions. This is a great trick for easy appetizers, much like getting our Easy Cheesy Sausage Balls ready for a crowd!
- Internal Temperature: For food safety, always ensure your ground beef reaches an internal temperature of 160°F (71°C). A digital meat thermometer is a small investment that gives you big peace of mind.
How to Store Cheddar-Stuffed BBQ Bacon Bombs
If by some miracle you have any leftovers (I never do!), here’s how to keep them fresh:
Refrigeration: Once cooled, store your Cheddar-Stuffed BBQ Bacon Bombs in an airtight container in the refrigerator for up to 3-4 days. To reheat, you can pop them back in the oven at 350°F (175°C) for about 10-15 minutes, or until heated through. A quick zap in the microwave works too, but they might lose a little crispness.
Freezing: These bombs freeze remarkably well! Once baked and completely cooled, arrange them in a single layer on a baking sheet and freeze until solid. Then, transfer them to a freezer-safe bag or container. They’ll keep in the freezer for up to 2-3 months. To reheat from frozen, bake at 350°F (175°C) for 20-25 minutes, or until thoroughly heated.
FAQs
Got questions? I’ve got answers!
Q: Can I use different types of ground meat?
A: Absolutely! While ground beef is classic, feel free to experiment with ground turkey, chicken, or even a pork and beef blend. Just be mindful that cooking times might vary slightly depending on the fat content.
Q: What if I don’t have beef bacon?
A: No problem at all! Regular pork bacon works perfectly. You can also use turkey bacon if you prefer, but it might not get as crispy.
Q: Can I make these without breadcrumbs?
A: Breadcrumbs help with binding and moisture. If you need a gluten-free option, you can use gluten-free breadcrumbs or an equal amount of crushed gluten-free crackers. A small amount of finely ground oats can also work in a pinch!
Q: How can I serve these?
A: These are fantastic on their own as an appetizer! For a more substantial meal, serve them alongside some mashed potatoes, a fresh green salad, or even nestled in a soft bun for a fun slider. They’d also be a perfect pairing with a comforting main like our Easy Sloppy Joe Casserole for a truly satisfying family dinner.
For more delicious recipes and cooking inspiration, make sure to follow us on Pinterest!
Cheddar-Stuffed BBQ Bacon Bombs: Your Ultimate Cheesy, Meaty, & Irresistible Treat!
Ingredients
Equipment
Method
- Step 1: First things first, let's get that oven warmed up. Set your oven to a cozy 375°F (190°C). While it’s heating, grab a baking sheet and line it with parchment paper for easy cleanup later. Trust me on this one, it’s a lifesaver!
- Step 2: In a nice big mixing bowl, you’re going to combine your ground beef, breadcrumbs, egg, salt, black pepper, garlic powder, and onion powder. Now, don't be shy – get those hands in there! Gently mix everything until it's just combined. You want it fully integrated, but try not to overmix, as that can make your meat a little tough.
- Step 3: Divide your seasoned meat mixture into eight equal portions. You can eyeball it or use a kitchen scale for perfect uniformity if you're feeling fancy. Flatten each portion into a little patty in the palm of your hand. Then, place a generous pinch of shredded cheddar cheese right in the center. Carefully cup your hands around the meat and shape it into a ball, making absolutely sure that all that yummy cheese is completely sealed inside. We don't want any cheesy escapes!
- Step 4: Now for the bacon! Take one slice of beef bacon and lovingly wrap it around each stuffed meatball. You want to make sure the ends of the bacon are tucked snugly underneath the ball. This helps prevent it from unraveling during baking.
- Step 5: Place your beautifully wrapped bacon bombs onto your prepared parchment-lined baking sheet. Give them a little space so they can crisp up nicely on all sides.
- Step 6: Next, grab that barbecue sauce! With a pastry brush (or even a spoon, if that’s what you’ve got), brush each bomb evenly with your chosen BBQ sauce. This creates a delicious, sticky, caramelized glaze as they bake.
- Step 7: Into the preheated oven they go! Bake them for about 25–30 minutes. Keep an eye on them, you're looking for that bacon to be wonderfully crisp and for the internal temperature of the meat to reach 160°F (71°C). A meat thermometer is your best friend here for perfectly cooked, juicy results.
- Step 8: Once they're golden, crispy, and cooked through, pull them out of the oven. Let them cool for just a minute or two before diving in. These are best served hot, with that cheese still gloriously melted. Enjoy your incredible creation!