Hey there, dessert lovers! Get ready to meet your new favorite indulgence. Do you ever think back to those big family gatherings, the ones filled with laughter, love, and a dessert table that was the absolute highlight? There was always that one showstopper, right? Well, get ready to be that person, but with a dessert that’s surprisingly simple to pull off!
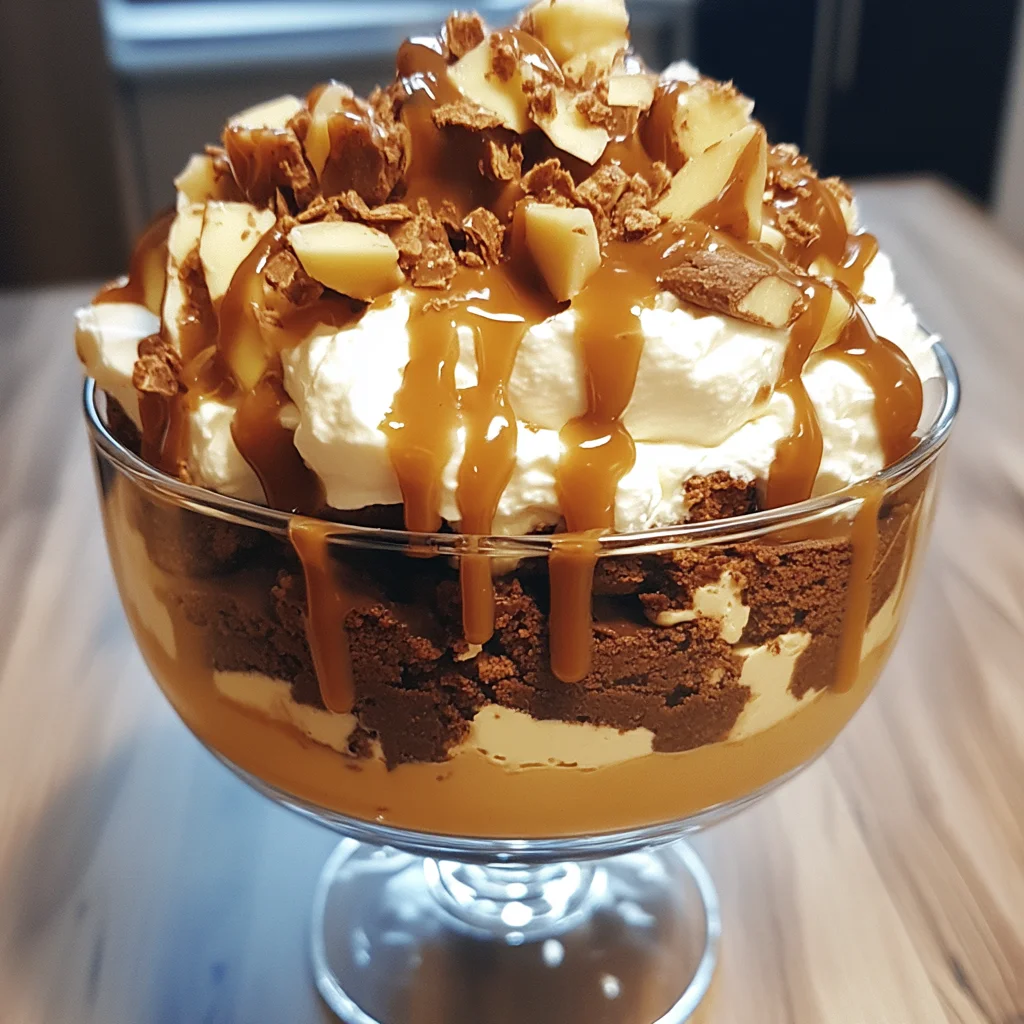
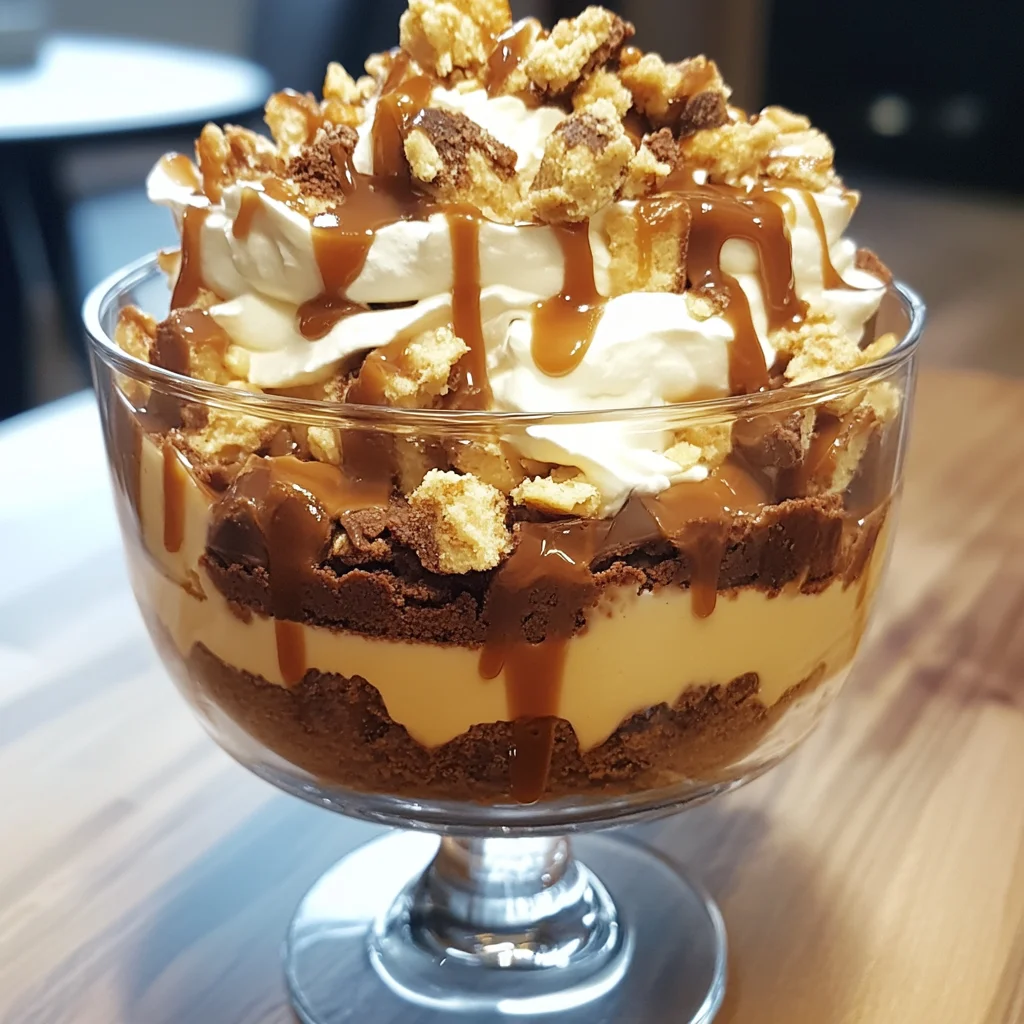
This Caramel Cheesecake Brownie Trifle is layers of pure joy in a dish. Imagine: rich, fudgy brownies, creamy dreamy cheesecake filling, and luscious swirls of caramel sauce all piled high. It looks fancy, like you slaved away for hours, but shhh… it’s our little secret how truly easy it is. It’s the perfect make-ahead treat for potlucks, holidays, or just because you deserve something amazing!
Why You’ll Love This Recipe
- Fast: Especially if you use a box mix and store-bought goodies!
- Easy: No complicated steps, just layering deliciousness.
- Giftable: Perfect for bringing to parties or sharing with friends.
- Crowd-pleasing: Brownies, cheesecake, and caramel? Everyone says YES.
Ingredients
Gather ’round! Here’s what you’ll need to create this magic:
- For the Brownies: You’ve got options! Either grab 1 box of your favorite brownie mix (plus the oil, eggs, and water it calls for on the box for a 13×9 inch pan). Or, if you’re feeling it, you can make them from scratch with:
- 1 1/2 cups unsalted butter, melted (makes them extra fudgy!)
- 2 cups sugar
- 1 tsp vanilla extract (always adds a cozy flavor)
- 4 large eggs
- 1 1/2 cups all-purpose flour
- 3/4 cup unsweetened cocoa powder (the good stuff for rich chocolate)
- 1/2 tsp baking powder
- 1/2 tsp salt (helps balance all that sweetness)
- For the Cheesecake Filling: This is the creamy heart of the trifle!
- 16 oz cream cheese, softened (let it sit out so it’s easy to whip!)
- 1/2 cup powdered sugar (dissolves beautifully for a smooth filling)
- 1 teaspoon vanilla extract (classic flavor booster)
- 1 1/2 cups whipped topping (like Cool Whip, super easy!) OR 1 cup heavy cream, whipped to stiff peaks (if you prefer homemade whipped cream)
- 1 1/4 cups caramel sauce (jarred is totally fine and convenient, or use your favorite homemade)
- Optional: 1/2 cup brown sugar (You can mix a little brown sugar directly into the cheesecake layer for an extra caramelly twist, or just stick to the caramel drizzles!)
- For Assembly and Garnish: Time to make it pretty!
- Chocolate sauce (optional, for extra chocolatey drizzle power)
- Extra caramel sauce (because you can never have too much!)
- Chocolate covered caramels or Heath bits/Rolo candies (optional, for crunchy, chewy bits on top!)
- Fresh whipped cream (optional, for piling high on top!)
How to Make It
Let’s get layering! It’s really as simple as 1-2-3…well, 4 steps!
1. Prepare Your Brownies
First things first, those brownies! If you’re using a box mix, follow the package directions for a 13×9 inch pan. If you’re making them from scratch (yay!), preheat your oven to 350°F (175°C). In a medium bowl, whisk together the melted butter, sugar, and vanilla extract. Beat in the eggs one at a time until everything is combined and smooth. In a separate bowl, whisk together your dry ingredients: flour, cocoa powder, baking powder, and salt. Slowly add the dry mixture to the wet mixture, mixing just until everything is combined – try not to overmix! Pour the batter into a greased 9×13 inch baking pan and spread it out evenly. Pop it in the oven and bake for about 24-27 minutes, or until a toothpick comes out with just a few moist crumbs attached. The most important step here? Let those brownies cool completely. Like, completely completely. If they’re warm, they’ll make a melty mess in your trifle.
Once they’re cool, cut them into bite-sized cubes. Don’t worry if some crumble, those bits work too!
2. Make the Cheesecake Filling
While the brownies are cooling, you can whip up the creamy filling. Get your softened cream cheese into a large mixing bowl and beat it with an electric mixer until it’s super smooth and no lumps remain. Gradually add the powdered sugar and vanilla extract, continuing to mix until it’s all beautifully combined and fluffy.
Now, here’s where you add the whipped topping or homemade whipped cream. If using whipped topping, gently fold it into the cream cheese mixture with a spatula until it’s smooth and airy. If you’re whipping your own heavy cream, do that in a separate bowl until stiff peaks form, then gently fold that into the cream cheese mixture. Keep it light and fluffy!
3. Assemble the Trifle
Okay, the fun part! Grab your gorgeous trifle dish or a large glass serving bowl so you can see all those lovely layers. Start by placing about half of your brownie pieces (cubes or crumbles) in an even layer at the bottom.
Next, get your caramel sauce ready! Drizzle a generous layer of caramel sauce right over the brownies. Don’t be shy!
Now, carefully spoon about half of the creamy cheesecake mixture on top of the caramel layer. Spread it out gently.
If you’re using chocolate sauce, this is a great spot to add a drizzle over the cheesecake layer.
Time to repeat! Add the remaining brownies on top of the cheesecake layer. Then, drizzle with more caramel sauce. Finish with the rest of the cheesecake mixture on top.
For the grand finale, add a thick layer of fresh whipped cream (if you’re using it) or the remaining whipped topping on the very top. Then go wild with your garnishes! Drizzle with extra caramel sauce, sprinkle on those chocolate covered caramels or Heath bits… make it look irresistible!
4. Chill Out
This step is essential! Cover your beautiful trifle with plastic wrap and pop it in the refrigerator. It needs at least 2-4 hours to chill, allowing all those amazing flavors to meld together and the layers to firm up nicely. Honestly, if you can make it the night before, even better! The flavors deepen and it gets even more delicious.
Substitutions & Additions
Want to put your own spin on this trifle? Here are a few ideas:
- Brownie Swap: Try using a different flavored brownie mix, like dark chocolate or even a peanut butter swirl if you’re feeling adventurous!
- Caramel Boost: Stir in some flaky sea salt into the caramel sauce before drizzling for a salted caramel twist.
- Add Crunch: Sprinkle chopped pecans or walnuts between the layers, especially if you used them in your brownies.
- Extra Chocolate: Toss some mini chocolate chips into the cheesecake filling or sprinkle them over the layers.
- Candy Mix-Ins: Besides the suggested garnishes, you could crumble up other chocolate bars or candies that pair well with caramel and chocolate, like Snickers or Twix.
- Make it Boozy: For an adults-only version, drizzle a little coffee liqueur or caramel vodka over the brownie layers before adding the caramel sauce.
Tips for Success
Here are a few friendly pointers to make sure your trifle turns out perfect every time:
- Cool Brownies Are Key: I cannot stress this enough! Warm brownies will melt the cheesecake layer and make things messy. Patience is a virtue here.
- Soften That Cream Cheese: Make sure your cream cheese is properly softened. This ensures a smooth, lump-free filling. Take it out of the fridge at least an hour before you start.
- Don’t Overmix the Filling: Once you’ve folded in the whipped topping or whipped cream, stop mixing as soon as it’s combined. Overmixing can deflate it and make the filling less fluffy.
- Chill Time is Non-Negotiable: This trifle needs time in the fridge for the layers to set and the flavors to get happy together. Don’t skip or shorten the chilling period!
- Use a Glass Dish: A clear trifle dish or glass bowl lets you see all those beautiful layers, which is half the fun!
- Prep Ahead: You can bake and cool the brownies a day in advance. You can also make the cheesecake filling ahead of time and store it in the fridge. This makes assembly super fast on the day you plan to serve!
How to Store It
Once assembled and chilled, your Caramel Cheesecake Brownie Trifle should be kept covered tightly with plastic wrap or an airtight lid in the refrigerator. It will stay delicious for about 3-4 days. Honestly, it rarely lasts that long in my house!
FAQs
Got questions? I’ve got answers!
Q: Can I make this trifle ahead of time?
A: Absolutely! In fact, it’s best made ahead to give the layers time to meld and the flavors to deepen. Making it the night before you plan to serve is perfect.
Q: What kind of dish should I use?
A: A large, clear trifle dish (usually around 3-4 quarts) is ideal for showcasing the layers. A large glass serving bowl will also work just fine.
Q: Can I use homemade brownies or caramel sauce?
A: Yes, please do! The recipe includes instructions for scratch brownies, and homemade caramel sauce would be absolutely divine in this trifle. Use whatever you love or whatever is most convenient for you.
Q: Is this recipe actually easy, or just “blogger easy”?
A: Ha! Great question. This one is genuinely easy, especially if you use a box brownie mix and store-bought caramel/whipped topping. It’s mostly just mixing and layering!

Easy Caramel Cheesecake Brownie Trifle Recipe
Ingredients
Equipment
Method
1. Prepare Your Brownies
First things first, those brownies! If you're using a box mix, follow the package directions for a 13x9 inch pan. If you're making them from scratch (yay!), preheat your oven to 350°F (175°C). In a medium bowl, whisk together the melted butter, sugar, and vanilla extract. Beat in the eggs one at a time until everything is combined and smooth. In a separate bowl, whisk together your dry ingredients: flour, cocoa powder, baking powder, and salt. Slowly add the dry mixture to the wet mixture, mixing just until everything is combined – try not to overmix! Pour the batter into a greased 9x13 inch baking pan and spread it out evenly. Pop it in the oven and bake for about 24-27 minutes, or until a toothpick comes out with just a few moist crumbs attached. The most important step here? Let those brownies cool completely. Like, completely completely. If they're warm, they'll make a melty mess in your trifle. Once they're cool, cut them into bite-sized cubes. Don't worry if some crumble, those bits work too!2. Make the Cheesecake Filling
While the brownies are cooling, you can whip up the creamy filling. Get your softened cream cheese into a large mixing bowl and beat it with an electric mixer until it's super smooth and no lumps remain. Gradually add the powdered sugar and vanilla extract, continuing to mix until it's all beautifully combined and fluffy. Now, here's where you add the whipped topping or homemade whipped cream. If using whipped topping, gently fold it into the cream cheese mixture with a spatula until it's smooth and airy. If you're whipping your own heavy cream, do that in a separate bowl until stiff peaks form, then gently fold that into the cream cheese mixture. Keep it light and fluffy!3. Assemble the Trifle
Okay, the fun part! Grab your gorgeous trifle dish or a large glass serving bowl so you can see all those lovely layers. Start by placing about half of your brownie pieces (cubes or crumbles) in an even layer at the bottom. Next, get your caramel sauce ready! Drizzle a generous layer of caramel sauce right over the brownies. Don't be shy! Now, carefully spoon about half of the creamy cheesecake mixture on top of the caramel layer. Spread it out gently. If you're using chocolate sauce, this is a great spot to add a drizzle over the cheesecake layer. Time to repeat! Add the remaining brownies on top of the cheesecake layer. Then, drizzle with more caramel sauce. Finish with the rest of the cheesecake mixture on top. For the grand finale, add a thick layer of fresh whipped cream (if you're using it) or the remaining whipped topping on the very top. Then go wild with your garnishes! Drizzle with extra caramel sauce, sprinkle on those chocolate covered caramels or Heath bits... make it look irresistible!4. Chill Out
This step is essential! Cover your beautiful trifle with plastic wrap and pop it in the refrigerator. It needs at least 2-4 hours to chill, allowing all those amazing flavors to meld together and the layers to firm up nicely. Honestly, if you can make it the night before, even better! The flavors deepen and it gets even more delicious.