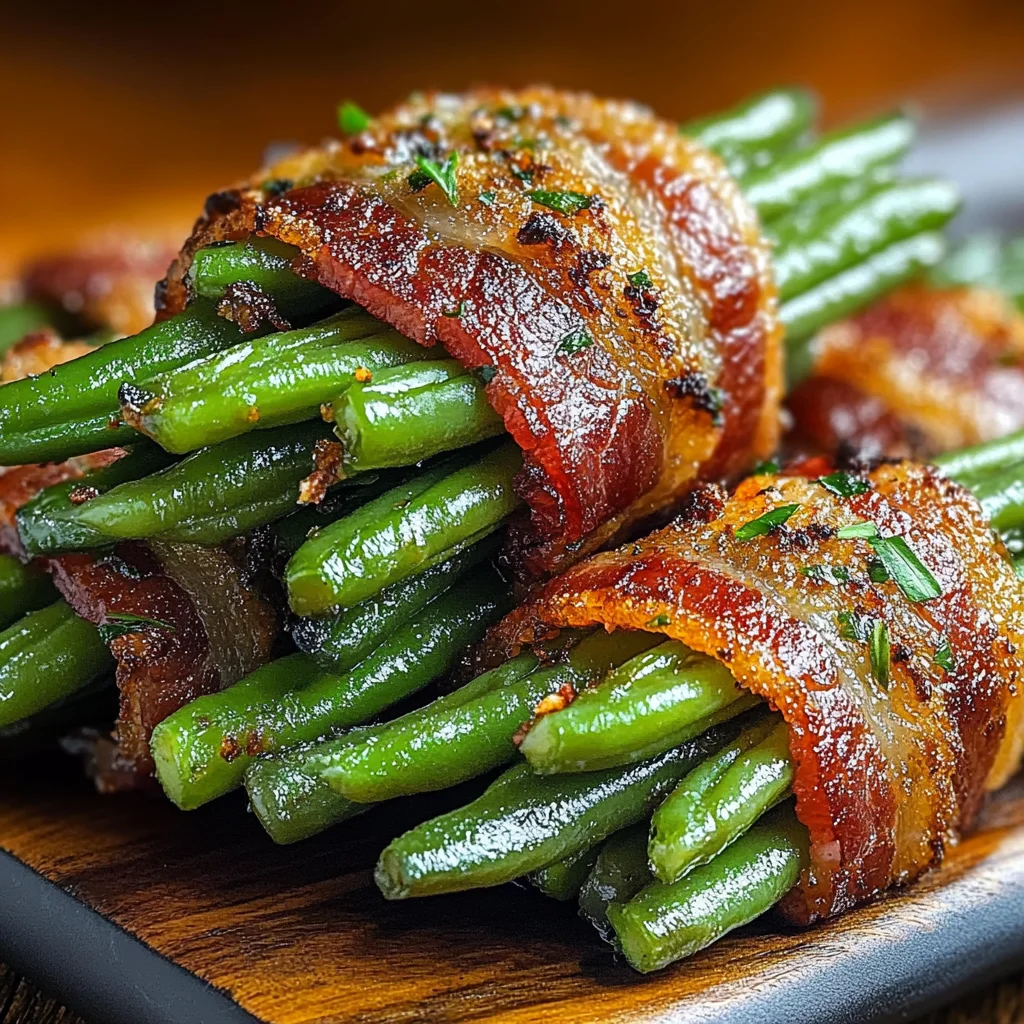
There’s just something so comforting about those little bites of crispy bacon wrapped around fresh green beans, isn’t there? Maybe it’s the smell of bacon sizzling in the oven or the perfect balance of savory and fresh in each bite that brings back memories of family dinners and holiday gatherings. If you’re looking for a quick, impressive side dish or party snack that’s bursting with flavor, these Bacon-Wrapped Green Bean Bundles are exactly what you need. They’re simple to make, quick to bake, and guaranteed to be a crowd-pleaser every time.
Why You’ll Love Bacon-Wrapped Green Bean Bundles
- Fast – Takes just about 30 minutes from start to finish
- Easy – Minimal ingredients and straightforward steps
- Giftable – Perfect for potlucks, holiday dinners, or a savory snack gift
- Crowd-pleasing – Crispy bacon and tender green beans are always a hit
Ingredients
- 1 pound fresh green beans, trimmed – Fresh is best here for that satisfying snap and vibrant color.
- 8-10 slices bacon, cut in half – Choose your favorite bacon; thick-cut works great for extra crispness.
- 1 tablespoon olive oil – This helps the seasoning stick and the bacon crisp up nicely.
- 1 teaspoon garlic powder – Adds a gentle garlicky warmth without overpowering.
- 1/2 teaspoon salt – Just enough to enhance the natural flavors.
- 1/4 teaspoon black pepper – A mild kick to balance the bacon’s richness.
Optional Glaze
- 2 tablespoons brown sugar – Creates a sweet, caramelized glaze over the bacon.
- 1 tablespoon soy sauce – Adds a depth of savory umami to the glaze.
- 1/4 teaspoon black pepper – Keeps the glaze balanced with a little peppery heat.
How to Make Bacon-Wrapped Green Bean Bundles
Alright, let’s get cooking! Follow these simple steps to make savory, crispy bundles everyone will ask for again and again.
- Preheat your oven to 400°F (200°C). This hot temperature will crisp up the bacon just right.
- Prepare your green beans. Wash and trim off the ends. If you want a softer bite and brighter color, blanch the green beans by boiling them for 2-3 minutes, then immediately dunking them in ice water. Drain well.
- Create your bundles. Grab 6-8 green beans and wrap them tightly with a half slice of bacon. Use a toothpick to secure if needed.
- Arrange the bundles on a parchment-lined baking sheet. This helps with easy cleanup and prevents sticking.
- Drizzle olive oil over the bundles. Then sprinkle garlic powder, salt, and black pepper evenly.
- If you’re using the glaze, mix brown sugar, soy sauce, and black pepper in a small bowl. Drizzle this over the bundles for that sticky, sweet-savory finish.
- Bake the bundles for 25-30 minutes. You want the bacon to be nice and crispy, and the green beans tender. For extra crispiness, pop them under the broiler for 2-3 minutes—just watch carefully so they don’t burn!
- Remove from the oven and let them cool slightly before serving. These are best enjoyed warm, so the bacon fat is still melt-in-your-mouth good.
These bundles pair wonderfully with a variety of dishes—whether you’re serving up a family dinner or hosting friends, they add a bit of wow to the plate. If you love quick sides with bold flavor, you might want to check out my Cream Cheese Corn Casserole recipe for another easy, crowd-pleasing side dish.
Substitutions & Additions
Feel free to get creative depending on what you have or prefer:
- Bacon swaps: Try turkey bacon for a leaner version or prosciutto for a delicate twist.
- Green bean alternatives: Asparagus, snap peas, or even thin carrot sticks work great.
- Spice it up: Add a pinch of smoked paprika or cayenne pepper with the garlic powder for a smoky or spicy kick.
- Cheesy upgrade: Sprinkle bundles with shredded parmesan or sharp cheddar right before baking for extra melty goodness.
- Herb infusion: Fresh rosemary or thyme can be tucked inside the bundle or sprinkled on top for an aromatic lift.
Tips for Success
- Don’t skip the parchment paper. It makes cleanup a breeze and prevents the bacon from sticking.
- Blanch your green beans if you like them softer. This step is optional, but it helps the green beans cook perfectly without getting mushy.
- Use toothpicks carefully. If securing the bacon with toothpicks, remember to remove them before serving or warn your guests to be cautious.
- Make ahead: Assemble the bundles and refrigerate for up to 24 hours before baking. Just add a couple extra minutes to baking time if baking straight from the fridge.
- Watch the broiler closely! A quick broil crisps up the bacon beautifully, but it can easily burn if left unattended.
How to Store Bacon-Wrapped Green Bean Bundles
After enjoying your bundles, you can store leftovers in an airtight container in the fridge for up to 3 days. To reheat and keep that lovely bacon crisp, pop them in a preheated oven at 350°F (175°C) for 10 minutes or so instead of microwaving.
FAQs
- Can I make these bundles ahead of time? Yes! You can prep and assemble them a day before baking. Store them covered in the fridge and bake when ready.
- Is it necessary to blanch the green beans? No, it’s optional. Blanching makes green beans more tender and brightens their color, but if you like them crispier, you can skip this step.
- Can I use frozen green beans? It’s best to use fresh for this recipe, but if you only have frozen, thaw and pat them dry thoroughly before bundling to avoid sogginess.
- How many green beans should I put in each bundle? About 6 to 8 green beans per bundle works well for wrapping and eating.
If you’re in need of more easy and delightful side dishes or snacks, make sure to explore the variety of recipes available at Easily Cooked. For instance, their Hamburger Green Bean Casserole Bake might be a great addition to your weeknight dinner rotation!
Ready to add these tasty bundles to your recipe collection? Trust me, once you make them, they’ll become a staple — perfect for holidays, casual dinners, or whenever you want to jazz up your green beans with a bacon embrace.
Don’t forget to follow my Pinterest account for more scrumptious recipes and kitchen inspiration!

Bacon-Wrapped Green Bean Bundles
Ingredients
Equipment
Method
- Step 1: Preheat your oven to 400°F (200°C) to ensure the bacon crisps perfectly.
- Step 2: Wash and trim the green beans. Optionally, blanch them by boiling for 2-3 minutes and then plunging into ice water. Drain well.
- Step 3: Gather 6-8 green beans and wrap tightly with a half slice of bacon. Secure with a toothpick if necessary.
- Step 4: Arrange the bundles on a parchment-lined baking sheet to prevent sticking and ease cleanup.
- Step 5: Drizzle olive oil over the bundles, then sprinkle with garlic powder, salt, and black pepper evenly.
- Step 6: If using the optional glaze, mix brown sugar, soy sauce, and black pepper. Drizzle this mixture over the bundles for a sweet-savory finish.
- Step 7: Bake the bundles for 25-30 minutes until the bacon is crispy and the green beans are tender. For extra crispiness, broil for 2-3 minutes, watching carefully to avoid burning.
- Step 8: Remove from the oven and allow to cool slightly before serving. Enjoy warm for the best flavor and texture.