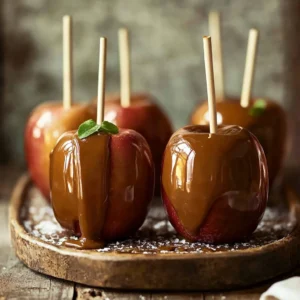
Sweet & Sticky Perfection: Homemade Caramel Apples
Experience the magic of homemade caramel apples! This quick and easy recipe creates wonderfully gooey, golden caramel apples that are perfect for crisp autumn days, gatherings, or a delightful treat any time.
Equipment
- Sturdy Sticks or Skewers
- Baking sheet
- Parchment paper
- Medium saucepan
- Whisk
Ingredients
- 6 small apples Granny Smith, Honeycrisp, or Fuji, firm
- 1 can sweetened condensed milk 14 oz
- 1 cup light brown sugar packed
- 0.5 cup unsalted butter
- 0.5 cup light corn syrup
- 1 tsp vanilla extract
- sea salt pinch
Optional Toppings
- chopped nuts
- mini chocolate chips
- sprinkles
Instructions
- Step 1: Prepare Apples: Wash and thoroughly dry each apple. This step is super important, as any moisture will prevent the caramel from sticking properly. Once dry, firmly insert a sturdy stick or skewer into the stem end of each apple. Place your prepared apples on a baking sheet lined with parchment paper. This will be their happy cooling spot!
- Step 2: Cook Caramel: In a medium saucepan, combine the sweetened condensed milk, light brown sugar, unsalted butter, and light corn syrup. Place this mixture over medium heat. Stir continuously for about 10-12 minutes until the mixture thickens and turns a beautiful golden brown. It should coat the back of a spoon and be visibly richer in color.
- Step 3: Finish Caramel: Once your caramel has reached that lovely thick, golden stage, immediately remove the saucepan from the heat. Stir in the vanilla extract and that little pinch of sea salt. Give it a good whisk to ensure everything is perfectly combined.
- Step 4: Dip Apples: Take one prepared apple by its stick and dip it into the hot caramel. Gently tilt and twist the saucepan as you dip to ensure the apple is completely coated. Lift the apple slowly, allowing any excess caramel to drip back into the pan. You want a nice, even coating.
- Step 5: Add Toppings (Optional): If you're using toppings, now's the time! While the caramel is still warm and sticky, immediately roll the caramel-coated apples in your desired toppings. Chopped peanuts, mini chocolate chips, colorful sprinkles, or even crushed Oreos are fantastic choices.
- Step 6: Cool: Once topped, place your finished caramel apples back onto the parchment-lined baking sheet. Let them cool completely at room temperature until the caramel is firm and set. This can take anywhere from 30 minutes to an hour, depending on your kitchen's temperature.
Notes
Ensure apples are bone-dry before dipping to prevent caramel from sliding off. Cook caramel over medium heat with continuous stirring; do not rush to avoid scorching. Have all toppings ready before dipping as caramel sets quickly. Avoid overcooking the caramel, or it will be hard and brittle. A light swipe of butter or cooking oil on parchment paper can prevent sticking. Store finished caramel apples individually wrapped in wax paper or cellophane bags in the refrigerator for up to 1-2 weeks. Bring them out 15-30 minutes before serving for optimal texture. Feel free to experiment with other firm apples like Gala or Pink Lady. For added flavor, stir a pinch of cinnamon or apple pie spice into the caramel with the vanilla. After setting, drizzle with melted white, milk, or dark chocolate for extra decadence.