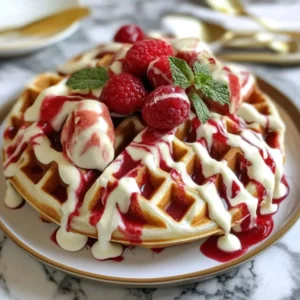
Red Velvet Marble Waffles
Red Velvet Marble Waffles are a magical breakfast treat, combining the rich cocoa notes and iconic crimson swirl of red velvet with crispy, fluffy waffles. This easy-to-make recipe promises a fast and delightful experience, perfect for impressing family and friends and turning any morning into a special celebration.
Equipment
- Mixing bowls
- Whisk
- Waffle Iron
- Toothpick or Knife
Ingredients
For the Classic Waffle Batter
- 1.5 cups all-purpose flour
- 1 tablespoon sugar
- 1 teaspoon baking powder
- 0.5 teaspoon baking soda
- 0.25 teaspoon salt
- 1 cup buttermilk
- 2 large eggs
- 0.25 cup melted butter
- 1 teaspoon vanilla extract
For the Red Velvet Batter
- 1 cup all-purpose flour
- 2 tablespoons cocoa powder
- 0.25 cup sugar
- 1 teaspoon baking powder
- 0.5 teaspoon baking soda
- 0.25 teaspoon salt
- 0.75 cup buttermilk
- 1 large egg
- 0.25 cup melted butter
- 1 teaspoon vanilla extract
- 1 tablespoon red food coloring
Instructions
- Step 1: Prepare the Classic Waffle Batter: In a large mixing bowl, whisk together the dry ingredients for the classic batter: flour, sugar, baking powder, baking soda, and salt. In a separate bowl, whisk together the wet ingredients: buttermilk, eggs, melted butter, and vanilla extract. Pour the wet ingredients into the dry ingredients and mix until just combined, being careful not to overmix (a few lumps are fine).
- Step 2: Prepare the Red Velvet Batter: In a separate mixing bowl, whisk together the dry ingredients for the red velvet batter: flour, cocoa powder, sugar, baking powder, baking soda, and salt. In another bowl, whisk together the wet ingredients: buttermilk, egg, melted butter, vanilla extract, and red food coloring. Pour the wet into the dry and mix until just combined, also being careful not to overmix.
- Step 3: Preheat the Waffle Iron: Get your waffle iron preheating according to its manufacturer’s instructions. You want it nice and hot before you add any batter.
- Step 4: Create the Marbled Effect: Once your waffle iron is hot, lightly grease it. Pour a small amount of your classic waffle batter onto the waffle iron, then immediately follow with a small amount of the red velvet batter right next to or on top of the classic batter. Take a toothpick or a knife and gently swirl the batters together, ensuring not to overmix to maintain distinct colors.
- Step 5: Cook the Waffles: Close the waffle iron and cook according to the manufacturer’s instructions. This usually takes a few minutes, until the waffles are golden brown, crisp on the outside, and cooked through in the middle. They should release easily from the iron when done.
- Step 6: Serve: Serve your gorgeous waffles warm. They're incredible with a dollop of whipped cream, a sprinkle of fresh berries, or a drizzle of maple syrup.
Notes
Customize your waffles with chocolate chips (white or milk), a simple cream cheese glaze, fresh raspberries or strawberries (in batter or as topping), or a tiny drop of almond extract in the red velvet batter for complexity. For dairy-free, swap buttermilk for a dairy-free alternative (like almond milk with a splash of vinegar) and use plant-based butter. Other toppings include chocolate syrup or powdered sugar. Key tips for success include: do not overmix the batter (overmixing develops gluten, leading to tough waffles); allow batters to rest for 10-15 minutes after mixing to allow flour to hydrate and leavening agents to work, resulting in lighter, fluffier waffles; use a properly preheated iron for a crispy exterior (the first waffle is often a test run!); lightly grease your waffle iron between each waffle to prevent sticking and aid browning. To keep waffles warm and crisp while you cook the rest, place them directly on a wire rack set over a baking sheet in a 200°F (95°C) oven. Store cooled waffles completely on a wire rack before storing to prevent sogginess. Place cooled waffles in an airtight container or Ziploc bag for up to 3-4 days in the refrigerator. For longer storage, flash freeze waffles by placing them in a single layer on a baking sheet until solid (about 1-2 hours), then transfer them to a freezer-safe bag or container for up to 2-3 months. Reheat frozen waffles in a toaster, toaster oven, or your waffle iron (on a low setting) to bring back crispiness. This recipe can be made without food coloring; the food coloring is purely for aesthetics. Gel food coloring is preferred for more vibrant color with less liquid, but liquid food coloring also works. If you don't have buttermilk, you can make your own by adding 1 tablespoon of lemon juice or white vinegar to a measuring cup, then filling the rest with regular milk until it reaches 1 cup; let it sit for 5 minutes before using.