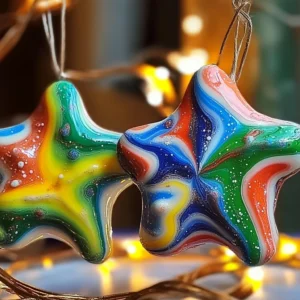
Melted Crayon Star Decorations
Transform old, broken crayons into vibrant, stained-glass-like star decorations. This fast, easy, and eco-friendly craft is perfect for kids and adults, offering a burst of color and a touch of handmade charm to any space.
Equipment
- Scissors
- Crayon Sharpener or Knife
- Iron
- Star Stencil or Cookie Cutter
- Hole Punch
Ingredients
- Crayons old, broken, or well-loved; the more colors, the merrier
- Wax Paper our base for melting
- Parchment Paper crucial for protecting your iron
- Baker's Twine or any string/ribbon, for hanging
- Scissors for cutting out star shapes
- Crayon Sharpener or Knife to get crayons into tiny, meltable bits (adult supervision for knife)
- Iron with adult supervision; set to a low heat, no steam
- Star Stencil or Cookie Cutter for perfectly shaped stars, but freehand is fine too
- Hole Punch to make a neat spot for your twine
Instructions
- Step 1: Unwrap Those Crayons: First things first, peel off all the paper wrappers from your chosen crayons. This can be a fun task for little hands, or a meditative one for you!
- Step 2: Shave 'Em Down: Now, for the magic! Use a crayon sharpener or a knife to shave your crayons into small bits. Think of it like making colorful sprinkles. The smaller the bits, the smoother and more evenly they'll melt. A vegetable peeler can create broader shavings for cool swirls!
- Step 3: Spread the Color: Lay out a sheet of wax paper on a flat, protected surface (like an ironing board with an old towel). Sprinkle your crayon shavings evenly onto one half of the wax paper. This is where you get to be an artist! Mix colors, create gradients, or stick to a single hue.
- Step 4: Fold and Seal: Carefully fold the other half of the wax paper over your crayon shavings, creating an enclosed packet. Press down firmly around the edges to seal them, making sure no shavings can escape.
- Step 5: Parchment Paper Protection: Place your wax paper packet between two sheets of parchment paper. This is super important! It protects your iron and ironing board from any stray crayon wax.
- Step 6: Iron Away the Meltdown: With adult supervision, set your iron to a low heat setting – no steam! Gently glide the iron over the top sheet of parchment paper. You'll see the crayon shavings start to melt and blend together like magic. Keep the iron moving to avoid scorching the wax. Once everything looks nicely melted and combined, lift the iron.
- Step 7: Cool Down: Let the melted crayon wax cool and harden completely. This usually only takes a few minutes, but resist the urge to peek too soon!
- Step 8: Starry, Starry Night: Once cool, carefully peel back the parchment paper and then the wax paper. Now for the fun part: using your star stencil or cookie cutter, trace and carefully cut out your star shapes from the hardened crayon wax. If you’re feeling extra creative, you can even freehand cut other shapes!
- Step 9: Punch a Hole: Grab your hole punch and make a small hole at the top of each star. This is where your hanging twine will go.
- Step 10: Hang and Admire: Finally, thread a piece of baker's twine through the hole in each star, tie a loop, and hang your beautiful, vibrant decorations! They look stunning in a window, catching the light, or as festive ornaments.
Notes
Tips for Success: Always use a low heat setting on your iron to prevent wax from becoming too runny or burning. Spread crayon shavings evenly for uniform melting. Always use parchment paper to protect your iron and ironing board. Allow wax to cool completely before cutting to avoid gumminess. Don't worry if your first star isn't perfect; focus on the fun! You can shave crayons in advance and store them for quicker assembly.
Storage: Store your decorations flat between sheets of wax paper or parchment paper in a cool, dry place. Avoid direct sunlight or very warm areas, as the wax can soften or stick. They will last indefinitely if stored properly.