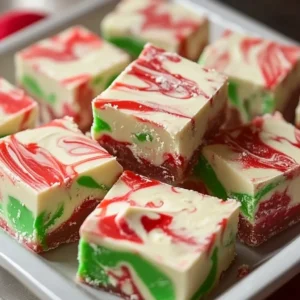
Easy No-Bake Christmas Fudge
This easy, no-bake Christmas fudge recipe is a pure holiday gold—simple, unbelievably quick, and destined to become a beloved tradition. Forget the stress of candy thermometers; this no-fuss wonder delivers perfectly smooth, rich, and wonderfully festive fudge every single time, perfect for gifting or enjoying.
Equipment
- 8x8-inch Square Baking Pan
- Parchment paper
- Double Boiler or a heat-safe bowl over a saucepan with simmering water
- 3 Small Bowls
- Large Spoon
- Butter Knife
Ingredients
For the Fudge
- 22 ounces white chocolate chips opt for a good quality brand
- 1.75 cups vanilla frosting canned
- 1 tsp red gel food coloring
- 1 tsp green gel food coloring
Instructions
- Step 1: Prepare your pan. Grab an 8x8-inch (20x20cm) square baking pan and line it with parchment paper, leaving some overhang on the sides for easy lifting.
- Step 2: In the top bowl of a double boiler (or a heat-safe bowl over a saucepan with an inch or two of simmering water, ensuring the bowl doesn't touch the water), combine the white chocolate chips and vanilla frosting. Set this over medium-low heat.
- Step 3: Stir constantly for about 8-10 minutes, until the mixture is completely melted and beautifully smooth. Keep the heat medium-low to prevent the chocolate from burning.
- Step 4: Once melted and smooth, divide this mixture equally into three separate bowls.
- Step 5: Into the first bowl, stir in the red gel food coloring until completely blended and you have a vibrant festive red.
- Step 6: Repeat with the second bowl, adding the green gel food coloring and mixing until it’s a perfect Christmas green. Leave the third bowl pure white.
- Step 7: Using a large spoon, randomly dollop about 2 tablespoons of each colored fudge mixture into your prepared pan. Don't overthink the placement.
- Step 8: Once all your colorful dollops are in the pan, take a butter knife and gently swirl the colors together to create a beautiful, marbled pattern. Avoid over-mixing.
- Step 9: Pop the fudge, uncovered, into the refrigerator for 1-2 hours, or until it's completely firm and set.
- Step 10: Once firm, use the parchment paper overhangs to carefully lift the fudge out of the pan. Let it sit at room temperature for about 20 minutes before slicing into pieces. Serve immediately.
Notes
This recipe is wonderfully versatile! You can experiment with milk chocolate or semi-sweet chocolate chips, keeping in mind colors will be darker. Swap vanilla frosting for cream cheese or chocolate frosting for different flavor bases. For extra flavor, stir in ½ teaspoon of peppermint, almond, or even rum extract. Before chilling, gently fold in mix-ins like festive sprinkles, crushed candy canes, chopped nuts (pecans or walnuts), mini marshmallows, or dried cranberries. For an extra pop, sprinkle festive sprinkles on top before chilling.
When melting the chocolate and frosting, always keep the heat on medium-low and stir constantly to prevent burning. Use gel food coloring for vibrant colors without altering the fudge's texture. Don't over-swirl the colors; a few gentle passes are enough for a marbled effect. Parchment paper is crucial for easy removal. Letting the fudge sit at room temperature for about 20 minutes before slicing helps prevent cracking and ensures clean cuts. This fudge is an ideal make-ahead treat, storing wonderfully in an airtight container in the refrigerator for up to 2 weeks, or in the freezer for up to 2-3 months. Thaw in the refrigerator or at room temperature before serving.