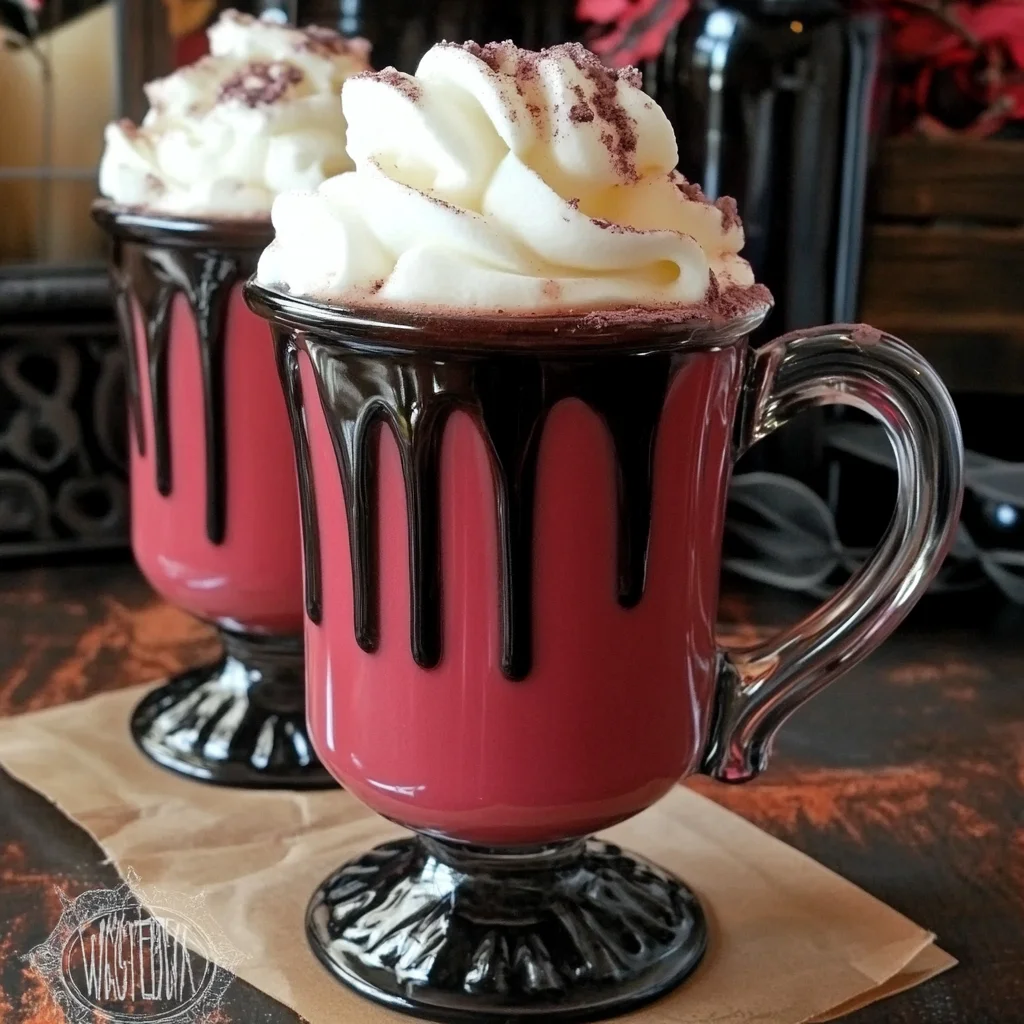
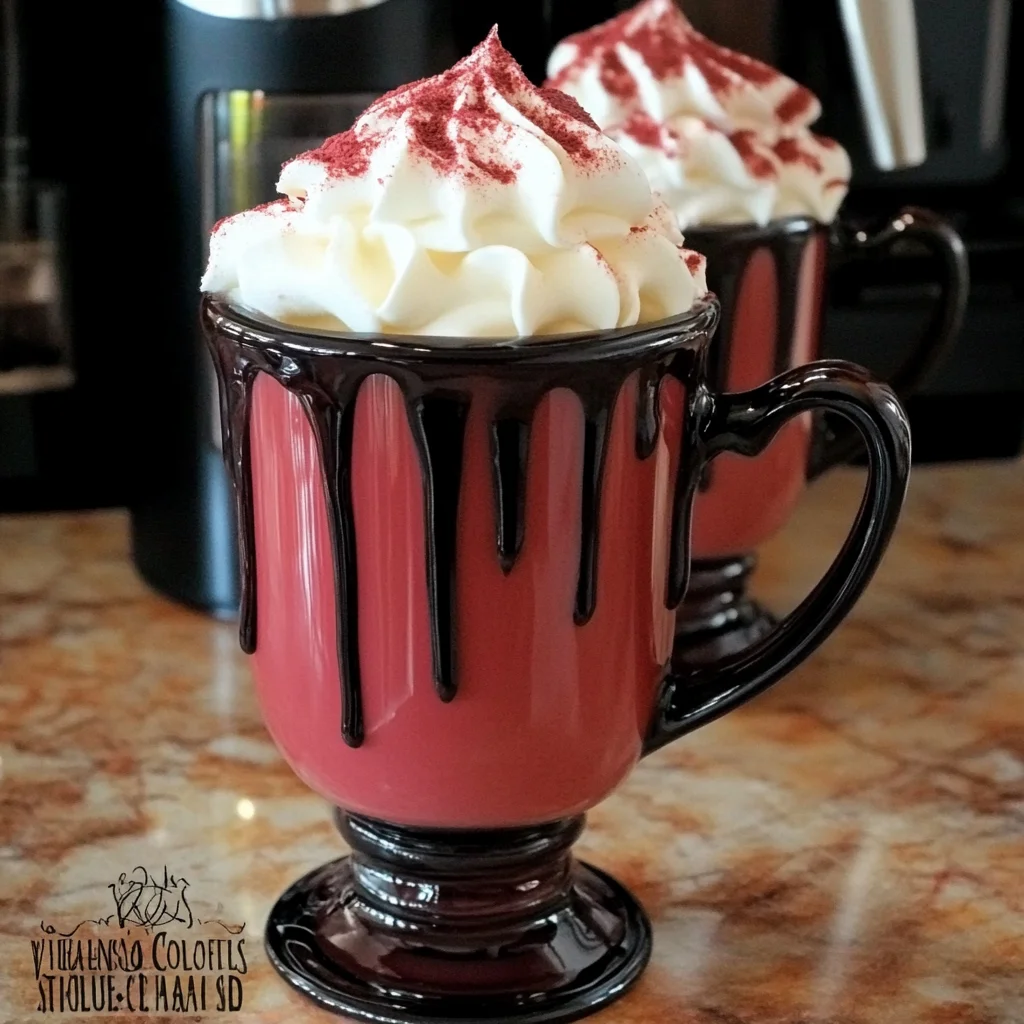
Oh, fall! There’s just something about the crisp air, the rustling leaves, and the anticipation of cozy nights in that makes my heart sing. And what’s a cozy night without a warm, comforting drink in hand? Forget those basic mugs of cocoa; today, we’re diving into something delightfully devilish yet utterly delicious: Vampire Hot Chocolate!
I remember the first time I whipped up a batch of this “bloody” good beverage. It was for a Halloween movie night, and my friends’ eyes lit up – first with a little surprise, then with pure delight. It’s not just a drink; it’s an experience. This recipe is so easy, incredibly quick to pull together, and trust me, it’s one of those memorable treats that will have everyone asking for the recipe. You’re going to love how simple it is to bring a little spooky fun to your kitchen!
Why You’ll Love Vampire Hot Chocolate
- Fast: Ready in a flash, perfect for impromptu cozy moments.
- Easy: Simple ingredients, straightforward steps – no culinary wizardry required!
- Giftable: Package the dry ingredients with a cute mug for a unique present.
- Crowd-pleasing: A hit with kids and adults alike, especially during the spooky season.
Ingredients
Let’s gather our potion-making essentials. Don’t worry, these are all easy-to-find goodies you might already have in your pantry!
For the Vampire Hot Chocolate:
- 3 cups Whole Milk: The richer, the creamier! Whole milk gives us that perfect velvety base.
- 1 cup Heavy Cream: This is our secret weapon for an unbelievably luxurious and decadent hot chocolate.
- 1 teaspoon Vanilla Extract: A splash of vanilla brightens up all those chocolatey flavors.
- 8 ounces White Chocolate, finely chopped: Go for a good quality white chocolate here – it really makes a difference in the final taste and smoothness. Finely chopped helps it melt beautifully!
- 1/2 cup Mini Chocolate Chips: Adding a little extra chocolatey goodness and texture.
- Red Food Coloring: This is where the magic happens! You’ll want a vibrant red to achieve that “vampire” look.
For the Whipped Cream:
- 1 cup Heavy Whipping Cream: For light, airy peaks of deliciousness.
- 1 tablespoon Granulated Sugar: Just a touch of sweetness for our topping.
- 1 teaspoon Vanilla Extract: Another dash of vanilla to make our whipped cream extra special.
For the Sugar Blood:
- 1/2 cup Light Corn Syrup: Helps prevent crystallization and gives our “blood” that glossy, drippy consistency.
- 1/2 cup Water: The liquid base for our sugary concoction.
- 1 cup Granulated Sugar: The main component of our edible sugar glass.
- Red Gel Food Coloring: Gel coloring gives a much more intense and realistic red hue than liquid coloring for this effect.
How to Make Vampire Hot Chocolate
Ready to get spooky in the kitchen? Let’s walk through it together!
For the Whipped Cream:
- In the clean bowl of a stand mixer (or a large bowl with a hand mixer), combine your 1 cup heavy whipping cream, granulated sugar, and vanilla extract.
- Whip on medium-high speed until you see stiff peaks form. This means when you lift the whisk, the cream holds its shape. Set this aside in the fridge – you want it nice and cold for topping!
For the Sugar Blood:
This part is super fun, but do be careful with hot sugar!
- In a small, heavy-bottomed saucepan, combine the water and light corn syrup. Add the granulated sugar and give it a quick stir, just until it’s moistened.
- Heat this mixture over medium heat. Now, here’s the trick: do not stir it once it starts heating! Let it cook until it reaches 300°F (150°C) on a candy thermometer. If you don’t have a candy thermometer, you can try the cold water test, but I really recommend a thermometer for accuracy and safety here.
- Once it hits 300°F, immediately remove it from the heat. Quickly add your red gel food coloring and stir to combine. Work fast, as it will start to thicken!
- Allow the mixture to cool for just a moment – maybe 30 seconds to a minute. It needs to be slightly cooled so it doesn’t melt your glass, but still liquid enough to drip. Carefully dip the rim of your clean glasses or mugs into the sugar mixture to coat them.
- Immediately invert the glasses or set them upright to allow the sugar blood to drip down the sides as it hardens. This creates that wonderfully eerie, “bloody” effect. Let them cool completely; this will take a little while. Once they’re firm, they’re ready for their gruesome glory!
For the Vampire Hot Chocolate:
- In a medium saucepan, combine the whole milk, heavy cream, vanilla extract, finely chopped white chocolate, and mini chocolate chips.
- Heat this over medium-low heat, stirring occasionally. You want to gently melt the white chocolate and warm the milk through, but don’t let it boil rapidly. Just until it’s simmering gently and all the white chocolate is smoothly incorporated.
- Now for the color! Stir in 1-2 drops of red food coloring. Add more if you want a deeper, more intense “blood” red. I find starting with a couple of drops and building from there is the best way to get that perfect hue without overdoing it.
- Pour the hot chocolate into your beautifully prepared mugs with the sugar blood rims.
- Finally, top each mug with a generous dollop of your homemade whipped cream. For an extra touch of Halloween charm, you could even sprinkle a few more mini chocolate chips on top or a tiny drizzle of extra red food coloring.
Substitutions & Additions
Part of the fun of cooking is making a recipe your own! Here are some ideas to shake things up:
- Chocolate Choices: No white chocolate? You could use milk chocolate for a richer, darker “blood” effect, or even a blend of both. If you’re looking for other ways to incorporate chocolate into your treats, you might love these Cookies and Cream Cake.
- Dairy-Free Option: Swap whole milk and heavy cream for full-fat coconut milk (from a can) or your favorite dairy-free milk and a dairy-free heavy cream alternative. Ensure your white chocolate is also dairy-free.
- Simpler “Blood”: If the sugar blood feels a bit intimidating or you’re short on time, you can create a quick “blood” drizzle by mixing red gel food coloring with a little corn syrup until it has a drippy consistency, then just drizzle it down the inside of your mugs before pouring in the hot chocolate.
- Spice it Up: Add a pinch of cayenne pepper for a subtle warming kick, or a dash of cinnamon or pumpkin pie spice for a fall twist.
- Adult Version: For the grown-ups, a shot of raspberry liqueur or a flavored vodka (like vanilla or whipped cream) would turn this into a truly decadent cocktail.
- Toppings Galore: Beyond whipped cream, think mini marshmallows, chocolate shavings, a dusting of cocoa powder, or even a spooky gummy candy perched on the rim!
Tips for Success
- Quality Counts: Using good quality white chocolate makes a huge difference in the smoothness and flavor of your hot chocolate. It melts better and tastes richer.
- Don’t Rush the Sugar Blood: The candy thermometer is your best friend here. Reaching 300°F is crucial for that hard, brittle “glass” texture. If you remove it too soon, it might be sticky.
- Work Quickly with Sugar Blood: Once the red food coloring is in, the sugar blood will start to set up fast. Have your mugs ready and dip them without delay.
- Gentle Heat for Hot Chocolate: Keep the heat on medium-low for your hot chocolate. You want to melt and warm, not boil, which can scorch the milk or cause the chocolate to seize.
- Batch Prep: The whipped cream can be made a few hours ahead and stored in the fridge. The sugar blood rims can also be done in advance and left to harden. This makes serving a breeze, much like preparing a delicious no-bake caramel pretzel bars for a party!
How to Store Vampire Hot Chocolate
If you happen to have any leftover Vampire Hot Chocolate (which, let’s be honest, is unlikely!), you can store it in an airtight container in the refrigerator for up to 2-3 days. When you’re ready for another sip, gently reheat it on the stovetop over low heat, stirring frequently, until warmed through. The sugar blood rims are best enjoyed fresh, as humidity can make them a bit sticky over time. I usually only prepare the sugar blood on the mugs I know will be served right away.
FAQs
Q: Can I make the sugar blood ahead of time?
A: Yes, you can prepare the sugar blood rims a few hours in advance. Store the prepared mugs in a cool, dry place. Avoid the refrigerator, as humidity can cause the sugar to melt and become sticky.
Q: What if my sugar blood doesn’t drip well?
A: The trick is timing! If it’s too hot, it will be too thin and run everywhere. If it’s too cool, it will be too thick and won’t drip at all. Allow it to cool for about 30-60 seconds after removing from heat and adding color, then dip and immediately invert the mug. Practice makes perfect!
Q: Is this recipe only for Halloween?
A: Absolutely not! While it has a wonderfully spooky vibe, it’s essentially a delicious white hot chocolate with a fun twist. You can easily make the hot chocolate without the red food coloring or sugar blood for a regular cozy treat. If you’re looking for more fun ways to enjoy chocolate, you might also enjoy making some homemade Vampire Bite Trail Mix!
Q: Can I use different food coloring?
A: Of course! Feel free to experiment with purple, green, or even black food coloring for different eerie effects. Get creative!
For more delicious recipes and kitchen inspiration, follow us on Pinterest!