Oh, friend, do you ever get that craving for a little bit of magic, a sprinkle of whimsy, especially when it comes to treats? For me, candy apples always bring back the happiest memories of carnivals, autumn fairs, and those special moments that feel like they’re plucked straight from a storybook. There’s just something so enchanting about a perfectly glossy, vibrantly colored apple, isn’t there?
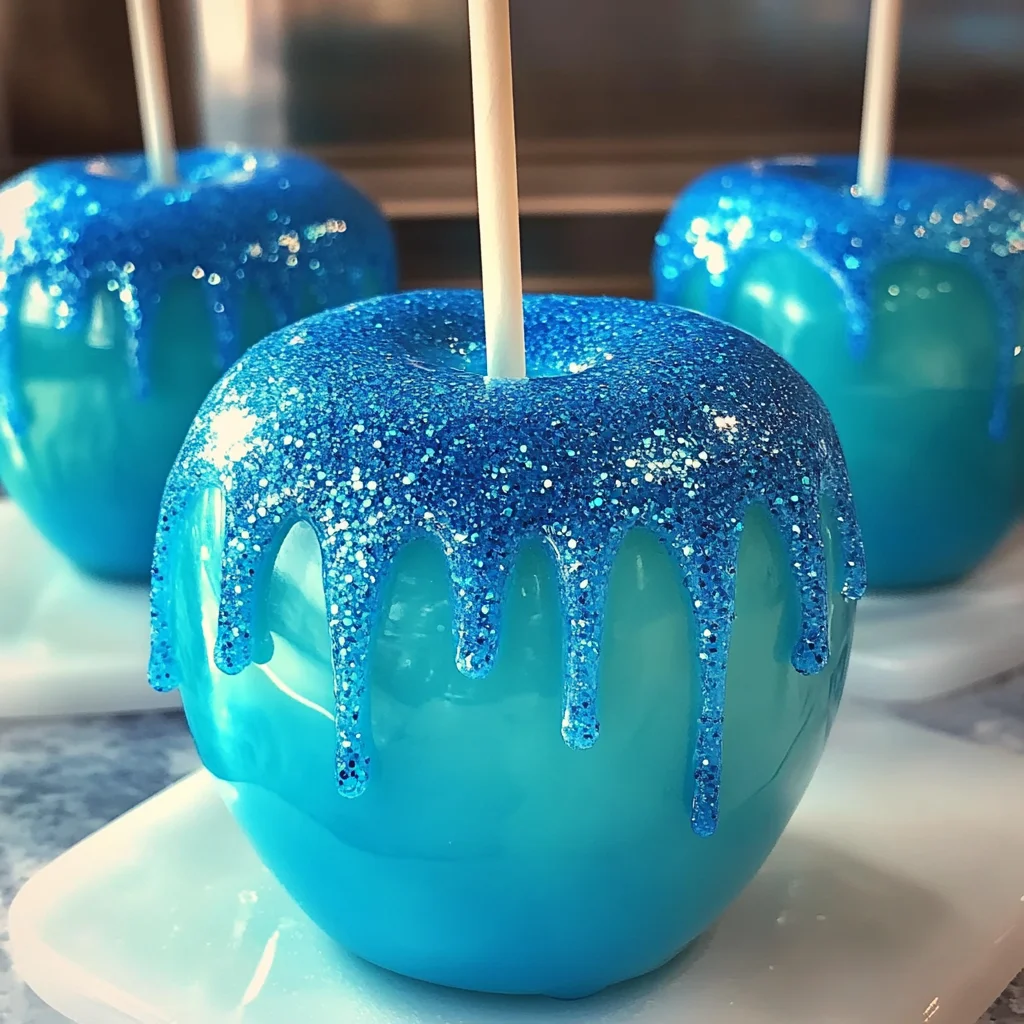
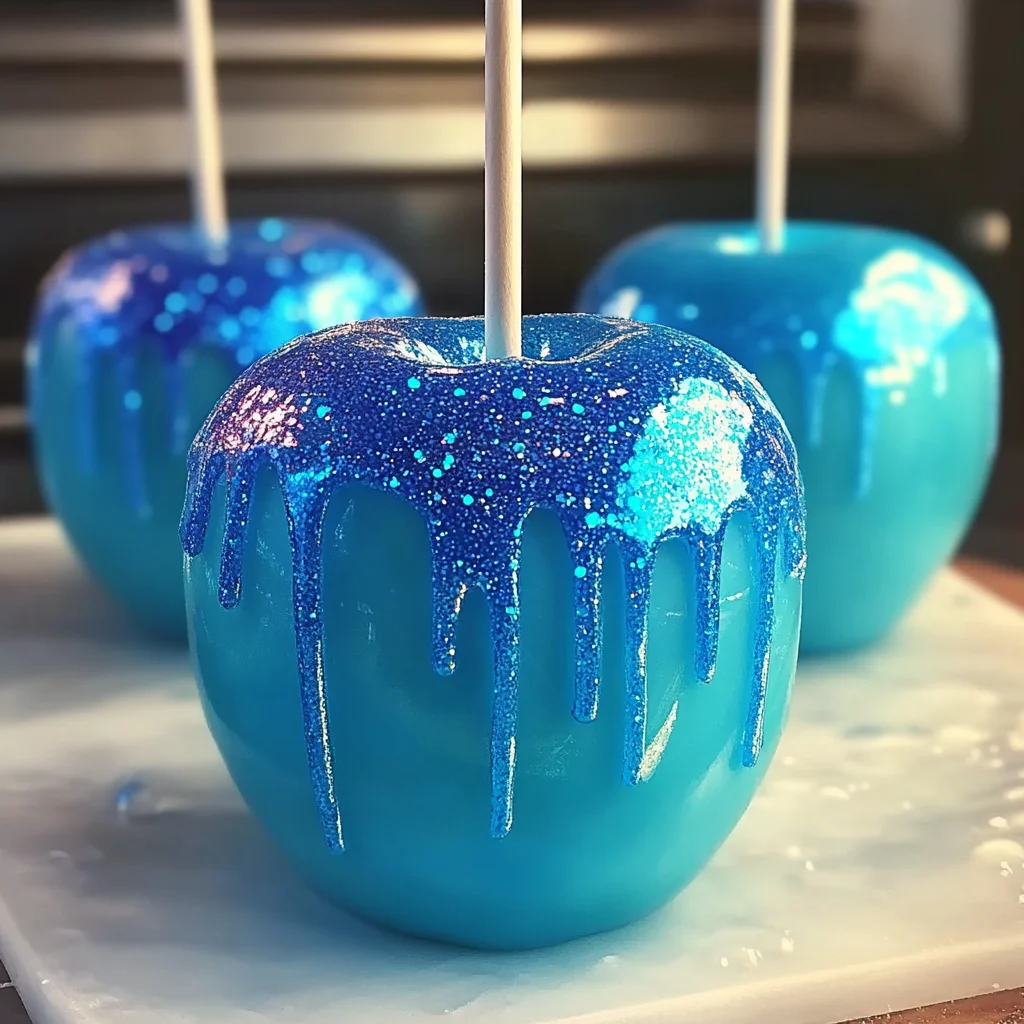
Well, get ready to bring that enchantment right into your kitchen! Today, we’re not just making any candy apples; we’re diving into the delightful world of “Sweet Ocean Candy Apples.” Imagine the shimmering blue of the sea, captured in a crunchy, sweet coating around your favorite crisp apple. They look incredibly impressive, but here’s the best part: they are shockingly easy to make, quick to put together, and will instantly become a memorable treat for any occasion. Seriously, you’re going to feel like a candy wizard!
Why You’ll Love Sweet Ocean Candy Apples
- Fast: Whip up a batch quicker than you can say “under the sea”!
- Easy: No fancy techniques, just simple steps to dazzling results.
- Giftable: Package them up for the prettiest, most thoughtful homemade gift.
- Crowd-pleasing: Kids and adults alike will gasp with delight at these beauties.
Ingredients
Gather your treasures, my dear! Here’s what you’ll need for our shimmering ocean treats:
- 6 medium apples (Granny Smith or Honeycrisp recommended): I always go for Granny Smiths because that tartness cuts through the sweet candy coating so beautifully. Honeycrisps are fantastic too, offering a lovely crisp bite.
- 6 lollipop sticks or wooden skewers: These are essential for handling your apples like a pro!
- 400 g (2 cups) granulated sugar: Our main sweetener, making that glorious hard candy shell.
- 120 ml (½ cup) light corn syrup (or glucose syrup): This is your secret weapon for a smooth, shiny, crack-free candy coating. Don’t skip it!
- 120 ml (½ cup) water: Helps dissolve the sugar evenly.
- ½ tsp blue gel food coloring: Gel coloring gives you that vibrant, deep blue without adding too much liquid.
- Edible blue glitter (optional): For that extra magical, shimmering “ocean” effect. Trust me, it makes a difference!
- 1 tsp vanilla extract (optional): A little splash of vanilla just rounds out the flavor, making the candy even more delicious.
How to Make Sweet Ocean Candy Apples
Alright, let’s get our hands (a little bit!) sticky and create some candy magic!
- Prep Your Apples: First things first, you need to thoroughly wash and completely dry your apples. Any wax or moisture can prevent the candy from sticking, and we don’t want that! Once clean and dry, firmly insert a lollipop stick or wooden skewer into the top of each apple. Arrange them on a parchment-lined tray and set them aside. This will be their cozy spot to cool.
- Candy Creation Time: Grab a heavy-bottom saucepan – this is key for even heating. Combine your granulated sugar, corn syrup, and water in the pan. Now, here’s a super important tip: do NOT stir the mixture once it starts heating up! Stirring can cause sugar crystals to form, leading to a cloudy, gritty candy coating. Just let it do its thing over medium-high heat until the sugar dissolves. Keep a close eye on it and let it boil until it reaches exactly 150°C (300°F), which is the “hard crack stage” on a candy thermometer. If you love the magic of transforming simple ingredients into something special, much like whipping up a batch of Muddy Buddies, you’re going to adore this part!
- Add the Sparkle and Flavor: As soon as your thermometer hits 300°F, remove the pan from the heat immediately. This step moves quickly! Stir in your blue gel food coloring, the vanilla extract (if you’re using it), and a little pinch of that edible blue glitter. Give it a quick, gentle stir until everything is beautifully combined.
- Dip and Dazzle: Now for the fun part! Carefully tilt your saucepan slightly to pool the candy mixture. Take one prepped apple by its stick and dip it into the candy, twirling it to get a smooth, even coat all around. Lift the apple, letting any excess candy drip back into the pan. It should drip off fairly quickly. Place your perfectly coated apple back onto your parchment paper-lined tray to set. And just like when you’re making those irresistible Easy No-Bake Caramel Pretzel Bars, patience is key here for the perfect set!
- Glitter Finish: While the candy coating is still warm and a little sticky (but not wet!), grab your edible blue glitter and sprinkle a little more on top of each apple. This really makes them shimmer like the ocean! Let your beautiful candy apples cool completely. This can take about 20-30 minutes, depending on your kitchen’s temperature. Once they’re firm and shiny, they’re ready to serve!
Substitutions & Additions
Want to get creative? Here are a few ideas to customize your candy apples:
- Flavor Swaps: Instead of vanilla, try almond extract for a subtle nutty note, or a touch of lemon extract for a zesty twist. Just be sure to use food-grade extracts!
- Color Play: Don’t feel limited to blue! Use red for classic carnival apples, green for a wicked witch vibe, or even mix a few drops of different colors for a marbled effect.
- Crunchy Toppings: Immediately after dipping (and before the candy hardens completely), you can roll the coated apple in chopped nuts, sprinkles, mini chocolate chips, or even crushed freeze-dried fruit for extra texture and flavor.
- Spiced Apples: For a fall-inspired twist, add a tiny pinch of ground cinnamon or apple pie spice to your sugar mixture before it boils.
Tips for Success
To ensure your Sweet Ocean Candy Apples turn out perfectly every time, keep these pointers in mind:
- Candy Thermometer is Your BFF: Seriously, this isn’t a recipe to eyeball. A candy thermometer is crucial for reaching the precise hard crack stage, which is what gives you that perfect, snappy candy coating.
- Humidity is the Enemy: Candy can get sticky in humid conditions. Try to make these on a dry day, if possible, or work in an air-conditioned kitchen.
- Clean Apples, Always: As mentioned, any wax or moisture on the apples will make the candy slide right off. Wash and dry them meticulously!
- Work Quickly: Once the candy is off the heat, it starts to set. Have all your apples prepped and your glitter ready so you can dip them efficiently.
- Don’t Scrape the Bottom: When dipping, try not to scrape the bottom of the pan, as sugar crystals might have formed there. Just tilt the pan and dip into the smooth, clear candy.
- Prep Ahead: Gather all your ingredients and equipment before you start cooking the sugar. This makes the dipping process much smoother and less stressful. If you’re looking for other fun, easy desserts that make great gifts or party treats, you’ve got to check out these No-Bake Oreo Bars!
How to Store Sweet Ocean Candy Apples
Once your beautiful candy apples are completely cool and set, you’ll want to store them properly to maintain their crunch and shine.
- Room Temperature: Store them individually wrapped in cellophane or in an airtight container at cool room temperature.
- Shelf Life: They are best enjoyed within 1-2 days. After that, the candy coating might start to get sticky or soften, especially if there’s any humidity around.
- Avoid the Fridge: Do not store candy apples in the refrigerator, as the moisture can cause the candy to become sticky and dull.
FAQs
Got questions? I’ve got answers!
Why did my candy apples turn out sticky?
The most common culprit is humidity! Also, not reaching the exact hard crack stage (300°F) can cause stickiness. Make sure your apples are completely dry, and cook your sugar to the correct temperature.
Can I use any type of apple?
While you can use any apple, firm, slightly tart varieties like Granny Smith or Honeycrisp are ideal. Their crisp texture and tart flavor balance the sweetness of the candy beautifully.
Is a candy thermometer really necessary?
Yes, absolutely! For perfect candy apples, precision is key. A candy thermometer ensures you reach the exact temperature needed for a hard, crunchy, non-sticky coating.
Why are they called “Sweet Ocean Candy Apples”?
With their vibrant blue color and shimmering edible glitter, these candy apples evoke the beautiful, mysterious depths of the ocean, making them a truly unique and delightful treat!
I hope you have the most wonderful time making and sharing these Sweet Ocean Candy Apples. They’re truly a treat that brings smiles and a little touch of magic to any day!
For more delicious recipes and kitchen inspiration, be sure to follow us on Pinterest!

Sweet Ocean Candy Apples
Ingredients
Equipment
Method
- Step 1: Prep Your Apples: Thoroughly wash and completely dry your apples. Any wax or moisture can prevent the candy from sticking. Firmly insert a lollipop stick or wooden skewer into the top of each apple. Arrange them on a parchment-lined tray and set aside to cool.
- Step 2: Candy Creation Time: In a heavy-bottom saucepan, combine granulated sugar, corn syrup, and water. Do NOT stir the mixture once it starts heating up to prevent sugar crystals. Heat over medium-high heat until the sugar dissolves and the mixture boils, reaching exactly 150°C (300°F) on a candy thermometer (hard crack stage).
- Step 3: Add the Sparkle and Flavor: As soon as the thermometer hits 300°F, immediately remove the pan from the heat. Stir in the blue gel food coloring, vanilla extract (if using), and a little pinch of edible blue glitter until beautifully combined.
- Step 4: Dip and Dazzle: Carefully tilt the saucepan slightly to pool the candy mixture. Take one prepped apple by its stick and dip it into the candy, twirling it to get a smooth, even coat. Lift the apple, letting any excess candy drip back into the pan. Place the coated apple back onto your parchment paper-lined tray to set.
- Step 5: Glitter Finish: While the candy coating is still warm and a little sticky (but not wet!), sprinkle a little more edible blue glitter on top of each apple to make them shimmer. Let your beautiful candy apples cool completely, which can take about 20-30 minutes. Once firm and shiny, they are ready to serve!
Notes
- Flavor Swaps: Try almond or lemon extract instead of vanilla.
- Color Play: Use red for classic carnival apples, green, or mix colors for a marbled effect.
- Crunchy Toppings: Immediately after dipping (before candy hardens), roll in chopped nuts, sprinkles, mini chocolate chips, or crushed freeze-dried fruit.
- Spiced Apples: Add a tiny pinch of ground cinnamon or apple pie spice to the sugar mixture before boiling for a fall twist.
- A candy thermometer is crucial for reaching the precise hard crack stage (300°F).
- Humidity is the enemy; try to make these on a dry day.
- Clean apples thoroughly; any wax or moisture will prevent candy from sticking.
- Work quickly once the candy is off the heat, as it starts to set fast.
- When dipping, avoid scraping the bottom of the pan to prevent sugar crystals.
- Prep all ingredients and equipment before cooking the sugar.
- Store individually wrapped in cellophane or in an airtight container at cool room temperature.
- Best enjoyed within 1-2 days. The coating might get sticky after that, especially in humidity.
- Do NOT store in the refrigerator, as moisture can make the candy sticky and dull.