Oh, friend, there’s something truly magical about the aroma of pancakes sizzling on a griddle on a lazy weekend morning. It instantly transports me back to childhood, to slow starts and sunny kitchen windows. But what if I told you we could take that classic comfort and whisk it away to a sunny beach with just a hint of tropical bliss? That’s exactly what these Sweet Coconut Cream Pancakes do! They’re not just pancakes; they’re a mini-vacation on a plate, delivering fluffy, dreamy deliciousness that feels gourmet but is incredibly easy and quick to whip up. Trust me, once you try these, your breakfast routine might just get a delightful, coconut-infused upgrade.
Why You’ll Love Sweet Coconut Cream Pancakes
- Fast: From mixing bowl to breakfast table in under 30 minutes! Perfect for those mornings when you want something special without the fuss.
- Easy: No complicated steps or fancy equipment needed. If you can whisk, you can make these!
- Giftable: While perhaps not “giftable” in the traditional sense, treating your loved ones to a stack of these is a gift in itself. Imagine waking someone up with this delightful scent!
- Crowd-pleasing: The sweet, subtle coconut flavor appeals to almost everyone, making them a hit at any brunch or family breakfast.
Ingredients

Gathering your ingredients is the first step to any great recipe, and for these coconut cream pancakes, you’ll find they’re all kitchen staples with one special star!
- 1 cup All-Purpose Flour: The backbone of our fluffy pancakes. Regular unbleached all-purpose works perfectly.
- 1 tablespoon Granulated Sugar: Just enough to sweeten things up and help with that beautiful golden-brown crust.
- 1 teaspoon Baking Powder: Our first leavening agent, crucial for that classic pancake lift.
- 1/2 teaspoon Baking Soda: The second part of our leavening duo, reacting with the coconut cream to create even more fluff!
- 1/4 teaspoon Salt: A little pinch goes a long way to balance the sweetness and enhance all the flavors.
- 1 cup Coconut Cream: This is our secret weapon! Unlike coconut milk, coconut cream is thicker and richer, giving these pancakes an incredible texture and deep coconut flavor. You can usually find it in a can in the international foods aisle.
- 1 large Egg: Binds everything together and adds a touch more richness.
- 2 tablespoons Unsalted Butter, melted: Adds moisture and flavor. Unsalted gives you control over the overall saltiness.
- 1 teaspoon Vanilla Extract: A classic enhancer that complements the coconut beautifully.
- 1/4 cup Shredded Coconut (optional): For an extra boost of coconut texture and flavor. I love adding this for a little chewiness!
How to Make Sweet Coconut Cream Pancakes
Alright, let’s get cooking! You’ll be amazed at how quickly these come together.
- In a large bowl, start by whisking together all your dry ingredients: the flour, sugar, baking powder, baking soda, and salt. Give them a good whisk to make sure everything is evenly distributed. This helps prevent clumps and ensures your pancakes rise beautifully.
- In a separate, medium-sized bowl, it’s time for the wet ingredients. Combine the creamy coconut cream, that trusty large egg, your melted unsalted butter, and the fragrant vanilla extract. Whisk these together until they’re perfectly blended and smooth.
- Now, for the magic moment! Pour the wet ingredients mixture into the bowl with your dry ingredients. Stir gently, just until everything is combined. This is where a common pancake mistake happens – do not overmix! A few small lumps are perfectly fine and even desirable for tender, fluffy pancakes. If you’re adding the shredded coconut, gently fold it in now. It adds such a wonderful texture!
- Place a non-stick skillet or griddle over medium heat. You want it warm enough to sizzle gently, but not smoking hot. Lightly grease the skillet with a dab of butter or a little cooking spray.
- Once your skillet is ready, pour approximately 1/4 cup of batter onto the hot surface for each pancake. This usually makes a nice, medium-sized pancake. Don’t crowd the pan; give them some breathing room!
- Cook for about 2-3 minutes. You’ll know it’s time to flip when you see bubbles forming on the surface of the pancake and the edges start to look set and a little dry. Gently slide your spatula under a pancake and flip it over. Cook for another 1-2 minutes on the second side, until it’s golden brown and cooked all the way through.
- Repeat with the remaining batter, making sure to lightly grease your skillet between batches as needed. This ensures each pancake gets that perfect golden finish.
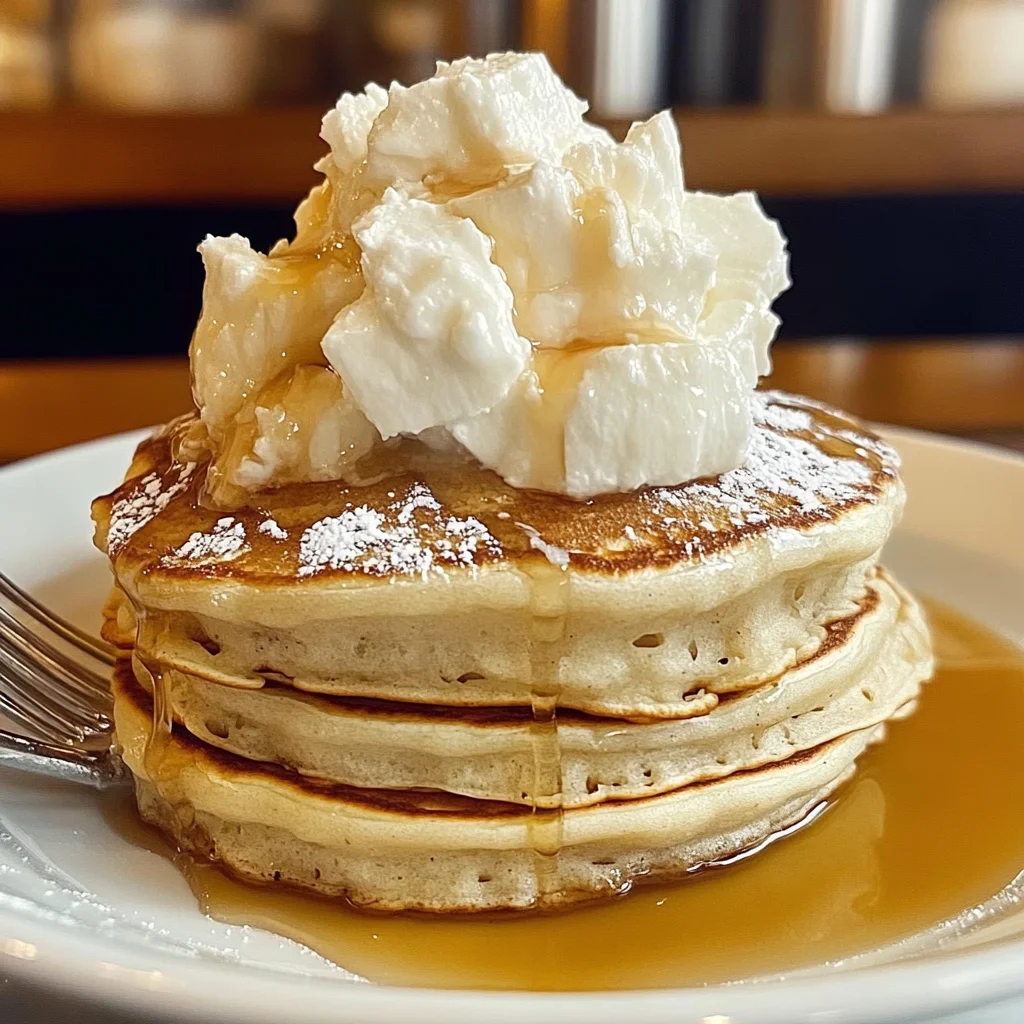
- Serve these beauties warm, straight from the pan! They’re absolutely divine with a drizzle of maple syrup, a dollop of whipped cream, or some fresh fruit.
Substitutions & Additions
Part of the joy of cooking is making a recipe your own! Here are some ideas to play with:
- Dairy-Free: Good news, these are already pretty close! Just ensure your butter is plant-based or use a neutral oil like avocado oil.
- Flour Alternatives: While all-purpose flour gives the best texture here, you could try a 1:1 gluten-free baking blend if you’re looking for a gluten-free option. Keep in mind the texture might be slightly different.
- Sweetness Boost: If you like your pancakes a little sweeter, feel free to add another tablespoon of sugar to the dry ingredients.
- Fruity Fun: Fresh berries (blueberries, sliced strawberries, raspberries) are fantastic folded into the batter or sprinkled on top. Sliced bananas also make a wonderful addition.
- Chocolate Lovers: Who can say no to chocolate? Mini chocolate chips folded into the batter would be a delicious indulgence.
- Nutty Crunch: A sprinkle of chopped pecans or macadamia nuts would add a lovely crunch and complement the coconut flavor.
- Spices: A pinch of cinnamon or nutmeg could add a cozy warmth, especially if you’re making these for a fall breakfast.
Tips for Success
To ensure your Sweet Coconut Cream Pancakes are perfect every time, keep these friendly tips in mind:
- Don’t Overmix! I cannot stress this enough. Overmixing develops the gluten in the flour, leading to tough, rubbery pancakes instead of light, fluffy ones. A few lumps are totally fine.
- Rest Your Batter (if you have time): Letting the batter sit for 5-10 minutes after mixing allows the flour to fully hydrate and the leavening agents to start working. This can lead to even fluffier pancakes.
- Medium Heat is Key: Too high, and your pancakes will burn on the outside before cooking through. Too low, and they’ll be pale and potentially dense. Adjust your heat as you go to find that perfect sweet spot.
- Test Pancake: Make one “test” pancake first to gauge your skillet’s temperature. You can then adjust the heat or batter consistency if needed.
- Keep Them Warm: As you cook batches, place finished pancakes on a plate loosely covered with foil in a warm oven (around 200°F/95°C) to keep them toasty until everyone is ready to eat.
- Prep Ahead: You can whisk together the dry ingredients the night before and store them in an airtight container. In the morning, just combine the wet ingredients, add to the dry, and cook! It makes busy mornings a breeze, much like our Fluffy Lemon Ricotta Pancakes which are another breakfast favorite.
How to Store Sweet Coconut Cream Pancakes
If you happen to have any leftovers (a rare occurrence with these!), here’s how to keep them fresh:
- Refrigeration: Allow the pancakes to cool completely. Stack them with a piece of parchment paper between each one to prevent sticking, then store them in an airtight container in the refrigerator for up to 3-4 days.
- Freezing: These pancakes freeze wonderfully! Again, cool them completely and stack them with parchment paper in between. Place the stack in a freezer-safe bag or container. They’ll keep well in the freezer for up to 2 months.
- Reheating: For best results, reheat refrigerated pancakes in a toaster oven, microwave briefly, or on a skillet over medium-low heat until warmed through. Frozen pancakes can be reheated directly from the freezer in a toaster or oven.
FAQs
Can I use regular milk instead of coconut cream?
You can, but the texture and flavor will be quite different. Coconut cream is much thicker and richer, contributing significantly to the “cream” in these pancakes. If you use regular milk, your pancakes will be lighter and less dense, and of course, won’t have that lovely coconut flavor! You might also want to increase the shredded coconut if you do. For another delightful pancake experience with a different flavor profile, you might enjoy our Easy Oreo Pancakes!
What’s the best way to get perfectly round pancakes?
A 1/4-cup measuring cup is your best friend for consistent sizing. You can also use an ice cream scoop or a pancake dispenser for really neat, round shapes.
My pancakes aren’t very fluffy, what did I do wrong?
The most common culprits are overmixing the batter (which makes them tough) or your baking powder/soda might be old. Make sure your leavening agents are fresh, and remember to mix just until the dry ingredients are moistened!
Can I make the batter ahead of time?
While you can prep the dry ingredients, I don’t recommend mixing the wet and dry ingredients together too far in advance. The baking soda and baking powder start reacting once they meet the wet ingredients, and if the batter sits too long, you’ll lose some of that leavening power, resulting in flatter pancakes. However, you can mix the dry and wet ingredients separately and combine them right before cooking.
For more delicious and easy recipes, be sure to follow us on Pinterest!
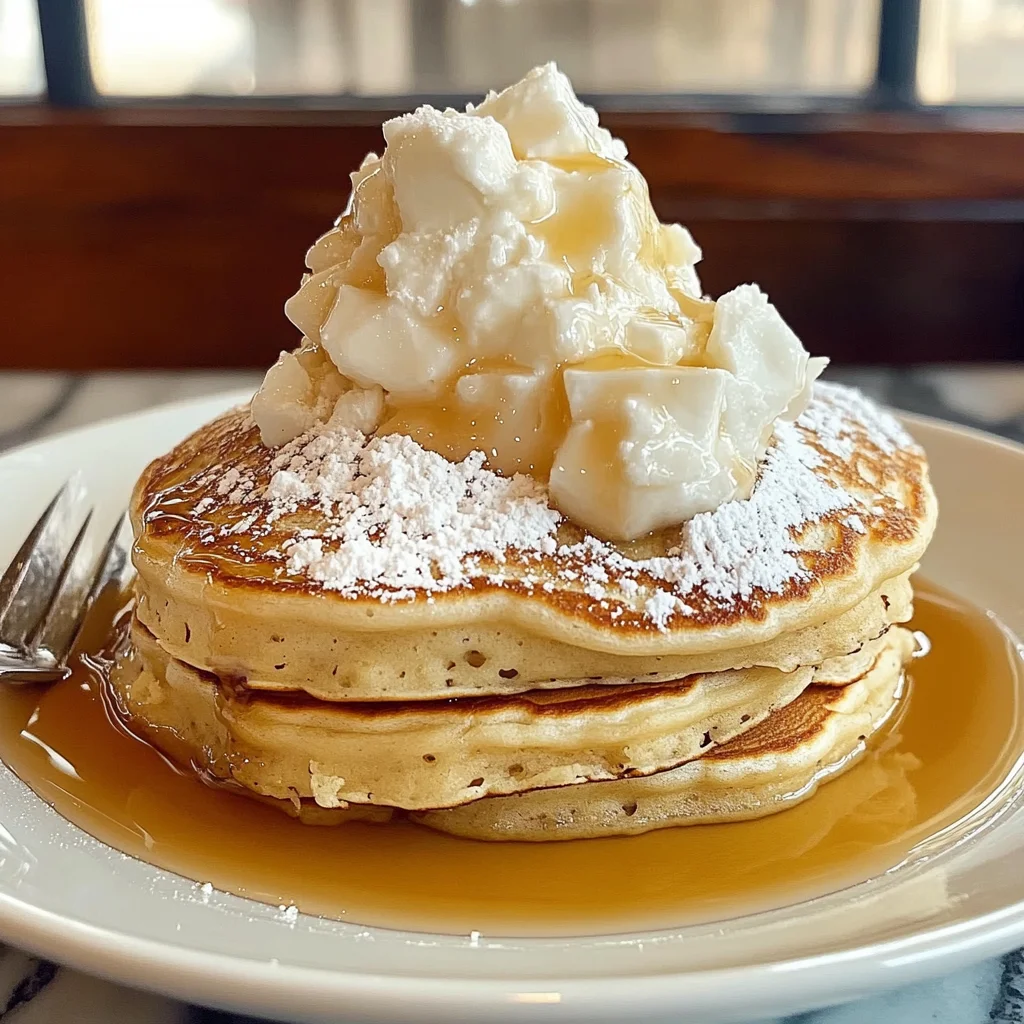
Sweet Coconut Cream Pancakes: Your Tropical Getaway Breakfast
Ingredients
Equipment
Method
- Step 1: In a large bowl, whisk together all your dry ingredients: the flour, sugar, baking powder, baking soda, and salt. Whisk well to ensure even distribution and prevent clumps.
- Step 2: In a separate, medium-sized bowl, combine the coconut cream, large egg, melted unsalted butter, and vanilla extract. Whisk these together until perfectly blended and smooth.
- Step 3: Pour the wet ingredients mixture into the bowl with your dry ingredients. Stir gently, just until everything is combined. Do not overmix; a few small lumps are fine. If adding shredded coconut, gently fold it in now.
- Step 4: Place a non-stick skillet or griddle over medium heat. Lightly grease the skillet with a dab of butter or cooking spray.
- Step 5: Once the skillet is ready, pour approximately 1/4 cup of batter onto the hot surface for each pancake. Cook for about 2-3 minutes, until bubbles form on the surface and edges look set. Flip and cook for another 1-2 minutes until golden brown and cooked through.
- Step 6: Repeat with the remaining batter, lightly greasing the skillet between batches as needed.
- Step 7: Serve warm, straight from the pan, with a drizzle of maple syrup, whipped cream, or fresh fruit.