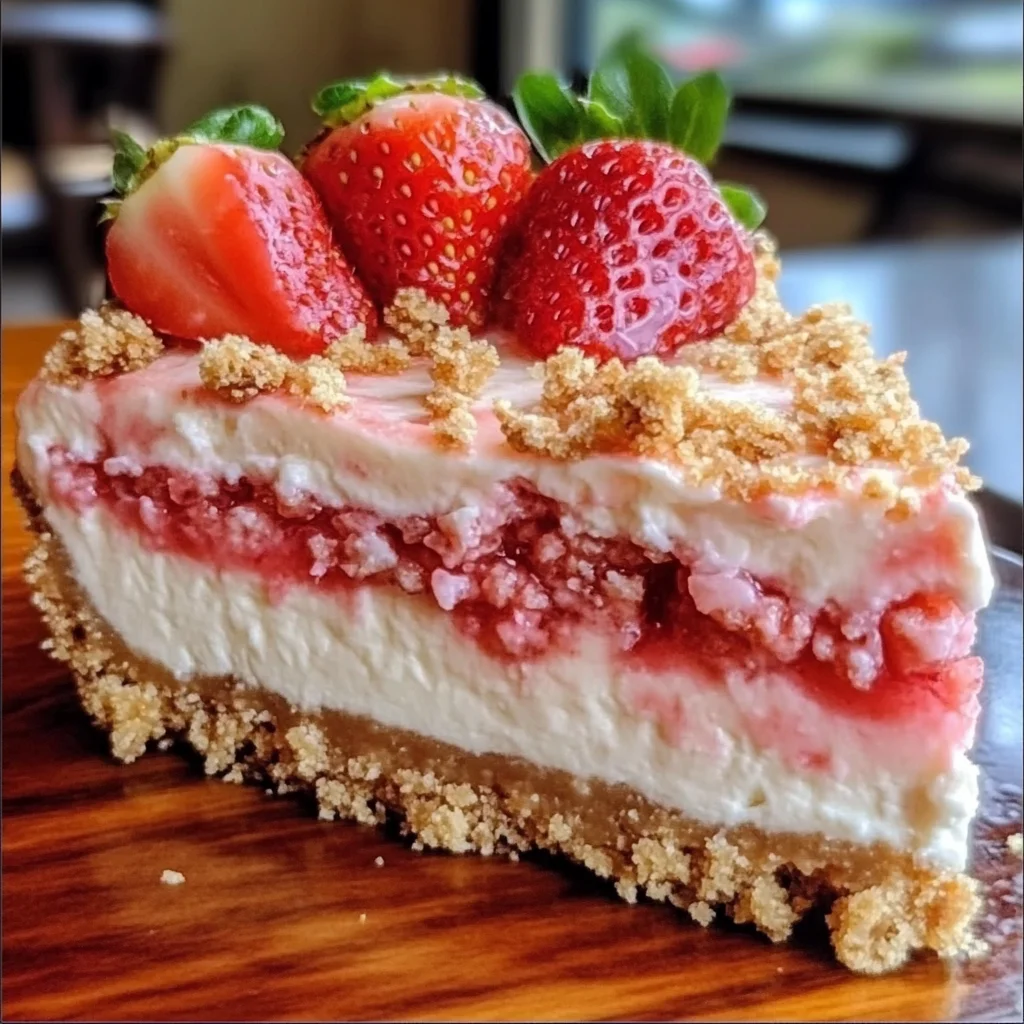
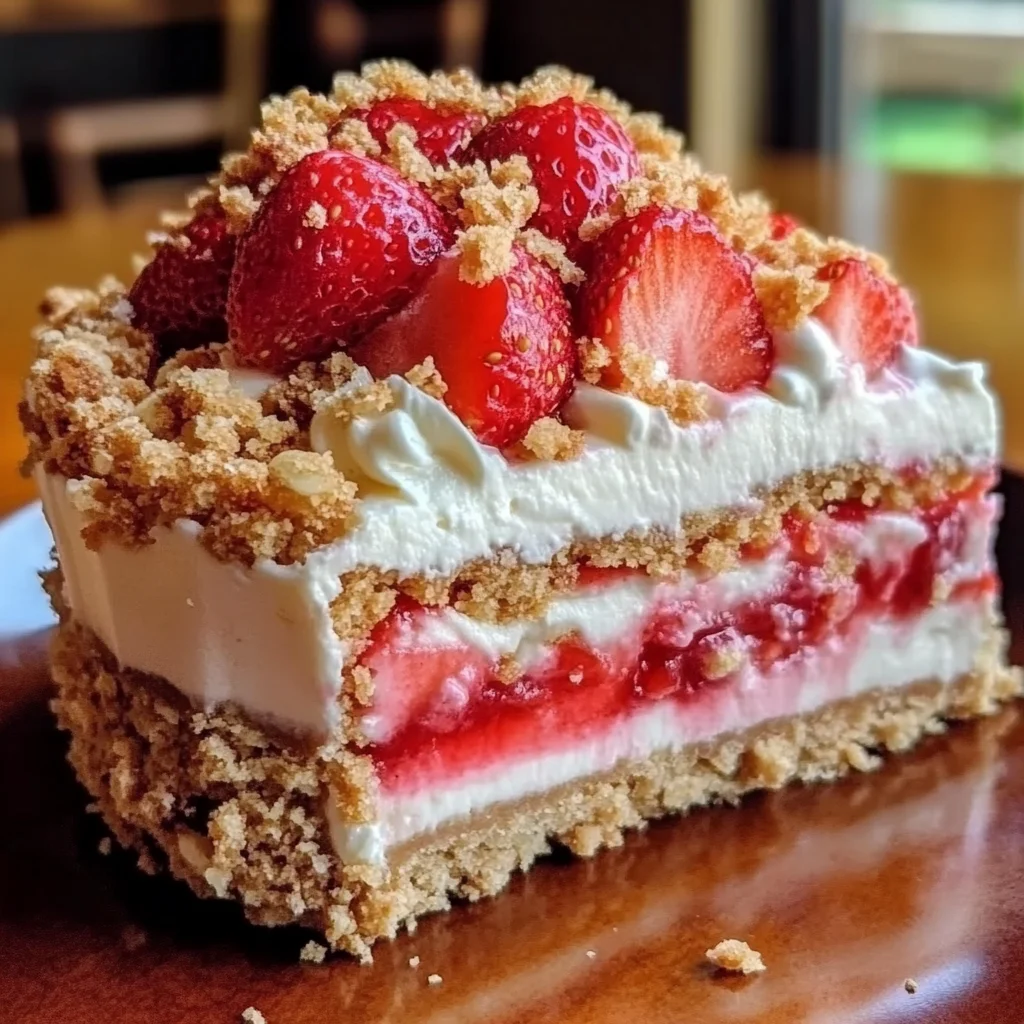
Hey there, friend! Does the phrase “Strawberry Crunch” bring back sweet memories for you? Maybe of those iconic ice cream bars from childhood? Well, get ready to have your taste buds do a happy dance because we’re bringing that glorious flavor combo into a luscious, creamy, no-bake cheesecake! Forget turning on the oven, wrestling with water baths, or worrying about cracks. This recipe is so simple, so quick, and delivers maximum deliciousness with minimal effort. It’s the perfect showstopper dessert for gatherings, potlucks, or just a Tuesday night when you need a little slice of heaven.
Why You’ll Love This Recipe
- Fast: Seriously quick to whip up, requires mostly chill time!
- Easy: No baking, simple steps, perfect for beginners.
- Giftable: Makes a beautiful presentation that friends and family will adore.
- Crowd-pleasing: Who can resist that strawberry and cream cheese combo with a crunchy crust?
Ingredients
Gather ’round, let’s talk ingredients! Most of these are pantry staples or easy finds at your grocery store.
- 2 cups graham cracker crumbs: You can buy these pre-crushed or make your own by blitzing graham crackers in a food processor or crushing them in a bag with a rolling pin. They make the perfect crunchy base!
- 1/2 cup unsalted butter, melted: This is what holds our delicious crust together. Make sure it’s fully melted!
- 2 cups heavy cream, whipped: Whipped cream makes the filling light and airy. Whip it to stiff peaks before folding into the cream cheese mixture.
- 1 (8 ounce) package cream cheese, softened: The star of our cheesecake! Make sure it’s really softened to room temperature – this is key to a smooth filling.
- 1/2 cup powdered sugar: For sweetness and a smooth texture in the filling.
- 1 teaspoon vanilla extract: A little touch of vanilla enhances all those creamy flavors.
- 2 cups fresh strawberries, sliced: Fresh berries are best here for vibrant flavor and texture. Slice them up and get them ready!
- 1/4 cup strawberry jam: Adds a lovely layer of sweet, fruity flavor that just screams strawberry!
How to Make It
Alright, let’s get this no-bake magic happening! It’s easier than you think, I promise.
- First things first, let’s make that iconic crust. Grab a medium bowl and combine your graham cracker crumbs and the melted butter. Stir it all together until it looks like wet sand. Now, grab your 9-inch springform pan and press the crumb mixture firmly into the bottom. Use the bottom of a glass or a flat measuring cup to really pack it down. Pop this into the fridge while you get the filling ready.
- Now for the dreamy, creamy filling! Get a large bowl and beat the softened cream cheese and powdered sugar together. Beat it until it’s super smooth and there are no lumps – this is where having really soft cream cheese pays off! Stir in the vanilla extract.
- Okay, time to gently fold in that beautifully whipped cream. Add the whipped cream to the cream cheese mixture and fold it in carefully with a spatula until it’s just combined. Don’t overmix, or you’ll lose that lovely airy texture!
- Let’s start layering this beauty! Grab your chilled crust from the fridge. Spread half of the cream cheese mixture evenly over the graham cracker base. Now, arrange half of your sliced strawberries over this creamy layer. Drizzle half of the strawberry jam over the berries. Doesn’t that look pretty already?
- Carefully spread the remaining cream cheese mixture over the strawberry layer. It might be a little tricky to get it perfectly smooth over the berries, but just do your best! Top this layer with the rest of your sliced strawberries. Drizzle the remaining strawberry jam over the top.
- For that classic “crunch” look, sprinkle the top with some additional graham cracker crumbs. You can also garnish with a few whole strawberries if you like – it makes it look extra special!
- Now comes the hardest part: waiting! You need to refrigerate the cheesecake for at least 3 hours to let it set properly. I highly recommend leaving it in the fridge overnight if you can – it makes slicing so much easier and the flavors meld beautifully.
Substitutions & Additions
Want to put your own spin on this? Here are a few ideas:
- Different Crust: Instead of graham crackers, try crushed vanilla wafers, shortbread cookies, or even golden Oreos.
- Different Berries: Swap strawberries for raspberries, blueberries, or a mix of your favorites!
- Different Jam: Use raspberry jam, mixed berry jam, or even a little lemon curd for a tangy twist.
- Extra Crunch: Mix some crushed freeze-dried strawberries or a sprinkle of white chocolate chips into the graham cracker crumb topping for extra texture and flavor.
- Chocolate Drizzle: A little drizzle of melted white chocolate or milk chocolate over the top wouldn’t hurt anyone!
Tips for Success
Making this cheesecake is pretty straightforward, but here are a few things I’ve learned:
- Soften That Cream Cheese! I can’t stress this enough. Cold cream cheese will give you lumps, and nobody wants lumpy cheesecake filling. Leave it out on the counter for at least an hour (or two!) before you start.
- Don’t Overmix: Once you add the whipped cream, fold it in gently with a spatula until just combined. Overmixing will deflate the whipped cream and make your filling dense instead of light and fluffy.
- Chill Time is Crucial: Resist the urge to cut into it too soon! The refrigeration time is essential for the cheesecake to set up properly. An overnight chill is truly ideal.
- Clean Slices: To get beautiful, clean slices, dip your knife in hot water and wipe it dry between each slice.
How to Store It
Once your masterpiece is assembled and set, cover it tightly with plastic wrap or aluminum foil. It will keep well in the refrigerator for 3-4 days. I don’t recommend freezing this particular cheesecake as the texture of the cream cheese and whipped cream filling can change after thawing.
FAQs
Got questions? Let’s tackle a couple common ones!
Can I use frozen strawberries?
While fresh are preferred for texture and less liquid, you could potentially use frozen ones if you thaw them completely and drain off all the excess liquid very well before slicing and layering.
Can I make this in a different pan?
Yes! A 9×13 inch baking dish would work too, but it won’t be as tall and you might need to adjust the chilling time slightly. You won’t get the nice tall sides like a springform pan provides, but it will still be delicious!
Get ready to fall in love with this easy no-bake Strawberry Crunch Cheesecake! It’s a dessert that tastes like pure joy. Happy baking (or rather, no-baking!), friends!

Easy No-Bake Strawberry Crunch Cheesecake
Ingredients
Equipment
Method
- Step 1: Grab a medium bowl and combine your graham cracker crumbs and the melted butter. Stir it all together until it looks like wet sand. Now, grab your 9-inch springform pan and press the crumb mixture firmly into the bottom. Use the bottom of a glass or a flat measuring cup to really pack it down. Pop this into the fridge while you get the filling ready.
- Step 2: Get a large bowl and beat the softened cream cheese and powdered sugar together. Beat it until it's super smooth and there are no lumps. Stir in the vanilla extract.
- Step 3: Add the beautifully whipped cream to the cream cheese mixture and fold it in carefully with a spatula until it's just combined. Don't overmix, or you'll lose that lovely airy texture!
- Step 4: Grab your chilled crust from the fridge. Spread half of the cream cheese mixture evenly over the graham cracker base. Now, arrange half of your sliced strawberries over this creamy layer. Drizzle half of the strawberry jam over the berries.
- Step 5: Carefully spread the remaining cream cheese mixture over the strawberry layer. Top this layer with the rest of your sliced strawberries. Drizzle the remaining strawberry jam over the top.
- Step 6: Sprinkle the top with some additional graham cracker crumbs. You can also garnish with a few whole strawberries.
- Step 7: Refrigerate the cheesecake for at least 3 hours to let it set properly. Leaving it in the fridge overnight is highly recommended for easier slicing and melded flavors.