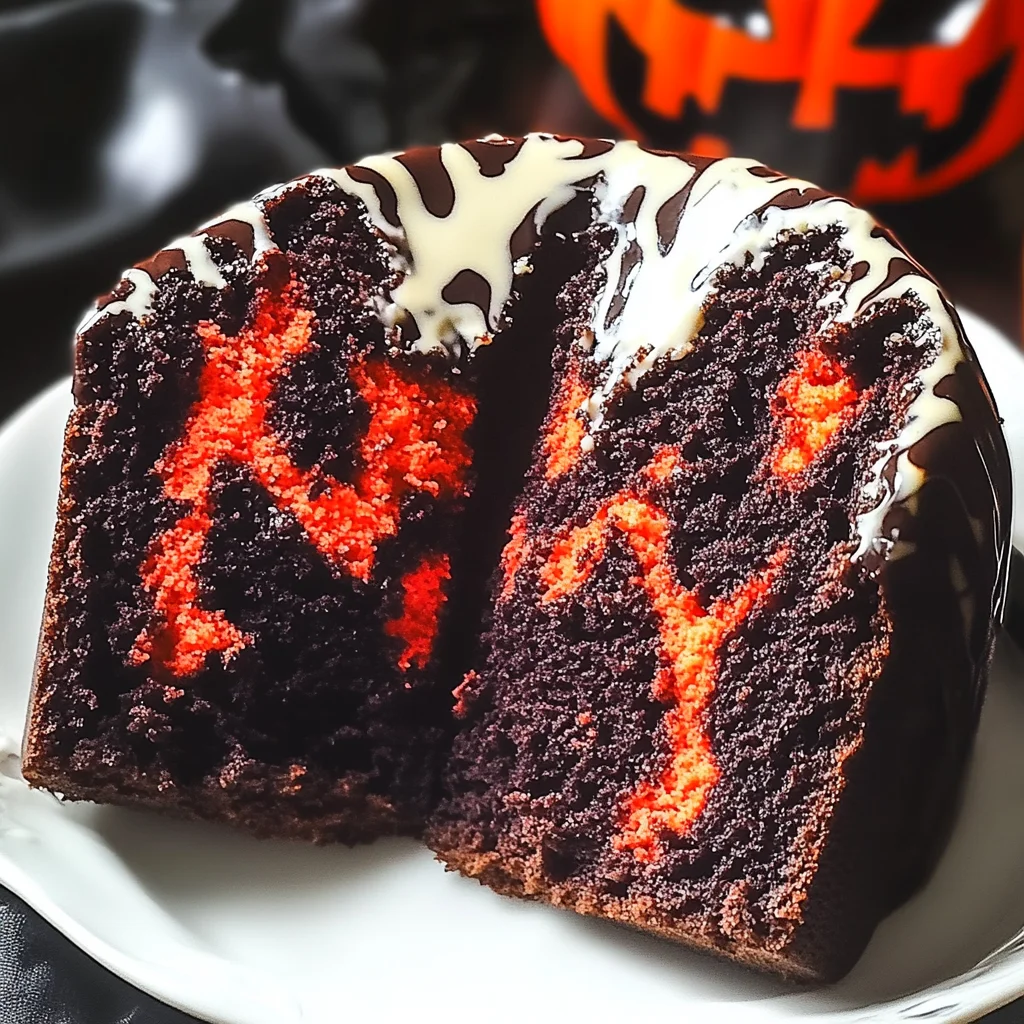
Remember those magical Halloween nights growing up? The crisp autumn air, the rustling leaves, and the thrilling anticipation of trick-or-treating. For me, some of the fondest memories involve coming home to a warm, comforting treat, maybe something spooky-themed or just wonderfully sweet. This year, let’s create new traditions with something truly special, but without all the fuss. If you’re looking for other festive treats, you might also love our Halloween Lofthouse Sugar Cookies! This Spooky Halloween Marble Cake is exactly that – a delightfully easy, incredibly moist, and visually stunning centerpiece for your Halloween spread. It’s got those classic vanilla and chocolate flavors, but with a spooky twist of orange and black swirls that will make everyone gasp with delight. Get ready to impress with minimal effort, my friend!
Why You’ll Love Spooky Halloween Marble Cake
- Fast: Quick prep means more time for costume planning or perfecting your haunted house decorations!
- Easy: Even beginner bakers can master this festive marvel. No complicated techniques here!
- Giftable: Wrap a slice, a mini bundt, or even a whole small cake for a thoughtful, delicious treat for neighbors or party hosts.
- Crowd-pleasing: A guaranteed hit with kids and adults alike, everyone loves a good marble cake, especially with a spooky twist!
Ingredients
- 2 cups all-purpose flour: The sturdy backbone of our delicious cake, giving it just the right structure.
- 1 ½ teaspoons baking powder: Our little secret for a beautifully light and airy texture.
- ½ teaspoon baking soda: This works wonders with the buttermilk for extra lift and a wonderfully tender crumb.
- ½ teaspoon salt: Just a pinch to balance all that sweetness and enhance every single flavor in the cake.
- ½ cup unsalted butter, softened: Make sure it’s nice and soft (but not melted!) for that creamy, dreamy texture when you cream it with the sugar.
- 1 ½ cups granulated sugar: For pure, sweet goodness that makes this cake truly irresistible.
- 3 large eggs: These bind everything together, adding richness and moisture to our batter.
- 1 teaspoon vanilla extract: A classic flavor booster that makes everything taste better and brings out the warmth in our cake.
- 1 cup buttermilk: Don’t skip this! It adds a lovely tang and keeps the cake incredibly moist and tender.
- ⅓ cup cocoa powder: For that essential dark chocolate swirl that makes our marble effect so striking.
- Black food coloring: To get that perfectly spooky, deep shade. Gel food colorings work best for vibrant, concentrated colors without adding too much liquid!
- Orange food coloring: For a pop of classic Halloween cheer! Again, gel colors give the most vibrant results.
- ½ cup semi-sweet chocolate chips (optional): Because who doesn’t love a little extra chocolatey surprise dotted throughout their cake?
How to Make Spooky Halloween Marble Cake
Alright, let’s get our aprons on and bake some magic! Follow these simple steps, and you’ll have a show-stopping cake in no time.
- First things first, let’s get the oven ready. Preheat your oven to a cozy 350°F (175°C). Then, grab your favorite bundt pan or a classic 9-inch round cake pan. Make sure to grease and flour it really well. This little step is crucial to ensure your beautiful cake comes out easily – no sticking allowed!
- In a medium-sized bowl, you’ll whisk together all your dry goodies: the all-purpose flour, baking powder, baking soda, and salt. Give it a good whisk until everything is nicely combined, then set it aside for a moment.
- Now for the wet ingredients! In a large mixing bowl, get ready to cream together the softened unsalted butter and granulated sugar. Beat them with an electric mixer until they’re light, fluffy, and look almost like sunshine. Next, add your eggs one at a time, mixing well after each addition. Finish by stirring in that wonderful vanilla extract – it’s going to smell amazing!
- Time to combine! You’ll alternately add your dry ingredients mixture and the buttermilk into your butter-sugar-egg batter. Start with about a third of the dry, mix gently, then half the buttermilk, mix, another third of the dry, mix, the remaining buttermilk, mix, and finally the last of the dry ingredients. Mix just until everything is smooth and combined. Be careful not to overmix; we want a tender, fluffy cake, not a tough one!
- Here’s where the spooky fun begins! Divide your gorgeous batter evenly into three separate bowls. One bowl will remain its lovely plain vanilla color. To the second bowl, add the cocoa powder and your black food coloring. Mix it until you get a deep, rich, spooky black. To the third bowl, add your orange food coloring and mix until you achieve a vibrant, Halloween-perfect orange.
- Now for the artistic part! Take spoonfuls of each colored batter and dollop them randomly into your prepared cake pan. Don’t overthink it! Layer them, alternating colors, until all the batter is in the pan. Once all the batter is in, grab a knife or a skewer and gently swirl through the batters once or twice. You’re just looking for a beautiful marbled effect, not fully mixing the colors together.
- If you’re like me and believe there’s no such thing as too much chocolate, now’s the time to sprinkle those semi-sweet chocolate chips evenly over the top of your cake batter. It’s totally optional, but oh-so-delicious!
- Pop your pan into the preheated oven and bake for about 40–45 minutes. You’ll know it’s perfectly done when a toothpick inserted into the center comes out clean.
- Once baked, let your magnificent cake cool in the pan for about 15 minutes. This helps it firm up and makes it easier to gently transfer it to a wire rack to cool completely. Patience is a virtue, especially when waiting for cake!
Substitutions & Additions
This recipe is super versatile, so feel free to make it your own! Here are a few ideas to get those creative juices flowing:
- Cake Mix Shortcut: In a pinch, you can totally use a vanilla or yellow cake mix as your base. Just prepare it according to package directions, then divide and color as per step 5. Easy peasy!
- Different Colors: Not feeling orange and black? Go for purple and green for a witchy vibe, or even red and black for a vampy look! The possibilities are endless for themed parties.
- Extract Swap: Instead of vanilla, try almond extract for a slightly different flavor profile, or even a touch of orange zest in the orange batter for an extra citrusy kick.
- Frosting Fun: This cake is amazing on its own, but a simple cream cheese frosting (just like the one we use for our ultimate classic carrot cake) or a classic vanilla buttercream would take it to the next level. You could even drizzle some melted white chocolate over it for a ghostly effect!
- Candy & Sprinkles: Before serving, decorate with Halloween sprinkles, candy corn, gummy worms, or even some edible googly eyes for extra spookiness!
Tips for Success
- Don’t Overmix: When combining your wet and dry ingredients, mix just until combined. Overmixing can develop the gluten too much, leading to a tough, dry cake. Gentle is the key!
- Softened Butter is Key: Make sure your butter is truly softened (but not melted!) before you start. This helps it cream properly with the sugar, creating a light and airy batter that will result in a tender cake.
- Gel Food Coloring: For the best, most vibrant Halloween colors, I highly recommend using gel food coloring over liquid drops. You’ll get much richer hues without thinning your batter too much, which can affect the cake’s texture.
- Gentle Swirl: When marbling, remember that less is more! A few gentle swirls with a knife or skewer are all you need to create that beautiful effect. If you over-swirl, your colors might blend too much and lose their distinct marble look.
- Room Temperature Ingredients: For the most consistent and best-textured cake, ensure your eggs and buttermilk are at room temperature before adding them to the batter. They’ll incorporate better and create a smoother emulsion. This is a tip I use for everything from this marble cake to my favorite pumpkin banana loaf.
- Prep Ahead: To save time on baking day, you can whisk your dry ingredients together and store them in an airtight container. You can also get your butter and eggs out to come to room temperature a couple of hours before you plan to bake.
How to Store Spooky Halloween Marble Cake
If there are any slices left (a big if, believe me!), here’s how to keep your cake fresh and delicious for as long as possible:
- At Room Temperature: Store your cooled, unfrosted cake in an airtight container at room temperature for up to 2-3 days. If your cake is frosted with a dairy-based frosting (like cream cheese), it’s best kept in the fridge.
- In the Refrigerator: Frosted cake will last beautifully in an airtight container in the fridge for up to 5 days. Just let it come to room temperature for about 30 minutes before serving for the best flavor and texture.
- Freezing: You can absolutely freeze unfrosted slices or the whole unfrosted cake. Wrap it tightly in plastic wrap, then add another layer of aluminum foil to prevent freezer burn. It will keep well in the freezer for up to 3 months. Thaw overnight in the refrigerator before serving or frosting.
FAQs
- Can I use regular milk instead of buttermilk?
- You can! If you don’t have buttermilk on hand, it’s easy to make your own substitute. Just add 1 tablespoon of white vinegar or lemon juice to a liquid measuring cup, then fill it to the 1-cup mark with regular milk. Give it a gentle stir and let it sit for 5-10 minutes until it looks slightly curdled. Voila, homemade buttermilk!
- Do I have to use food coloring?
- Absolutely not! The cocoa powder will still give you a lovely chocolate swirl, and the vanilla batter will be naturally light. It’ll still be a delicious marble cake, just without the vibrant Halloween hues. It’s all about what you prefer!
- What kind of frosting should I use?
- A classic vanilla buttercream, a simple powdered sugar glaze, or even a rich chocolate ganache would all be fantastic choices! For a creamy tang that beautifully cuts through the sweetness, I often reach for a cream cheese frosting.
- Can I make this into cupcakes?
- Yes, you sure can! This recipe works wonderfully for cupcakes. Just line a muffin tin with cupcake liners, fill them about two-thirds full with the marbled batter, and reduce the baking time to approximately 18-22 minutes, or until a toothpick inserted into the center of a cupcake comes out clean.
For more delicious recipes and kitchen inspiration, be sure to follow us on Pinterest!

Spooktacularly Simple Halloween Marble Cake
Ingredients
Equipment
Method
- Step 1: Preheat your oven to 350°F (175°C). Grease and flour a bundt pan or a 9-inch round cake pan thoroughly.
- Step 2: In a medium-sized bowl, whisk together the all-purpose flour, baking powder, baking soda, and salt until nicely combined. Set aside.
- Step 3: In a large mixing bowl, cream together the softened unsalted butter and granulated sugar with an electric mixer until light and fluffy. Add the eggs one at a time, mixing well after each addition. Stir in the vanilla extract.
- Step 4: Alternately add the dry ingredients mixture and the buttermilk into the butter-sugar-egg batter. Start with about a third of the dry, mix gently, then half the buttermilk, mix, another third of the dry, mix, the remaining buttermilk, mix, and finally the last of the dry ingredients. Mix just until everything is smooth and combined, being careful not to overmix.
- Step 5: Divide the batter evenly into three separate bowls. Leave one bowl plain (vanilla). To the second bowl, add the cocoa powder and black food coloring and mix until deep black. To the third bowl, add orange food coloring and mix until vibrant orange.
- Step 6: Take spoonfuls of each colored batter and dollop them randomly into your prepared cake pan, alternating colors. Once all the batter is in, gently swirl through the batters once or twice with a knife or skewer to create a marbled effect, without fully mixing the colors.
- Step 7: (Optional) Sprinkle the semi-sweet chocolate chips evenly over the top of the cake batter.
- Step 8: Bake for about 40–45 minutes, or until a toothpick inserted into the center comes out clean.
- Step 9: Let the cake cool in the pan for about 15 minutes before gently transferring it to a wire rack to cool completely.