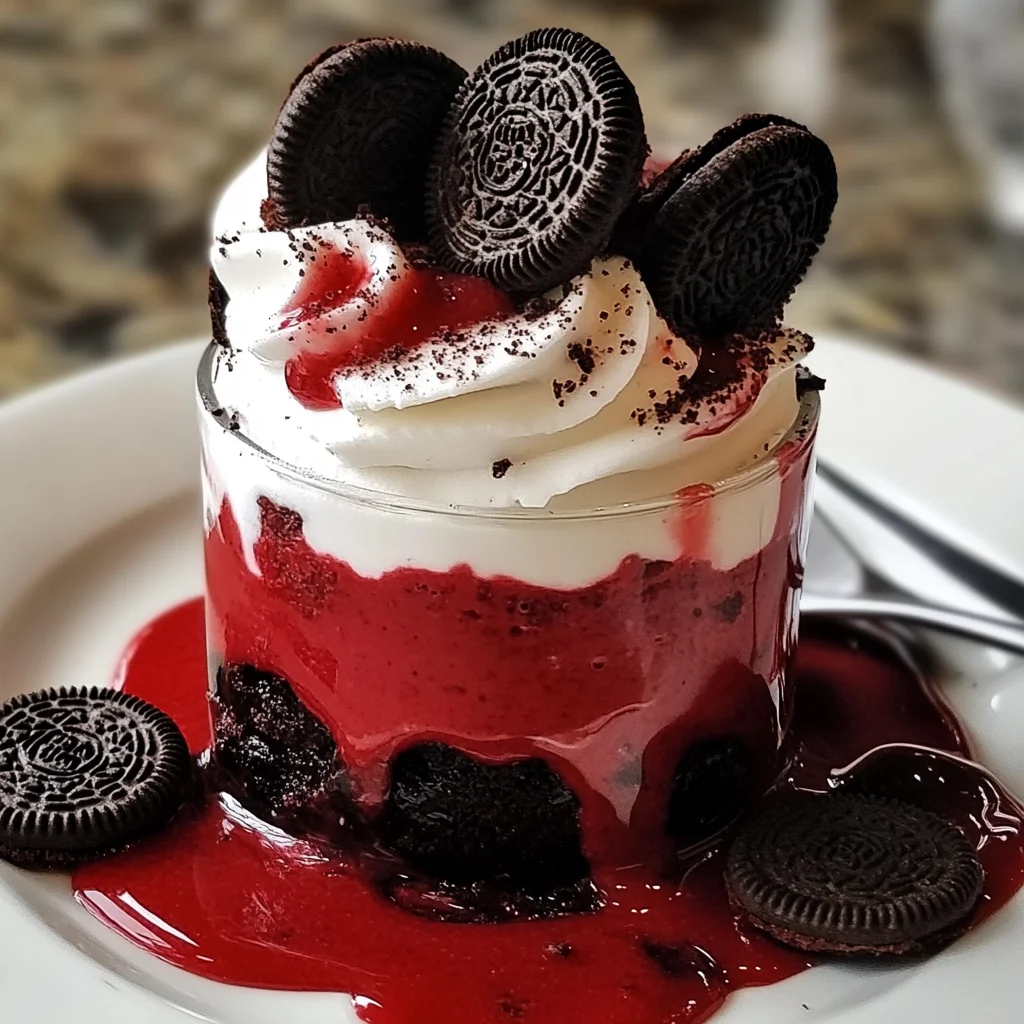
There’s something truly magical about desserts that take you back to those cozy moments in your grandma’s kitchen, where the aroma of freshly baked treats fills the air and every bite feels like a warm hug. The Red Velvet Oreo Parfait Explosion is exactly one of those nostalgic desserts that brings together the rich, velvety charm of red velvet cake with the classic crunch and creaminess of Oreos, all enveloped in a luscious cream cheese filling. It’s a perfect blend of flavors and textures that’s not only incredibly tasty but also surprisingly easy to make.
Whether you’re looking for a quick dessert to whip up on a weeknight, a crowd-pleaser for your next party, or a charming treat to gift your loved ones, this parfait has you covered. The recipe layers cake, creamy filling, and crunchy cookie bits in a way that’s both visually stunning and utterly delicious. Plus, it’s no-bake, which means less time in the kitchen and more time enjoying every spoonful.
Why You’ll Love Red Velvet Oreo Parfait Explosion
- Fast: Ready to enjoy in just a couple of hours with minimal prep.
- Easy: No complicated baking or fancy techniques—just simple mixing and layering.
- Giftable: Makes a beautiful homemade gift for friends, family, or neighbors.
- Crowd-pleasing: Combines beloved flavors that everyone will rave about.
Ingredients
Let’s talk about the ingredients because each one plays an important role in making this parfait a showstopper:
- Red velvet cake (crumbled): This adds the signature rich, cocoa flavor and vibrant red color. You can use a homemade red velvet cake or a high-quality store-bought one for convenience.
- Cream cheese (softened): The heart of the cheesecake filling. Softening ensures it blends smoothly without lumps.
- Heavy cream: Whipped into stiff peaks, it lightens the cream cheese mixture, giving the parfait an airy, fluffy texture.
- Granulated sugar: Adds just the right amount of sweetness to balance the tangy cream cheese.
- Vanilla extract: A little vanilla brings warmth and depth to the filling.
- Crushed Oreo cookies: Adds that iconic crunch and chocolatey goodness, plus a little nostalgia.
- Mini chocolate chips (optional): A fun garnish to sprinkle on top for extra texture and chocolate bursts.
How to Make Red Velvet Oreo Parfait Explosion
Now, let’s dive into how you can easily assemble this dessert in your own kitchen. I always find that breaking it down step-by-step makes the process less intimidating and even fun!
- Prepare the cheesecake filling: Start by beating the softened cream cheese, granulated sugar, and vanilla extract in a medium bowl. Use a hand mixer or stand mixer on medium speed until the mixture is smooth, thick, and creamy. This step is key for that perfect cheesecake texture—no lumps allowed! If you want, you can pre-soften the cream cheese by letting it sit out for about 30 minutes or zap it in the microwave for 10 seconds at a time.
- Whip the heavy cream: In a separate bowl, whip your heavy cream on high speed until stiff peaks form. This means when you lift the whisk, the cream holds its shape firmly without drooping. It’s what makes the filling so light and fluffy.
- Fold the whipped cream into the cream cheese mixture: This is the gentle part! Add the whipped cream in batches to your cream cheese mixture and fold it in slowly with a spatula. You want to keep as much air as possible to maintain that airy texture. Avoid vigorous stirring or mixing.
- Layer your parfaits: Grab some pretty serving glasses or bowls. Start with a layer of red velvet cake crumbles at the bottom, spoon over a layer of the cheesecake filling, then sprinkle a layer of crushed Oreos. Repeat these layers until you fill your glasses, finishing with a generous layer of cheesecake filling on top.
- Garnish and chill: For the finishing touch, sprinkle mini chocolate chips on each parfait and place an Oreo half on top. Cover the parfaits with plastic wrap and refrigerate for at least 2 hours. This chilling time lets the flavors meld beautifully and gives the parfaits a nice firm texture.
When you’re ready to serve, you’ll want to grab a spoon and dig right in. The combination of moist, tender cake, creamy filling, and crunchy Oreos is simply irresistible. If you love desserts with a little extra flair, you might adore pairing this with a cup of coffee or even trying it alongside some Earl Grey Cookies for a lovely afternoon treat.
Substitutions & Additions
Feel free to get creative with this recipe! Here are some ideas to make it your own or adjust based on what you have on hand:
- Red Velvet Cake: If you want a different twist, swap it with chocolate cake or even a moist chocolate brownie. For a fruity flair, try using strawberry cake crumbs.
- Cream Cheese Filling: You can lighten it up a bit by swapping half the heavy cream with Greek yogurt for a tangier, healthier option.
- Cookies: Oreos are classic, but try crushed peppermint cookies for a festive vibe or peanut butter sandwich cookies for an unexpected flavor combo.
- Add-Ins: Toss in some chopped nuts like pecans or walnuts for crunch. Mini chocolate chips inside the layers add bursts of melty chocolate throughout.
- Flavor Boost: A teaspoon of espresso powder mixed into the cream cheese filling can elevate the chocolate flavors. Or add a dash of cinnamon for warmth.
For more creative dessert inspiration that’s just as easy and delicious, you might enjoy checking out this no-bake Oreo cheesecake sushi roll recipe. It shares a similar vibe with playful layers and Oreo magic!
Tips for Success
Here are some of my favorite tips to make sure your Red Velvet Oreo Parfait Explosion turns out perfectly every time:
- Softened cream cheese is key: Make sure your cream cheese is fully softened before mixing to avoid lumps. I usually let it sit out at room temperature for about 30 minutes or soften it gently in the microwave.
- Whip cream properly: Don’t under-whip or over-whip your heavy cream. Stiff peaks mean the cream holds its shape firmly without being grainy. This gives your filling that perfect fluffy texture.
- Fold gently: When combining the whipped cream with the cream cheese mixture, fold slowly and carefully to keep the airiness. This prevents the filling from becoming dense.
- Layer evenly: Try to layer your parfaits evenly for a beautiful presentation. Using a piping bag for the cream cheese filling can make this easier and neater.
- Chill time matters: Don’t skip the refrigeration step. The parfaits need at least 2 hours to set properly and for the flavors to blend.
- Prep ahead: You can prepare the filling and cake crumbs a day ahead. Store them separately in airtight containers and assemble the parfaits just before serving or the night before.
If you’re interested in other make-ahead desserts that are just as charming and easy, this Grandma’s Easy 3-Ingredient Berry Yogurt Parfait is a wonderful, lighter option packed with fresh fruit.
How to Store Red Velvet Oreo Parfait Explosion
Once assembled and chilled, these parfaits keep beautifully in the refrigerator. Cover them tightly with plastic wrap or use airtight lids if your serving glasses have them.
They will stay fresh and delicious for up to 3 days. After that, the cake crumbs may start to absorb moisture and become soggy, and the cookie crunch can soften. For best texture and flavor, I recommend enjoying them within the first 48 hours.
If you want to prepare the components ahead of time, keep the cake crumbs, cream cheese filling, and crushed Oreos stored separately in airtight containers at room temperature or in the fridge. Assemble just before serving to maintain the perfect texture contrast.
FAQs
Q: Can I use store-bought red velvet cake or should I bake it from scratch?
A: Absolutely! Store-bought red velvet cake works perfectly and saves time. Just crumble it finely for best layering.
Q: Can I substitute the heavy cream with something lighter?
A: You can try whipping coconut cream for a dairy-free option or use half heavy cream and half Greek yogurt for a lighter version, but the texture may be slightly different.
Q: How can I make this dessert ahead for a party?
A: Prepare the cream cheese filling and cake crumbs a day in advance. Assemble the parfaits a few hours before serving and chill. They hold up well and taste even better after some time in the fridge.
Q: Can I freeze the parfaits?
A: Freezing isn’t recommended as the texture of the cream cheese filling and cake may change, becoming grainy or soggy when thawed.
Ready to indulge in this delightful treat? I promise, once you try the Red Velvet Oreo Parfait Explosion, it’ll become a favorite you’ll want to make again and again. And if you love desserts that combine creamy textures with nostalgic cookie crunches, don’t miss out on the incredible No-Bake Oreo Bars either—they’re another simple yet scrumptious favorite in my kitchen.
So grab your mixing bowls, get those Oreos ready, and start layering your way to pure dessert bliss. Happy cooking, and even happier eating!
For more mouthwatering recipes and sweet inspiration, be sure to follow my Pinterest account!
Red Velvet Oreo Parfait Explosion
Ingredients
Equipment
Method
- Step 1: In a medium bowl, beat softened cream cheese, granulated sugar, and vanilla extract with a hand mixer until smooth, thick, and creamy.
- Step 2: In a separate bowl, whip the heavy cream on high speed until stiff peaks form.
- Step 3: Gently fold the whipped cream into the cream cheese mixture in batches to keep it light and airy.
- Step 4: Layer parfait glasses starting with red velvet cake crumbles, then cheesecake filling, followed by crushed Oreos. Repeat layers, finishing with a layer of cheesecake filling on top.
- Step 5: Garnish each parfait with mini chocolate chips and an Oreo half. Cover and refrigerate for at least 2 hours before serving.