Introduction
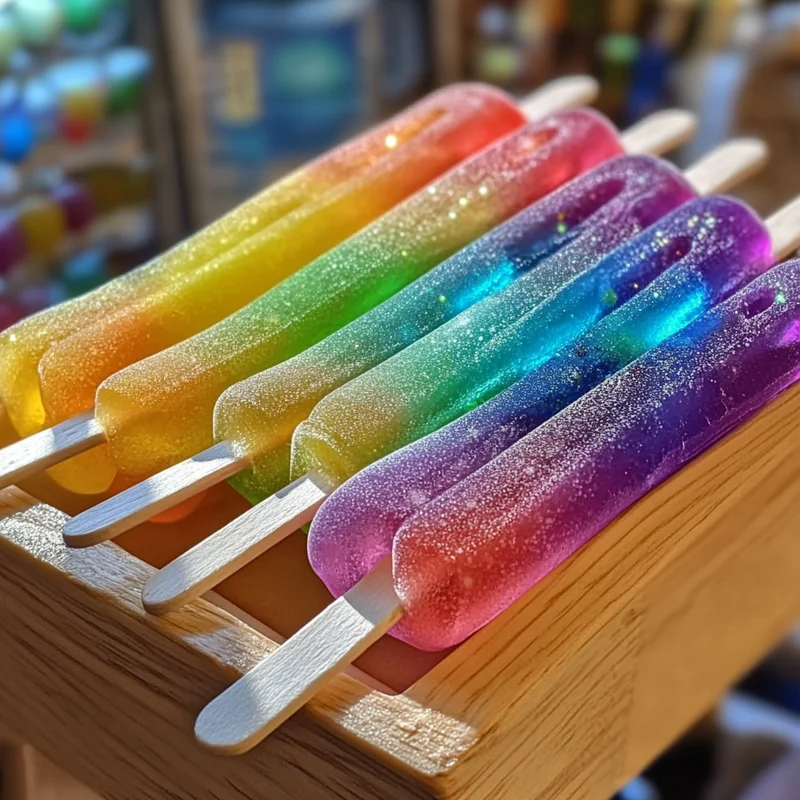
Hey there, friend! Remember those scorching hot summer days when the only thing that mattered was the race to finish your favorite colorful popsicle before it melted all over your hands? Ah, pure childhood magic! Well, buckle up, buttercup, because we’re bringing back that simple joy, but with a decidedly adult twist. Get ready to meet the Rainbow Gummy Tequila Pop – a vibrant, fun, and totally delicious frozen treat that’s basically a party on a stick.
Seriously, these popsicles are an absolute blast to make and even more fun to share. They’re bursting with color, studded with chewy gummy goodness, and have just the right kick of tequila to make them the star of any backyard BBQ, pool party, or just a quiet evening on your porch.
Why You’ll Love This Recipe
- Quick: The prep time is minimal, and the freezing is mostly hands-off!
- Easy: If you can boil water and stir, you can make these!
- Perfect as a gift: Who wouldn’t want a batch of homemade boozy popsicles?!
- Crowd-pleaser: These disappear faster than you can say “tequila!”
- Hello, summer! They are the quintessential warm-weather cool-down.
Ingredients
Gather your colorful crew! Here’s what you’ll need to whip up these delightful pops:
- 1 cup Tequila: Use something decent that you’d actually drink. It doesn’t need to be top-shelf, but avoid the cheap stuff that gives you a headache just by looking at it!
- 1 cup Water: Simple tap water works just fine here.
- 1 cup Sugar: Plain granulated sugar is perfect for sweetening our base.
- 1 package (3 oz) Flavored Gelatin (various colors): This is where the magic happens! Grab a box with a few different colors if you want that true rainbow effect. Think strawberry, lemon, lime, blue raspberry… the more colors, the merrier!
- 1/4 cup Rainbow Gummy Candies: The chewy stars! Rainbow bears, worms, rings – pick your favorite little pops of color and chewiness.
- 1 tablespoon Lime Juice: A little citrus brightens everything up and plays so well with tequila. Freshly squeezed is always best!
- 1 tablespoon Lemon Juice: More citrusy goodness to balance the sweetness.
- Ice pop molds: You’ll need some popsicle molds. Silicone or plastic work great. The amount of popsicles you get depends on the size of your molds.
- Ice pop sticks: Don’t forget the sticks! Most molds come with them, but double-check.

How to Make It
Alright, let’s get making these beauties! It’s easier than you think, I promise.
- First things first, grab a medium saucepan. Over medium heat, combine your water and sugar. Give it a good stir until that sugar is completely dissolved and the liquid is clear.
- Take the pan off the heat. Let it hang out for just a couple of minutes to cool down slightly – we don’t want to cook the alcohol out! Now, carefully stir in the Tequila, lime juice, and lemon juice. Give it a taste (carefully!). Add a tiny bit more sugar or juice if you like, but remember the gelatin will add sweetness too.
- Now comes the fun part – dividing the liquid! Figure out how many different colors you want. Pour the liquid base evenly into separate bowls, one for each color of gelatin you plan to use.
- Open up your first packet of gelatin powder. Add it to one of the bowls of liquid. Grab a whisk and whisk it vigorously until the gelatin powder is completely dissolved. No little gritty bits allowed! Repeat this step for each color in its own bowl. You should have a few bowls of brightly colored liquid now.
- Okay, layering time! Carefully pour the first color (maybe red or purple?) into the bottom of your ice pop molds. Don’t fill it all the way – just enough for your first layer.
- Pop the molds into the freezer for about 30 minutes. The goal here isn’t to freeze them solid, just until the layer is slightly firm – like firm jelly. This stops the colors from bleeding into each other later.
- Once that first layer is slightly set, it’s time for the gummies! Gently drop a few rainbow gummy candies into the mold, pressing them down slightly into the set layer. Don’t overcrowd it, but make sure there are enough for a chewy surprise!
- Now, grab your next color of gelatin mixture. Carefully pour it over the gummy layer. Again, just enough for your next layer.
- Return the molds to the freezer for another 30 minutes, or until that layer is also slightly firm.
- Keep repeating steps 6-9: Add gummies, pour the next color, freeze for 30 minutes, until your molds are full! Try to end with a liquid layer on top to make inserting the stick easier.
- Once the final layer is poured and slightly set (or before the final layer is fully frozen solid), it’s time to insert the ice pop sticks. Push them down about halfway into the mold.
- Finally, pop the molds back into the freezer for at least 4 hours, or until they are completely frozen solid. Patience is key here!
- When you’re ready to unleash the deliciousness, take the mold out of the freezer. Briefly run some warm water over the outside of the mold (just a few seconds!) to help loosen the pops. Wiggle them gently and pull them out.
Voilà! You’ve made Rainbow Gummy Tequila Pops!
Substitutions & Additions
Want to get creative? Here are a few ideas:
- Different Booze: Not a tequila fan? Swap it out for vodka, white rum, or even a sweet Moscato wine. Just keep the alcohol ratio about the same.
- Make it Non-Alcoholic: Easy peasy! Just skip the tequila and replace it with an equal amount of extra water or white grape juice.
- Candy Swap: Use sour gummies, mini marshmallows, or even sprinkles instead of (or in addition to!) the rainbow gummies.
- Fruity Boost: Add tiny pieces of fresh fruit like sliced strawberries, blueberries, or lime segments to the layers.
- Different Flavors: Get creative with gelatin flavors! Piña colada? Margarita flavored? The possibilities are endless.
Tips for Success
A few little pointers to make sure your pops turn out perfectly:
- The Partial Freeze is Crucial: Don’t skip or shorten the 30-minute partial freeze between layers. This is what keeps those vibrant colors separate and prevents them from running together into a muddy mess.
- Don’t Overfill: Leave a little headspace at the top of the mold. Liquids expand as they freeze.
- Gentle with Gummies: When adding the gummies, gently press them into the slightly set layer. If you push too hard, you might break through the layer.
- Easy Release: Running warm water over the mold for just a few seconds is the best way to get the pops out cleanly. Don’t use hot water, and don’t soak them!
- Make Ahead: These are absolutely perfect for making a day or two in advance of your party. Just follow the storage instructions below.
Storage Instructions
Once your pops are completely frozen and you’ve released them from the molds, you’ll want to store them properly to keep them fresh and prevent freezer burn.
Individually wrap each pop in plastic wrap or small plastic bags. Then, place the wrapped pops into a large freezer-safe zip-top bag or an airtight container. They’ll keep well in the freezer for about 1-2 weeks. After that, they might start to get a little icy, but they’ll still be tasty!
FAQ
Got questions? I’ve got answers!
- Can I make these without the alcohol? Yes! Just replace the 1 cup of tequila with an additional 1 cup of water or white grape juice. The rest of the recipe stays the same.
- My layers bled together! What happened? This usually means you didn’t freeze the layers long enough between pours. Make sure each layer is slightly firm before adding the next one (about 30 minutes is typically needed, but check on them).
- Can I use different types of molds? Absolutely! Silicone molds, traditional plastic popsicle molds, even small paper cups with sticks work. Just adjust freezing times slightly depending on the mold size.
- Why aren’t they freezing totally solid? Alcohol has a lower freezing point than water. The tequila in these will prevent them from becoming rock-hard like traditional water-based popsicles. They’ll be more like a slushy, semi-frozen texture, which is part of their charm!
There you have it! A fun, colorful, and totally adult take on a classic summer treat. Whip up a batch, call some friends, and enjoy the sunshine (responsibly, of course!). Happy popping!
Rainbow Gummy Tequila Pops
Ingredients
Equipment
Method
- First things first, grab a medium saucepan. Over medium heat, combine your water and sugar. Give it a good stir until that sugar is completely dissolved and the liquid is clear.
- Take the pan off the heat. Let it hang out for just a couple of minutes to cool down slightly – we don't want to cook the alcohol out! Now, carefully stir in the Tequila, lime juice, and lemon juice. Give it a taste (carefully!). Add a tiny bit more sugar or juice if you like, but remember the gelatin will add sweetness too.
- Now comes the fun part – dividing the liquid! Figure out how many different colors you want. Pour the liquid base evenly into separate bowls, one for each color of gelatin you plan to use.
- Open up your first packet of gelatin powder. Add it to one of the bowls of liquid. Grab a whisk and whisk it vigorously until the gelatin powder is completely dissolved. No little gritty bits allowed! Repeat this step for each color in its own bowl. You should have a few bowls of brightly colored liquid now.
- Okay, layering time! Carefully pour the first color (maybe red or purple?) into the bottom of your ice pop molds. Don't fill it all the way – just enough for your first layer.
- Pop the molds into the freezer for about 30 minutes. The goal here isn't to freeze them solid, just until the layer is slightly firm – like firm jelly. This stops the colors from bleeding into each other later.
- Once that first layer is slightly set, it's time for the gummies! Gently drop a few rainbow gummy candies into the mold, pressing them down slightly into the set layer. Don't overcrowd it, but make sure there are enough for a chewy surprise!
- Now, grab your next color of gelatin mixture. Carefully pour it over the gummy layer. Again, just enough for your next layer.
- Return the molds to the freezer for another 30 minutes, or until that layer is also slightly firm.
- Keep repeating steps 6-9: Add gummies, pour the next color, freeze for 30 minutes, until your molds are full! Try to end with a liquid layer on top to make inserting the stick easier.
- Once the final layer is poured and slightly set (or before the final layer is fully frozen solid), it's time to insert the ice pop sticks. Push them down about halfway into the mold.
- Finally, pop the molds back into the freezer for at least 4 hours, or until they are completely frozen solid. Patience is key here!
- When you're ready to unleash the deliciousness, take the mold out of the freezer. Briefly run some warm water over the outside of the mold (just a few seconds!) to help loosen the pops. Wiggle them gently and pull them out.
Notes
- The 30-minute partial freeze between layers is crucial to prevent colors from bleeding.
- Don't overfill the molds; leave a little headspace.
- Gently press gummies into the slightly set layer.
- Briefly running warm water over the mold helps with easy release (don't use hot water or soak). Substitutions & Additions:
- Different Booze: Swap tequila for vodka, white rum, or sweet Moscato wine (keep alcohol ratio similar).
- Non-Alcoholic: Replace 1 cup tequila with 1 cup extra water or white grape juice.
- Candy Swap: Use sour gummies, mini marshmallows, or sprinkles.
- Fruity Boost: Add tiny pieces of fresh fruit like strawberries, blueberries, or lime segments.
- Different Flavors: Get creative with gelatin flavors. Storage Instructions:
- Individually wrap each pop in plastic wrap or small plastic bags.
- Place wrapped pops into a large freezer-safe zip-top bag or airtight container.
- They keep well in the freezer for about 1-2 weeks. FAQ:
- Alcohol lowers the freezing point, so they won't be rock-hard like traditional popsicles, but more slushy/semi-frozen.