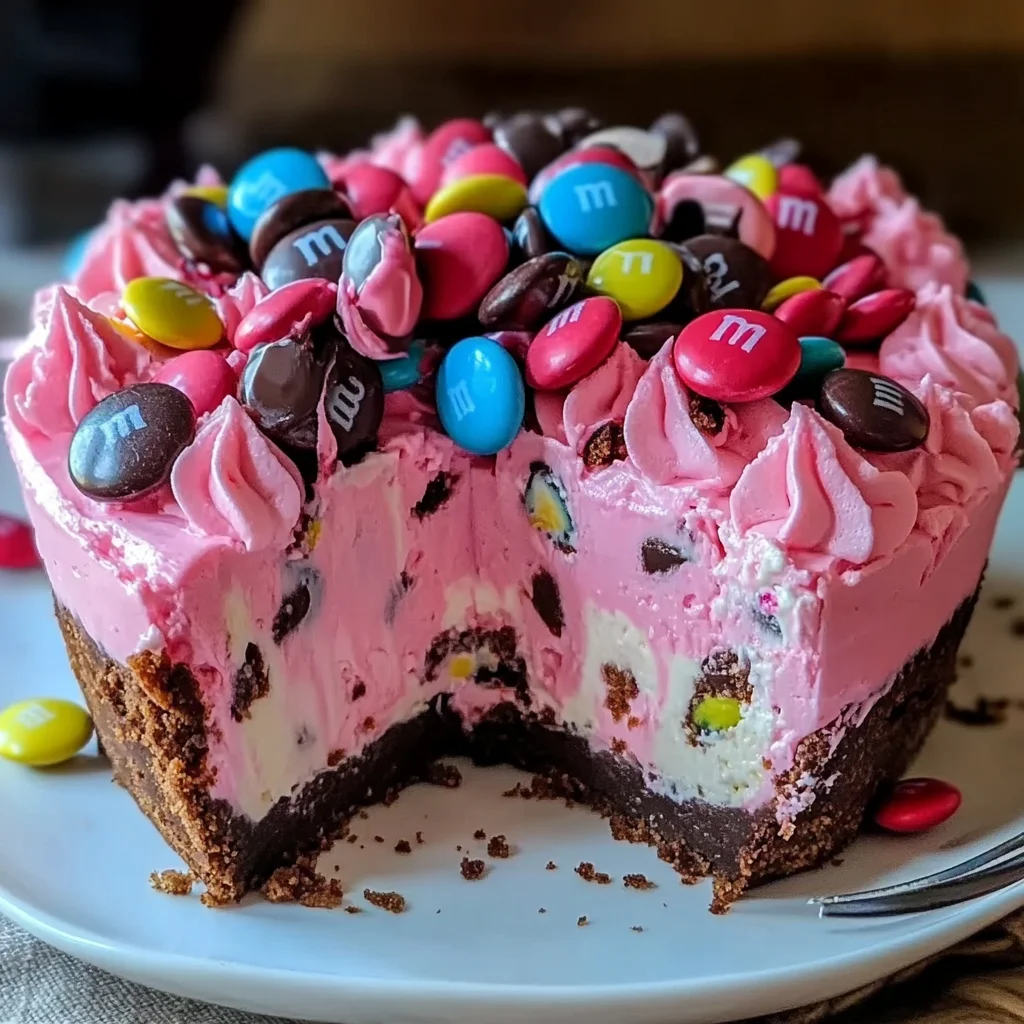
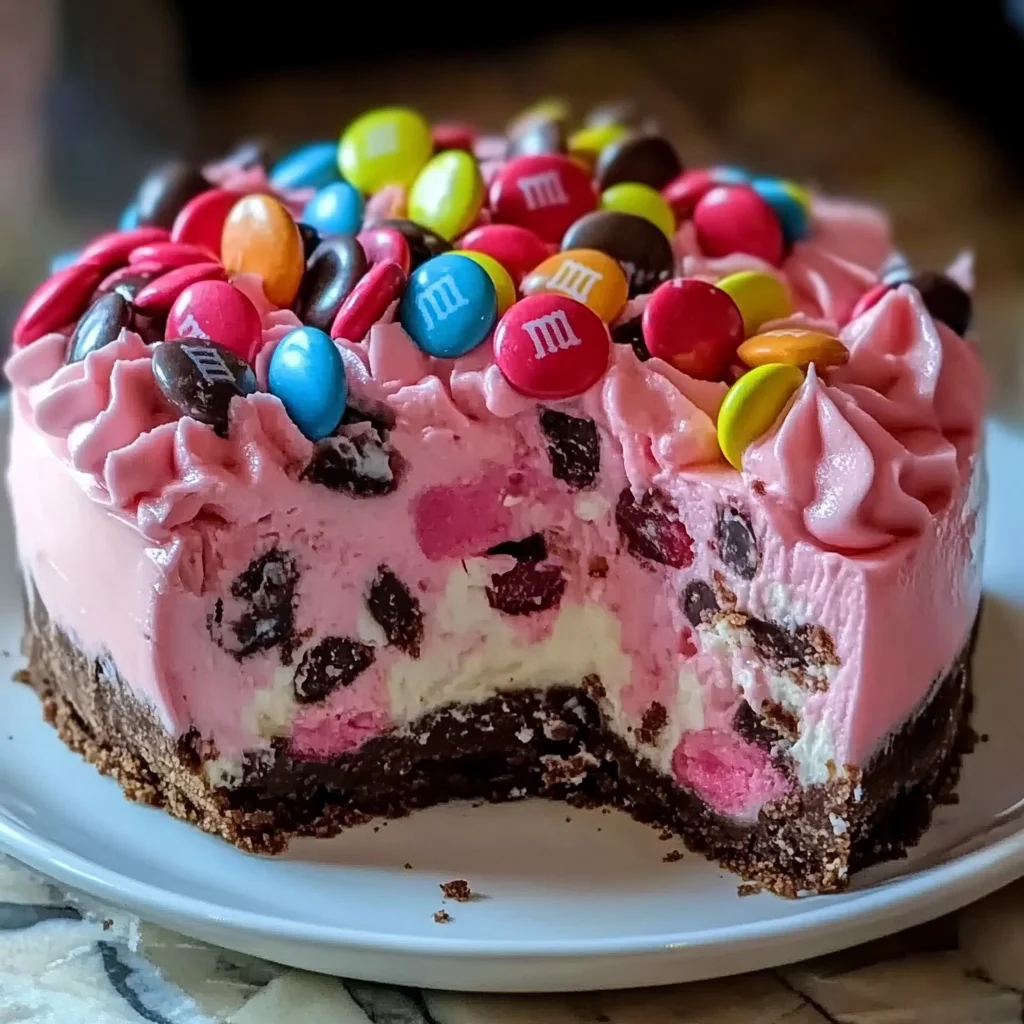
Hey there, sweet friend! Remember those times you craved something absolutely decadent, maybe for a special occasion, or just because? Something that feels fancy but isn’t a huge hassle? Well, pull up a chair, because I have a recipe for you that hits all those sweet spots and then some. This Pink M&M Snickers Cheesecake is not just a dessert; it’s a showstopper! It’s incredibly easy to whip up, requires no baking (hooray for no cracked tops!), and tastes like pure joy in every bite. Plus, that gorgeous pink color makes it perfect for so many celebrations, from Valentine’s Day and baby showers to just a regular Tuesday that needs a little extra sparkle. Trust me, once you make this, it’ll be a go-to in your recipe box!
Why You’ll Love This Recipe
- Fast: No baking means less time fussing and more time enjoying!
- Easy: Simple steps anyone can follow, even if you’re a kitchen newbie.
- Giftable: Package up a slice or two for a friend – they’ll adore you!
- Crowd-pleasing: Snickers? M&M’s? Cheesecake? It’s got all the favorites.
- Pretty in Pink: That color just makes everyone smile!
Ingredients
Gather your goodies! Here’s what you’ll need to create this magic:
- For the Base:
- 1 ½ cups Graham cracker crumbs or crushed Oreos: Your choice! Graham crackers give a classic cheesecake base, but Oreos? Oh, Oreos make it extra chocolatey and decadent.
- ⅓ cup unsalted butter, melted: Melts down to bind your crumbs into that perfect crust.
- For the Filling:
- 3 (8 oz / 226g each) packages cream cheese, softened: This is key! Make sure your cream cheese is nice and soft, left out on the counter for an hour or two, so you get a smooth, lump-free filling.
- 1 cup powdered sugar: Sweetens and helps create that dreamy, smooth texture.
- 1 teaspoon vanilla extract: A little splash of warmth and classic flavor.
- ½ cup heavy cream: We’ll whip this up to lighten the filling and make it extra fluffy.
- 2 cups semi-sweet chocolate chips, melted and cooled: Gives it that rich chocolatey backbone. Let it cool a bit after melting so it doesn’t seize up the cream cheese.
- 1 cup chopped Snickers bars: The star of the show! All that nougat, caramel, peanuts, and chocolate goodness mixed right in.
- Pink food coloring (gel or liquid): A few drops is usually all you need to get that lovely pink hue. Gel gives a more vibrant color with less liquid.
- For the Toppings (Optional):
- Whipped cream: For that classic cheesecake swirl on top.
- Chopped Snickers bars: Extra candy bar goodness for garnish!
- M&M’s: Pink ones if you can find them, or any color you love for a festive touch.
How to Make It
Alright, let’s get this party started! Making this cheesecake is truly a breeze. Just follow these simple steps:
1. First things first, let’s get the base ready. If you’re starting with whole cookies or crackers, crush them up! A food processor is super quick, but sticking them in a sturdy bag and rolling over them with a rolling pin works great too – maybe a good way to release a little stress? 😉 Once you have fine crumbs, mix them up with your melted butter. Press this mixture firmly into the bottom of a 9-inch springform pan. Use the bottom of a glass or a flat measuring cup to really pack it down. Pop this into the fridge for at least 30 minutes to set up while you make the filling.
2. Now, gently melt your chocolate chips. You can do this in a saucepan over low to medium heat, stirring constantly. Or, if you prefer the microwave, heat in 30-second intervals, stirring well after each, until smooth. The key is low and slow to avoid burning! Once melted, set it aside to cool down a bit. We don’t want it hot when it meets our cream cheese.
3. In a large bowl, grab your electric mixer. Beat the softened cream cheese, powdered sugar, and vanilla extract together until it’s wonderfully smooth and creamy. Scrape down the sides of the bowl to make sure everything is incorporated. Now, gradually add that cooled melted chocolate to the cream cheese mixture, beating until it’s all combined and looks beautifully rich. This is where the magic starts! Then, gently fold in your chopped Snickers bars with a spatula. Don’t overmix – you want those lovely chunks of Snickers throughout.
4. Time for the pink! Take out a small portion of your chocolate-Snickers filling into a separate small bowl. Add just a few drops of pink food coloring to it first. Stir that small portion until the color is really intense. Now, gradually add this colored portion back into your main bowl of filling, stirring just until you get the shade of pink you like. Adding it back this way helps you control the color and avoid adding too much liquid food coloring to the whole batch.
5. In a separate clean bowl (or after washing your mixer whisk), whip the heavy cream until stiff peaks form. This means when you lift the whisk, the cream stands up firmly on its own. Be careful not to overwhip, or you’ll end up with butter!
6. Now for the grand finale of the mixing! Gently fold the whipped cream into your gorgeous pink filling. Use a spatula and a gentle hand, cutting through the mixture and folding it over. You want to keep that lovely airiness from the whipped cream, so don’t stir vigorously. Mix just until no white streaks remain.
7. Pour this dreamy pink filling over your chilled crust in the springform pan. Use a spatula to smooth the top evenly. Cover the pan tightly with plastic wrap. Now comes the hardest part: waiting! Pop it back in the fridge for at least 4 hours, or ideally overnight, until it’s completely firm and set.
8. Once it’s set, carefully release the sides of the springform pan. Now for the fun part – decorating! Add swirls of whipped cream, sprinkle with more chopped Snickers pieces, and scatter those colorful M&M’s over the top. Slice with a sharp knife (running it under hot water and wiping clean between slices helps!) and serve up a piece of pink perfection!
Substitutions & Additions
Want to get creative? This recipe is super flexible! Here are some ideas:
- Crust Swap: Instead of Graham crackers or Oreos, try shortbread cookies, Nutter Butters, or even pretzels for a sweet and salty twist.
- Candy Bar Fun: Not a Snickers fan? Try chopped Butterfingers, Reese’s cups, Twix, or Heath bars! The possibilities are endless.
- Color Crazy: Change the food coloring to match any holiday or occasion! Red for Christmas, green for St. Patrick’s Day, blue for a baby shower, or swirl a few colors together!
- Nutty Boost: If you love peanuts, try adding about ¼ cup of chopped roasted peanuts to the crust mixture or gently folding them into the filling along with the Snickers.
- Extra Texture: Swirl a little caramel sauce or peanut butter through the filling before chilling for extra layers of flavor.
Tips for Success
Making a no-bake cheesecake is pretty forgiving, but here are a few pointers from my kitchen to yours:
- Soft Cream Cheese is Non-Negotiable: Seriously, if your cream cheese isn’t properly softened, you’ll end up with lumps, and no one wants lumpy cheesecake!
- Cool the Chocolate: Don’t add hot melted chocolate to your cream cheese mix – it can mess with the texture. Let it sit for 10-15 minutes after melting until it’s just slightly warm or room temp.
- Don’t Overmix the Whipped Cream: Stop as soon as those stiff peaks form. Overbeating turns it grainy or, eventually, into butter.
- Fold Gently: When incorporating the whipped cream and the Snickers, use a gentle hand. You want to keep the filling light and airy.
- Chill Time is Crucial: Patience, friend! That minimum 4 hours (or overnight) in the fridge is essential for the cheesecake to set up properly so you get nice clean slices.
- Springform Pan Power: Using a springform pan makes removing the cheesecake so easy and gives you those beautiful clean sides.
How to Store It
Got leftovers? (Highly unlikely, but hey!). Here’s how to keep your cheesecake fresh:
- Keep the cheesecake covered with plastic wrap or in an airtight container in the refrigerator.
- It will stay fresh for about 3-4 days in the fridge.
- You can also freeze slices! Place individual slices on a baking sheet in the freezer until firm, then wrap them tightly in plastic wrap and then foil. They can last for up to 1-2 months. Thaw in the refrigerator before serving.
FAQs
- Can I use low-fat cream cheese? I really don’t recommend it for this recipe. The full-fat cream cheese provides the essential richness and structure needed for the no-bake filling to set properly.
- Why did my cheesecake not set? This is usually due to not chilling it long enough, or potentially overmixing the whipped cream and then over-folding it, which can break down its structure. Ensure you follow the chilling time and fold gently!
- Can I make this ahead of time for a party? Absolutely! This cheesecake is perfect for making the day before. The flavors actually meld even better overnight, and it ensures it’s perfectly set for slicing.
- Do I have to use pink food coloring? Nope! The pink is just for fun and flair. You can leave it out for a plain chocolate Snickers cheesecake, or color it differently!
There you have it! A fun, easy, and absolutely delicious cheesecake that’s sure to be a hit. Give it a try and let me know how you like it! Happy baking (or rather, no-baking)!

Pink M&M Snickers Cheesecake
Ingredients
Equipment
Method
- 1. First things first, let's get the base ready. If you're starting with whole cookies or crackers, crush them up! A food processor is super quick, but sticking them in a sturdy bag and rolling over them with a rolling pin works great too. Once you have fine crumbs, mix them up with your melted butter. Press this mixture firmly into the bottom of a 9-inch springform pan. Use the bottom of a glass or a flat measuring cup to really pack it down. Pop this into the fridge for at least 30 minutes to set up while you make the filling.
- 2. Now, gently melt your chocolate chips. You can do this in a saucepan over low to medium heat, stirring constantly. Or, if you prefer the microwave, heat in 30-second intervals, stirring well after each, until smooth. Once melted, set it aside to cool down a bit.
- 3. In a large bowl, grab your electric mixer. Beat the softened cream cheese, powdered sugar, and vanilla extract together until it's wonderfully smooth and creamy. Scrape down the sides of the bowl. Gradually add that cooled melted chocolate to the cream cheese mixture, beating until it's all combined. Then, gently fold in your chopped Snickers bars with a spatula. Don't overmix.
- 4. Take out a small portion of your chocolate-Snickers filling into a separate small bowl. Add just a few drops of pink food coloring to it first. Stir that small portion until the color is really intense. Now, gradually add this colored portion back into your main bowl of filling, stirring just until you get the shade of pink you like.
- 5. In a separate clean bowl, whip the heavy cream until stiff peaks form. Be careful not to overwhip.
- 6. Gently fold the whipped cream into your gorgeous pink filling. Use a spatula and a gentle hand, cutting through the mixture and folding it over. Mix just until no white streaks remain.
- 7. Pour this dreamy pink filling over your chilled crust in the springform pan. Use a spatula to smooth the top evenly. Cover the pan tightly with plastic wrap. Pop it back in the fridge for at least 4 hours, or ideally overnight, until it's completely firm and set.
- 8. Once it's set, carefully release the sides of the springform pan. Decorate with swirls of whipped cream, sprinkle with more chopped Snickers pieces, and scatter those colorful M&M's over the top. Slice with a sharp knife and serve up a piece of pink perfection!