Hey there, friend! Are you ready for a dessert that feels like a warm hug and a summer picnic all rolled into one? If you grew up with classic banana pudding (maybe from your grandma’s kitchen or a potluck BBQ), you know there’s just something magical about those creamy layers and sweet vanilla wafers. But what if we gave that beloved classic a little glow-up? Get ready for this incredible Strawberry Cheesecake Banana Pudding! It takes everything you love about the original and adds the dreamy tang of cheesecake and the fresh sweetness of strawberries. And the best part? It’s completely no-bake, so you can whip it up anytime you need a little slice of heaven!
This recipe is seriously easy, unbelievably delicious, and disappears lightning fast. It’s perfect for pretty much any occasion – a casual weeknight treat, a holiday gathering, or just because you deserve it!
Why You’ll Love This Recipe
Seriously, what’s not to love? But just in case you need convincing…
- Fast: Zero baking required! Most of your time is spent mixing and layering, which means you can have this assembled in about 20-30 minutes.
- Easy: If you can whisk and layer, you can make this. No fancy techniques or equipment needed.
- Giftable: Layer it in cute jars or a decorative dish, and you’ve got a gorgeous homemade gift or hostess treat.
- Crowd-Pleasing: This dessert is universally loved. The combination of flavors and textures is simply irresistible to almost everyone!
Ingredients
Alright, let’s gather our goodies! These are all pretty standard grocery store finds, which makes this recipe even easier to pull off. This recipe makes a generous amount, perfect for feeding 8-10 happy dessert lovers.
- 1 box (3.4 oz) instant vanilla pudding mix: Make sure it’s INSTANT! This is key for getting that perfect pudding texture without cooking.
- 2 cups cold milk: Whole milk works best for richness, but 2% is fine too. Just make sure it’s nice and cold to help the pudding set up quickly.
- 1 (14 oz) can sweetened condensed milk: This little can of magic adds sweetness, creaminess, and that signature no-bake dessert richness.
- 8 oz cream cheese, softened: Let it sit out on the counter for an hour or two before you start. Softened cream cheese is essential for a smooth, lump-free cheesecake layer. If you forget, you can microwave it for 10-15 seconds at a time, just until pliable.
- 1 cup heavy whipping cream: Whipped into soft peaks, this lightens the pudding base and makes it extra dreamy.
- 1 tsp vanilla extract: A little touch of classic vanilla flavor brings everything together.
- 3–4 ripe bananas, sliced: Look for bananas that are yellow with just a few small brown spots. They’ll be sweet but still firm enough to hold their shape in the layers.
- 1 lb fresh strawberries, sliced: Pick the sweetest, reddest berries you can find! They add such a vibrant freshness.
- 1 box vanilla wafer cookies, crushed (or graham cracker crumbs): Nilla wafers are the traditional choice and give that classic banana pudding vibe. Crushed graham crackers offer a different but equally delicious crunch and pair wonderfully with the cheesecake flavor. Pick your favorite!
- 1 cup strawberry puree: Just blend up some fresh strawberries! You can strain it through a sieve for a super smooth layer, but I often skip this step for a slightly more rustic texture and extra fiber.
- 1 cup whipped topping (store-bought or homemade): Cool Whip is super convenient, or you can make your own fresh whipped cream for the strawberry layer.
How to Make It
Okay, let’s get layering! Follow these simple steps, and you’ll have this beautiful dessert chilling in the fridge in no time.
-
Make the Pudding Base: Grab a large bowl. Add the instant vanilla pudding mix and the cold milk. Whisk them together really well for about 2 minutes. You’ll see it start to thicken up almost immediately. Let it sit for a minute while you move to the next step.
-
Add the Cheesecake Magic: To that thickened pudding, add the sweetened condensed milk and your softened cream cheese. Now, whisk, whisk, whisk! You want this to be super smooth and creamy. Make sure there are no little lumps of cream cheese left.
-
Lighten it Up: In a separate bowl, whip the heavy cream with the vanilla extract. Use an electric mixer (handheld or stand mixer) until you get soft peaks – that’s when the cream holds a gentle shape but the tips curl over. Be careful not to over-whip it into butter! Gently fold this whipped cream into your pudding and cream cheese mixture. Use a spatula and a light hand, folding until it’s just combined and looks wonderfully light and fluffy.
-
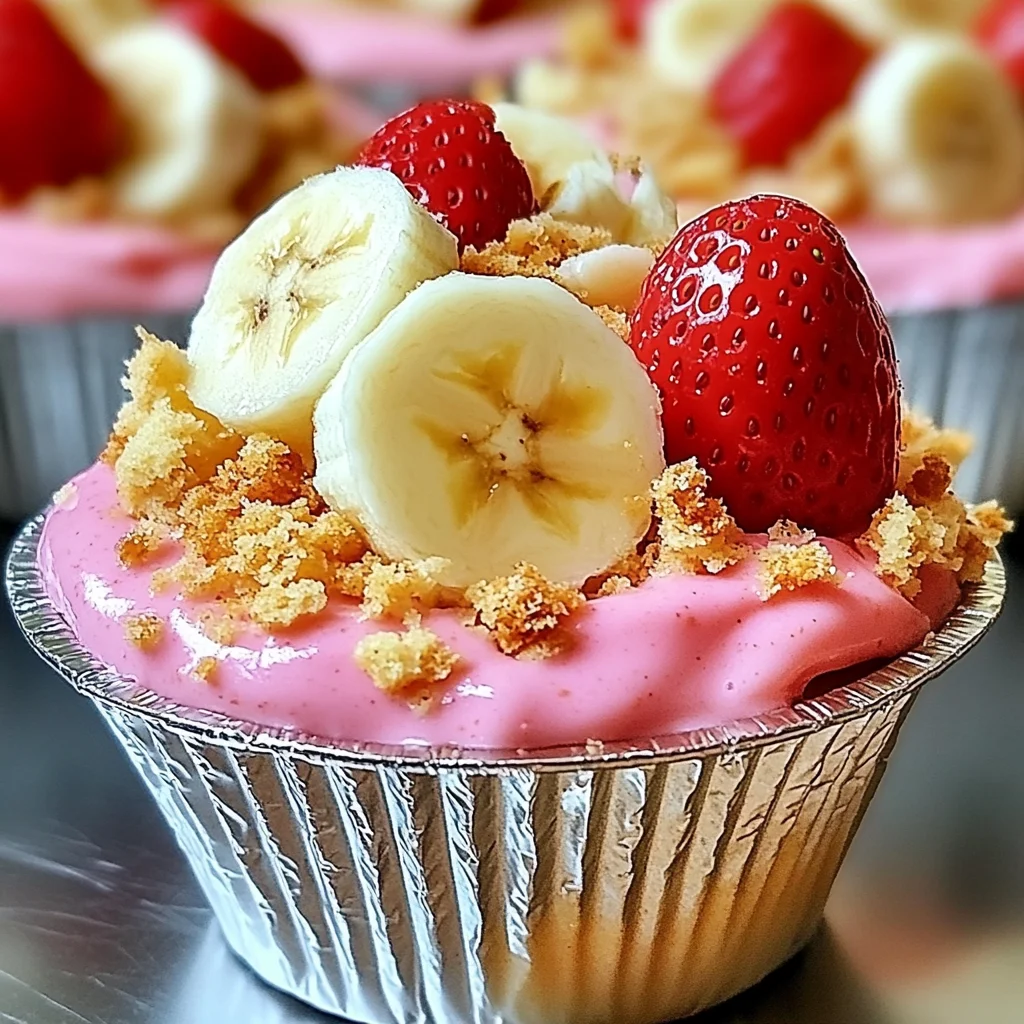
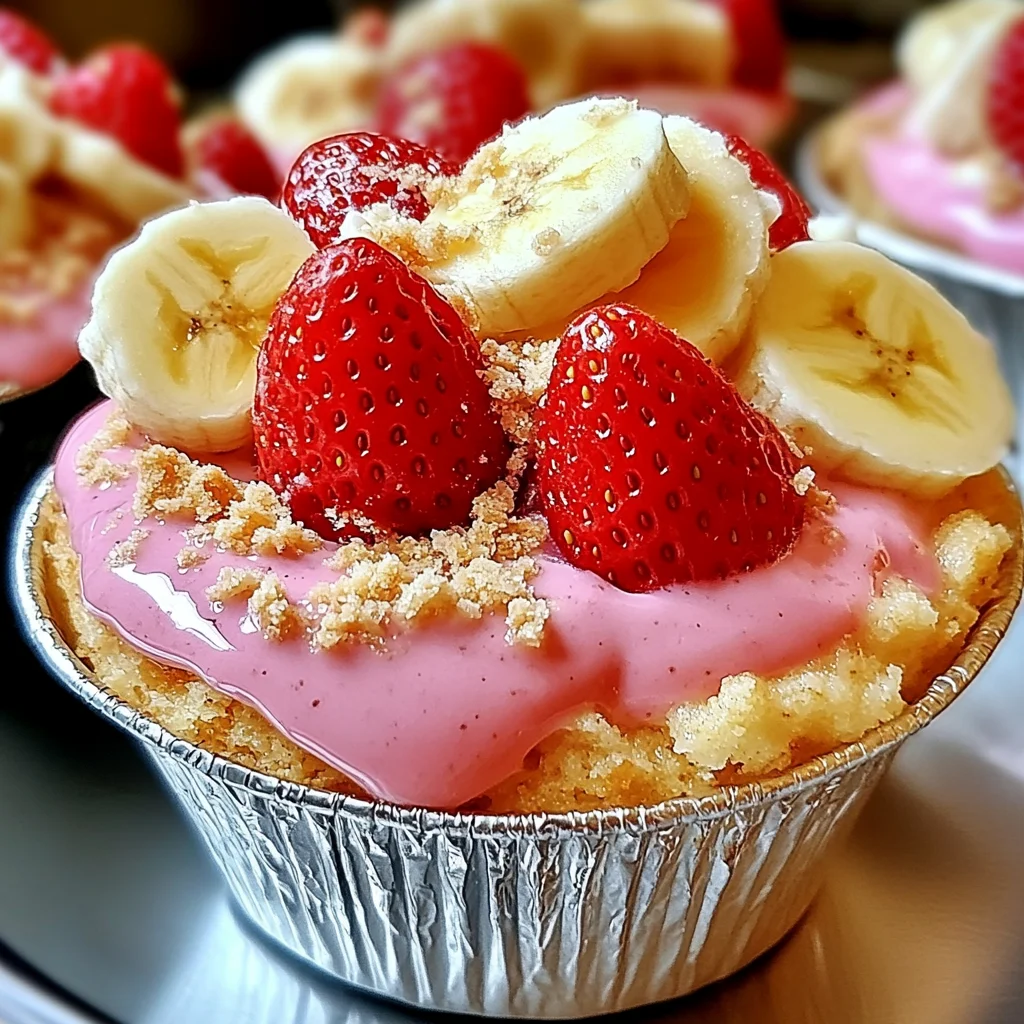
Whip Up the Strawberry Layer: In a medium bowl, combine the strawberry puree with the whipped topping. Stir gently until you have a smooth, beautifully pink cream. Doesn’t that look pretty?
-
Time to Layer!: Now for the fun part! Grab your serving dish – a big trifle dish is classic and shows off the layers beautifully, but a large serving bowl works perfectly too, or even individual cups for cute portions. Start with a layer of your creamy cheesecake pudding mixture at the bottom. Follow that with a layer of the crushed vanilla wafers (or graham crumbs), then a layer of sliced bananas, and finally a layer of sliced strawberries.
-
Repeat and Finish: Go for another round! Add a second layer of the cheesecake pudding mixture, more crushed cookies, more banana slices, and more strawberry slices. Finish the very top with the strawberry cream layer, spreading it out smoothly.
-
Chill Out: This is crucial! Cover your dessert tightly with plastic wrap (make sure the plastic wrap touches the top layer if possible to prevent a skin from forming) and pop it in the refrigerator. It needs at least 2 hours to set properly and let the flavors meld. Overnight is even better if you have the time – it really lets the cookies soften up nicely into the pudding.
-
Garnish and Serve: Just before you’re ready to dive in, add some finishing touches! Arrange a few extra sliced strawberries and banana slices on top, and sprinkle with a little more crushed vanilla wafers or graham crumbs for extra visual appeal and crunch.
Substitutions & Additions
Recipes are just guidelines, right? Feel free to play around and make this your own!
- Cookie Swap: While vanilla wafers are traditional, try using crushed shortbread cookies, Golden Oreos, or even gingersnaps for a little spice.
- Different Fruit: While bananas and strawberries are perfect here, you could try adding other berries like raspberries or blueberries. Peaches would also be amazing in the summer!
- Amp up the Strawberry: For an even stronger strawberry flavor in the base, you could try finding instant cheesecake or even strawberry instant pudding mix, just follow the package directions for milk and then add the cream cheese and condensed milk as written.
- Extra Crunch: Add a layer of chopped toasted pecans or walnuts for a nutty contrast to the creamy layers.
- Chocolate Lover’s Twist: A sprinkle of mini chocolate chips between layers wouldn’t hurt, or even a drizzle of chocolate sauce over the top before serving.
Tips for Success
Want to make sure your Strawberry Cheesecake Banana Pudding turns out absolutely perfect? Keep these little tips in mind!
- Use INSTANT Pudding: Seriously, don’t accidentally grab cook & serve. The thickening agents are different, and cook & serve won’t set up properly in this no-bake method.
- Soften That Cream Cheese: I know I mentioned it in the ingredients, but it’s worth repeating. Cold, hard cream cheese will leave you with lumps in your smooth pudding layer. Plan ahead!
- Don’t Over-Whip: When whipping the heavy cream, stop as soon as you get soft peaks. Over-whipped cream can become grainy and won’t fold into the pudding as smoothly.
- Chill Time is Mandatory: Don’t rush it! The refrigeration time is essential for the pudding layers to fully set and for the flavors to marry beautifully. It also allows the cookies to soften just the right amount.
- Bananas Brown: Bananas oxidize and turn brown when exposed to air. While the layers help protect them a bit, the banana slices on top for garnish are best added right before serving. For the layers, slicing them just before assembling helps minimize browning. Some people dip banana slices in a little lemon juice or a dissolved Vitamin C tablet solution, but this can sometimes slightly alter the flavor. I usually don’t bother for a quick dessert like this, knowing it will be eaten fast!
- Crushing Cookies: The easiest way to crush vanilla wafers or graham crackers is to put them in a zip-top bag and crush them with a rolling pin or the bottom of a glass. You want a mix of fine crumbs and some slightly larger pieces for texture.
How to Store It
If you’re lucky enough to have any leftovers (a rare occurrence in my house!), here’s how to keep them fresh.
Keep the Strawberry Cheesecake Banana Pudding covered tightly with plastic wrap or in an airtight container in the refrigerator. It will last for about 3-4 days. Keep in mind that the banana slices will soften and may start to brown over time, especially the longer it sits.
I don’t recommend freezing this dessert. The texture of the pudding and cream cheese layers can change significantly when frozen and thawed, becoming watery or grainy.
FAQs
Got questions? I’ve got some quick answers for you!
Q: Can I make this a day ahead?
A: Absolutely! Making it the day before serving is actually perfect. It gives the flavors plenty of time to develop and the cookies to soften beautifully. Just add the fresh banana and strawberry garnish right before serving.
Q: My pudding layer seems a little runny, what happened?
A: The most common reasons are accidentally using “cook & serve” pudding mix instead of “instant,” not using cold enough milk, not whisking the pudding and milk for the full 2 minutes, or not letting the assembled dessert chill for long enough.
Q: Can I use frozen strawberries for the puree?
A: Yes, you can. Thaw them completely and drain off as much liquid as possible before blending them into a puree. However, I highly recommend using fresh strawberries for the sliced layers and garnish for the best flavor and texture.
Q: What if I don’t have a trifle dish?
A: No worries at all! You can use any large glass or ceramic serving bowl. Individual parfait glasses, mason jars, or even small tumblers also work wonderfully for single-serving portions.
Dreamy Strawberry Cheesecake Banana Pudding (No-Bake!)
Ingredients
Equipment
Method
- Step 1: Make the Pudding Base: Grab a large bowl. Add the instant vanilla pudding mix and the cold milk. Whisk them together really well for about 2 minutes. You'll see it start to thicken up almost immediately. Let it sit for a minute while you move to the next step.
- Step 2: Add the Cheesecake Magic: To that thickened pudding, add the sweetened condensed milk and your softened cream cheese. Now, whisk, whisk, whisk! You want this to be super smooth and creamy. Make sure there are no little lumps of cream cheese left.
- Step 3: Lighten it Up: In a separate bowl, whip the heavy cream with the vanilla extract. Use an electric mixer (handheld or stand mixer) until you get soft peaks – that's when the cream holds a gentle shape but the tips curl over. Be careful not to over-whip it into butter! Gently fold this whipped cream into your pudding and cream cheese mixture. Use a spatula and a light hand, folding until it's just combined and looks wonderfully light and fluffy.
- Step 4: Whip Up the Strawberry Layer: In a medium bowl, combine the strawberry puree with the whipped topping. Stir gently until you have a smooth, beautifully pink cream. Doesn't that look pretty?
- Step 5: Time to Layer!: Now for the fun part! Grab your serving dish – a big trifle dish is classic and shows off the layers beautifully, but a large serving bowl works perfectly too, or even individual cups for cute portions. Start with a layer of your creamy cheesecake pudding mixture at the bottom. Follow that with a layer of the crushed vanilla wafers (or graham crumbs), then a layer of sliced bananas, and finally a layer of sliced strawberries.
- Step 6: Repeat and Finish: Go for another round! Add a second layer of the cheesecake pudding mixture, more crushed cookies, more banana slices, and more strawberry slices. Finish the very top with the strawberry cream layer, spreading it out smoothly.
- Step 7: Chill Out: This is crucial! Cover your dessert tightly with plastic wrap (make sure the plastic wrap touches the top layer if possible to prevent a skin from forming) and pop it in the refrigerator. It needs at least 2 hours to set properly and let the flavors meld. Overnight is even better if you have the time – it really lets the cookies soften up nicely into the pudding.
- Step 8: Garnish and Serve: Just before you're ready to dive in, add some finishing touches! Arrange a few extra sliced strawberries and banana slices on top, and sprinkle with a little more crushed vanilla wafers or graham crumbs for extra visual appeal and crunch.