There’s something truly magical about bite-sized desserts that bring back the warmth of family gatherings and cozy afternoons spent in the kitchen with loved ones. These No-Bake Pink Velvet Cheesecake Bites are just that—a nostalgic little indulgence wrapped in a pretty pink velvet hue, perfect for sharing or gifting. I remember the first time I made a no-bake cheesecake, how simple it was, yet how everyone’s eyes lit up after the first bite. These cheesecake bites take that joy and make it even easier to enjoy, without heating up the oven or spending hours fussing over layers. Whether you’re planning a last-minute party, a sweet gift for a friend, or just a special treat for yourself, these little bites are sure to become a staple in your dessert lineup.
Why You’ll Love No-Bake Pink Velvet Cheesecake Bites
- Fast: Ready in no time, with minimal hands-on prep.
- Easy: No baking skills required—just mix, chill, and enjoy.
- Giftable: Beautiful and charming, perfect for sharing or gifting.
- Crowd-pleasing: Fluffy, creamy, and irresistibly pretty, they’ll disappear fast!
Ingredients
Before you start, let’s gather everything you’ll need. Each ingredient plays a special role in creating that signature pink velvet charm and creamy texture.
- Graham cracker crumbs: The buttery, slightly sweet base that adds crunch and balance.
- Unsalted butter: Melted and mixed with crumbs for the perfect crust.
- Granulated sugar: Just a touch to sweeten the crust.
- Cream cheese: Softened for a smooth, rich filling. This is the heart of your cheesecake.
- Powdered sugar: Sweetens the filling without graininess.
- Vanilla extract: Adds warm, comforting flavor.
- Lemon juice: A splash to brighten the richness.
- Heavy whipping cream (two batches): One half whipped into stiff peaks and folded into the filling for lightness, the other whipped for the topping.
- Pink gel food coloring: The key to that gorgeous pink velvet color. Gel works best for vibrant color without thinning the mixture.
- White chocolate: Melted and folded in for a subtle sweetness and silky texture.
- Fresh blackberries and pink sugar crystals: For that final wow factor—fresh, juicy, and sparkling.
How to Make No-Bake Pink Velvet Cheesecake Bites
Making these cheesecake bites is like a fun little project you can easily do while chatting with friends or listening to your favorite music. I love how each step is straightforward, but the result feels so special.
- Make the crust: Start by mixing your graham cracker crumbs, melted butter, and sugar in a bowl. It should feel like wet sand—pressable but not too oily. Press about a tablespoon of this mixture firmly into the bottom of lined mini muffin tins or silicone molds. This little base will hold all that creamy goodness. Pop them in the fridge for 20–30 minutes to let them set up nicely.
- Prepare the cheesecake filling: In a large bowl, beat the softened cream cheese until it’s smooth and fluffy. I usually use my stand mixer for this step to get it really creamy. Add powdered sugar, vanilla extract, and lemon juice, beating them in until the mixture is silky and lump-free.
- Add white chocolate and color: Stir in the melted white chocolate gently—make sure it’s cooled a bit so it doesn’t melt your cream cheese. Then, add pink gel food coloring a teaspoon at a time until you get that perfect pink velvet shade. This is when the magic really happens—the color just brightens the whole dessert.
- Whip and fold: In a separate bowl, whip ½ cup of heavy cream until stiff peaks form. This step is crucial because folding the whipped cream into the cream cheese mixture makes the filling light and airy. Be gentle folding so you keep all that fluffy texture intact.
- Assemble the bites: Spoon or pipe the cheesecake filling over your chilled crusts, smoothing the tops with a small spatula or the back of a spoon. Once filled, place the tray back in the fridge for at least 4 hours or, if you have the patience, overnight. This chilling time allows the bites to set perfectly.
- Whip the topping: Just before serving, whip the remaining 1 cup of heavy cream with powdered sugar until thick and fluffy. Pipe a pretty swirl of whipped cream over each cheesecake bite using a piping bag or a zip-top bag with the corner snipped off.
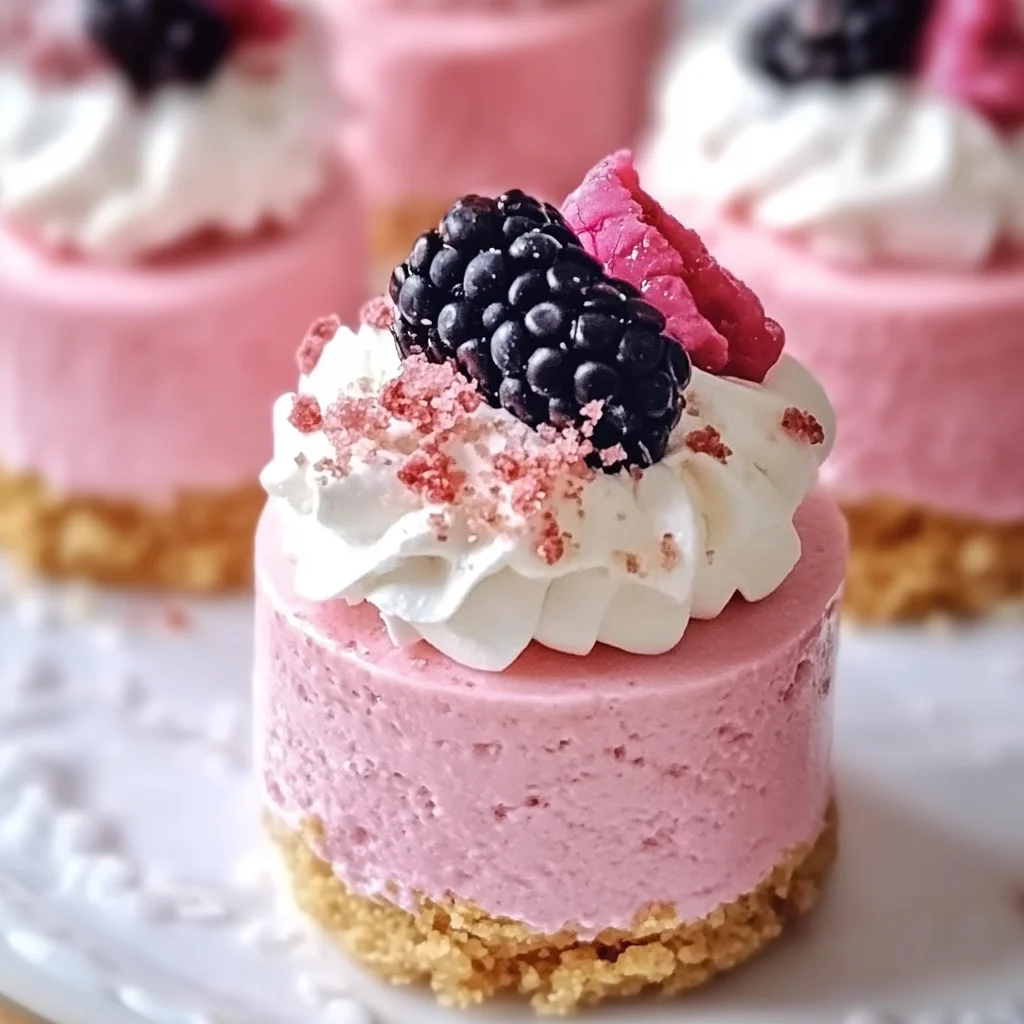
- Garnish and serve: Top each bite with a fresh blackberry and sprinkle some pink sugar crystals or sprinkles on top. The contrast of juicy blackberries against the pink and white cream is not only delicious but visually stunning.
If you’re a fan of no-bake treats, you might also enjoy other easy desserts like these No-Bake Oreo Bars or the delightfully creamy No-Bake Strawberry Crunch Cheesecake Bites for some fruity variation.
Substitutions & Additions
One of the best parts about this recipe is how adaptable it is. Here are some ideas if you want to switch things up or add your own twist:
- Crust variations: Swap graham cracker crumbs for crushed pink velvet cookies or vanilla wafers for an even sweeter base.
- Dairy-free option: Use dairy-free cream cheese and coconut cream instead of heavy cream for a vegan-friendly version.
- Flavor boosts: Add a teaspoon of almond extract to the filling for a nutty twist or a tablespoon of raspberry jam swirled in for a fruity surprise.
- Chocolate drizzle: After topping with whipped cream, drizzle some dark or white chocolate over the bites for extra decadence.
- Berry swaps: Fresh raspberries or strawberries work beautifully in place of blackberries, especially if you want a pop of red instead of the contrast.
For more creative no-bake ideas, don’t miss the Easy No-Bake Caramel Pretzel Bars, which offer a fun sweet-and-salty combo that pairs wonderfully with creamy treats like these cheesecake bites.
Tips for Success
I’ve learned a few tricks along the way to make sure your cheesecake bites come out perfect every time. Here are some tips to keep in mind:
- Use room temperature cream cheese: This makes mixing easier and prevents lumps in your filling.
- Don’t over-whip the cream: Whip your heavy cream just until stiff peaks form—over-whipping can turn it grainy or even into butter.
- Folding technique: When folding the whipped cream into the cream cheese mixture, be gentle. Use a spatula to fold from the bottom up to keep the mixture light and airy.
- Chill time is crucial: Allow at least 4 hours, but overnight chilling is best for firm, sliceable bites.
- Line your molds: If you’re using mini muffin tins, line them with paper liners for easy removal. Silicone molds work great too and pop out effortlessly.
- Make ahead: These bites keep well in the fridge, so you can prepare them a day or two in advance. Perfect for party prep!
If you want to explore other make-ahead desserts, check out my recipe for the Easy No-Bake Peanut Butter Cup Poke Cake—it’s another crowd-pleaser that’s just as simple to prepare.
How to Store No-Bake Pink Velvet Cheesecake Bites
Storage is pretty straightforward with these cheesecake bites. Since they’re no-bake and dairy-based, keeping them fresh is key to maintaining their texture and flavor.
- Refrigerator: Store in an airtight container in the fridge. They’ll keep beautifully for up to 4 days. I recommend layering them with parchment paper if you’re stacking to prevent sticking.
- Freezer: You can freeze these bites for up to 1 month. Just place them on a baking sheet to freeze individually, then transfer to a freezer-safe container or bag. Thaw overnight in the fridge before serving.
- Serving tip: Let them sit at room temperature for 10–15 minutes before serving for the best creamy texture and flavor.
FAQs
Can I make these without white chocolate?
Absolutely! White chocolate adds richness and slight sweetness, but you can skip it or replace it with a little extra powdered sugar or even a tablespoon of cream cheese frosting if you want.
What if I don’t have pink gel food coloring?
You can use liquid food coloring, but gel is preferred because it won’t thin your filling. Alternatively, a small amount of natural beet juice or powder can provide color with a subtle earthy flavor.
Can I use regular sugar instead of powdered sugar in the filling?
Powdered sugar dissolves better and keeps the filling smooth. Using granulated sugar might leave a gritty texture, so it’s best to stick with powdered sugar for the creamiest results.
How do I prevent the crust from getting soggy?
Press the crust firmly and chill it well before adding the filling. This helps the butter set and creates a barrier, keeping the crust crisp and delicious.
These No-Bake Pink Velvet Cheesecake Bites are such a joy to make and share. Their pretty color and luscious, creamy texture make them perfect for everything from Valentine’s Day celebrations to bridal showers or just a sweet weekend treat. If you love exploring easy and delightful recipes, be sure to visit Easily Cooked for more inspiring ideas that’ll keep your kitchen buzzing with cozy vibes and delicious results.
And hey, if you enjoy this recipe, why not follow me on Pinterest for even more mouthwatering inspiration and kitchen fun!
No-Bake Pink Velvet Cheesecake Bites
Ingredients
Equipment
Method
- Step 1: Mix graham cracker crumbs, melted butter, and granulated sugar until mixture feels like wet sand. Press about a tablespoon firmly into the bottom of lined mini muffin tins or silicone molds. Chill in the fridge for 20–30 minutes.
- Step 2: Beat softened cream cheese until smooth and fluffy. Add powdered sugar, vanilla extract, and lemon juice; beat until silky and lump-free.
- Step 3: Stir in melted white chocolate (cooled) gently. Add pink gel food coloring a teaspoon at a time until desired pink velvet color is achieved.
- Step 4: Whip ½ cup heavy cream to stiff peaks. Fold gently into the cream cheese mixture to keep it light and airy.
- Step 5: Spoon or pipe filling over chilled crusts, smoothing the tops. Refrigerate for at least 4 hours or overnight to set.
- Step 6: Just before serving, whip remaining 1 cup heavy cream with powdered sugar until thick and fluffy. Pipe a swirl on each cheesecake bite.
- Step 7: Garnish each bite with a fresh blackberry and sprinkle pink sugar crystals on top. Serve and enjoy!