One of the joys of cooking is making a recipe your own! Here are a few ideas to customize your peanut butter pie:
Oh, friend, do you ever get that craving for something utterly decadent, wonderfully creamy, and packed with that irresistible peanut butter flavor, but without all the fuss of turning on the oven? I know I do! This No-Bake Peanut Butter Pie takes me right back to childhood summer days, where cool, rich desserts were the ultimate treat. It’s the kind of dessert that feels like a warm hug but tastes like a sweet, chilly dream. The best part? It’s ridiculously easy, comes together in a flash, and is absolutely unforgettable. Get ready to impress everyone (including yourself!) with minimal effort.
Why You’ll Love No Bake Peanut Butter Pie
This isn’t just another dessert recipe; it’s a game-changer! Here’s why this pie is about to become your new favorite:
- Fast: No baking means quicker prep and quicker chilling. Perfect for last-minute cravings or unexpected guests!
- Easy: Seriously, if you can mix, you can make this pie. No complicated steps or fancy equipment needed.
- Giftable: Whip up a pie and take it to a potluck, a friend’s dinner, or as a thoughtful thank-you. It travels beautifully!
- Crowd-pleasing: Who doesn’t love peanut butter and chocolate? This classic combination is a guaranteed hit with almost everyone.
Ingredients
Gathering your ingredients is half the fun! Here’s what you’ll need for this luscious pie:
- 8 ounces (225 g) cream cheese, softened to room temperature: This is crucial for that smooth, lump-free filling. Don’t rush it; let it sit out for an hour or two!
- 1 ¼ cups creamy peanut butter, divided: The star of our show! I always go for a good quality creamy peanut butter for the best texture and flavor.
- ¾ cup (90 g) powdered sugar: Also known as confectioners’ sugar. It dissolves perfectly to keep the filling silky smooth and sweet without being grainy.
- 8 ounces whipped topping, thawed: A tub of frozen whipped topping (like Cool Whip) is your best friend here. Make sure it’s fully thawed for easy folding.
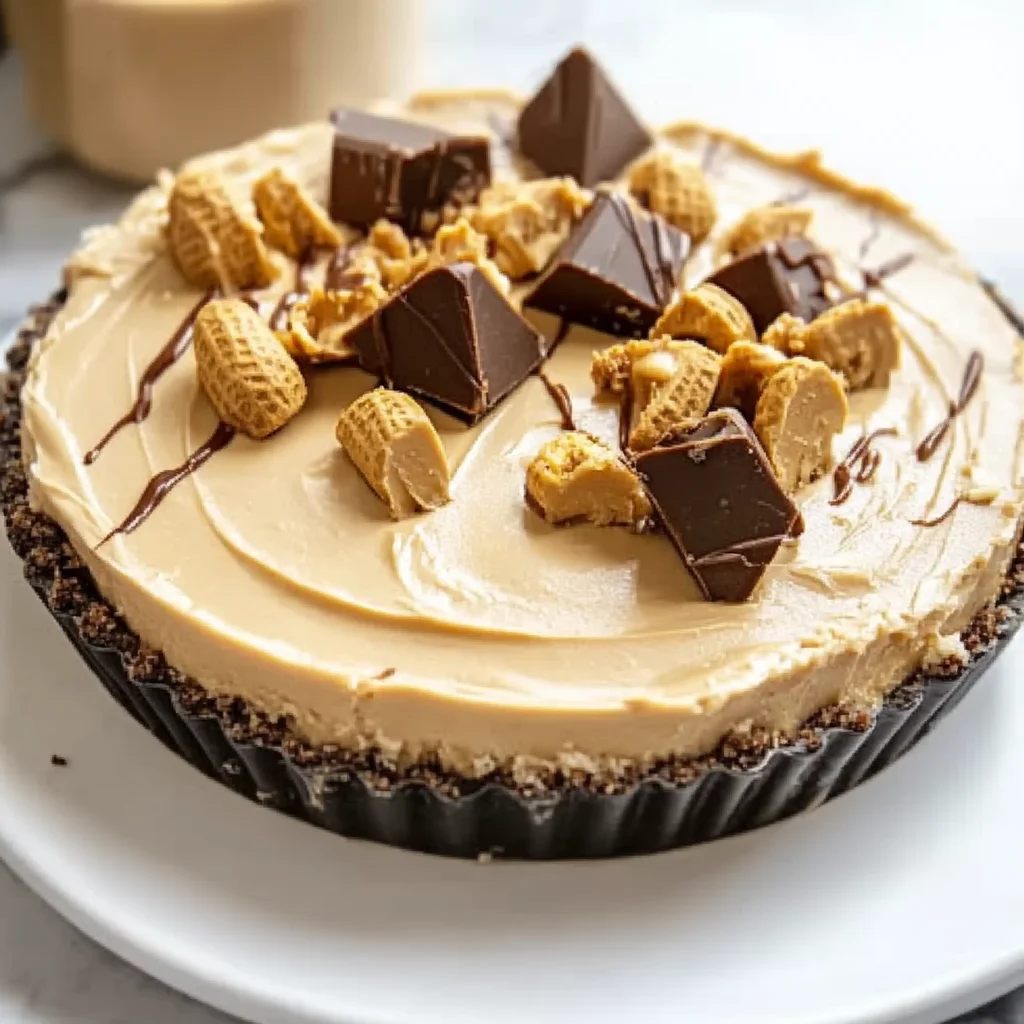
- 1 9-inch chocolate graham cracker crust: You can find these pre-made in the baking aisle. The chocolate crust perfectly complements the peanut butter, but a regular graham cracker crust works too if that’s what you have!
- 1 cup mini peanut butter cups, chopped (optional): Oh, these are a non-negotiable for me! They add an extra layer of peanut butter chocolate goodness and a delightful texture.
How to Make No Bake Peanut Butter Pie
Let’s get cooking (or rather, no-cooking!)! This is where the magic happens, and trust me, it’s easier than pie!
- First things first, grab a large mixing bowl. You’re going to beat the softened cream cheese, 1 cup of that glorious creamy peanut butter, and the powdered sugar together with an electric mixer. Keep going until everything is wonderfully smooth and creamy. You want it light and airy, with no lumps of cream cheese hiding.
- Next, you’ll gently fold in the thawed whipped topping. The key here is gently. You want to keep all that beautiful air in the whipped topping to make your pie light and fluffy. Use a spatula to carefully incorporate it until it’s fully combined and looks like a cloud of peanut butter goodness.
- Now, take your chocolate graham cracker crust and pour the creamy mixture right into it. Use your spatula to smooth the top out evenly. Make it look pretty!
- This is arguably the hardest part: waiting! You need to refrigerate your pie for at least 4 hours, but honestly, I always aim for overnight. The longer it chills, the firmer and more stable it will be, making for perfect slices. This is also a fantastic make-ahead dessert, just like our Easy No-Bake Caramel Pretzel Bars if you’re looking for other quick treats!
- When you’re ready to serve, this is where you can really make it shine. Sprinkle generously with the chopped mini peanut butter cups. Then, take the remaining ¼ cup of peanut butter, melt it slightly (just a few seconds in the microwave should do the trick), and drizzle it over the top. It adds such a beautiful finish and an extra burst of flavor! If you’re a true peanut butter fanatic, you might also adore our No-Bake Reese’s Peanut Butter Bars!
Substitutions & Additions
- Different Crust: While I adore the chocolate graham cracker crust, a classic graham cracker crust or even an Oreo crust would be absolutely delicious!
- Peanut Butter Swaps: Want a little more texture? You can definitely use crunchy peanut butter, but keep in mind it will change the overall smoothness of the filling.
- Chocolate Drizzle: Instead of just peanut butter drizzle, melt some chocolate chips or a chopped chocolate bar and drizzle that on top for an extra layer of chocolatey goodness.
- Candy Mix-ins: Get creative! Crushed Butterfingers, chopped Reese’s Cups (as suggested), or even a handful of chocolate chips would be amazing mixed into the filling or sprinkled on top.
- Salted Caramel: A swirl of salted caramel sauce (store-bought or homemade) on top would be a truly indulgent addition, balancing the sweetness with a touch of salt.
Tips for Success
Even the easiest recipes have a few secrets to making them truly stellar!
- Softened Cream Cheese is Key: I cannot stress this enough! If your cream cheese isn’t fully softened, you’ll end up with lumps in your filling, and nobody wants that.
- Don’t Overmix the Whipped Topping: Once you add the whipped topping, fold it gently. Overmixing can deflate the air, making your pie denser instead of light and fluffy.
- Chill Time is Your Friend: Resist the urge to cut into it too soon! A well-chilled pie means clean, beautiful slices and a firm, delightful texture.
- Quality Ingredients: Since this recipe uses so few ingredients, the quality really shines through. Use a peanut butter you genuinely love the taste of!
How to Store No Bake Peanut Butter Pie
This pie is best enjoyed fresh, but if you happen to have any leftovers (a rare occurrence in my house!), here’s how to keep it tasting great.
Store your No-Bake Peanut Butter Pie covered tightly with plastic wrap or in an airtight container in the refrigerator for up to 3-4 days. While technically you could freeze it for longer storage, the texture of the whipped topping might change slightly upon thawing. If you do freeze it, let it thaw in the fridge for several hours before serving.
FAQs
Got questions? I’ve got answers!
Q: Can I use natural peanut butter for this recipe?
A: I recommend sticking with creamy, processed peanut butter (like Jif or Skippy) for the best results. Natural peanut butter tends to separate and can make the pie a bit too oily or not set as firmly.
Q: Can I make this pie ahead for a party?
A: Absolutely! This pie is a dream for making ahead. Prepare it the day before and let it chill overnight in the refrigerator. It will be perfectly set and ready to serve when your guests arrive.
Q: What if I don’t have an electric mixer?
A: While an electric mixer makes it super easy, you can definitely make this pie with a sturdy whisk and a little elbow grease. Just make sure your cream cheese is extra soft to make whisking manageable.
Q: Can I add mini chocolate chips to the filling?
A: Yes, absolutely! Mini chocolate chips would be a fantastic addition to the filling, adding another layer of texture and chocolatey flavor. Fold them in gently with the whipped topping.
For even more delicious recipes and kitchen inspiration, be sure to follow us on Pinterest!

No-Bake Peanut Butter Pie
Ingredients
Equipment
Method
- Step 1: In a large mixing bowl, beat the softened cream cheese, 1 cup of creamy peanut butter, and powdered sugar together with an electric mixer until wonderfully smooth, creamy, light, and airy, with no lumps.
- Step 2: Gently fold in the thawed whipped topping with a spatula until fully combined and light and fluffy. Be careful not to overmix to maintain airiness.
- Step 3: Pour the creamy peanut butter mixture into the chocolate graham cracker crust and use a spatula to smooth the top out evenly.
- Step 4: Refrigerate the pie for at least 4 hours, or preferably overnight, to allow it to set firmly for perfect slices.
- Step 5: Before serving, sprinkle generously with the chopped mini peanut butter cups. Slightly melt the remaining ¼ cup of peanut butter (a few seconds in the microwave should do the trick) and drizzle it over the top for garnish.
Notes
- Different Crust: A classic graham cracker crust or an Oreo crust can be used instead of chocolate graham cracker.
- Peanut Butter Swaps: Crunchy peanut butter can be used for added texture, but it will change the smoothness of the filling.
- Chocolate Drizzle: Melted chocolate chips or a chopped chocolate bar can be drizzled on top for extra chocolatey goodness.
- Candy Mix-ins: Crushed Butterfingers, chopped Reese’s Cups, or chocolate chips can be mixed into the filling or sprinkled on top.
- Salted Caramel: A swirl of salted caramel sauce adds an indulgent balance to the sweetness.
- Softened Cream Cheese is Key: Ensure cream cheese is fully softened to prevent lumps in the filling.
- Don’t Overmix the Whipped Topping: Gently fold the whipped topping to maintain its airiness and keep the pie light and fluffy.
- Chill Time is Your Friend: Allow ample chilling time (at least 4 hours, preferably overnight) for clean, firm slices.
- Quality Ingredients: Use a high-quality peanut butter you enjoy for the best flavor.