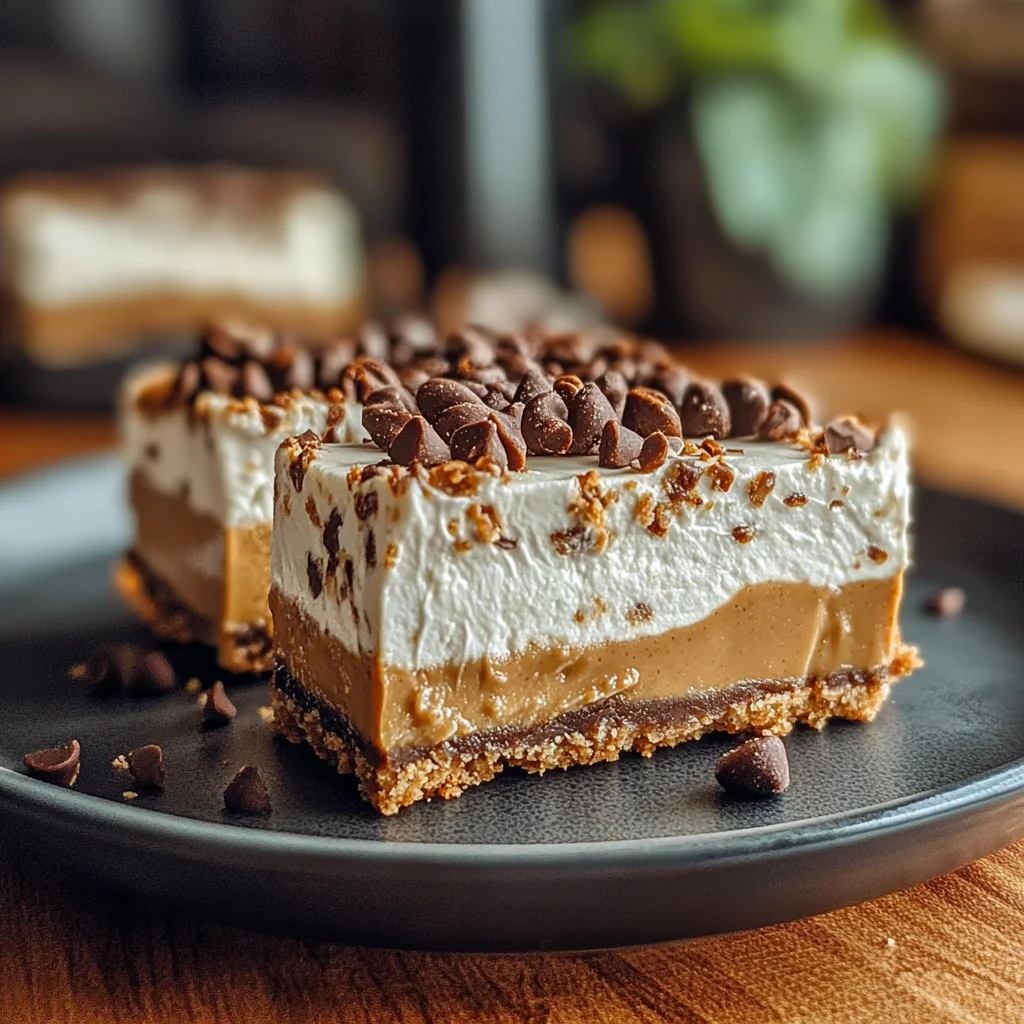
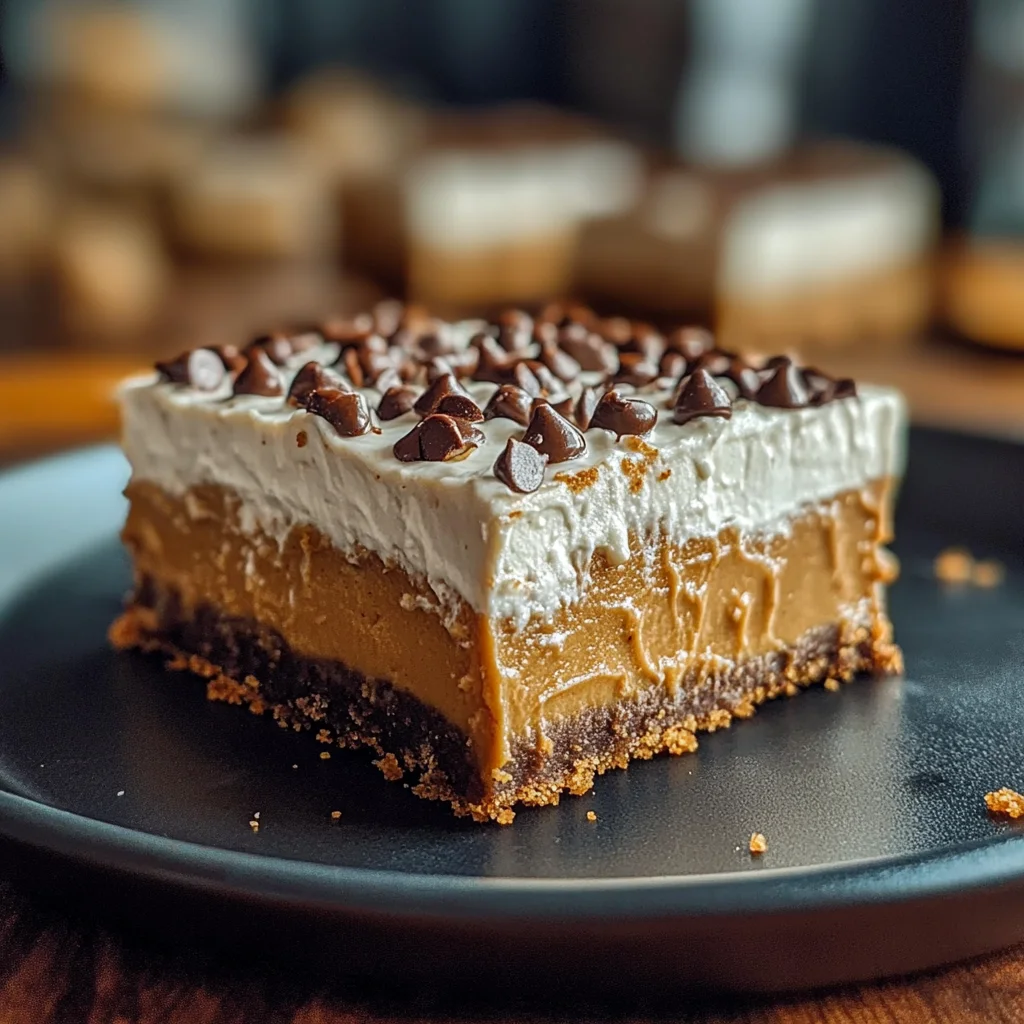
Oh, friend, do you ever get that craving for something incredibly decadent, something that just melts in your mouth with a perfect balance of sweet and salty, but you just can’t face turning on the oven? We’ve all been there! Maybe it’s a hot summer day, or perhaps you’re just looking for that magical dessert that comes together in a snap, yet tastes like you slaved away for hours. Well, let me tell you, these No-Bake Peanut Butter Cheesecake Bars are exactly that kind of magic!
They remind me of those carefree childhood days, where the simplest treats were often the most memorable. The classic combo of rich peanut butter and creamy cheesecake, all nestled on a crunchy graham cracker crust? Pure bliss! And the best part? No oven, no water bath, no cracking fears. Just simple ingredients, a little mixing, and a chill in the fridge, and you’ll have a dessert that everyone will rave about. Trust me, these are going to be your new go-to for potlucks, parties, or just a sweet night in!
Why You’ll Love No Bake Peanut Butter Cheesecake Bars
- Fast: Whipped up in about 15-20 minutes of active prep time!
- Easy: No baking involved, making it perfect for beginners or busy days.
- Giftable: They look impressive and make a fantastic edible gift for friends and family.
- Crowd-pleasing: Who doesn’t love the combo of peanut butter and cheesecake? It’s a universal favorite!
Ingredients
Gathering your ingredients is the first step to dessert heaven. Here’s what you’ll need, and a little note about each:
- 1 ½ cups graham cracker crumbs: You can buy these pre-crushed, or crush your own graham crackers in a food processor or a Ziploc bag with a rolling pin. This is our crunchy, buttery foundation!
- 6 tablespoons unsalted butter, melted: This binds our crust together. Unsalted is best so you can control the saltiness, but salted will work in a pinch if that’s all you have.
- ¼ cup granulated sugar: Just a touch of sweetness for that perfect crust.
- 16 oz cream cheese, softened: This is the heart of our creamy cheesecake. Make sure it’s softened to room temperature – this is key for a smooth, lump-free filling!
- ¾ cup creamy peanut butter: The star of the show! Use your favorite creamy peanut butter for the best flavor. I tend to use standard processed peanut butter like Jif or Skippy for the best texture here, as natural peanut butter can sometimes separate.
- 1 cup powdered sugar: Also known as confectioners’ sugar, this sweetens our filling and dissolves beautifully for that silky smooth texture.
- 1 teaspoon vanilla extract: A splash of vanilla always enhances sweet flavors and adds depth.
- 1 cup heavy whipping cream: This is what gives our cheesecake its light, airy, and fluffy texture. Make sure it’s very cold!
- ½ cup semi-sweet chocolate chips (optional, for topping): A classic pairing with peanut butter, and they add a nice visual touch too!
How to Make No Bake Peanut Butter Cheesecake Bars
Alright, let’s get into the fun part! You’re just a few simple steps away from peanut butter perfection.
1. Prepare the Crust: First things first, grab a good-sized mixing bowl. You’re going to combine your graham cracker crumbs, that lovely melted butter, and the granulated sugar. Stir it all together until it looks like wet sand and is fully combined. It’s truly the foundation of greatness!
2. Form the Crust: Now, line a 9×9-inch baking pan with parchment paper, leaving a little overhang on the sides – this is your secret weapon for easy removal later! Pour your graham cracker mixture into the pan. Use the back of a measuring cup or a flat-bottomed glass to really press it down firmly and evenly across the bottom. The tighter you pack it, the less crumbly your crust will be. Once it’s packed, pop that pan into the refrigerator to chill while you prepare the filling. This helps it set up nicely.
3. Prepare the Cheesecake Base: In another large mixing bowl, it’s time to tackle the star filling. Make sure your cream cheese is wonderfully soft; if it’s still cold, you might end up with lumps, and nobody wants that! Beat the softened cream cheese with an electric mixer until it’s super smooth and creamy. Then, add in your creamy peanut butter, powdered sugar, and vanilla extract. Keep mixing until everything is fully combined and looks fluffy and delicious.
4. Whip Heavy Cream: In a separate, chilled bowl, pour in your cold heavy whipping cream. Using clean beaters, whip the cream until it forms beautiful, stiff peaks. This means when you lift the beaters, the peaks hold their shape and don’t flop over. Don’t overmix, though, or you might end up with butter!
5. Fold and Pour Filling: This next step is all about gentleness. Carefully fold the whipped cream into your peanut butter mixture. You want to incorporate it without deflating all that wonderful air you just whipped into the cream. Use a spatula and fold until there are no more white streaks of whipped cream visible. Once it’s all beautifully combined, pour this dreamy peanut butter cheesecake filling over your chilled graham cracker crust. Use your spatula to spread it evenly and smooth out the top for a picture-perfect finish.
6. Add Topping (Optional): If you’re a chocolate-lover (and who isn’t when peanut butter is involved?), now’s the time to sprinkle those semi-sweet chocolate chips on top. They add a lovely texture and a touch of extra sweetness. For another fantastic no-bake treat that’s always a hit, you have to try our No-Bake Reese’s Peanut Butter Bars, which really leans into that chocolate-peanut butter dream!
7. Chill Until Firm: This is the hardest part – the waiting game! Cover your pan loosely with plastic wrap and return it to the refrigerator. Let it chill for at least 4 hours, or ideally, overnight. The longer it chills, the firmer and more sliceable your bars will be.
8. Slice and Serve: Once your cheesecake bars are perfectly firm, use the parchment paper overhang to gently lift the entire slab out of the pan. Place it on a cutting board, and then you can use a sharp knife (wiping it clean between cuts for the neatest slices) to cut them into squares. Serve them chilled, and get ready for the compliments!
Substitutions & Additions
Part of the fun of baking (or no-baking!) is making a recipe your own. Here are some ideas to get your creativity flowing:
- Crust Variations: Not a graham cracker fan? Try using crushed Oreo cookies, Nutter Butter cookies, or even pretzels for a salty-sweet twist! If you love easy, fuss-free desserts, you might also enjoy whipping up some No-Bake Oreo Bars for another crowd-pleaser.
- Peanut Butter Swaps: While creamy peanut butter is classic, you could experiment with crunchy peanut butter for added texture, or even almond butter or cashew butter if you prefer, just be aware the flavor will change.
- Toppings Galore: Beyond chocolate chips, consider a drizzle of melted chocolate, a sprinkle of chopped roasted peanuts, mini Reese’s Peanut Butter Cups, a dollop of extra whipped cream, or some colorful sprinkles for a festive look.
- Make it Gluten-Free: Simply use gluten-free graham crackers for the crust!
- Dairy-Free Option: With the increasing availability of plant-based cream cheese, butter, and heavy whipping cream, you can absolutely adapt this recipe to be dairy-free. Just ensure your chosen products whip up well for the cream.
Tips for Success
Even though these are “no-bake,” a few simple tips can make all the difference between good and absolutely amazing cheesecake bars:
- Softened Cream Cheese is a Must: I cannot stress this enough! If your cream cheese isn’t at room temperature, it won’t mix smoothly, and you’ll end up with lumps in your filling. Plan ahead and take it out of the fridge at least an hour before you start.
- Cold Heavy Cream: On the flip side, your heavy whipping cream needs to be very cold to whip up properly. I even like to chill my mixing bowl and beaters for 10-15 minutes before whipping for the best results.
- Don’t Overmix the Whipped Cream: Once stiff peaks form, stop. Overmixing will turn it grainy or even into butter.
- Patience with Chilling: The chilling time is crucial for the bars to set up properly and become sliceable. Rushing this step will result in a messy, soft dessert. Overnight chilling is always best!
- Parchment Paper is Your Friend: Seriously, don’t skip lining the pan with parchment paper. It makes lifting the entire cheesecake out of the pan a breeze, allowing for clean, beautiful slices.
- Clean Slices: For perfectly neat squares, use a sharp knife and wipe it clean with a hot, damp cloth between each cut. This prevents sticking and messy edges.
How to Store No Bake Peanut Butter Cheesecake Bars
These bars are best enjoyed chilled! Once you’ve made them, store any leftovers in an airtight container in the refrigerator. They’ll stay fresh and delicious for up to 5-7 days. If you want to make them further in advance or save some for later, they freeze beautifully too! Just wrap individual slices tightly in plastic wrap, then place them in a freezer-safe bag or container. They’ll keep in the freezer for up to 1-2 months. When you’re ready to enjoy, simply thaw them in the refrigerator for a few hours before serving. And for those who are all about that chocolate and peanut butter combo but want something different, our Easy Peanut Butter Cup Dump Cake is a must-try for another fantastic make-ahead option!
FAQs
Q: Can I use crunchy peanut butter instead of creamy?
A: Yes, you absolutely can! Using crunchy peanut butter will add a lovely texture to your cheesecake bars, giving them little bits of peanut crunch. The flavor will be the same, but the mouthfeel will be different. Go for it if you love that extra bite!
Q: My cheesecake filling isn’t firming up. What went wrong?
A: The most common reasons for a soft filling are insufficient chilling time or not whipping the heavy cream to stiff enough peaks. Make sure your heavy cream is very cold before whipping, and ensure you let the bars chill for the full recommended 4 hours, or even overnight for best results. A little extra chill time often does the trick!
Q: Can I make these in a different size pan?
A: You can, but you might need to adjust the recipe quantities and chilling time. A larger pan (like a 9×13-inch) would make thinner bars and likely require 1.5-2x the recipe ingredients. A smaller pan would make thicker bars and might need more chilling time. For a 9×9-inch pan, this recipe is just right!
Q: Are these good for gifting?
A: Absolutely! These No-Bake Peanut Butter Cheesecake Bars are fantastic for gifting. They’re easy to transport (especially if kept chilled), universally loved, and look beautiful. Just package them in a nice box with a ribbon, and you’ve got a wonderful homemade treat!
For more irresistible recipes and kitchen inspiration, be sure to follow us on Pinterest!

Dreamy No-Bake Peanut Butter Cheesecake Bars
Ingredients
Equipment
Method
- Step 1: Prepare the Crust: In a good-sized mixing bowl, combine graham cracker crumbs, melted butter, and granulated sugar. Stir until fully combined and it looks like wet sand.
- Step 2: Form the Crust: Line a 9x9-inch baking pan with parchment paper, leaving an overhang on the sides for easy removal. Pour the graham cracker mixture into the pan and press it down firmly and evenly across the bottom using the back of a measuring cup or flat-bottomed glass. Place the pan in the refrigerator to chill while you prepare the filling.
- Step 3: Prepare the Cheesecake Base: In another large mixing bowl, beat the softened cream cheese with an electric mixer until it's super smooth and creamy. Add in the creamy peanut butter, powdered sugar, and vanilla extract. Continue mixing until everything is fully combined and fluffy.
- Step 4: Whip Heavy Cream: In a separate, chilled bowl, pour in the cold heavy whipping cream. Using clean beaters, whip the cream until it forms beautiful, stiff peaks. Be careful not to overmix.
- Step 5: Fold and Pour Filling: Gently fold the whipped cream into the peanut butter mixture using a spatula. Incorporate it carefully until no white streaks of whipped cream are visible. Pour this dreamy filling over your chilled graham cracker crust and use your spatula to spread it evenly and smooth out the top.
- Step 6: Add Topping (Optional): If desired, sprinkle the semi-sweet chocolate chips evenly over the top of the filling.
- Step 7: Chill Until Firm: Cover the pan loosely with plastic wrap and return it to the refrigerator. Let it chill for at least 4 hours, or ideally, overnight, for the bars to set up properly and become sliceable.
- Step 8: Slice and Serve: Once the cheesecake bars are perfectly firm, use the parchment paper overhang to gently lift the entire slab out of the pan. Place it on a cutting board, and use a sharp knife (wiping it clean between cuts for neatest slices) to cut them into squares. Serve them chilled.