Oh, friend, do you ever get that craving for something incredibly decadent, something that just screams comfort and pure joy, but you just can’t bring yourself to turn on the oven? Maybe it’s a sweltering summer day, or perhaps you’re just looking for that perfect, effortless dessert that still impresses everyone at the potluck. Well, let me tell you, this No-Bake Oreo Cheesecake is about to become your new best friend in the kitchen. It’s got that nostalgic charm of childhood favorite cookies, combined with the creamy, dreamy texture of a classic cheesecake, all without a single minute of baking! It’s fast, it’s fun, and it’s truly a memorable treat that tastes like you slaved over it for hours (but shhh, we won’t tell!). If you’re looking for more amazing no-bake treats, you’ve come to the right place!
Why You’ll Love No-Bake Oreo Cheesecake
- Fast: Minimal hands-on time means you can whip this up in a flash.
- Easy: No baking, no complicated steps, just simple mixing and chilling.
- Giftable: It’s a beautiful dessert that makes a thoughtful homemade gift for friends, family, or neighbors.
- Crowd-pleasing: Who doesn’t love Oreos and cheesecake? This is a guaranteed hit at any gathering!
Ingredients
Gathering your ingredients is half the fun! Here’s what you’ll need to create this masterpiece:
- For the Oreo Crust:
- 24 Oreo cookies (approximately 1 ½ cups crushed, with filling removed and reserved): These are the backbone of our crust, giving us that iconic chocolatey crunch. Remember to save that creamy filling for the cheesecake!
- 6 tablespoons (85g) butter, melted: This binds our cookie crumbs together for a sturdy, delicious base.
- For the Cheesecake Filling:
- 16 ounces (454g) cream cheese, softened: The star of any cheesecake! Make sure it’s nice and soft to avoid lumps.
- ½ cup (100g) granulated sugar: Just enough sweetness to balance the tang of the cream cheese.
- 1 teaspoon vanilla extract: A classic flavor enhancer that brings out the best in our cheesecake.
- 2 ½ cups (595g) heavy whipping cream, cold: This is what gives our no-bake cheesecake its incredible light and airy texture. Keep it super cold!
- 1 ½ cups (188g) confectioners’ sugar: Also known as powdered sugar, it sweetens and stabilizes our whipped cream.
- 15 Oreo cookies (approximately 1 cup crushed, divided): More Oreos for the filling – because you can never have too much Oreo!
- For Garnish (Optional):
- Hot Fudge: For an extra drizzle of chocolatey goodness.
- Reserved crushed Oreos: A sprinkle on top adds texture and visual appeal.
- Remaining prepared whipped cream: For beautiful dollops or swirls.
How to Make No-Bake Oreo Cheesecake
Alright, let’s get to the fun part! Follow these simple steps and you’ll have a show-stopping dessert chilling in your fridge in no time.
Oreo Crust:
-
First things first, let’s make that glorious crust! Take your 24 Oreo cookies and carefully twist them apart, scraping out that creamy white filling. Don’t toss it! We’re going to reserve it for the cheesecake filling. Once the cookies are separated from their filling, pop those chocolatey wafers into a food processor. Pulse until they’re finely crushed – you’re looking for about 1½ cups of fine crumbs. If you don’t have a food processor, a zip-top bag and a rolling pin work wonders!
-
In a medium-sized bowl, combine those finely crushed Oreos with your melted butter. Stir them together until every crumb is coated. It should look like wet sand, ready to be molded.
-
Now, grab your prepared 9-inch springform pan. This type of pan is a lifesaver for cheesecakes, making for super easy serving. Press the cookie mixture firmly and evenly into the bottom of the pan, and if you’re feeling fancy, you can even press it slightly up the sides to create a little edge. The firmer you press, the better your crust will hold together!
-
Pop that crust into the refrigerator while you move on to the next delicious step. Chilling helps it firm up nicely.
Cheesecake Filling:
-
In a large bowl, using a hand mixer (or a stand mixer if you’ve got one), beat your softened cream cheese until it’s wonderfully light and fluffy. This is key for a smooth, lump-free cheesecake. Then, add in the granulated sugar, that lovely vanilla extract, and the reserved Oreo filling from earlier. Beat it all together until it’s completely smooth and creamy.
-
Now for the magic! In a separate, very clean, large bowl, pour in your cold heavy whipping cream. Using your hand mixer, start whipping the cream on medium-high speed. As it starts to thicken, gradually add the confectioners’ sugar. Keep beating until stiff peaks form. You’ll know they’re ready when you lift the beaters and the peaks stand tall without collapsing. This is what gives our cheesecake its light, airy texture!
-
Time to combine! Gently fold 2 cups of your freshly whipped cream into the cream cheese mixture. Be gentle here – we want to keep all that beautiful air in the whipped cream. Then, fold in ¾ cup of your crushed Oreo cookies. Make sure you reserve the remaining ¼ cup of crushed Oreos for garnish later!
-
Pour this luscious cheesecake filling over your chilled Oreo crust in the springform pan. Use a spatula to spread it out evenly, making sure it fills the pan from edge to edge.
-
Now comes the hardest part: the waiting game! Refrigerate your cheesecake for at least 3-4 hours, but honestly, if you can wait, overnight is truly best. This gives it plenty of time to set up perfectly, making for clean slices. You’ll be amazed at how firm it gets without any baking!
-
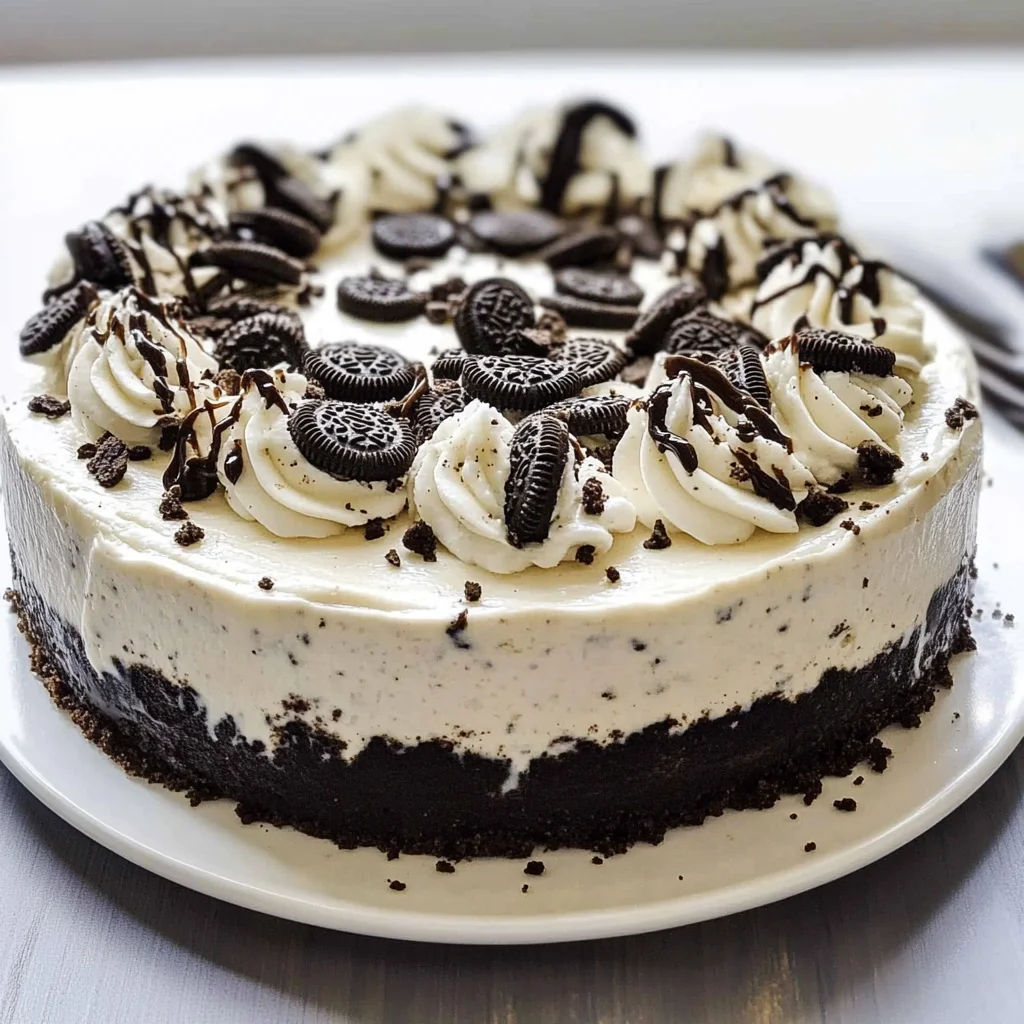
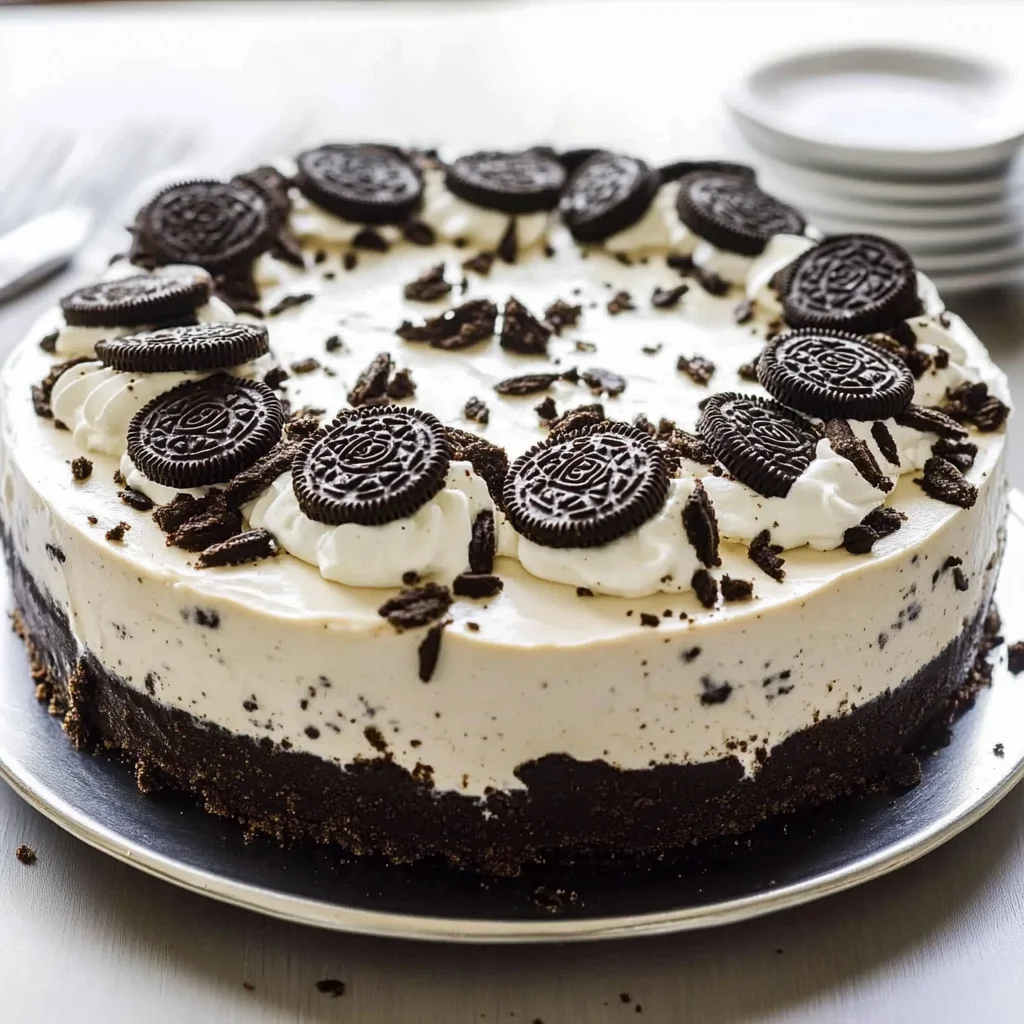
Once your cheesecake is firm and ready to be devoured, carefully remove it from the springform pan. Now’s your chance to get creative! Garnish with the remaining whipped cream, a sprinkle of those reserved crushed Oreos, and a generous drizzle of hot fudge, if you desire. Then, slice, serve, and enjoy the blissful silence as everyone savors a bite!
Substitutions & Additions
This No-Bake Oreo Cheesecake is fantastic as is, but it’s also a wonderful canvas for your own culinary creativity! Don’t be afraid to experiment.
- Different Crusts: Not an Oreo fan (gasp!)? You can swap out the Oreos for graham cracker crumbs, Nilla wafers, or even chocolate chip cookies for a different flavor profile. The ratio of crumbs to butter might vary slightly, so add butter slowly until it resembles wet sand.
- Flavor Twists: Feel free to add a different extract to the cheesecake filling – a little peppermint extract for a minty twist, or almond extract for a subtle nutty note. You could even swirl in some peanut butter with the cream cheese for a Reese’s-inspired treat, or try another one of our delicious chocolatey no-bake dessert options!
- Mix-ins: Fold in mini chocolate chips, chopped candy bars (like Snickers or Butterfinger), or even mini marshmallows for added texture and flavor.
- Topping Extravaganza: Beyond hot fudge, consider caramel sauce, fresh berries, chocolate shavings, sprinkles, or a sprinkle of chopped nuts. For another delightful option, check out our Berrylicious Strawberry Crunch Cheesecake for some inspiration on delicious cheesecake creations!
Tips for Success
Even though this recipe is super easy, a few tips can help ensure your No-Bake Oreo Cheesecake is absolutely perfect every time.
- Softened Cream Cheese is Key: I can’t stress this enough! If your cream cheese isn’t soft, you’ll end up with lumps in your filling, no matter how much you beat it. Take it out of the fridge at least 30 minutes to an hour before you plan to start.
- Keep Your Heavy Cream Cold: Seriously, ice cold! This helps it whip up faster and achieve those stiff peaks that are crucial for the cheesecake’s structure. You can even chill your mixing bowl and beaters in the freezer for 10-15 minutes before whipping for an extra boost.
- Don’t Overmix the Filling: Once you fold in the whipped cream and crushed Oreos, mix only until just combined. Overmixing can deflate the whipped cream, leading to a denser cheesecake. We want it light and airy!
- Patience with Chilling: The minimum 3-4 hours chilling time is truly essential for the cheesecake to set up. If you cut into it too early, it might be too soft. Overnight chilling really is the secret to perfect slices.
- Springform Pan Love: While you can make this in a regular pie dish, a springform pan makes removing and serving the cheesecake infinitely easier and prettier. Line the bottom with parchment paper for extra insurance against sticking.
How to Store No-Bake Oreo Cheesecake
Once your cheesecake is made and (partially) devoured, you’ll want to store any leftovers properly to keep them fresh and delicious.
Simply cover the springform pan (or slices) tightly with plastic wrap or aluminum foil and store it in the refrigerator. Your No-Bake Oreo Cheesecake will stay fresh and tasting fantastic for up to 3-4 days. While you could technically freeze this cheesecake for longer storage (up to a month), the texture of the whipped cream can change slightly upon thawing, becoming a bit icier. For the best creamy texture, I recommend enjoying it fresh from the fridge!
FAQs
Q: Can I use pre-crushed Oreo crumbs?
A: Absolutely! If you can find them at your grocery store, they’re a great time-saver. Just make sure you measure out 1½ cups for the crust and 1 cup for the filling, and remember the pre-crushed ones usually don’t have the filling, so you won’t have that reserved for the cream cheese mixture. If that’s the case, you can just omit the reserved filling step.
Q: My cheesecake filling seems too soft. What did I do wrong?
A: The most common culprit is either not beating the cream cheese enough to get it fluffy, or not whipping the heavy cream to stiff peaks. Make sure your cream cheese is very soft, and your heavy cream is very cold before you start. Also, ensure you give it plenty of time to chill in the refrigerator!
Q: Can I make this ahead for a party?
A: Yes, please do! This No-Bake Oreo Cheesecake is an ideal make-ahead dessert. You can prepare it a day or even two in advance. Just keep it tightly covered in the refrigerator until you’re ready to serve.
Q: Can I use low-fat cream cheese or whipped topping instead of heavy cream?
A: While you can try substitutions, I highly recommend sticking to full-fat cream cheese and heavy whipping cream for the best results. Low-fat products can alter the texture and may not set as firmly. Whipped topping (like Cool Whip) can work in a pinch for the whipped cream, but homemade whipped cream really gives it that superior light and fluffy texture.
For more delicious recipes and kitchen inspiration, be sure to follow us on Pinterest!
The Ultimate Dreamy No-Bake Oreo Cheesecake: Your Easiest Path to Dessert Bliss!
Oh, friend, do you ever get that craving for something incredibly decadent, something that just screams comfort and pure joy, but you just can’t bring yourself to turn on the oven? Maybe it’s a sweltering summer day, or perhaps you’re just looking for that perfect, effortless dessert that still impresses everyone at the potluck. Well, let me tell you, this No-Bake Oreo Cheesecake is about to become your new best friend in the kitchen. It’s got that nostalgic charm of childhood favorite cookies, combined with the creamy, dreamy texture of a classic cheesecake, all without a single minute of baking! It’s fast, it’s fun, and it’s truly a memorable treat that tastes like you slaved over it for hours (but shhh, we won’t tell!). If you’re looking for more amazing no-bake treats, you’ve come to the right place!
Why You’ll Love No-Bake Oreo Cheesecake
- Fast: Minimal hands-on time means you can whip this up in a flash.
- Easy: No baking, no complicated steps, just simple mixing and chilling.
- Giftable: It’s a beautiful dessert that makes a thoughtful homemade gift for friends, family, or neighbors.
- Crowd-pleasing: Who doesn’t love Oreos and cheesecake? This is a guaranteed hit at any gathering!
Ingredients
Gathering your ingredients is half the fun! Here’s what you’ll need to create this masterpiece:
- For the Oreo Crust:
- 24 Oreo cookies (approximately 1 ½ cups crushed, with filling removed and reserved): These are the backbone of our crust, giving us that iconic chocolatey crunch. Remember to save that creamy filling for the cheesecake!
- 6 tablespoons (85g) butter, melted: This binds our cookie crumbs together for a sturdy, delicious base.
- For the Cheesecake Filling:
- 16 ounces (454g) cream cheese, softened: The star of any cheesecake! Make sure it’s nice and soft to avoid lumps.
- ½ cup (100g) granulated sugar: Just enough sweetness to balance the tang of the cream cheese.
- 1 teaspoon vanilla extract: A classic flavor enhancer that brings out the best in our cheesecake.
- 2 ½ cups (595g) heavy whipping cream, cold: This is what gives our no-bake cheesecake its incredible light and airy texture. Keep it super cold!
- 1 ½ cups (188g) confectioners’ sugar: Also known as powdered sugar, it sweetens and stabilizes our whipped cream.
- 15 Oreo cookies (approximately 1 cup crushed, divided): More Oreos for the filling – because you can never have too much Oreo!
- For Garnish (Optional):
- Hot Fudge: For an extra drizzle of chocolatey goodness.
- Reserved crushed Oreos: A sprinkle on top adds texture and visual appeal.
- Remaining prepared whipped cream: For beautiful dollops or swirls.
How to Make No-Bake Oreo Cheesecake
Alright, let’s get to the fun part! Follow these simple steps and you’ll have a show-stopping dessert chilling in your fridge in no time.
Oreo Crust:
-
First things first, let’s make that glorious crust! Take your 24 Oreo cookies and carefully twist them apart, scraping out that creamy white filling. Don’t toss it! We’re going to reserve it for the cheesecake filling. Once the cookies are separated from their filling, pop those chocolatey wafers into a food processor. Pulse until they’re finely crushed – you’re looking for about 1½ cups of fine crumbs. If you don’t have a food processor, a zip-top bag and a rolling pin work wonders!
-
In a medium-sized bowl, combine those finely crushed Oreos with your melted butter. Stir them together until every crumb is coated. It should look like wet sand, ready to be molded.
-
Now, grab your prepared 9-inch springform pan. This type of pan is a lifesaver for cheesecakes, making for super easy serving. Press the cookie mixture firmly and evenly into the bottom of the pan, and if you’re feeling fancy, you can even press it slightly up the sides to create a little edge. The firmer you press, the better your crust will hold together!
-
Pop that crust into the refrigerator while you move on to the next delicious step. Chilling helps it firm up nicely.
Cheesecake Filling:
-
In a large bowl, using a hand mixer (or a stand mixer if you’ve got one), beat your softened cream cheese until it’s wonderfully light and fluffy. This is key for a smooth, lump-free cheesecake. Then, add in the granulated sugar, that lovely vanilla extract, and the reserved Oreo filling from earlier. Beat it all together until it’s completely smooth and creamy.
-
Now for the magic! In a separate, very clean, large bowl, pour in your cold heavy whipping cream. Using your hand mixer, start whipping the cream on medium-high speed. As it starts to thicken, gradually add the confectioners’ sugar. Keep beating until stiff peaks form. You’ll know they’re ready when you lift the beaters and the peaks stand tall without collapsing. This is what gives our cheesecake its light, airy texture!
-
Time to combine! Gently fold 2 cups of your freshly whipped cream into the cream cheese mixture. Be gentle here – we want to keep all that beautiful air in the whipped cream. Then, fold in ¾ cup of your crushed Oreo cookies. Make sure you reserve the remaining ¼ cup of crushed Oreos for garnish later!
-
Pour this luscious cheesecake filling over your chilled Oreo crust in the springform pan. Use a spatula to spread it out evenly, making sure it fills the pan from edge to edge.
-
Now comes the hardest part: the waiting game! Refrigerate your cheesecake for at least 3-4 hours, but honestly, if you can wait, overnight is truly best. This gives it plenty of time to set up perfectly, making for clean slices. You’ll be amazed at how firm it gets without any baking!
-
Once your cheesecake is firm and ready to be devoured, carefully remove it from the springform pan. Now’s your chance to get creative! Garnish with the remaining whipped cream, a sprinkle of those reserved crushed Oreos, and a generous drizzle of hot fudge, if you desire. Then, slice, serve, and enjoy the blissful silence as everyone savors a bite!
Substitutions & Additions
This No-Bake Oreo Cheesecake is fantastic as is, but it’s also a wonderful canvas for your own culinary creativity! Don’t be afraid to experiment.
- Different Crusts: Not an Oreo fan (gasp!)? You can swap out the Oreos for graham cracker crumbs, Nilla wafers, or even chocolate chip cookies for a different flavor profile. The ratio of crumbs to butter might vary slightly, so add butter slowly until it resembles wet sand.
- Flavor Twists: Feel free to add a different extract to the cheesecake filling – a little peppermint extract for a minty twist, or almond extract for a subtle nutty note. You could even swirl in some peanut butter with the cream cheese for a Reese’s-inspired treat, or try another one of our delicious chocolatey no-bake dessert options!
- Mix-ins: Fold in mini chocolate chips, chopped candy bars (like Snickers or Butterfinger), or even mini marshmallows for added texture and flavor.
- Topping Extravaganza: Beyond hot fudge, consider caramel sauce, fresh berries, chocolate shavings, sprinkles, or a sprinkle of chopped nuts. For another delightful option, check out our Berrylicious Strawberry Crunch Cheesecake for some inspiration on delicious cheesecake creations!
Tips for Success
Even though this recipe is super easy, a few tips can help ensure your No-Bake Oreo Cheesecake is absolutely perfect every time.
- Softened Cream Cheese is Key: I can’t stress this enough! If your cream cheese isn’t soft, you’ll end up with lumps in your filling, no matter how much you beat it. Take it out of the fridge at least 30 minutes to an hour before you plan to start.
- Keep Your Heavy Cream Cold: Seriously, ice cold! This helps it whip up faster and achieve those stiff peaks that are crucial for the cheesecake’s structure. You can even chill your mixing bowl and beaters in the freezer for 10-15 minutes before whipping for an extra boost.
- Don’t Overmix the Filling: Once you fold in the whipped cream and crushed Oreos, mix only until just combined. Overmixing can deflate the whipped cream, leading to a denser cheesecake. We want it light and airy!
- Patience with Chilling: The minimum 3-4 hours chilling time is truly essential for the cheesecake to set up. If you cut into it too early, it might be too soft. Overnight chilling really is the secret to perfect slices.
- Springform Pan Love: While you can make this in a regular pie dish, a springform pan makes removing and serving the cheesecake infinitely easier and prettier. Line the bottom with parchment paper for extra insurance against sticking.
How to Store No-Bake Oreo Cheesecake
Once your cheesecake is made and (partially) devoured, you’ll want to store any leftovers properly to keep them fresh and delicious.
Simply cover the springform pan (or slices) tightly with plastic wrap or aluminum foil and store it in the refrigerator. Your No-Bake Oreo Cheesecake will stay fresh and tasting fantastic for up to 3-4 days. While you could technically freeze this cheesecake for longer storage (up to a month), the texture of the whipped cream can change slightly upon thawing, becoming a bit icier. For the best creamy texture, I recommend enjoying it fresh from the fridge!
FAQs
Q: Can I use pre-crushed Oreo crumbs?
A: Absolutely! If you can find them at your grocery store, they’re a great time-saver. Just make sure you measure out 1½ cups for the crust and 1 cup for the filling, and remember the pre-crushed ones usually don’t have the filling, so you won’t have that reserved for the cream cheese mixture. If that’s the case, you can just omit the reserved filling step.
Q: My cheesecake filling seems too soft. What did I do wrong?
A: The most common culprit is either not beating the cream cheese enough to get it fluffy, or not whipping the heavy cream to stiff peaks. Make sure your cream cheese is very soft, and your heavy cream is very cold before you start. Also, ensure you give it plenty of time to chill in the refrigerator!
Q: Can I make this ahead for a party?
A: Yes, please do! This No-Bake Oreo Cheesecake is an ideal make-ahead dessert. You can prepare it a day or even two in advance. Just keep it tightly covered in the refrigerator until you’re ready to serve.
Q: Can I use low-fat cream cheese or whipped topping instead of heavy cream?
A: While you can try substitutions, I highly recommend sticking to full-fat cream cheese and heavy whipping cream for the best results. Low-fat products can alter the texture and may not set as firmly. Whipped topping (like Cool Whip) can work in a pinch for the whipped cream, but homemade whipped cream really gives it that superior light and fluffy texture.
For more delicious recipes and kitchen inspiration, be sure to follow us on Pinterest!
No-Bake Oreo Cheesecake
Ingredients
Equipment
Method
- Step 1: First things first, let's make that glorious crust! Take your 24 Oreo cookies and carefully twist them apart, scraping out that creamy white filling. Don't toss it! We're going to reserve it for the cheesecake filling. Once the cookies are separated from their filling, pop those chocolatey wafers into a food processor. Pulse until they're finely crushed – you're looking for about 1½ cups of fine crumbs. If you don't have a food processor, a zip-top bag and a rolling pin work wonders!
- Step 2: In a medium-sized bowl, combine those finely crushed Oreos with your melted butter. Stir them together until every crumb is coated. It should look like wet sand, ready to be molded.
- Step 3: Now, grab your prepared 9-inch springform pan. This type of pan is a lifesaver for cheesecakes, making for super easy serving. Press the cookie mixture firmly and evenly into the bottom of the pan, and if you're feeling fancy, you can even press it slightly up the sides to create a little edge. The firmer you press, the better your crust will hold together!
- Step 4: Pop that crust into the refrigerator while you move on to the next delicious step. Chilling helps it firm up nicely.
- Step 5: In a large bowl, using a hand mixer (or a stand mixer if you've got one), beat your softened cream cheese until it's wonderfully light and fluffy. This is key for a smooth, lump-free cheesecake. Then, add in the granulated sugar, that lovely vanilla extract, and the reserved Oreo filling from earlier. Beat it all together until it's completely smooth and creamy.
- Step 6: Now for the magic! In a separate, very clean, large bowl, pour in your cold heavy whipping cream. Using your hand mixer, start whipping the cream on medium-high speed. As it starts to thicken, gradually add the confectioners' sugar. Keep beating until stiff peaks form. You'll know they're ready when you lift the beaters and the peaks stand tall without collapsing. This is what gives our cheesecake its light, airy texture!
- Step 7: Time to combine! Gently fold 2 cups of your freshly whipped cream into the cream cheese mixture. Be gentle here – we want to keep all that beautiful air in the whipped cream. Then, fold in ¾ cup of your crushed Oreo cookies. Make sure you reserve the remaining ¼ cup of crushed Oreos for garnish later!
- Step 8: Pour this luscious cheesecake filling over your chilled Oreo crust in the springform pan. Use a spatula to spread it out evenly, making sure it fills the pan from edge to edge.
- Step 9: Now comes the hardest part: the waiting game! Refrigerate your cheesecake for at least 3-4 hours, but honestly, if you can wait, overnight is truly best. This gives it plenty of time to set up perfectly, making for clean slices. You'll be amazed at how firm it gets without any baking!
- Step 10: Once your cheesecake is firm and ready to be devoured, carefully remove it from the springform pan. Now's your chance to get creative! Garnish with the remaining whipped cream, a sprinkle of those reserved crushed Oreos, and a generous drizzle of hot fudge, if you desire. Then, slice, serve, and enjoy the blissful silence as everyone savors a bite!