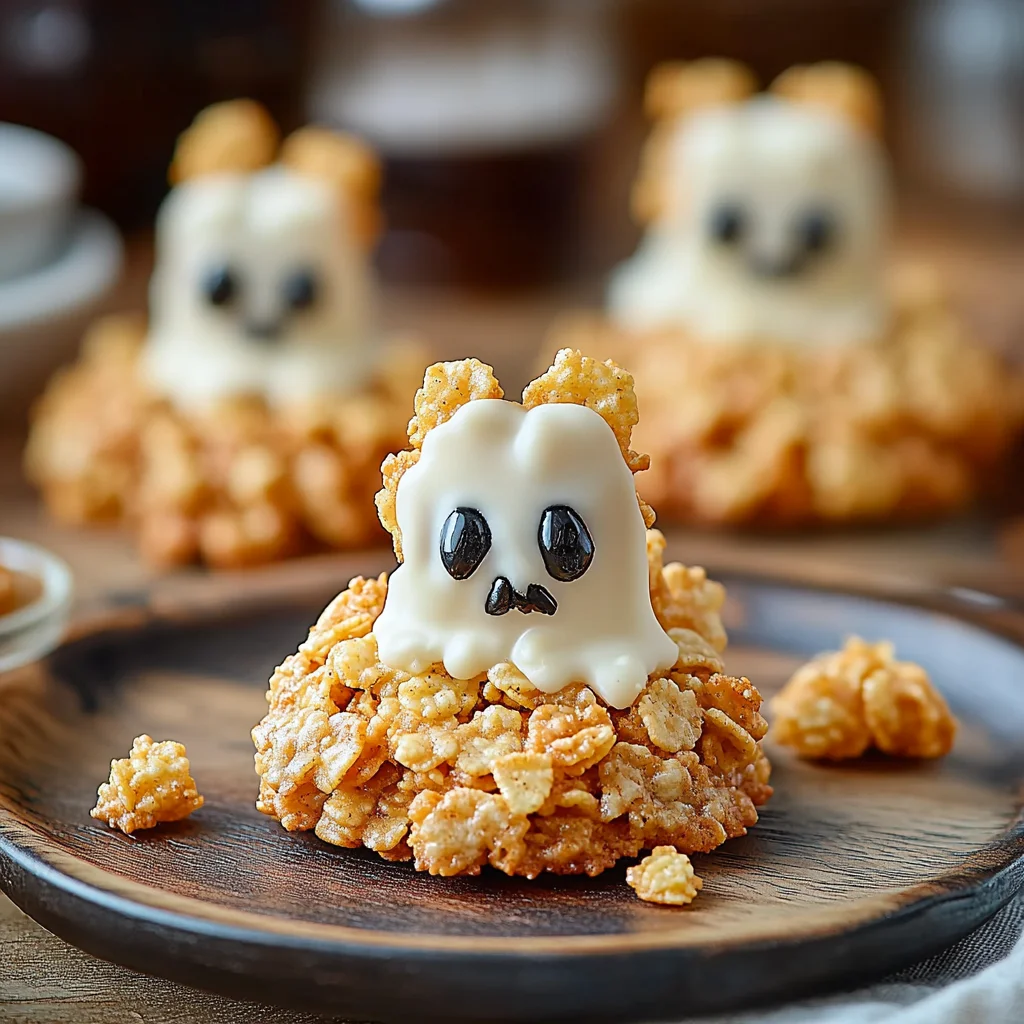
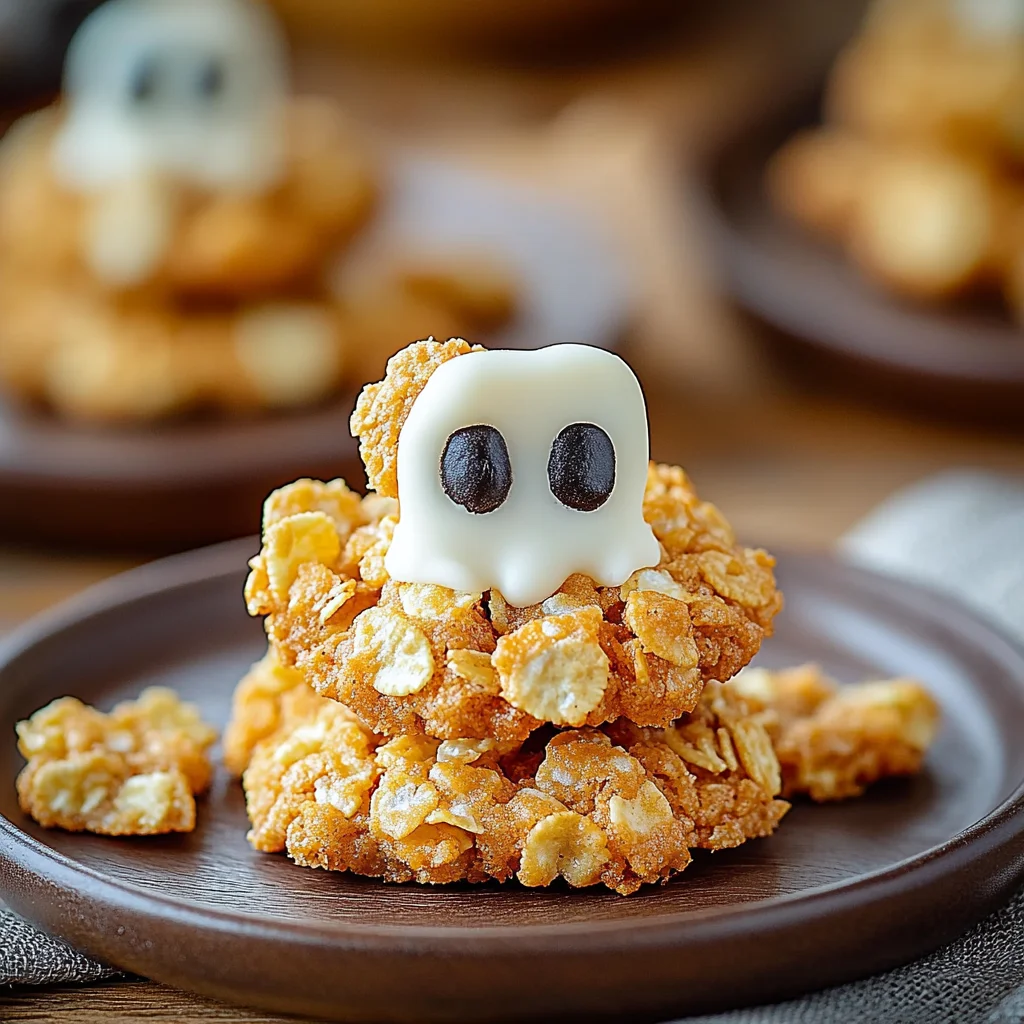
Hey there, sweet friends! Can you believe it’s that time of year again? The air is crisp, the leaves are turning, and there’s a certain spooky magic in the air. While I absolutely adore the coziness of fall, sometimes life gets a little hectic, and baking up elaborate treats just isn’t in the cards. That’s exactly why I’m so excited to share this recipe for No-Bake Ghost Cornflake & Peanut Butter Cookies with you today!
If you’re anything like me, you’re always on the hunt for a treat that’s as simple as it is delicious. And let me tell you, these Ghost Cornflake & Peanut Butter Cookies hit that sweet spot! They’re quick, they’re fun, and they bring a smile to everyone’s face, whether it’s for a classroom party, a neighborhood get-together, or just a cozy night in with the family. Speaking of easy, if you’re a fan of no-bake wonders, you absolutely have to check out my recipe for No-Bake Reese’s Peanut Butter Bars – they’re another fan favorite!
Why You’ll Love Ghost Cornflake & Peanut Butter Cookies
- Fast: Ready in minutes, no oven required!
- Easy: Simple ingredients and straightforward steps make this recipe foolproof.
- Giftable: Package them up for friends, neighbors, or teachers – they make the sweetest little handmade gifts.
- Crowd-Pleasing: Who doesn’t love the combo of peanut butter, cornflakes, and chocolate? They disappear fast!
Ingredients
- 4 cups Cornflake Cereal: The star of the show! Make sure they’re fresh and crunchy for the best texture. You can even find gluten-free cornflakes if needed!
- ½ cup Peanut Butter, creamy or crunchy: Your choice! Creamy gives a smoother base, while crunchy adds an extra layer of texture.
- ½ cup Syrup (maple syrup, corn syrup, or honey): Any of these will work beautifully. Corn syrup tends to be thicker, giving a slightly chewier cookie, while maple syrup or honey add a wonderful flavor dimension.
- ½ teaspoon Salt: Don’t skip this! It perfectly balances the sweetness and enhances the peanut butter flavor.
- 1 teaspoon Vanilla Extract: A little splash of vanilla elevates everything.
- 18 Marshmallows: The magical “body” for our little ghosts! Standard-sized marshmallows work best here.
- 1 cup White Chocolate chips or chopped bar: For that classic ghostly white coating. High-quality white chocolate melts smoother.
- 1 tablespoon Dark Chocolate chips or chopped bar: Just a small amount for the adorable ghost faces.
How to Make Ghost Cornflake & Peanut Butter Cookies
Get ready to have some fun, because these are a breeze to put together!
1. Prepare the Cookie Base: Grab your largest mixing bowl. Into it, toss the cornflake cereal, peanut butter, syrup, salt, and vanilla extract. Now, get in there with a sturdy spoon or even your hands (it’s a bit sticky, but fun!) and stir everything until every single cornflake is nicely coated. This is the foundation of your delicious ghosts!
2. Form the Ghosts: Line a baking sheet with parchment paper. This is key for easy removal later! Scoop out tablespoon-sized portions of your cornflake mixture. Now, with gentle hands, shape them into cute little ghost-like figures. Think of a rounded bottom that tapers slightly towards a point at the top. Don’t worry about perfection; rustic ghosts are charming ghosts!
3. Add Marshmallows: This is where the magic happens! Carefully press one marshmallow onto the wider, bottom part of each ghost shape. This gives your ghosts their plump, adorable base.
4. Melt the White Chocolate: Time for the “skin”! Melt your white chocolate according to the package directions. My go-to method is often in the microwave, zapping it in 20-30 second intervals, stirring well after each, until it’s smooth and creamy. Be careful not to overheat it, or it can seize up. Dip the top two-thirds of each ghost (the cornflake part, covering the marshmallow) into the melted white chocolate, letting any excess drip off. Place the cookies back on your parchment-lined baking sheet.
5. Decorate: Now for the spooky personality! Melt the dark chocolate in a separate small bowl. You can do this the same way as the white chocolate. Once melted, grab a toothpick, a small food-safe brush, or even a piping bag with a tiny hole (I sometimes use a ziptop bag with the corner snipped off!). Use the dark chocolate to draw two eyes and a little open mouth on the white chocolate part of each ghost. Let your creativity flow!
6. Set and Serve: Once all your ghosts have their faces, pop the baking sheet into the refrigerator for 10-15 minutes. This quick chill helps the white chocolate set up nicely. If you’re not in a rush, you can also let them sit at room temperature until the chocolate is firm. Then, they’re ready to haunt your snack plate!
Substitutions & Additions
Part of the fun of cooking is making a recipe your own! Here are some ideas to get you started:
- Nut Butter Swaps: Not a peanut butter fan, or dealing with allergies? Almond butter, cashew butter, or even sunflower seed butter (for a nut-free option) can work. Just be aware that the flavor and consistency might change slightly.
- Syrup Variations: While the recipe calls for versatile syrup options, you can also experiment with brown rice syrup for a chewier texture or agave nectar for a slightly thinner consistency.
- Chocolate Choices: Instead of white chocolate, you could use milk chocolate or even a semi-sweet for a darker ghost. If you want colored ghosts, try melting candy melts in different colors!
- Extra Crunch: Add a sprinkle of chopped peanuts, mini chocolate chips, or even a few more crushed cornflakes into the base mixture for extra crunch.
- Spooky Sprinkles: Before the white chocolate sets, sprinkle on some Halloween-themed sprinkles! Orange, black, or purple jimmies would look fantastic.
- Candy Eyes: For an even easier decorating step, grab some edible candy eyes from the baking aisle. Just press them onto the wet white chocolate!
Tips for Success
- Don’t Overheat Chocolate: This is crucial! White chocolate can be finicky. Melt it slowly and stir often. If it seizes (gets thick and clumpy), you can sometimes rescue it by stirring in a tiny bit of vegetable oil or shortening, but prevention is best.
- Work Quickly: Once the base mixture is made, it can start to firm up. Shape your ghosts and add marshmallows without too much delay.
- Parchment Paper is Your Friend: Seriously, don’t skip it! It makes cleanup a breeze and ensures your ghosts don’t stick to the pan.
- Chilling is Key: While they don’t bake, a little time in the fridge helps these treats set properly and prevents a sticky mess.
- Make it a Family Activity: This recipe is perfect for getting kids involved! They’ll love shaping the ghosts and decorating the faces.
- Pre-measure: Have all your ingredients measured out before you start. This makes the “no-bake” process even faster and smoother. And if you’re looking to mix up your dessert game even more, you might love these strawberry cheesecake stuffed cookies – they offer a delightful twist on a classic!
How to Store Ghost Cornflake & Peanut Butter Cookies
Once your cute little ghosts are set, transfer them to an airtight container. You can store them at room temperature for up to 3-4 days, but if your kitchen is warm, they’ll hold their shape better in the refrigerator. They can last up to a week in the fridge. For longer storage, you can freeze them for up to a month in a freezer-safe container, separating layers with parchment paper. Just let them thaw at room temperature for a few minutes before enjoying!
FAQs
Q: Can I make these ahead of time for a party?
A: Absolutely! These cookies are perfect for making 1-2 days in advance. Store them in an airtight container at room temperature or in the fridge.
Q: Are these cookies gluten-free?
A: The base ingredients are naturally gluten-free, but make sure to use certified gluten-free cornflakes to ensure they are safe for those with gluten sensitivities.
Q: My mixture is too sticky to shape. What went wrong?
A: The stickiness can vary slightly based on your peanut butter and syrup. If it’s too sticky, try chilling the mixture in the fridge for 5-10 minutes. If it’s still too sticky, you can add a tiny bit more cornflakes, a tablespoon at a time, until it’s workable.
Q: Can I use different cereals?
A: While cornflakes give that classic crispy texture, you could experiment with other crisp cereals like Rice Krispies for a different consistency. Just know it might alter the final texture and taste slightly.
These cookies are not just for Halloween; they’re so good, they’ll become a year-round staple. They’re also fantastic for gift-giving, just like my easy no-bake caramel pretzel bars, perfect for any occasion.
For more delicious and easy recipes, make sure to follow us on Pinterest!

No-Bake Ghost Cornflake & Peanut Butter Cookies
Ingredients
Equipment
Method
- Step 1: Prepare the Cookie Base: Grab your largest mixing bowl. Into it, toss the cornflake cereal, peanut butter, syrup, salt, and vanilla extract. Now, get in there with a sturdy spoon or even your hands (it’s a bit sticky, but fun!) and stir everything until every single cornflake is nicely coated. This is the foundation of your delicious ghosts!
- Step 2: Form the Ghosts: Line a baking sheet with parchment paper. This is key for easy removal later! Scoop out tablespoon-sized portions of your cornflake mixture. Now, with gentle hands, shape them into cute little ghost-like figures. Think of a rounded bottom that tapers slightly towards a point at the top. Don't worry about perfection; rustic ghosts are charming ghosts!
- Step 3: Add Marshmallows: This is where the magic happens! Carefully press one marshmallow onto the wider, bottom part of each ghost shape. This gives your ghosts their plump, adorable base.
- Step 4: Melt the White Chocolate: Time for the "skin"! Melt your white chocolate according to the package directions. My go-to method is often in the microwave, zapping it in 20-30 second intervals, stirring well after each, until it's smooth and creamy. Be careful not to overheat it, or it can seize up. Dip the top two-thirds of each ghost (the cornflake part, covering the marshmallow) into the melted white chocolate, letting any excess drip off. Place the cookies back on your parchment-lined baking sheet.
- Step 5: Decorate: Now for the spooky personality! Melt the dark chocolate in a separate small bowl. You can do this the same way as the white chocolate. Once melted, grab a toothpick, a small food-safe brush, or even a piping bag with a tiny hole (I sometimes use a ziptop bag with the corner snipped off!). Use the dark chocolate to draw two eyes and a little open mouth on the white chocolate part of each ghost. Let your creativity flow!
- Step 6: Set and Serve: Once all your ghosts have their faces, pop the baking sheet into the refrigerator for 10-15 minutes. This quick chill helps the white chocolate set up nicely. If you're not in a rush, you can also let them sit at room temperature until the chocolate is firm. Then, they're ready to haunt your snack plate!